Making Photographs in Low Light

Most accident reconstructionists and product liability engineers have had to photograph a vehicle, vehicle component, or other product in a dark area such as a warehouse, storage facility, lab, or even an office. Conditions can be even worse for building or fire investigators, especially if the power is out. By definition, what is missing in any of these situations is light!

But despite the lack of light, you might only get this one chance to inspect the evidence. You’ve got to come back with well-exposed, well-lit professional photographs—photos that accurately portray what you saw, represent you well to your clients, and reflect the quality standards of your work, especially during depositions and trials.

Unless you are trying to capture a low light scene as it is (which is a completely different discussion), you have several options to make a photo in low light.

One is light painting by moving a flashlight over your subject during a long exposure. This is tedious and time-consuming, especially if you have to make more than one or two images. It is also hit-and-miss, even if you are experienced with it. Of course you need a sturdy tripod for every shot, since the exposures are long. These long exposures also risk generating noise. So light painting might be good in an emergency, and it’s sometimes necessary for illuminating  vehicles at nighttime accident scenes.

It can work, as shown below, but it’s not recommended for making inspection photographs. This photograph of a rental car was made at dusk with no lights on in the garage. The only light came from when I walked around the vehicle constantly moving a flashlight, painting both the car and the garage bay. Note how the long (74 second) exposure made the outdoors look brighter than it was. (Click on image to enlarge, then click back arrow to return to this post.)

Light painting at f/11 and ISO 64 with shutter speed of 74 seconds. (Made using Nikon D850 with ZEISS Milvus 25 mm f/1.4 lens on RRS TVP-45 tripod.)

Another option is use high ISO sensitivities. On all digital cameras, the higher the ISO, the more noise and less dynamic range there is. With newer cameras, neither the increased noise nor the dynamic range loss are obtrusive until the middle or higher ISO values (say ISO 800 or even 1600). Here’s an example made at ISO 200,000 and cropped from the full frame. (Click on image to enlarge, then click back arrow to return to this post.)

Crop of an image made at f/16, 1/60 sec, ISO 200,000 showing noise. (Made using Nikon D850 with ZEISS Milvus 50 mm macro lens, no flash.)

As a third option, continuous light sources are better than nothing, but none are bright enough to avoid having to use a long shutter speed and/or to raise your ISO. Most fluorescent lights flicker and have an undesirable color cast. Halogen shop lights get hot and have a very warm color cast. Quality LED lights have good color control, but still aren’t bright enough. Even the larger LED panels made for photo studios don’t put out enough light, plus the brighter ones are big and unwieldy to transport and setup. Again, none of them put out enough light to allow a low ISO and a shorter shutter speed.

Flash is your best option, by far. But the tiny built-in flash on a point-and-shoot, the popup flash on a DSLR or mirrorless, or even a professional flash in your camera’s hot shoe won’t always be sufficient. You’ll need additional light.

There is a learning curve to using flash, since you can’t see the effect of the light until after you’ve made the photograph. But as long as you think about where and about how much light you need, it’s something you’ll pick up with a little practice.

Since I shoot Nikon, I always carry three Nikon Speedlights (flashes) with me. (You don’t need flashes made by your camera manufacturer, but those will always work with your camera, and are usually quite robust.) One flash goes in the camera’s hot shoe, and I put the other two where needed. I usually carry two small, lightweight, travel light stands with me so I can place the lights where they will do the most good, but I will often just prop them up on something nearby. (Within the next couple days, I will write a post about the gear I mention in this post.)

Since I do a lot of tire analysis, I often need even more light than the Speedlights can put out. Besides, Speedlights can take a long time to recharge their capacitors between shots.

Especially for tires, I use Profoto B10 battery-powered studio flashes on the road and battery-powered Profoto B1x studio flashes in my Studio Lab. Again, more on these in a post later this week.

Recently, I had to inspect tires and wheels inside a semi-trailer. Even though my inspection was close to noon on a sunny day, and the trailer had a couple side doors I could open, I knew it would be pretty dark inside the trailer for photography. I set up my two Profoto B10 flashes on my travel light stands. They were fired by a Nikon SB-910 flash in my camera hot shoe. Exposure and flash powers were all set manually. (Click on image to enlarge, then click back arrow to return to this post.)

Tire and wheel inside semi-trailer. (Made using Nikon D850 with ZEISS Milvus 35 mm lens and on-camera Nikon SB-910 that also fired two Profoto B10s.)

Here is a resulting image from that setup. (Click on image to enlarge, then click back arrow to return to this post.)

Tire and wheel inside semi-trailer. (Made using Nikon D850 with ZEISS Milvus 50 mm macro lens and on-camera Nikon SB-910 that also fired two Profoto B10s.)

A single flash on the camera—even Nikon’s most powerful Speedlight—could never have provided enough light to evenly illuminate this tire and wheel. The Speedlight and battery-powered strobes not only provided nice even lighting, but allowed me to shoot at ISO 64, which is the lowest on a Nikon D850. This minimized the noise and maximized the dynamic range to show the most detail possible.

Checking Tire Pressures in Truck Tire Monitoring and Inflation and Systems

Tire pressure monitoring systems (TPMS) are required on cars, pickups, and SUVs, and can be found on some heavy trucks. A TPMS simply warns the driver that the air pressure in a tire dropped to a certain pressure, or dropped a certain percent below the programmed pressure. TPMS does not replenish the air. 

Onboard tire inflation systems, which are becoming common on air-braked trucks, semi-trailers, and buses, use the onboard air system to maintain the appropriate air pressure in each tire. Truck tire inflation systems only warn a driver if a tire loses air faster than the system can replenish it.

During routine maintenance, after a tire issue, or after an accident, you will often want to check all tire inflation pressures, even if there is a tire monitoring system or an onboard inflation system. You’ll need to ensure that either type of system was working properly. That requires checking each tire pressure individually.

With either system, how to you access the valve for each tire? Below are two examples.

First is a Stemco AirBat RF tire monitoring system on the rear tandems of a three-axle truck tractor. (Click on image to enlarge, then click on back arrow to return to this post.)

Stemco AirBat RF assembled. (Made using Nikon D850 with ZEISS Milvus 50 mm macro lens and Nikon SB-910 flash.)

There are two standard metal valve caps—one for each tire of the dual. Remove these caps and use a truck tire pressure gauge as you normally would. You can also add air through these valves if required. (Click on image to enlarge, then click on back arrow to return to this post.)

Stemco AirBat RF with valve caps off. (Made using Nikon D850 with ZEISS Milvus 50 mm macro lens and Nikon SB-910 flash.)

Make sure you know which valve goes to which tire. It’s easy to do; just trace the hose back to its associated wheel.

As an example of tire inflation systems, the Meritor Tire Inflation System by P.S.I. (MTIS) is a popular system on both new and retrofitted semi-trailers. (Click on image to enlarge, then click on back arrow to return to this post.)

MTIS by P.S.I. assembled. (Made using Nikon D850 with ZEISS Milvus 50 mm macro lens and Nikon SB-910 flash.)

With MTIS, twist the knurled fitting at either end of the through tee, then use your truck tire pressure gauge on the valve at the end of each hose. Again, make sure you trace which hose goes to which tire. (Click on image to enlarge, then click on back arrow to return to this post.)

MTIS by P.S.I. valve stem. (Made using Nikon D850 with ZEISS Milvus 50 mm macro lens and Nikon SB-910 flash.)

While these systems initially look intimidating, it is actually much easier to check tire inflation pressures with them than it is trying to get a tire gauge to fit on individual valve stems on the wheels.

Using Off-Camera Flash to Bring Out Details

A couple posts ago, I showed examples of bringing out textures in a sponge by creating shadows using an off-camera flash. Here is an example with the type of photography subject we are more likely to encounter.

Vehicle wheels and other components are often stamped with model and serial numbers, along with with dates of manufacture. If you use a built-in flash or a flash mounted in the camera’s hot shoe, those stampings will often be invisible in your photograph. (Click on image to enlarge, then click on back arrow to return to this post.)

Stamping in wheel flange with flash in camera hot shoe. (Made using Nikon D850 with ZEISS Milvus 50 mm macro lens and Nikon SB-910 flash.)

This photo is properly exposed, but is useless in documenting the wheel. The key is to get the light at an oblique angle so it skims across the surface to create both light and shadow, just like we did with the sponge. (Click on image to enlarge, then click on back arrow to return to this post.)

Stamping in wheel flange with flash off camera almost perpendicular to the right. (Made using Nikon D850 with ZEISS Milvus 50 mm macro lens and Profoto B10 strobe to camera right.)

For this second photograph, I used a Profoto B10 strobe to the camera’s right, almost perpendicular to the stamping. I fired that strobe with the flash in my camera hot shoe, but I made sure the hot shoe flash did not affect the exposure. I used a B10, but could just as easily used another Nikon flash to get the exact same effect. I had already been using the B10 for other shots, so I just used that. In fact, it would have been even easier with second Nikon flash, since I could set the hot shoe flash to Master with no light output while the other flash would be set to Remote with either manual or TTL flash.

This second image is also properly exposed, but now the direction of the light makes this photo useful. Now you can see it is a 22.5 x 8.25 Accuride wheel manufactured 10/19/17.

The point is that you need to consider both the amount and direction of light to properly illuminate a subject. Light illuminates your subject, but the shadows give it definition. Shadows are essential in a 2-D depiction of a 3-D subject, especially when you need to show textures or depth.

Photo Composition: Too Much Wasted Space

I’m sure you’ve seen many photos like the one below. [Click on image to enlarge, then click back arrow to return to this post.]

Left front of truck with bad composition. (Nikon D850 with ZEISS Milvus 50 mm f/2 macro lens and Nikon SB-910 fill flash.)

What is the subject? The tire and wheel? The intruding part at the upper right (which was actually from an unrelated truck)? The gravel? Is there something important that I should be seeing in the gravel?

It was actually the tire and wheel. But if you draw a vertical line down the middle of the photo, almost the entire right half of it is unrelated to the subject.

In the image below, the tire and wheel are still featured, but now you can see how they relate to part of the truck’s frame rail and steering system, too. [Click on image to enlarge, then click back arrow to return to this post.]

Left front of truck with good composition. (Nikon D850 with ZEISS Milvus 50 mm f/2 macro lens and Nikon SB-910 fill flash.)

This photo makes more sense and eliminates unnecessary and confusing elements. It’s easy to pay so much attention to your subject that you forget what it looks like in the frame. Make sure you haven’t included too much empty space or too many unrelated elements that are not only distracting and confusing, but look sloppy, careless, and unprofessional.

Focus Stacking Close-up Images

Even when stopping down a macro lens to f/16, you often won’t have enough depth of field (DOF) to keep your entire close-up subject sharp. Fully stopping down a macro lens to, say, f/22 or smaller won’t yield a meaningful increase in DOF, but will likely make your entire image appear less sharp due to diffraction.

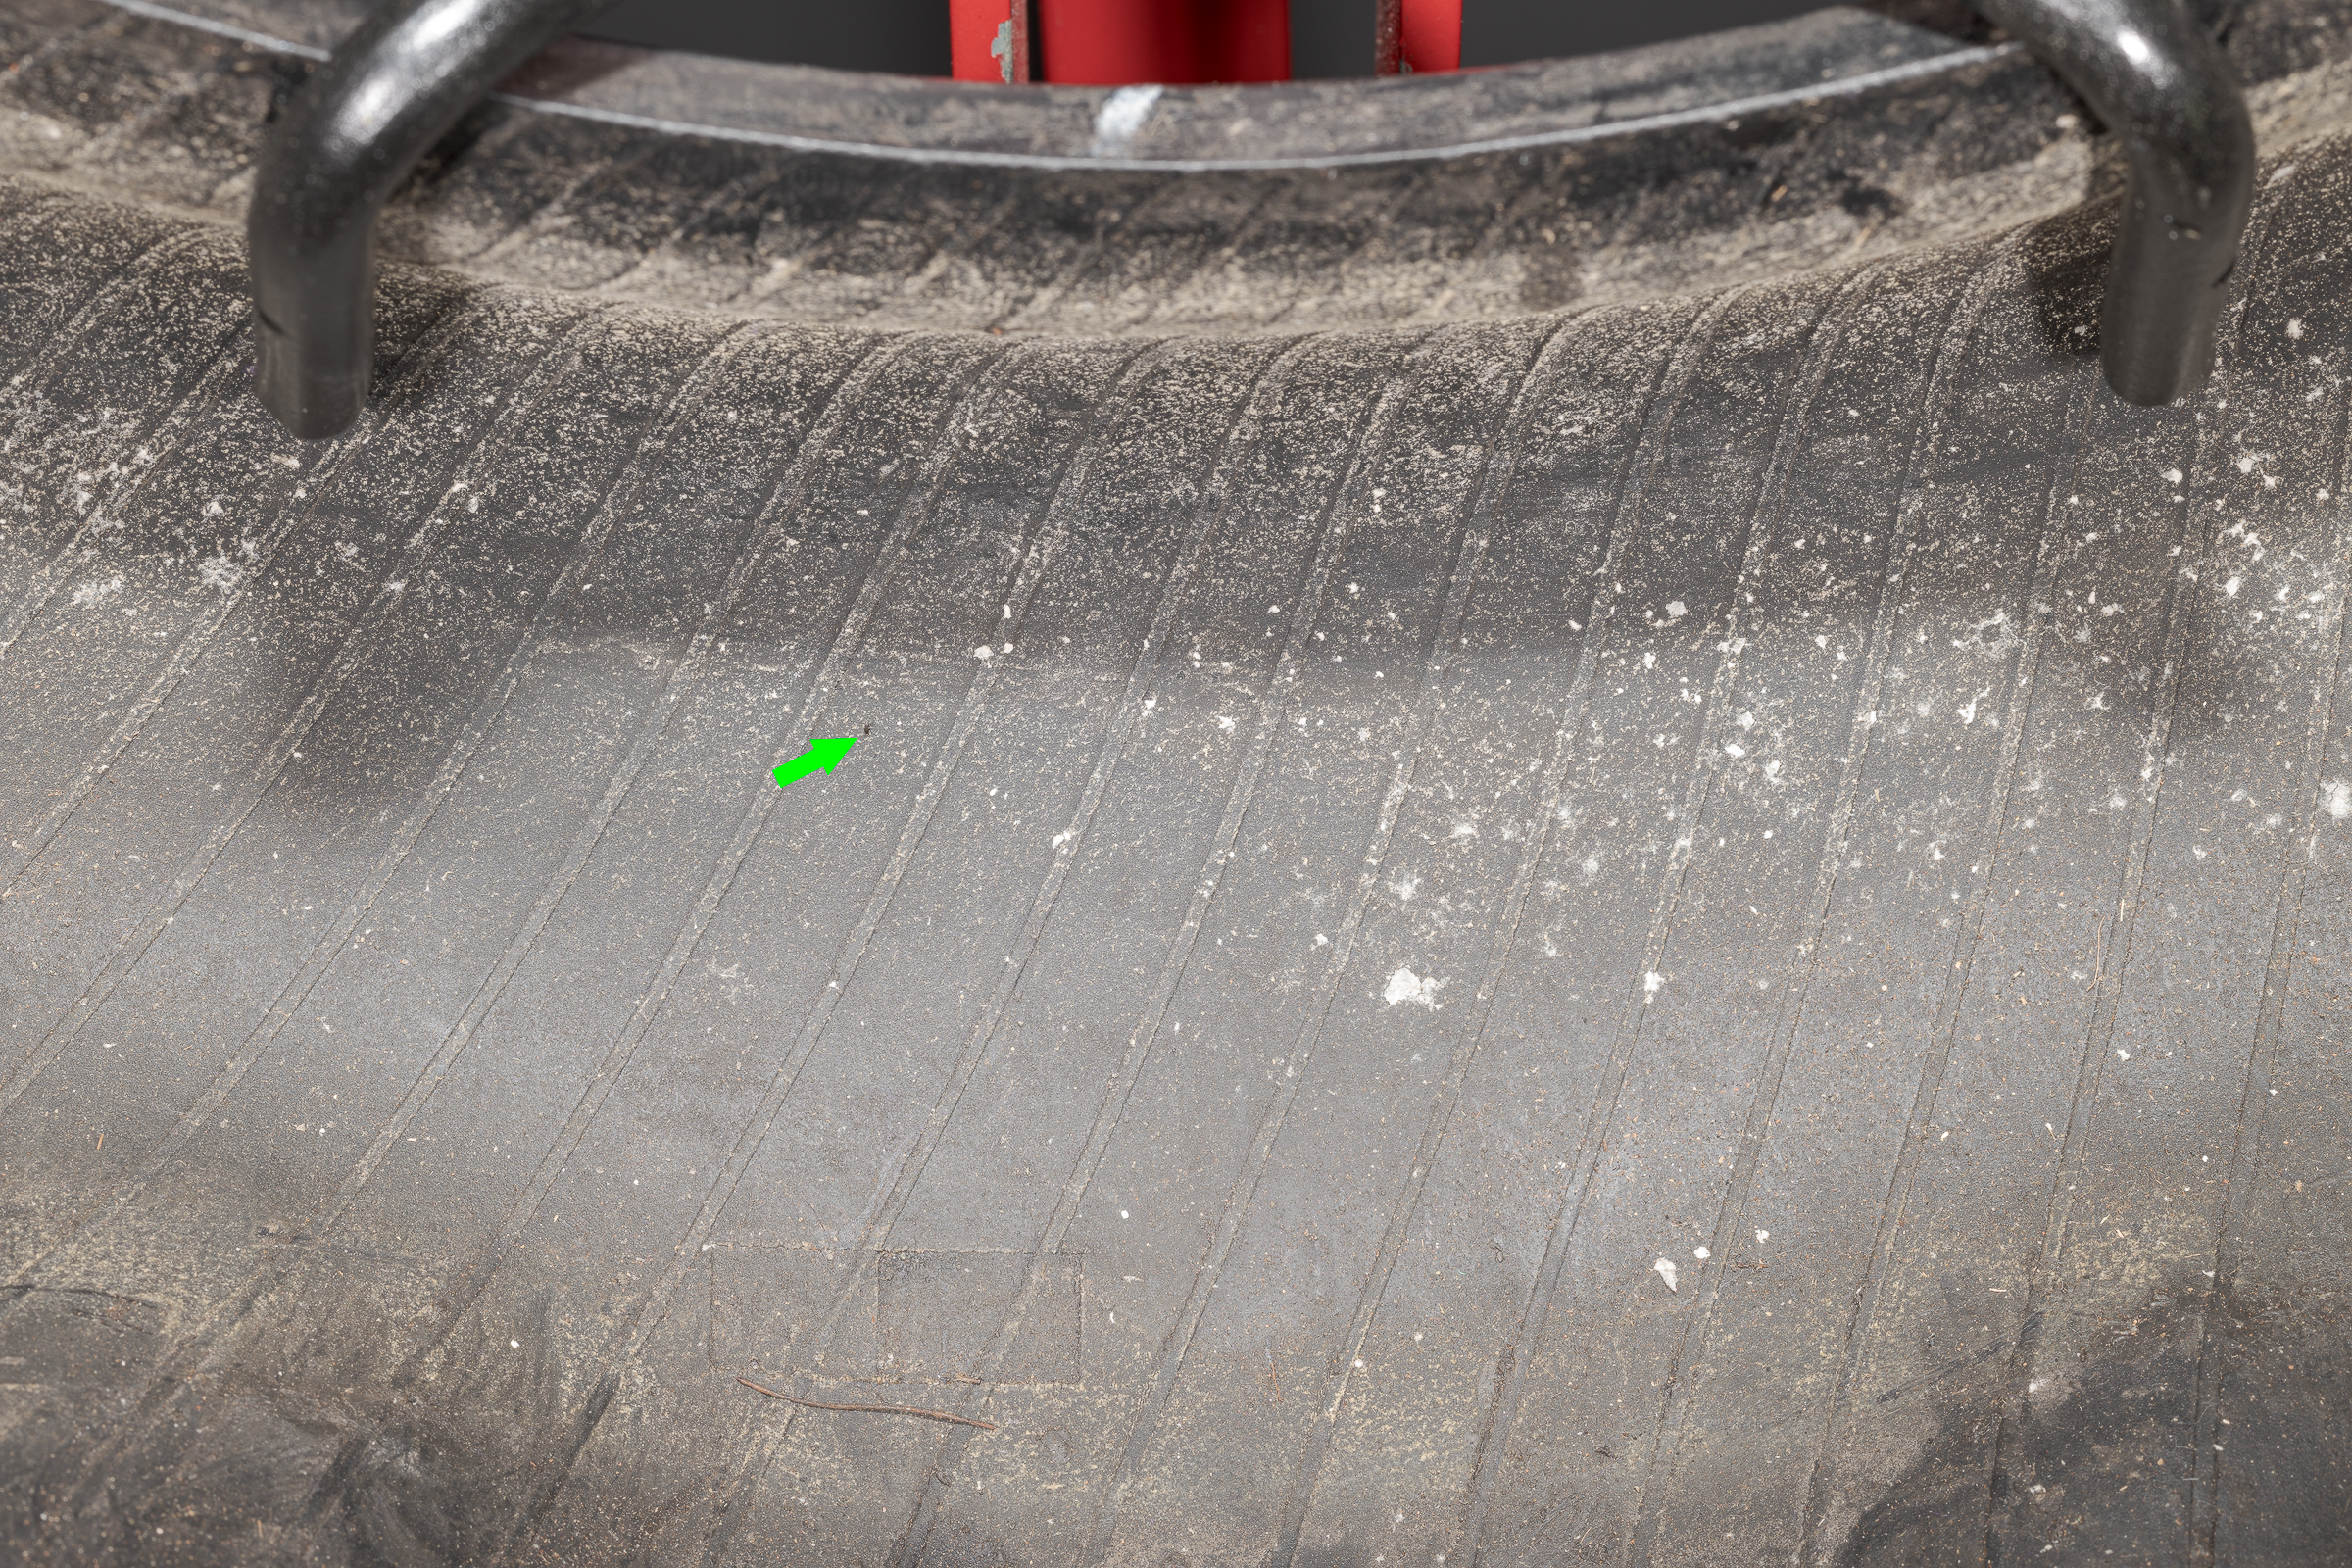
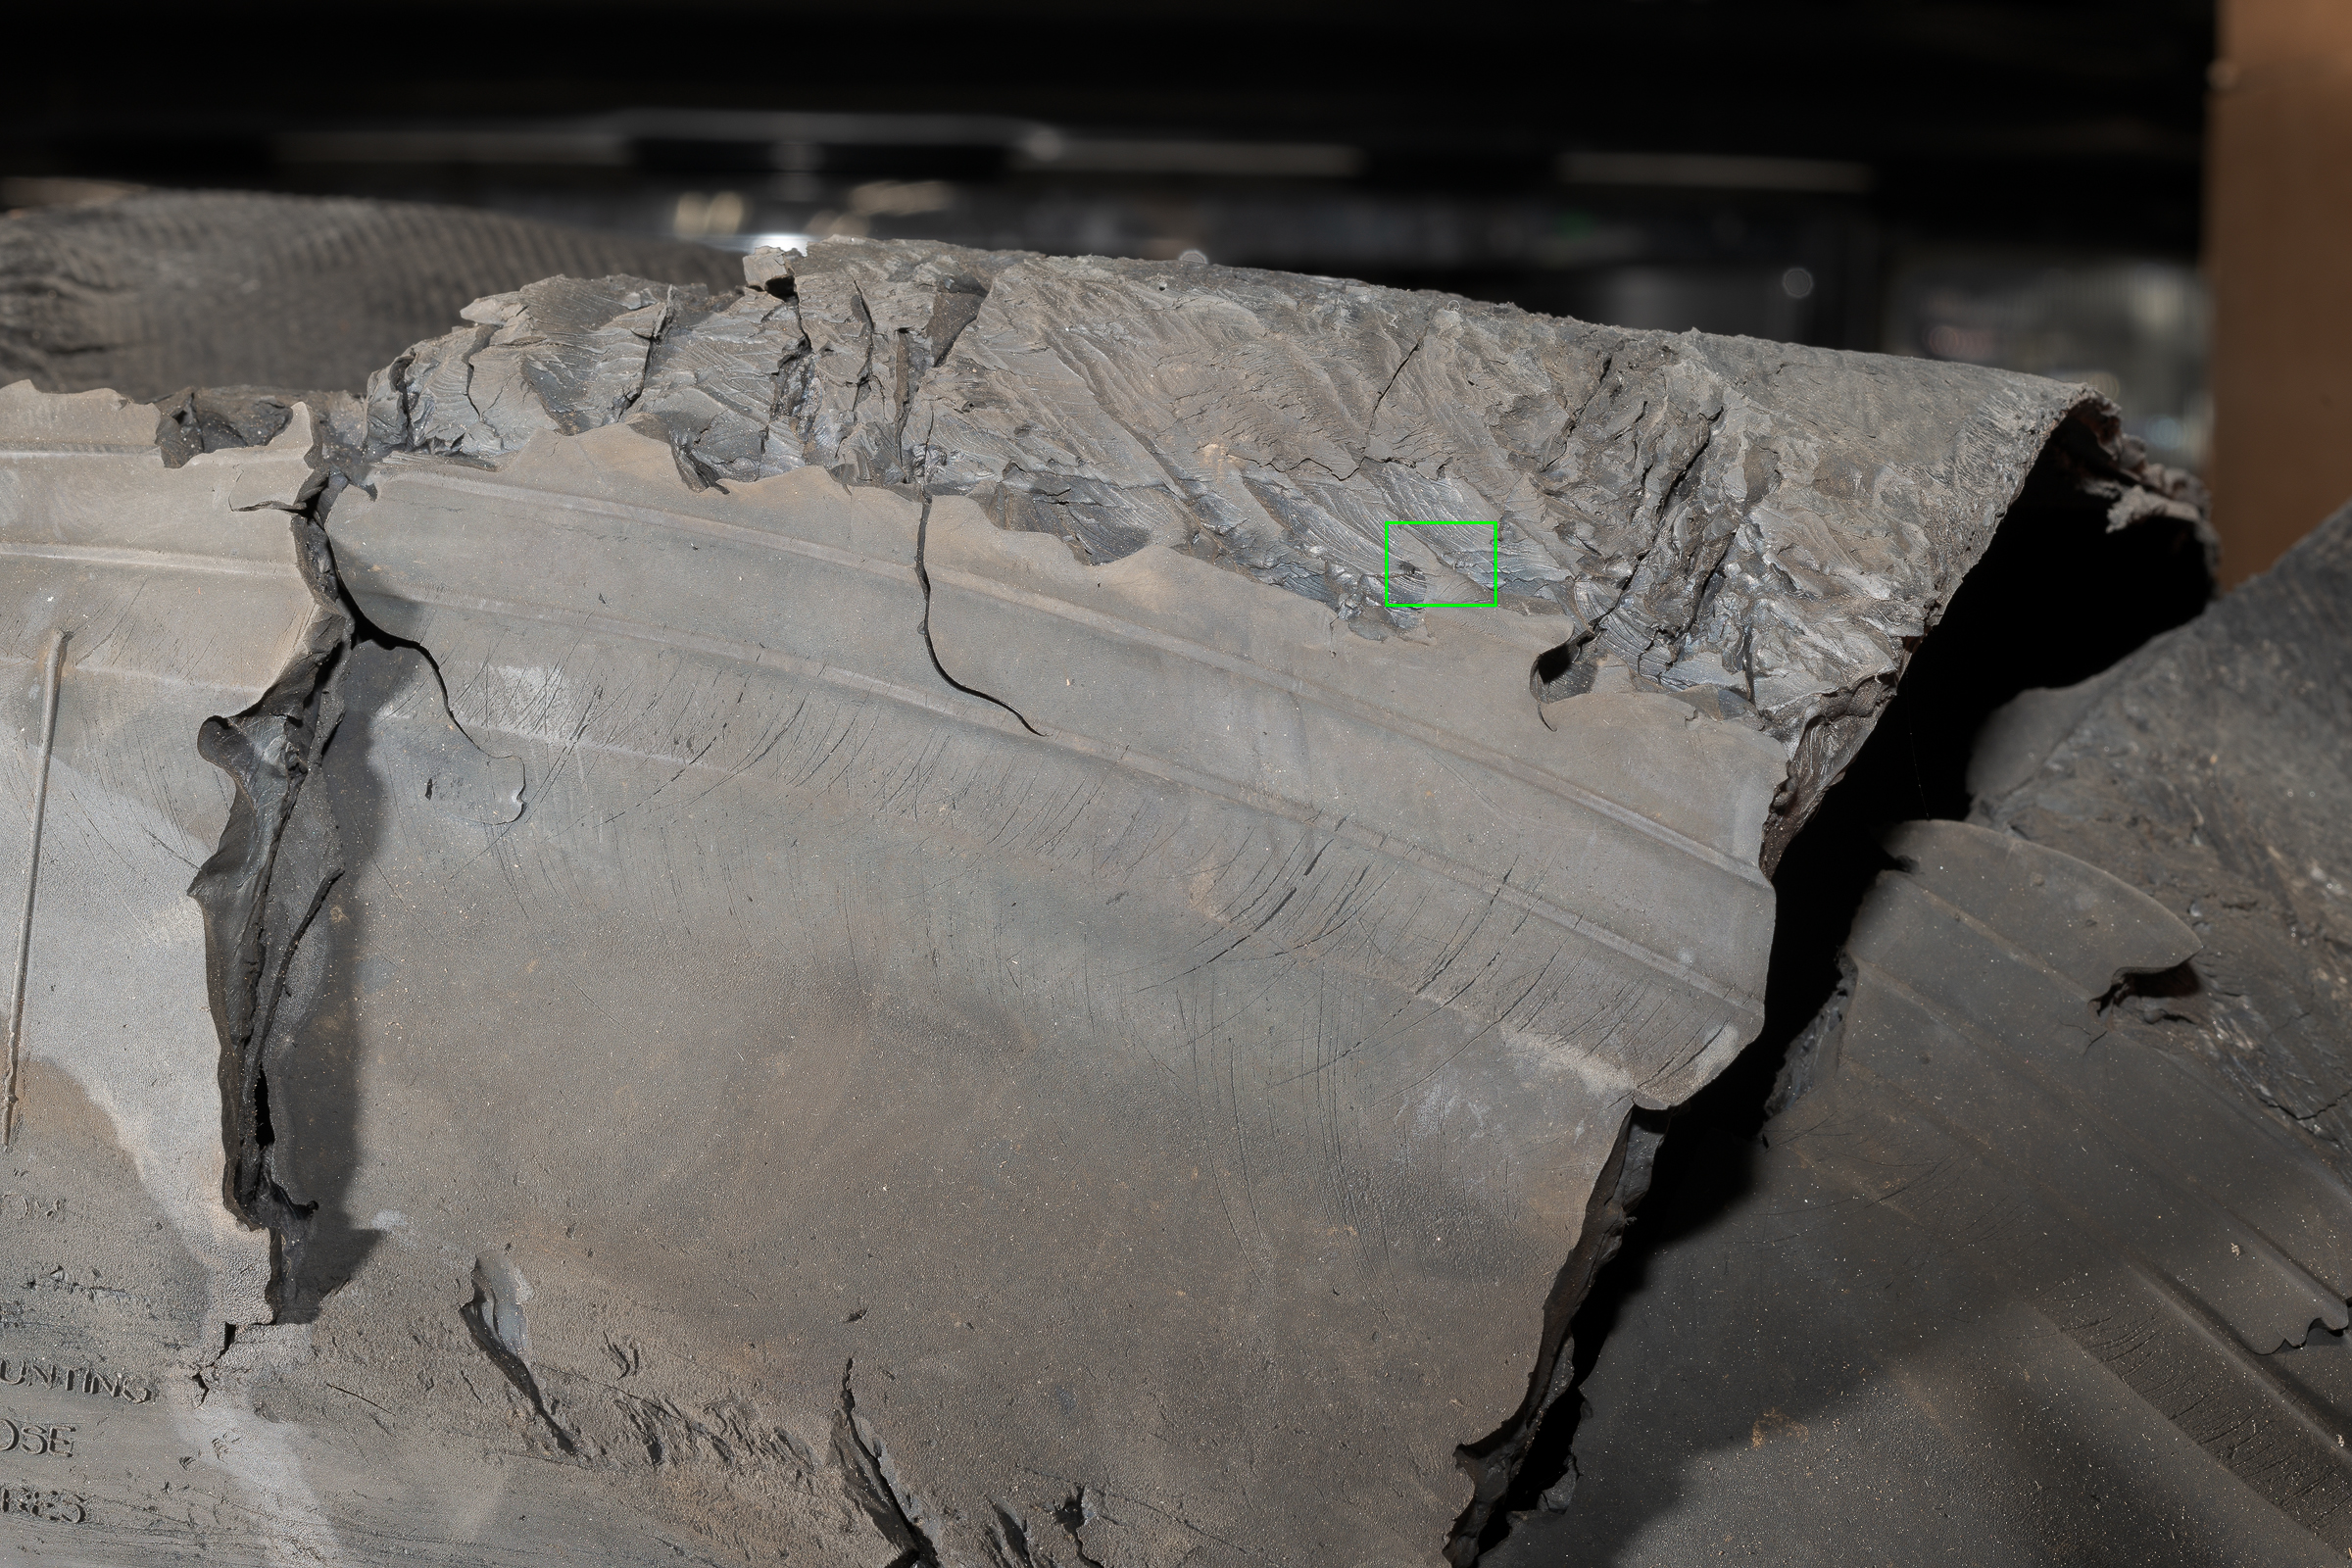
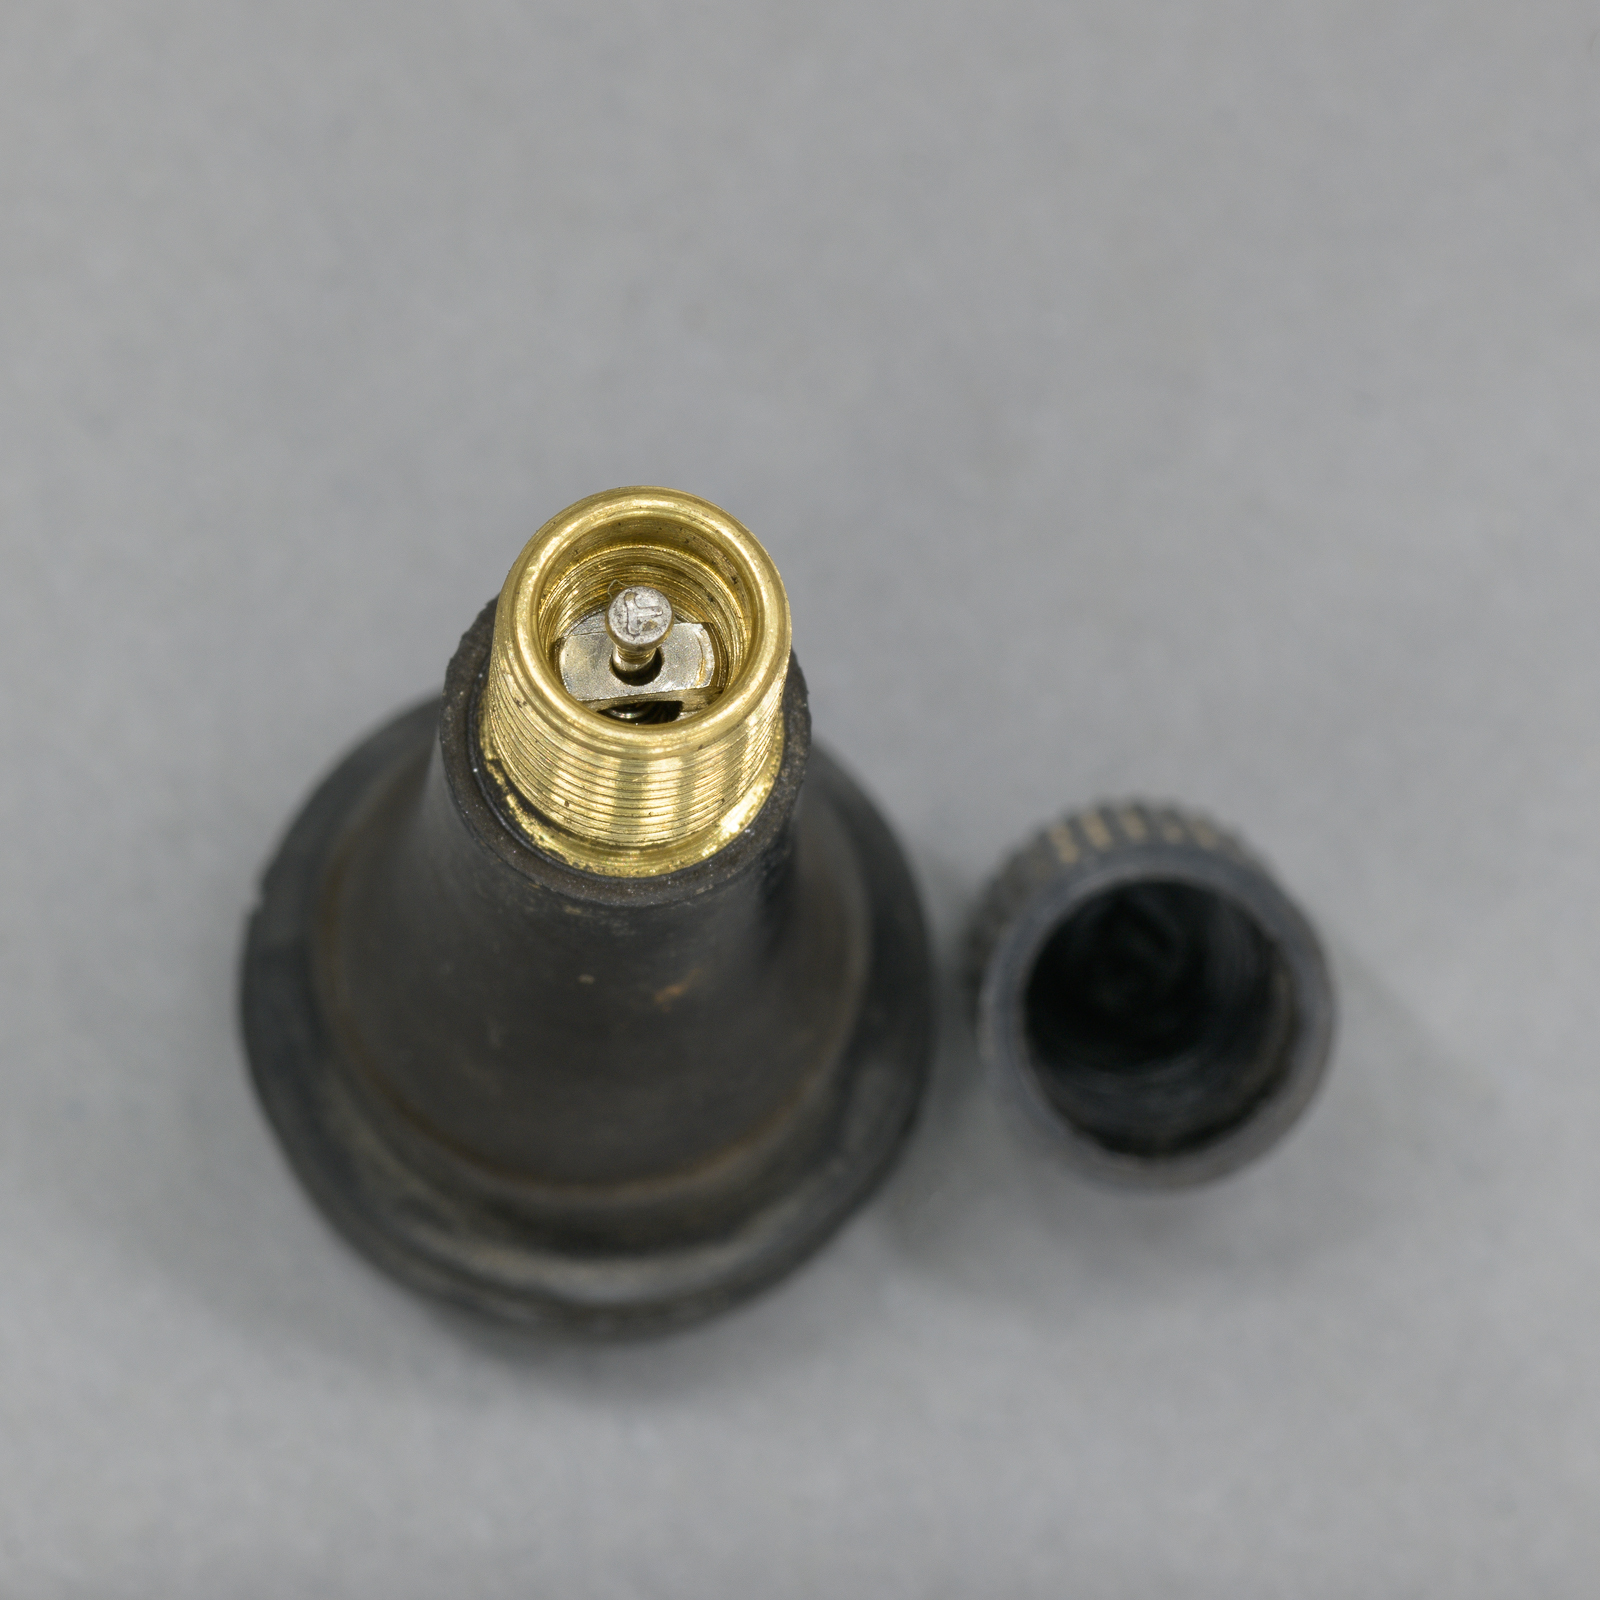
Here is an example photo of the rusted ends of steel belt cords made at f/16:

Broken steel belt edges – single shot at f/16. (Made with Nikon D850 with Nikon 60 mm macro lens.) Click on image to enlarge, then click on back arrow to return to post.

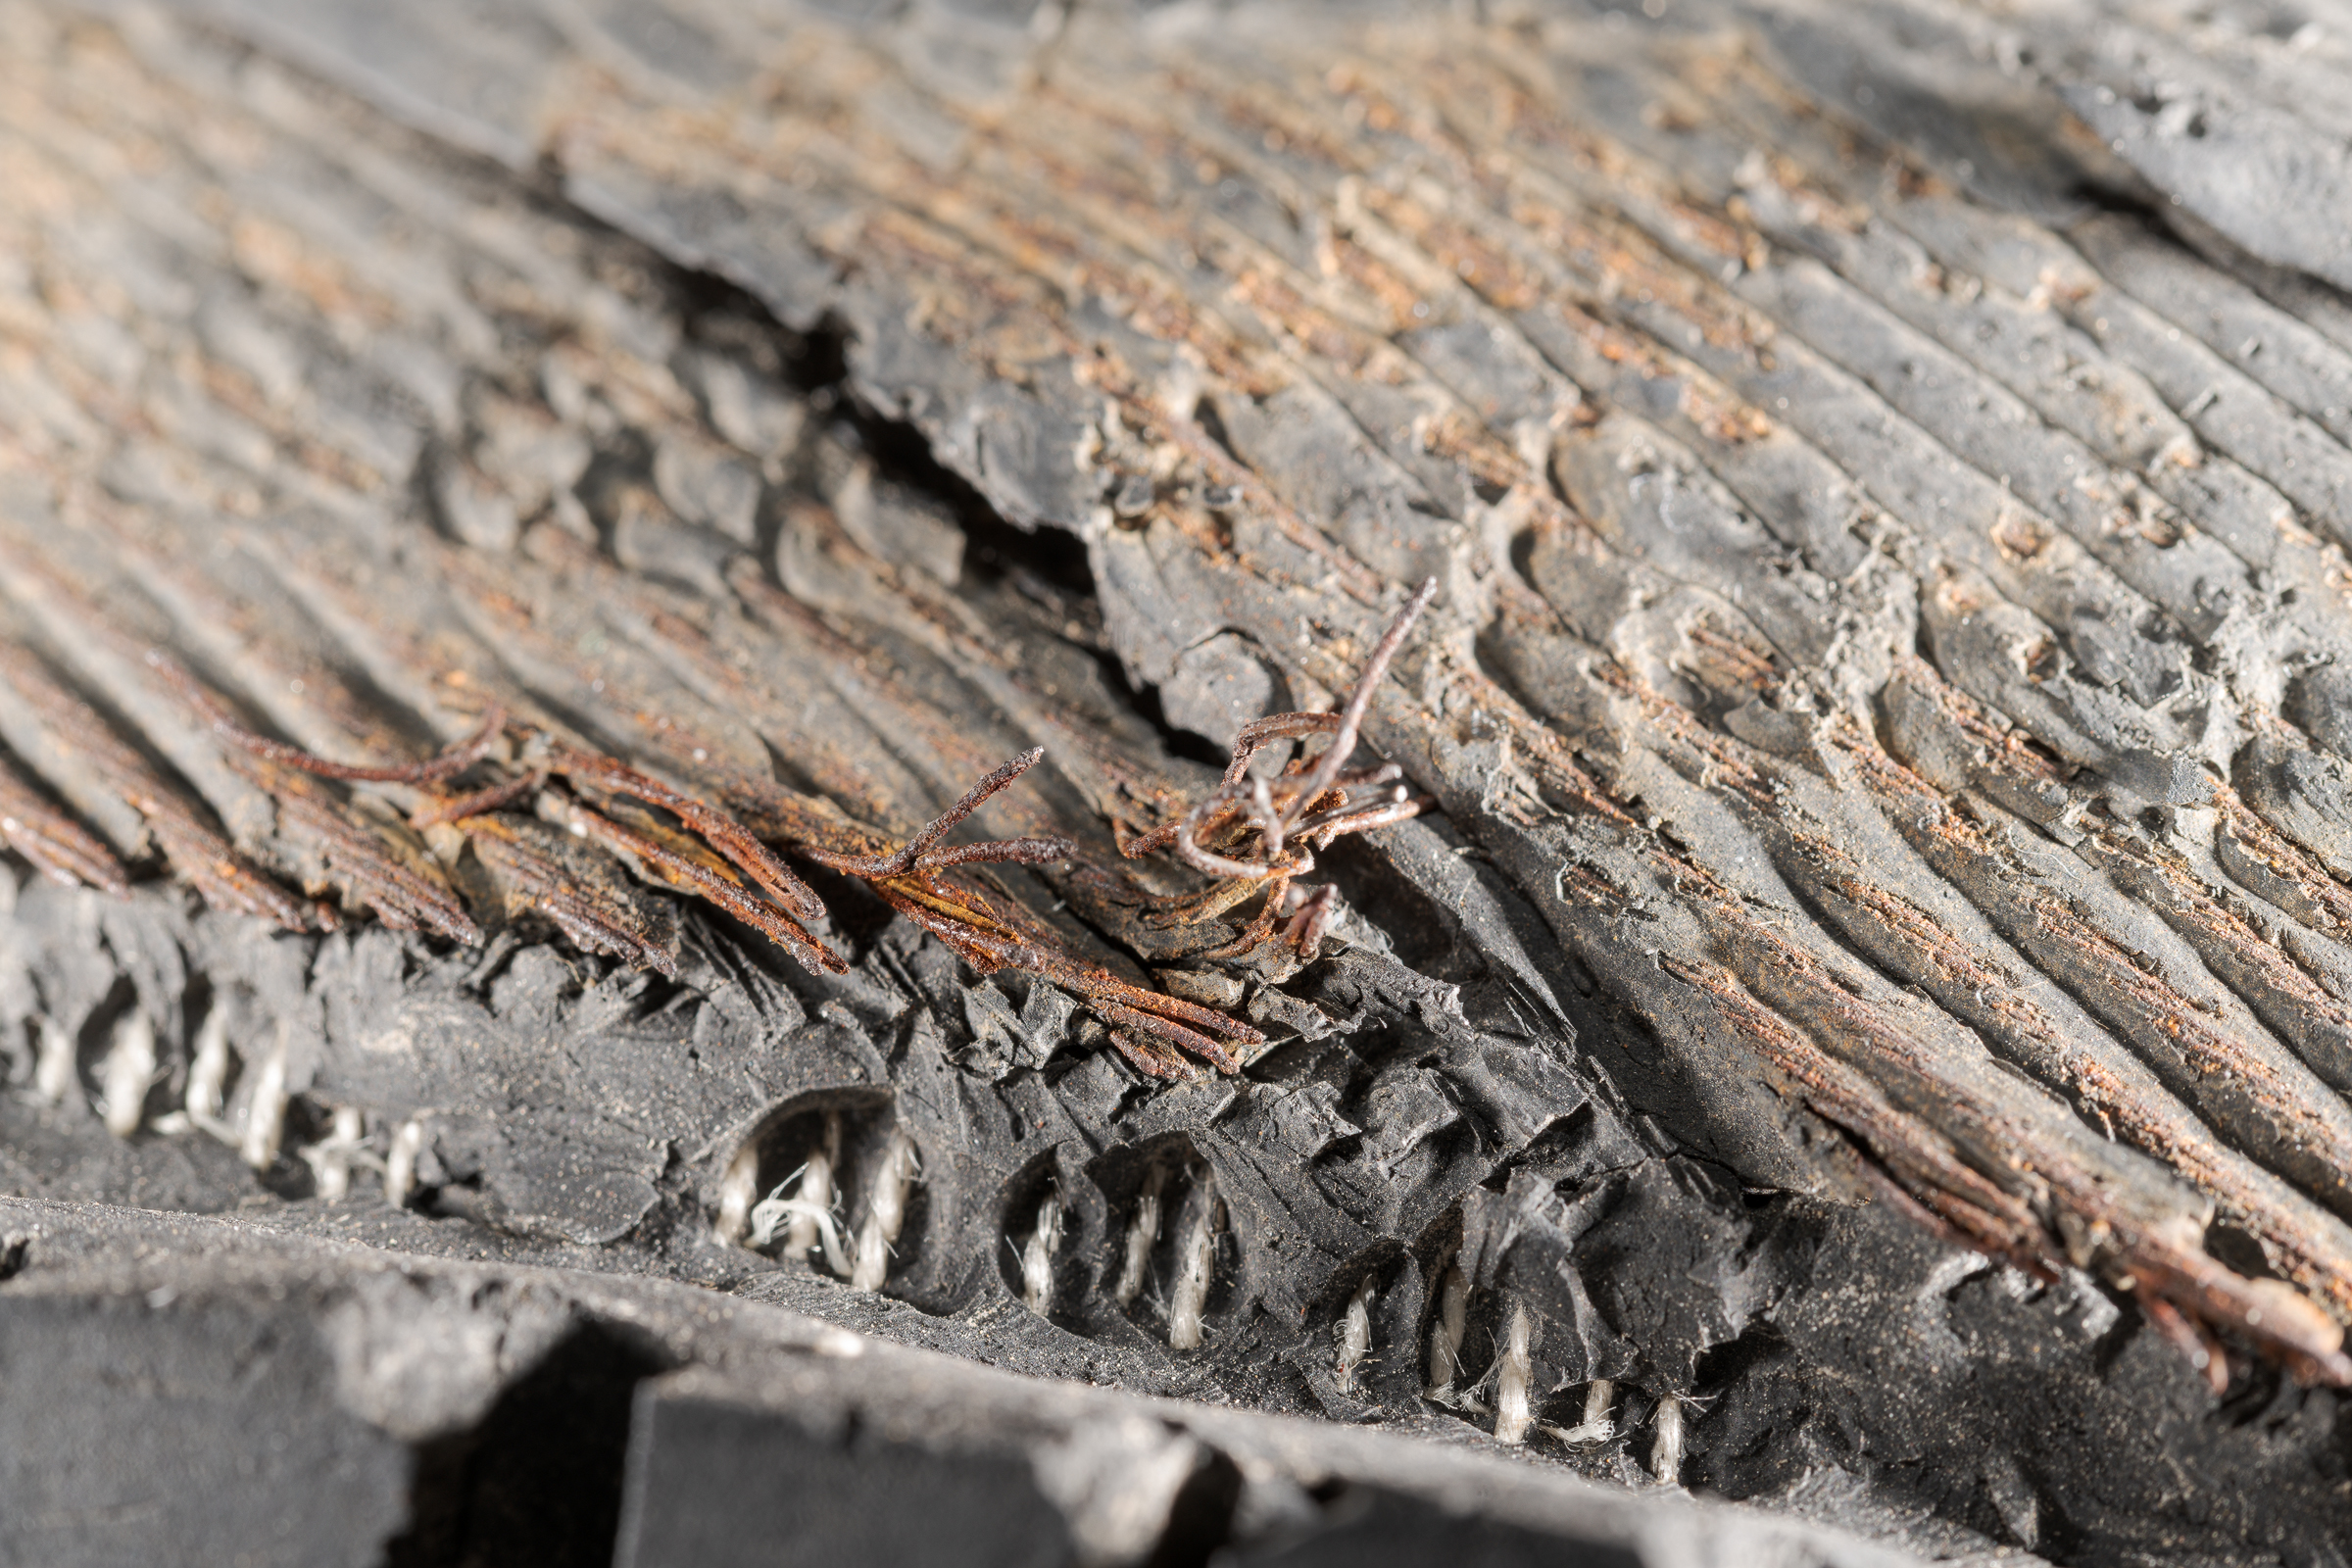
Some of the ends of the cords are sharp, but both the wires closer to the camera and the rubber skim coat of the belt farther away were soft. Focusing closer to the ends of the wires would make everything below them more out of focus. Focusing on the belt rubber would cause all the wire ends to be soft.

The solution is to take a series of photographs using a middle aperture (usually between f/5.6 and f/11) starting with the focus on the part of the subject closest to the camera. Focus slightly further away from the camera for each subsequent photo until you’ve focused on the part of your subject furthest from the camera. All exposure settings should be set manually and held constant for each frame; only focus should be changed.

For larger subjects including vehicles and accident sites, only two or three frames might be needed. More on that in another post. But close-up or macro images will typically need several more.

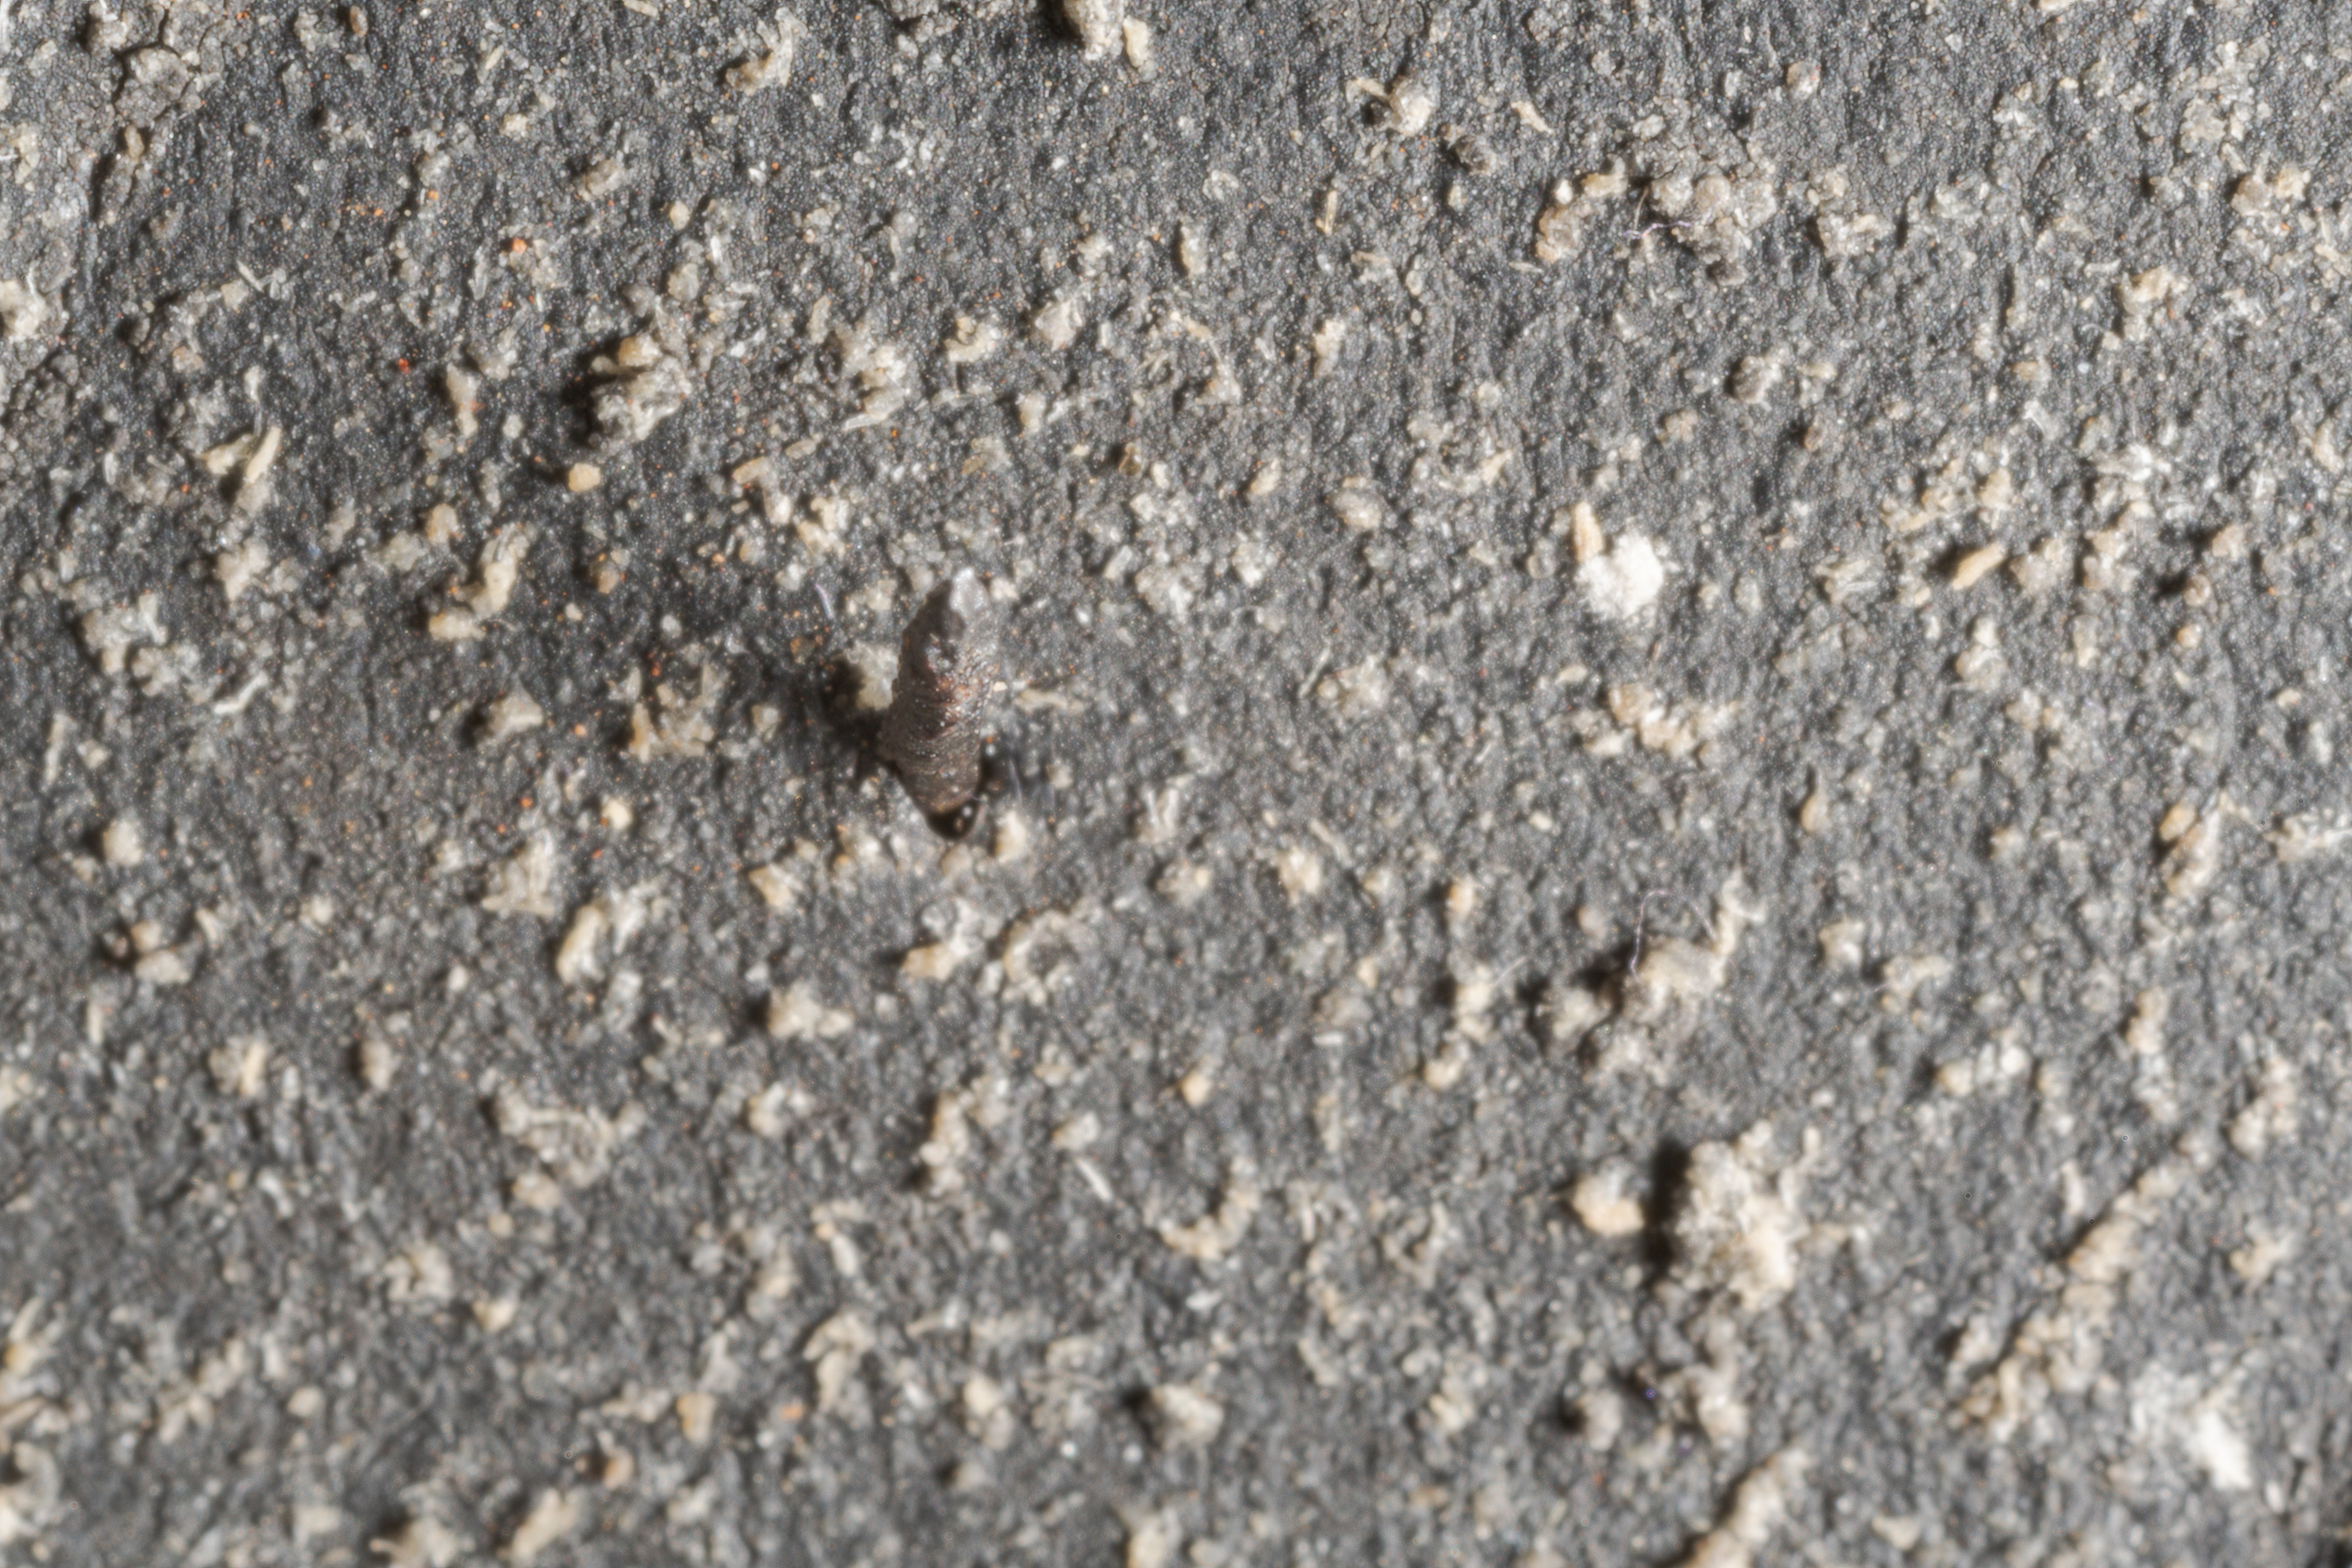
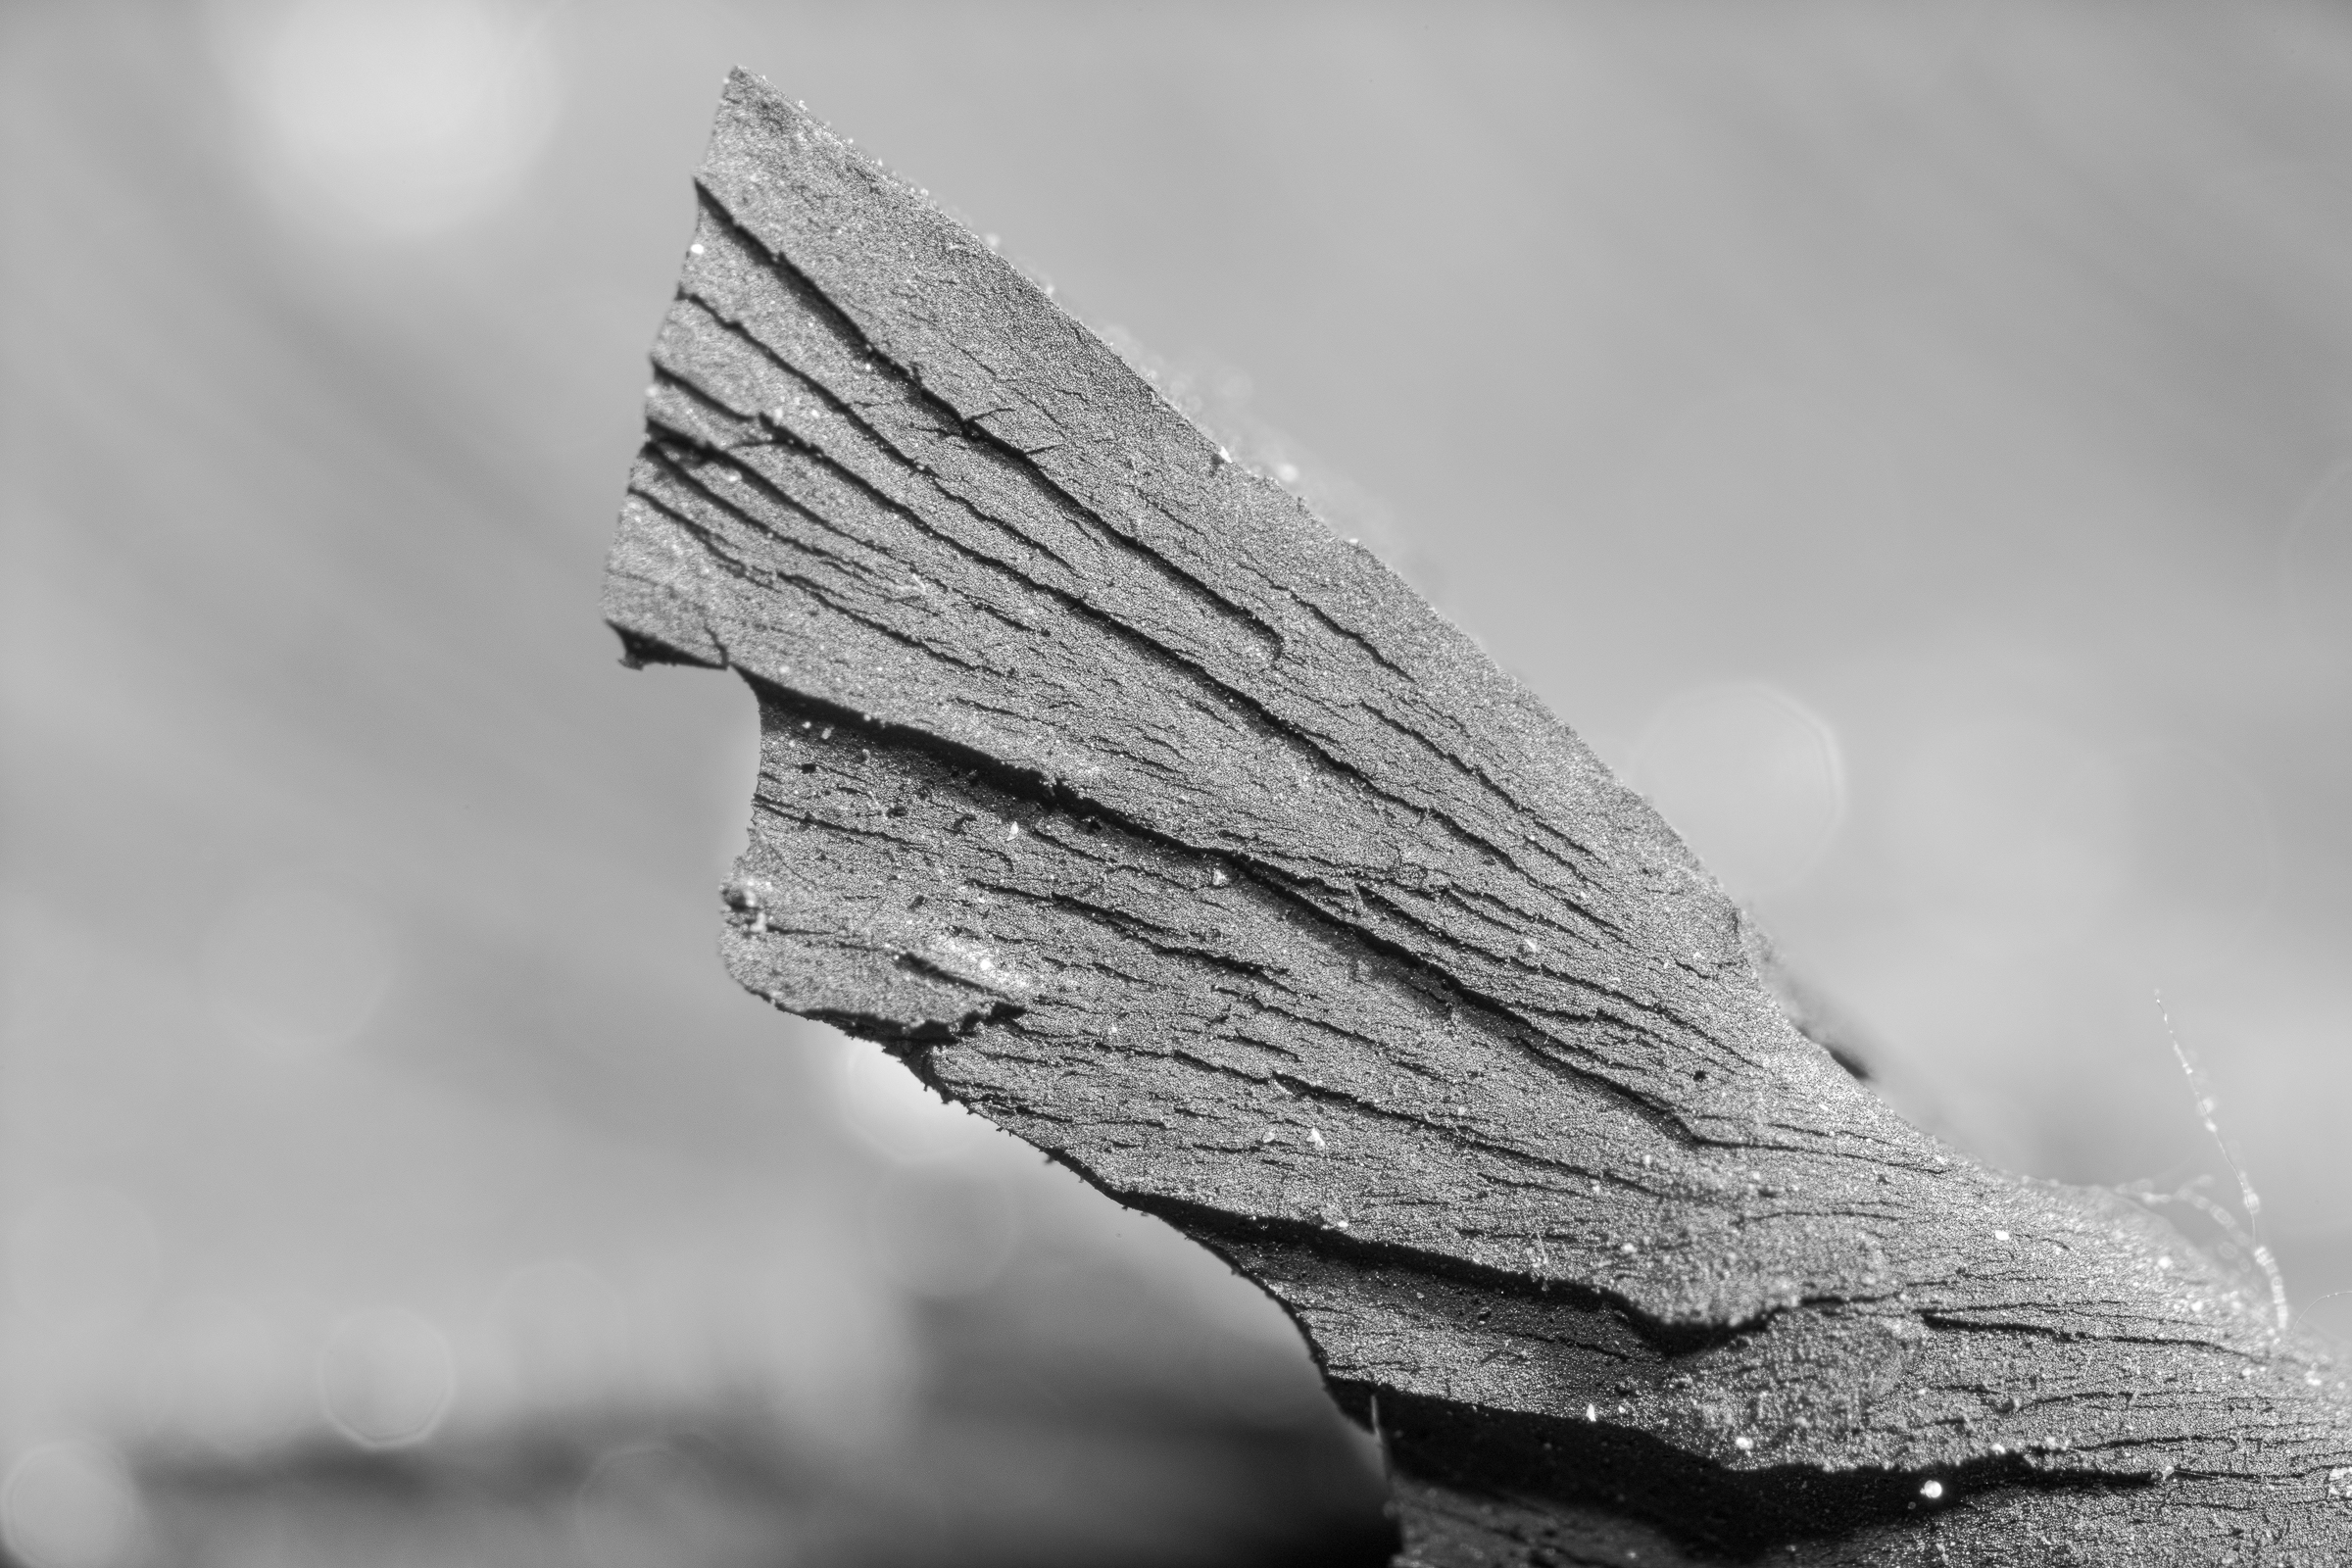
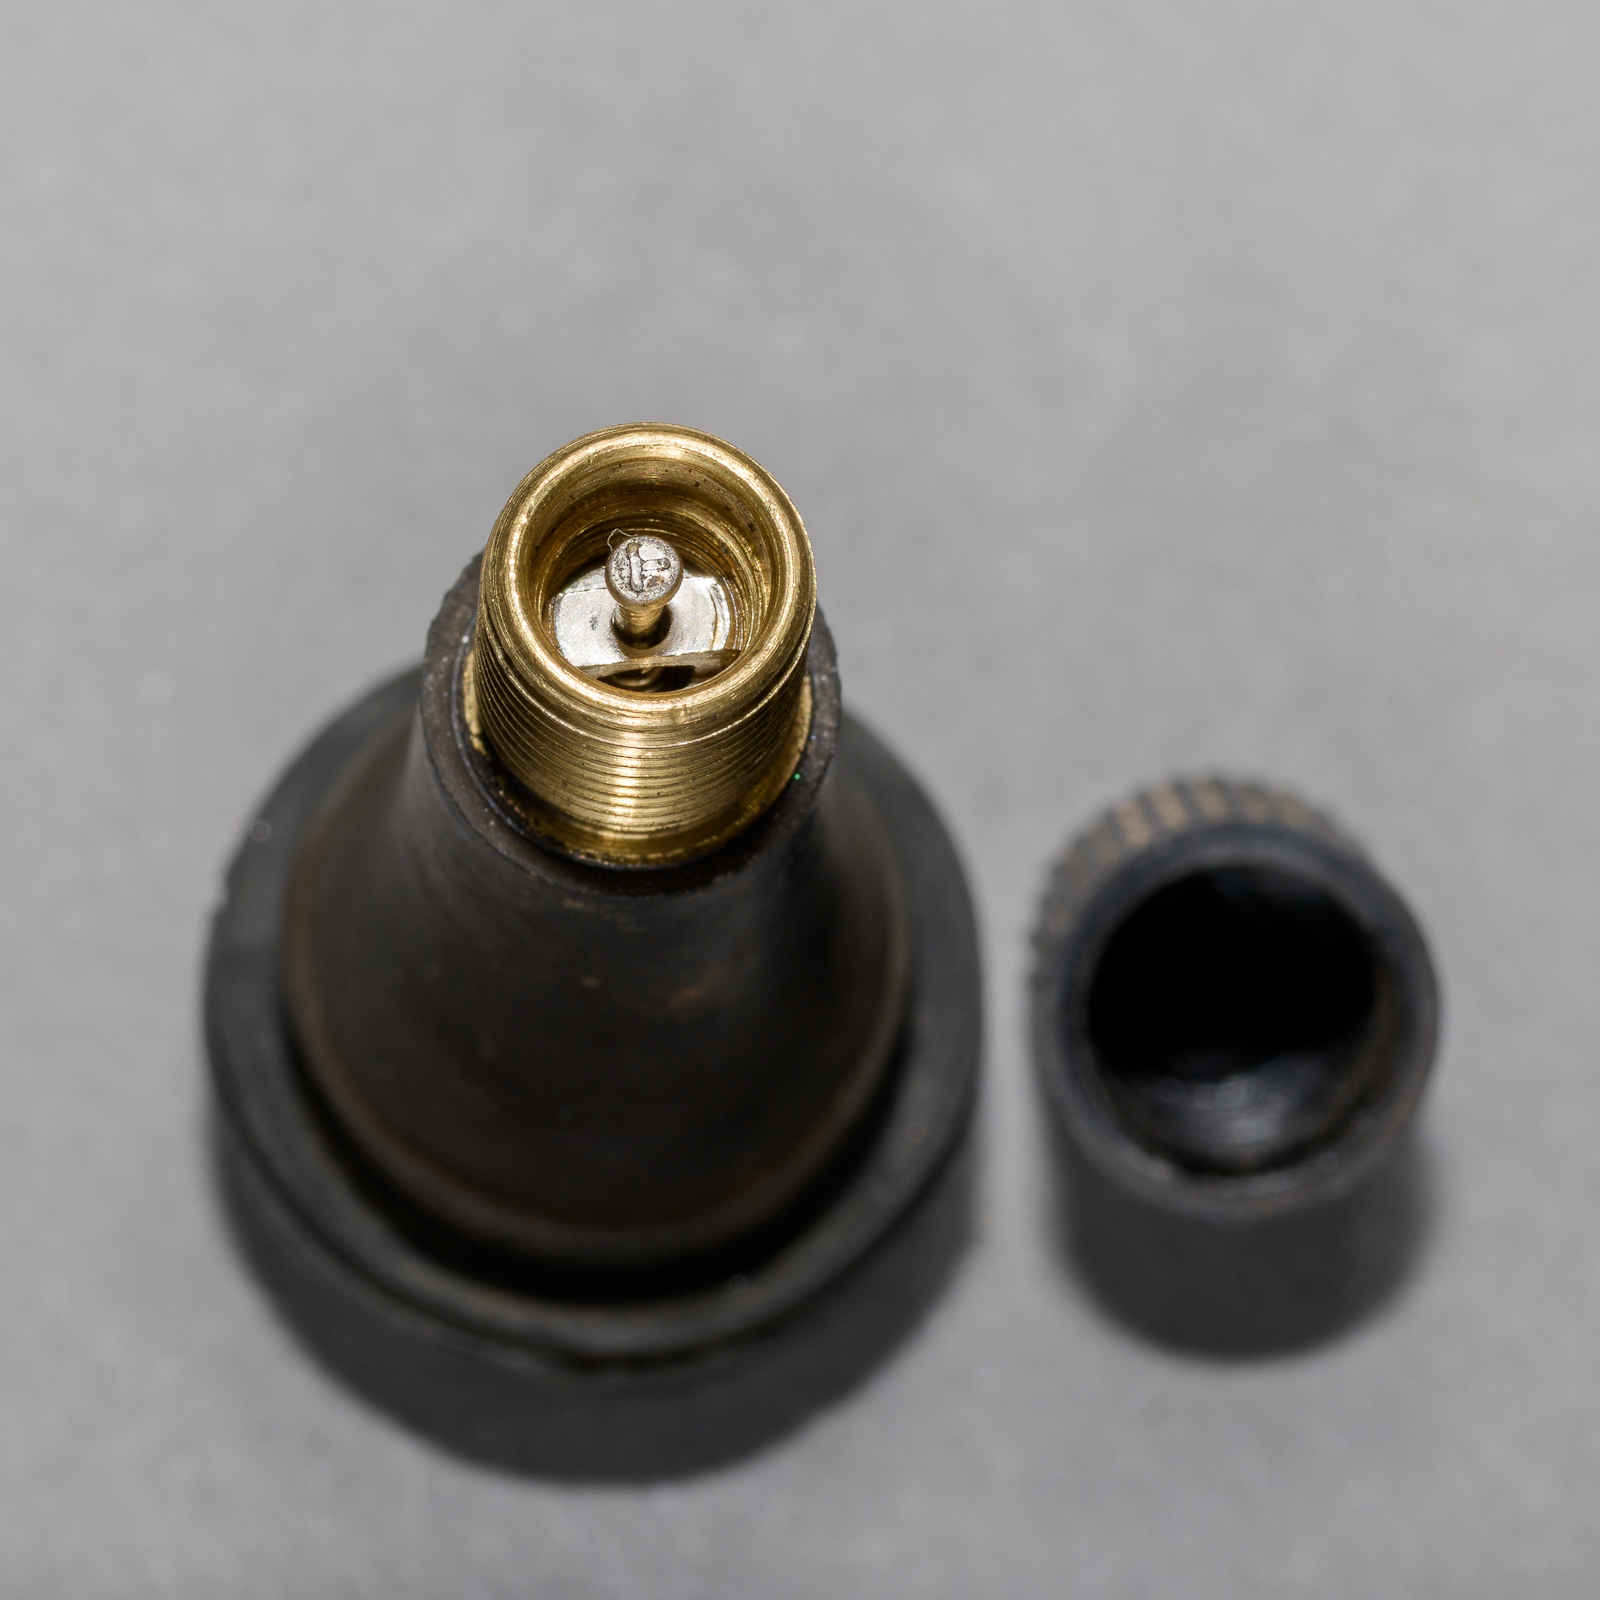
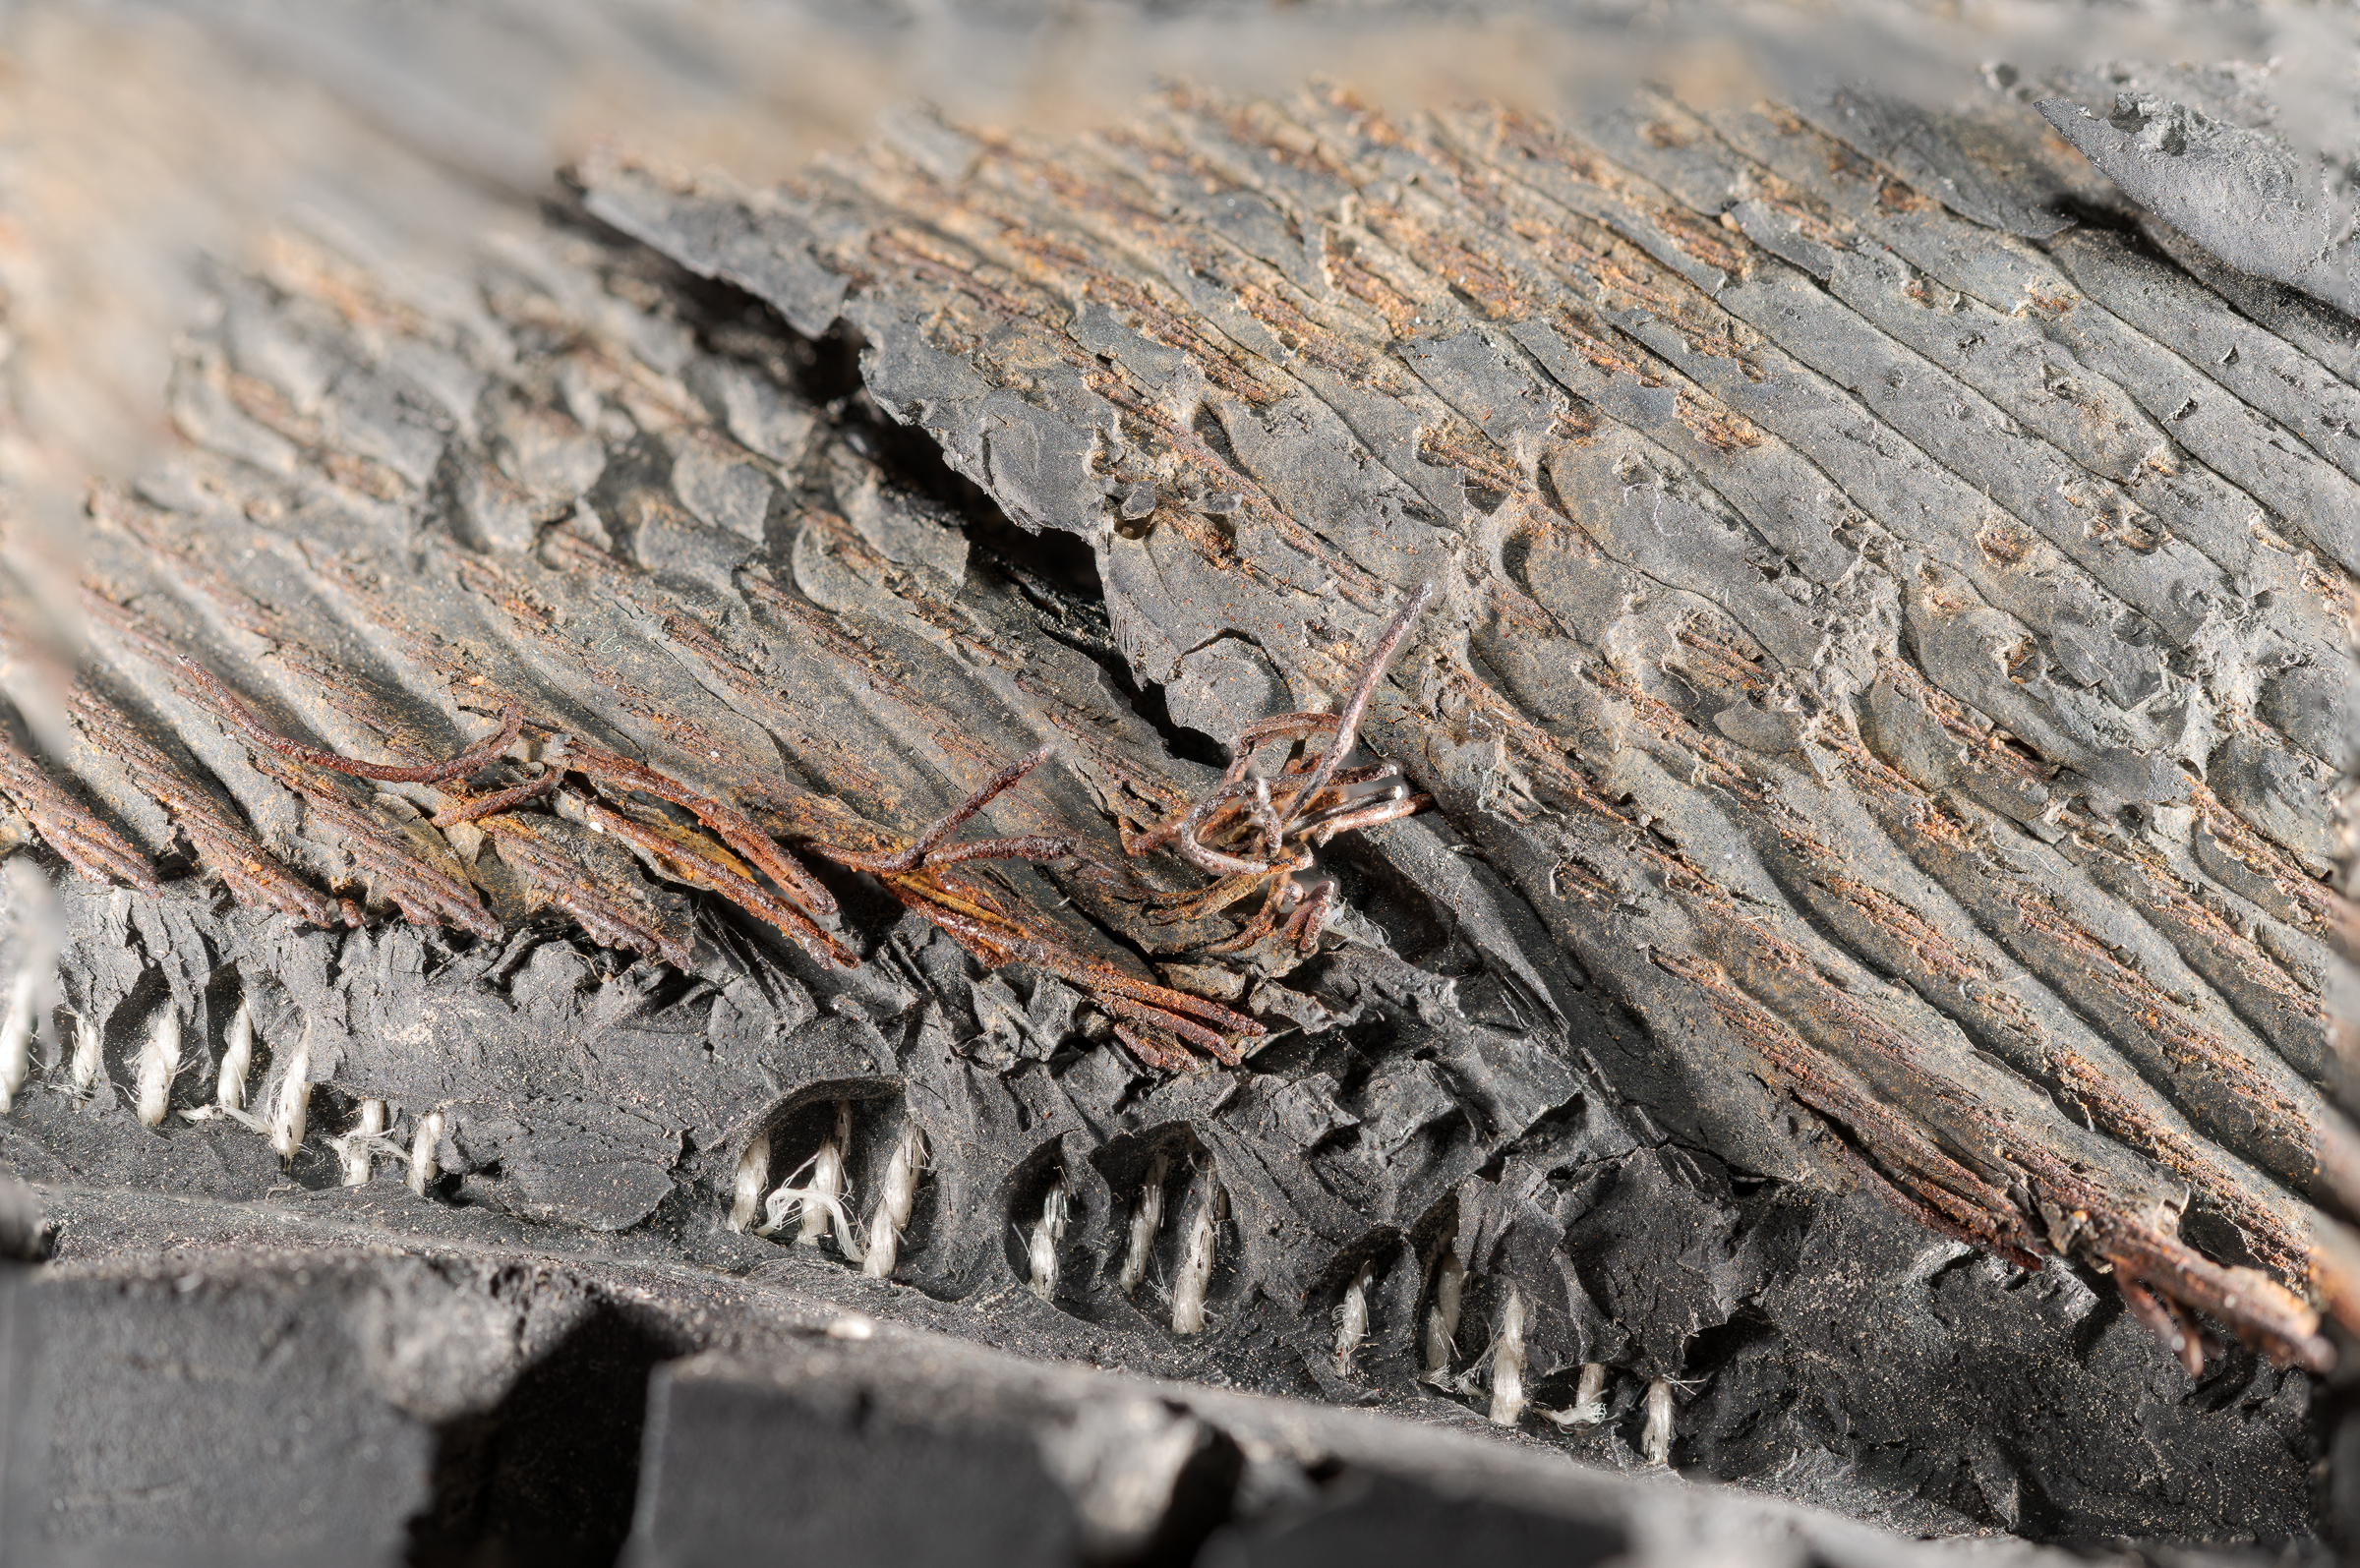
To create an image with all the belt edge wires sharp, I made thirteen photos at f/11, changing only focus. I started by focusing on the tip of the wire closest to the camera. Subsequent photos were made focusing slightly further from the camera with each frame.

All thirteen images were brought into Photoshop through Adobe Camera Raw as individual layers into a single image. All layers were auto aligned, then combined in a stack. As you can image, thirteen 45 megapixel Nikon D850 images brought into a single image resulted in a gigantic file. In fact, at five gigabites(!), it was too big to save as a PSD (Photoshop Document) file; I had to save it as a PSB (Photoshop Big) file. Of course, I flattened it, reduced its size, and saved it as a JPEG to send to my client and (even smaller) to post here:

Broken steel belt edges – thirteen stacked images f/11. (Made with Nikon D850 with Nikon 60 mm macro lens.) Click on image to enlarge, then click on back arrow to return to post.

If you look closely, there are some small artifacts around the edges of some wires. With a bit of work, these can be removed, but they are unobtrusive enough to ignore, unless an image will be used as a trial exhibit.

As alternatives to Photoshop, I also use Zerene Stacker and Helicon Focus to process stacked images. Different software processes create different artifacts, so sometimes I’ll process the stacked images in all three, then choose the best.

If you already own Photoshop, it’s well worth practicing focus stacking. It’s an effective tool that can produce images that can’t be captured in a single shot. I use it regularly for tires and products, and have even used it at accident sites on occasion (usually, as mentioned, with only two or three images stacked).

Nailing an Ultra Macro Photo

During my analysis of a failed tire, I noticed what looked like a tiny, tiny nail in one of the sidewalls. I looked inside the tire, but couldn’t see if the tip had penetrated the innerliner. I gingerly felt around the inside to detect if the tip had protruded through. It had. Now I had to document that.

Photographing the head of the nail on the outside was easy, but photographing the tiny tip on the inside was quite a challenge. It was both minuscule and inaccessible. Here is a photo  of the nail made with my usual lens, the ZEISS Milvus 50 mm f/2 macro. (Click on any image to enlarge. Then click on back arrow to return to the post.)

Arrow highlights point of tiny nail through tire innerliner. (ZEISS Milvus 50 mm f/2 macro lens on Nikon D850.)

Even with the arrow, it’s impossible to get any useful information about the nail tip from this photo.

I photographed that nail tip with several other combinations of lenses, lights, and camera supports, but couldn’t get close enough to it optically. Then I remembered my beanbag called “The Pod” (now sold as either The Red Pod or The Green Pod) to which I had added an Arca-Swiss-type quick release clamp.

The Pod beanbag with Arca-Swiss style quick release clamp. (ZEISS Milvus 50 mm f/2 macro lens on Nikon D850.)

To get the camera lens closer to the nail, I propped the beanbag with a mounted Nikon D850 and the Laowa 25 mm 2.5 to 5x Ultra Macro lens (which I discussed and showed in previous posts) on the opposite side bead. I removed two Nikon SB-R200 macro flashes from the R1C1 ring and placed them on either side of the nail tip. This photo shows the positions of The Pod and the flashes with the camera, lens, and on-camera SB-910 flash removed.

Setup for tiny nail end using The Pod and two Nikon SB-R200 flash units. Laowa 25 mm 2.5 to 5x Ultra Macro lens on Nikon D850 removed from The Pod to show setup. (ZEISS Milvus 50 mm f/2 macro lens on Nikon D850.)

Below is the resulting single-shot, uncropped, full-frame image with the incredible Laowa Ultra Macro lens. A single shot was necessary because the beanbag setup was not rigid enough to allow for focus stacking of multiple images.

Full frame, uncropped close-up of tiny nail. (Laowa 25 mm 2.5 to 5x Ultra Macro lens on Nikon D850.)

Compare the size of the nail tip in the the top and bottom photos, and recall both were full-frame, uncropped images. Considering there was such a significant enlargement of the subject, the detail in the bottom photo was remarkable despite the limited depth of field and the less-than-rigid support from the beanbag as opposed to a tripod.  I’d say that about nailed it!

Photography for Accident Reconstruction, Product Liability, and Testing Class Outline

From August 12 through 14, 2019, I will be teaching the third Photography for Accident Reconstruction, Product Liability, and Testing class for SAE. This time it will be at Southeast Toyota Technical Center in Jacksonville, FL. We’ll cover a lot of material in the three days, and you’ll come away making better quality, more professional photographs from that point on, regardless of the location or lighting conditions. After all, your photographs are at least as important as any other part of your work. You’re a professional, and your photographs should reflect that professionalism. After this class, they will.

Here’s a detailed outline of the class: SAE Forensic Photography Class Outline_2019-07.

Please contact me if you have any questions or would like more information about the class.

Another Example with Laowa 25 mm Ultra Macro Lens

This post shows another example image using the amazing Laowa 25 mm Ultra Macro lens. In an earlier post, I discussed what that lens is, and how to best use it. For this example, I made a 5X image of a small torn flap of rubber from a failed tire.

The green box in this first image highlights the tiny flap I wanted to make an extreme close-up photograph of.

Selection showing area of flap piece on tire. Made with ZEISS Milvus 50 mm macro lens on Nikon D850.

To illuminate the flap, I used a Nikon SB-910 flash mounted on my Nikon D850 camera hot shoe to control off-camera lights. I zoomed the lens all the way out to 5X magnification (5:1 reproduction ratio) to get the greatest enlargement possible. I then moved the camera on a pair of Really Right Stuff focusing rails until I was able to fill the frame with that tiny flap. Here is the result:

Close-up of flap piece on tire. Made with Laowa 25 mm Ultra Macro lens on Nikon D850 with flash.

That is the full size image; there was no cropping. The flap was covered with small dots of colors from the oils in the rubber compound. I felt these colored dots interfered with the subject, so I turned the image black & white.

You’ll notice that both the tip and the base of the flap are going out of focus. This is due to the inherent limited depth of field with such high magnification. It would have been easy to make everything appear to be in focus by taking a couple additional photographs at different focus points, then blending them together in focus stacking software such as Photoshop, Helicon Focus, or Zerene Stacker. But the purpose of this photo was to demonstrate the lens by itself.

Using this lens can’t be done on automatic, but if you align, focus, expose, and light properly, it’s an amazing performer at an amazingly low price.

Suggested Gear for Accident Reconstruction, Product Liability, and Testing Photography

Even before I started teaching Accident Reconstruction, Product Liability, and Testing Photography classes, I’ve often been asked about what photo gear works the best for those areas.

In response, I’ve created two wish lists at B&H Photo Video: one for Nikon Nikon Gear Wish List and one for Canon shooters Canon Gear Wish List. I’m a Nikon shooter, so most of my direct experience is with Nikon equipment. Here are some notes on the lists:

-1- I currently use the Nikon D850. It’s arguably the best all-around camera on the market, but I recommend the Nikon D750 for Nikon shooters for several reasons:
– Its files are more manageable in size, but are still plenty large.
– It still has the manageable body size and shape, and even has the really useful flip up and down LCD screen.
– It has a built-in flash to use to trigger the Nikon 4804 R1 macro flashes.
– The built-in flash isn’t terribly powerful, and can’t be rotated or removed, but can be used in a pinch.
– Right now, it is on a fantastic sale—especially with the 24-120 mm lens. You save $1,200 instantly.
– It’s been out for a while, and is tried and true.

There are similar advantages for Canon shooters with the 6D Mk II vs. the 5D Mk IV. If you have the budget, the Nikon D850 or Canon 5D Mk IV can’t be recommended highly enough. But they are not necessary for the work we do.

-2- The lists show both the ZEISS Milvus 50 mm and either Nikon 60 mm or Canon 100 mm macro lenses. I use the ZEISS, but also have the Nikon. I use my ZEISS Milvus 50 mm lens for most of my work photography, since it has a normal perspective. I also use the ZEISS Milvus 100 mm lens when I need to fill the frame with a macro shot, but can’t get close enough.
Advantages of the ZEISS are: Precise manual focus; amazing micro contrast; and, 50 mm is accepted “normal” lens that I use for almost everything.
Disadvantages of the ZEISS are: Manual focus only (but that is my preference); and, only enlarges to 1:2 (or half life-size).
Advantages of the Nikon: 1:1 (life-size macro); autofocus (but see note below); close enough to “normal” focal length; and, less expensive.
Disadvantages of Nikon: Not as easy to manually focus.
Note: When shooting macro images, you’ll most likely have to manually focus anyway, so having a more precise manual focusing ring is a real benefit.

Speaking of ZEISS lenses, four ZEISS manual focus prime lenses make up my work kit: the classic ZEISS 25 mm f/2 Distagon; the ZEISS Milvus 35 mm f/2; the ZEISS Milvus 100 mm f/2 macro; and, the aforementioned ZEISS Milvus 50 mm f/2 macro. I use the latter for 90 percent of my work. ZEISS makes lenses for Nikon, Canon, and Sony mounts. They have unrivaled sharpness and micro-contrast, and such smooth and accurate manual focusing that you’ll forget autofocus exists! Continue reading “Suggested Gear for Accident Reconstruction, Product Liability, and Testing Photography”

Adding Light with a Reflector

Even once you get your flashes dialed in to give you the exposure you want, there may be areas where you need more detail in the shadows. You can add lights, or just use a reflector. For this example, the flash lighting illuminated the tire just as I wanted, but the tread area in the foreground was too dark. (Click on image to enlarge, then click on back arrow to return.)

Sidewall lit with studio flashes, but tread in shadow. (ZEISS Miluvs 50mm f/2 macro lens on Nikon D850.)
I could have added one or more lights to illuminate the tread, but I chose to place a simpler silver reflector at an angle next to the shadowed tread. This allowed me to redirect the spill light from the flashes back into the tire’s tread.
Sidewall lit with studio flashes, with silver reflector lighting the tread. (ZEISS Miluvs 50mm f/2 macro lens on Nikon D850.)
I used the silver side of a Profoto collapsible white/silver reflector to bounce light into the shadows. The beauty of a reflector is that it does not affect the overall exposure, so there was no need to re-meter to determine the proper exposure.