Lighting Equipment Used for the Previous Low Light Blog Post

In the last post, I showed some lighting solutions to use when your subject is in low light. In this post, I will briefly describe some of the supports and the lights I referred to. Flash is a big and interesting subject, and I have an entire module on flash photography in the photography class I teach for SAE (SAE C1729). Or, I should say, will resume teaching once this pandemic eases.

I will expand on each of these in future posts, but wanted to give the basics here. First and foremost is using a good tripod. There is nothing better you can do to improve your photographs than to use a tripod. I use a tripod in any kind of light for almost every image of any subject, including accident sites, vehicles, tires, and other products. A good tripod is even more essential when the light levels are low.

It used to be unusual to see someone with a tripod at an inspection. But with so many scanners now being used, tripods have become quite common. So there goes one excuse for not carrying and using one!

I have a post all about tripods in the works, but for now I’ll just mention the Really Right Stuff (RRS) TVC-24L with a RRS BH-40 ball head that I use for all inspections out of my Studio Lab. It is compact and lightweight, yet it extends quite high, which is essential. All of my tripods have LensCoat LegWraps for insulation (from both hot sun and freezing temperatures) and for comfort in carrying. (Click on image to enlarge, then click on back arrow to return to this post.)
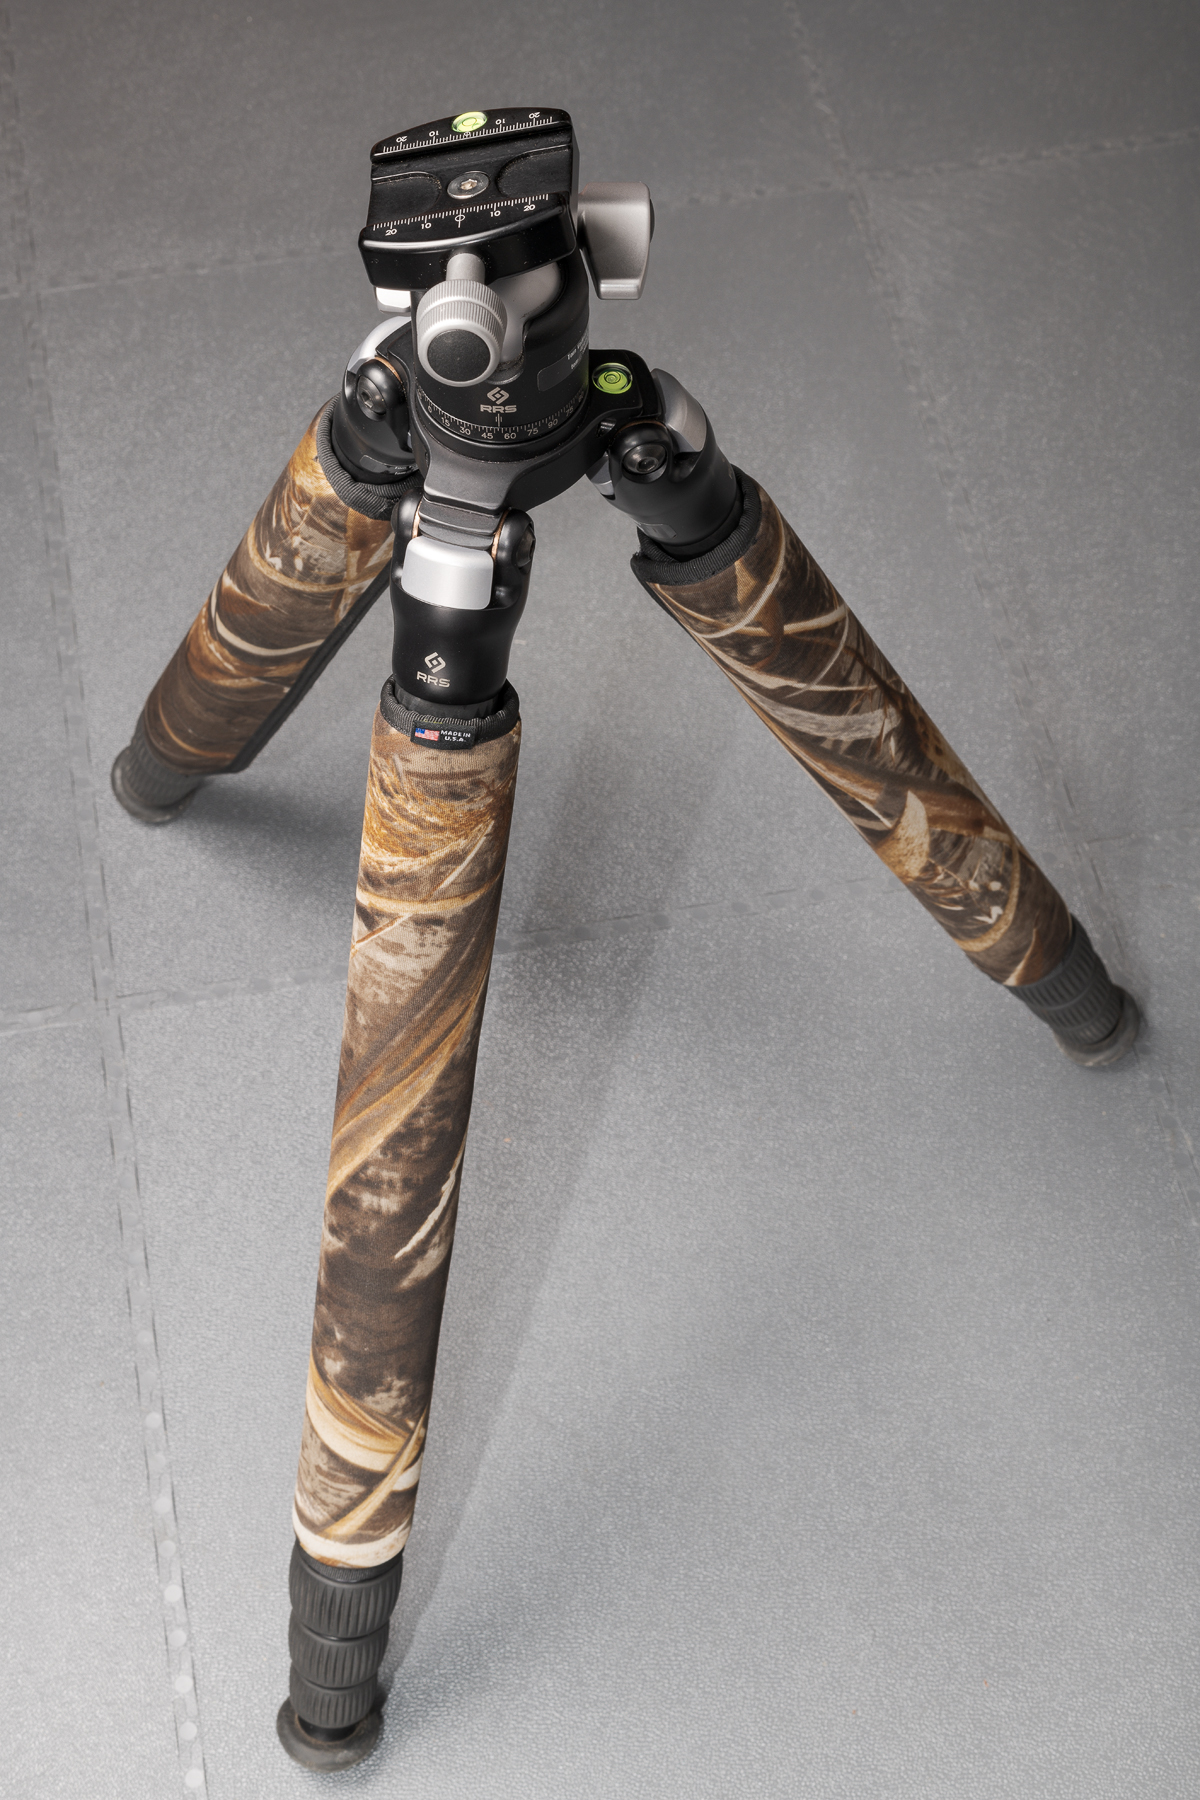
Really Right Stuff (RRS) TVC-24L tripod with RRS BH-40 ball head. (Made using Nikon D850 with ZEISS Milvus 50 mm macro lens. Lit with two Profoto B1x strobes firing into silver umbrellas.)

While future posts (and classes) will discuss flash techniques in detail, in this post I will focus on the equipment I used in the previous post.

Flashes that fit in your camera’s hot shoe are generically called speedlights or flashes. In fact, Nikon calls their flashes Speedlights while Canon calls theirs Speedlites. Larger studio-type flashes are referred to as strobes. Here are some examples from the front. All are battery powered. (Click on image to enlarge, then click on back arrow to return to this post.)
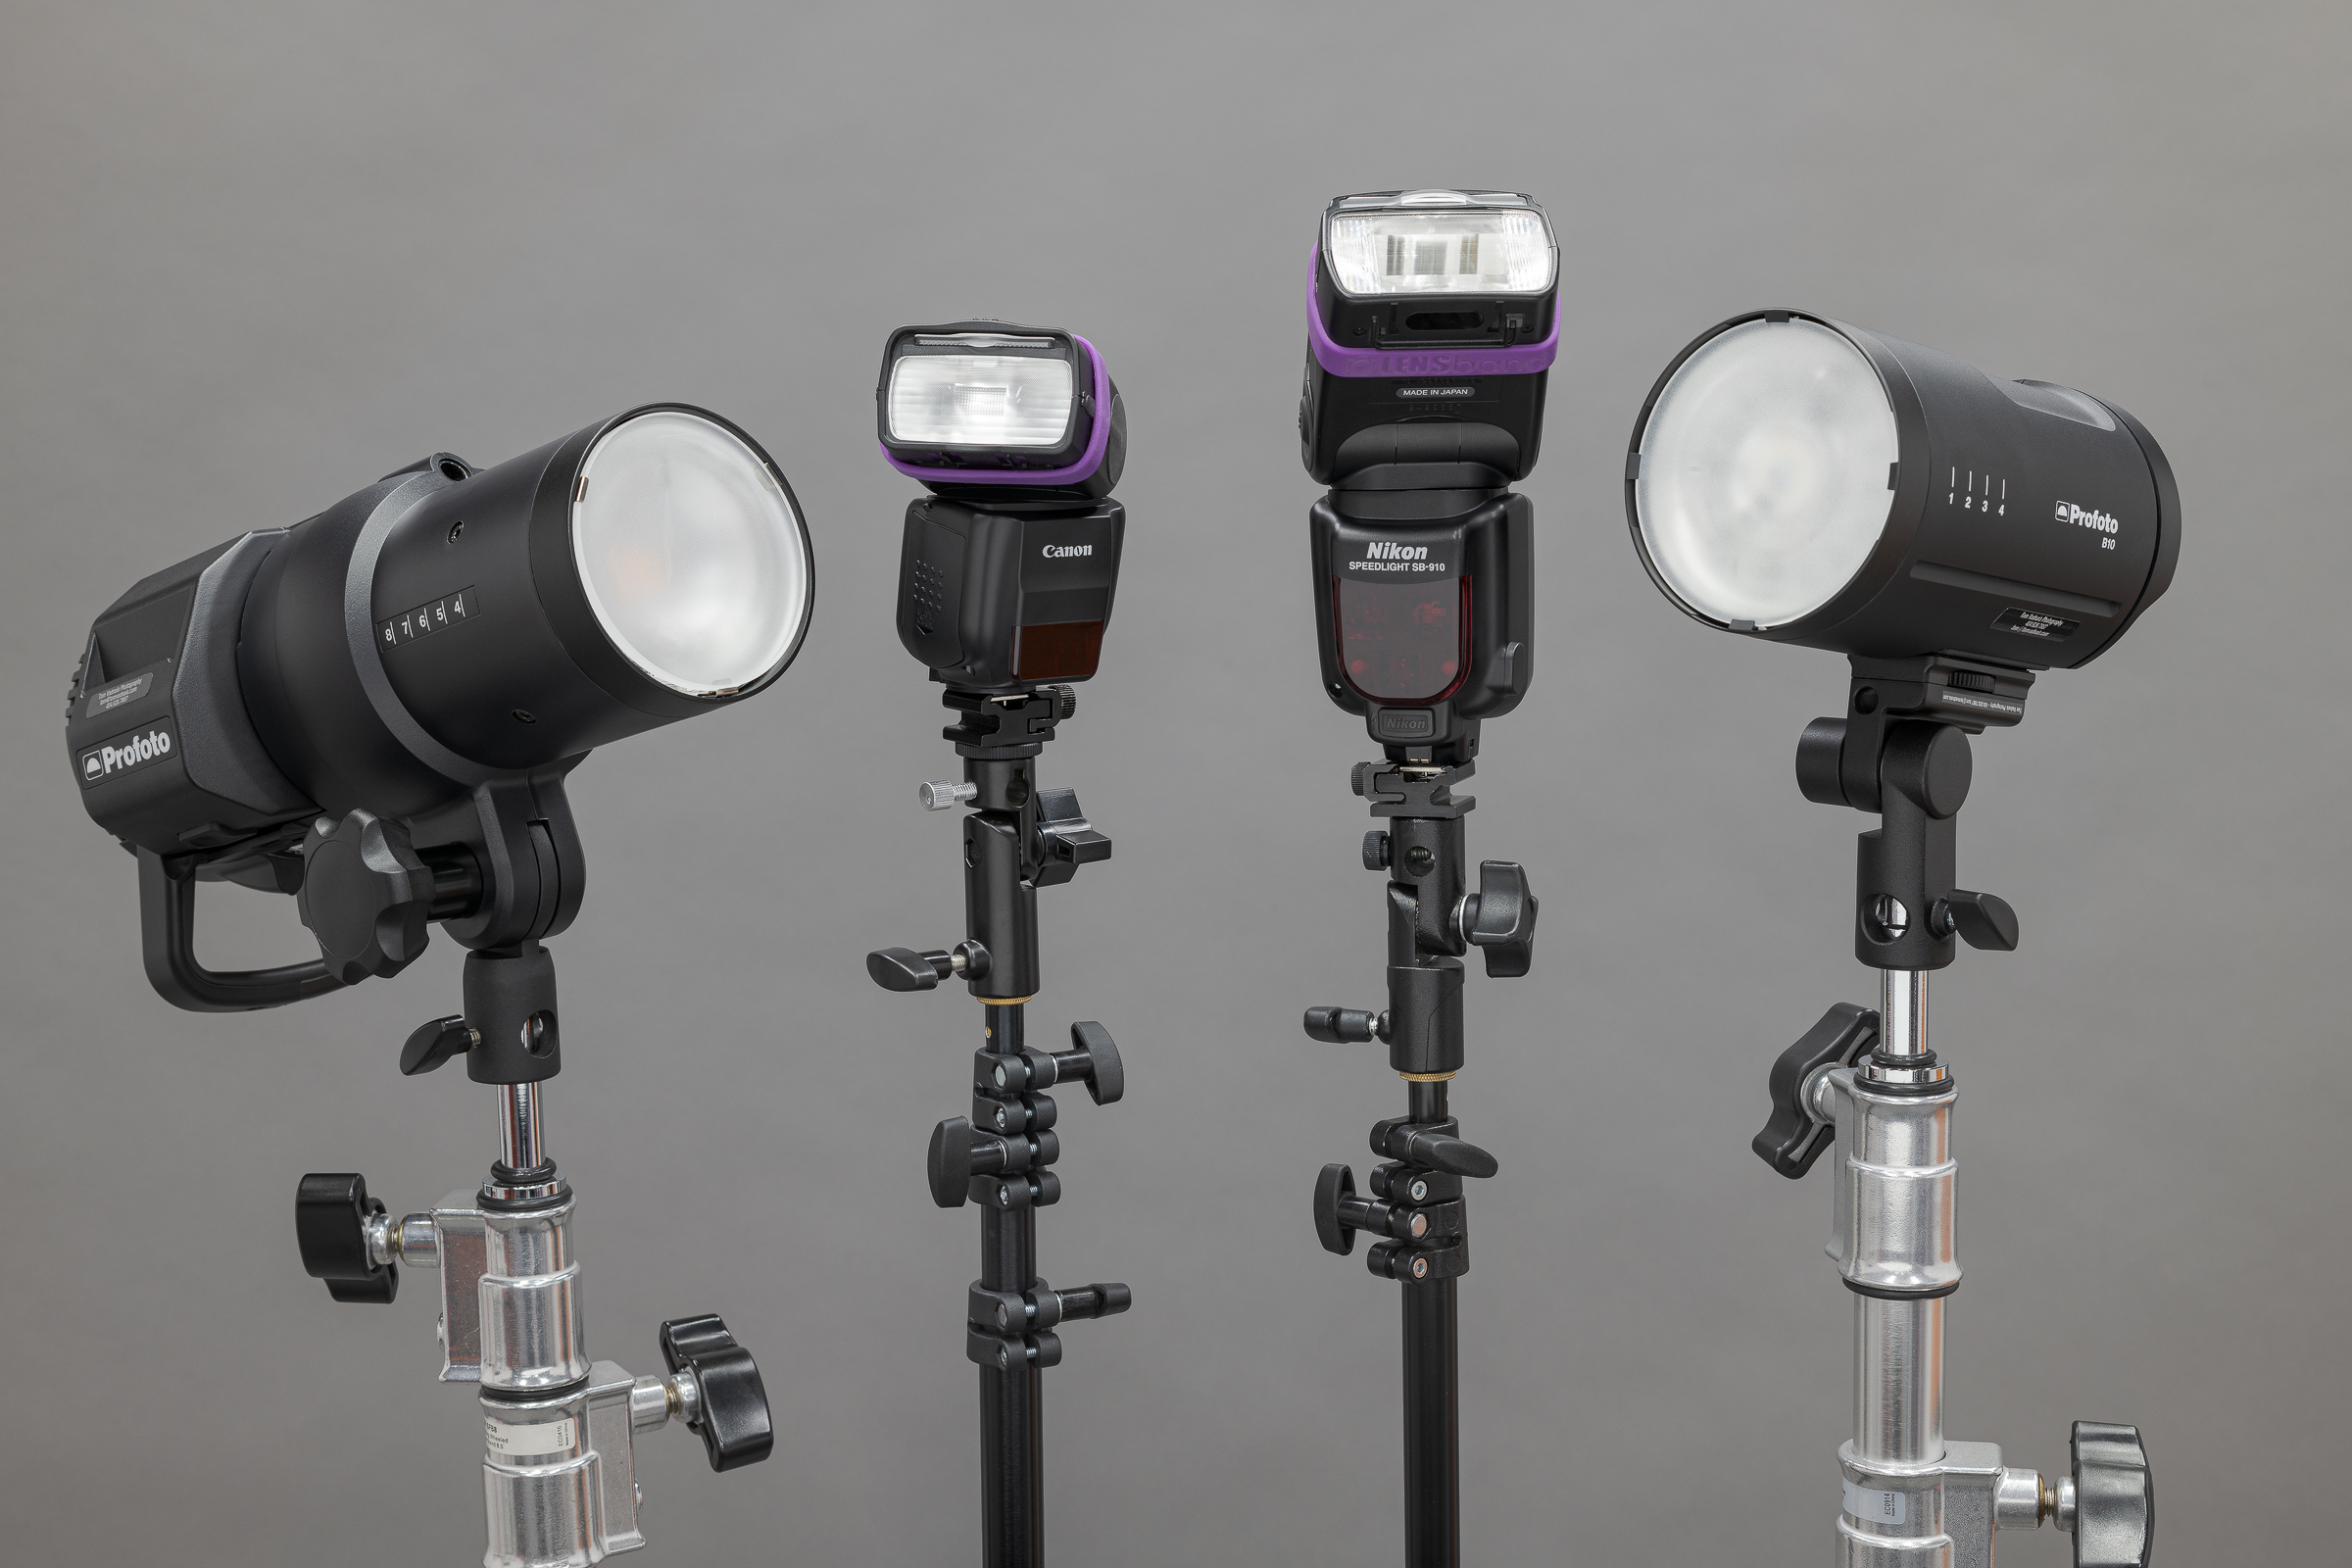
(L to R) Profoto B1x, Canon 430EX III-RT, Nikon SB-910, and Profoto B10. (Made using Nikon D850 with ZEISS Milvus 50 mm macro lens.)

And here they are from the rear. Note that the speedlight flashes can be mounted in a camera hot shoe or on a light stand. (Click on image to enlarge, then click on back arrow to return to this post.)
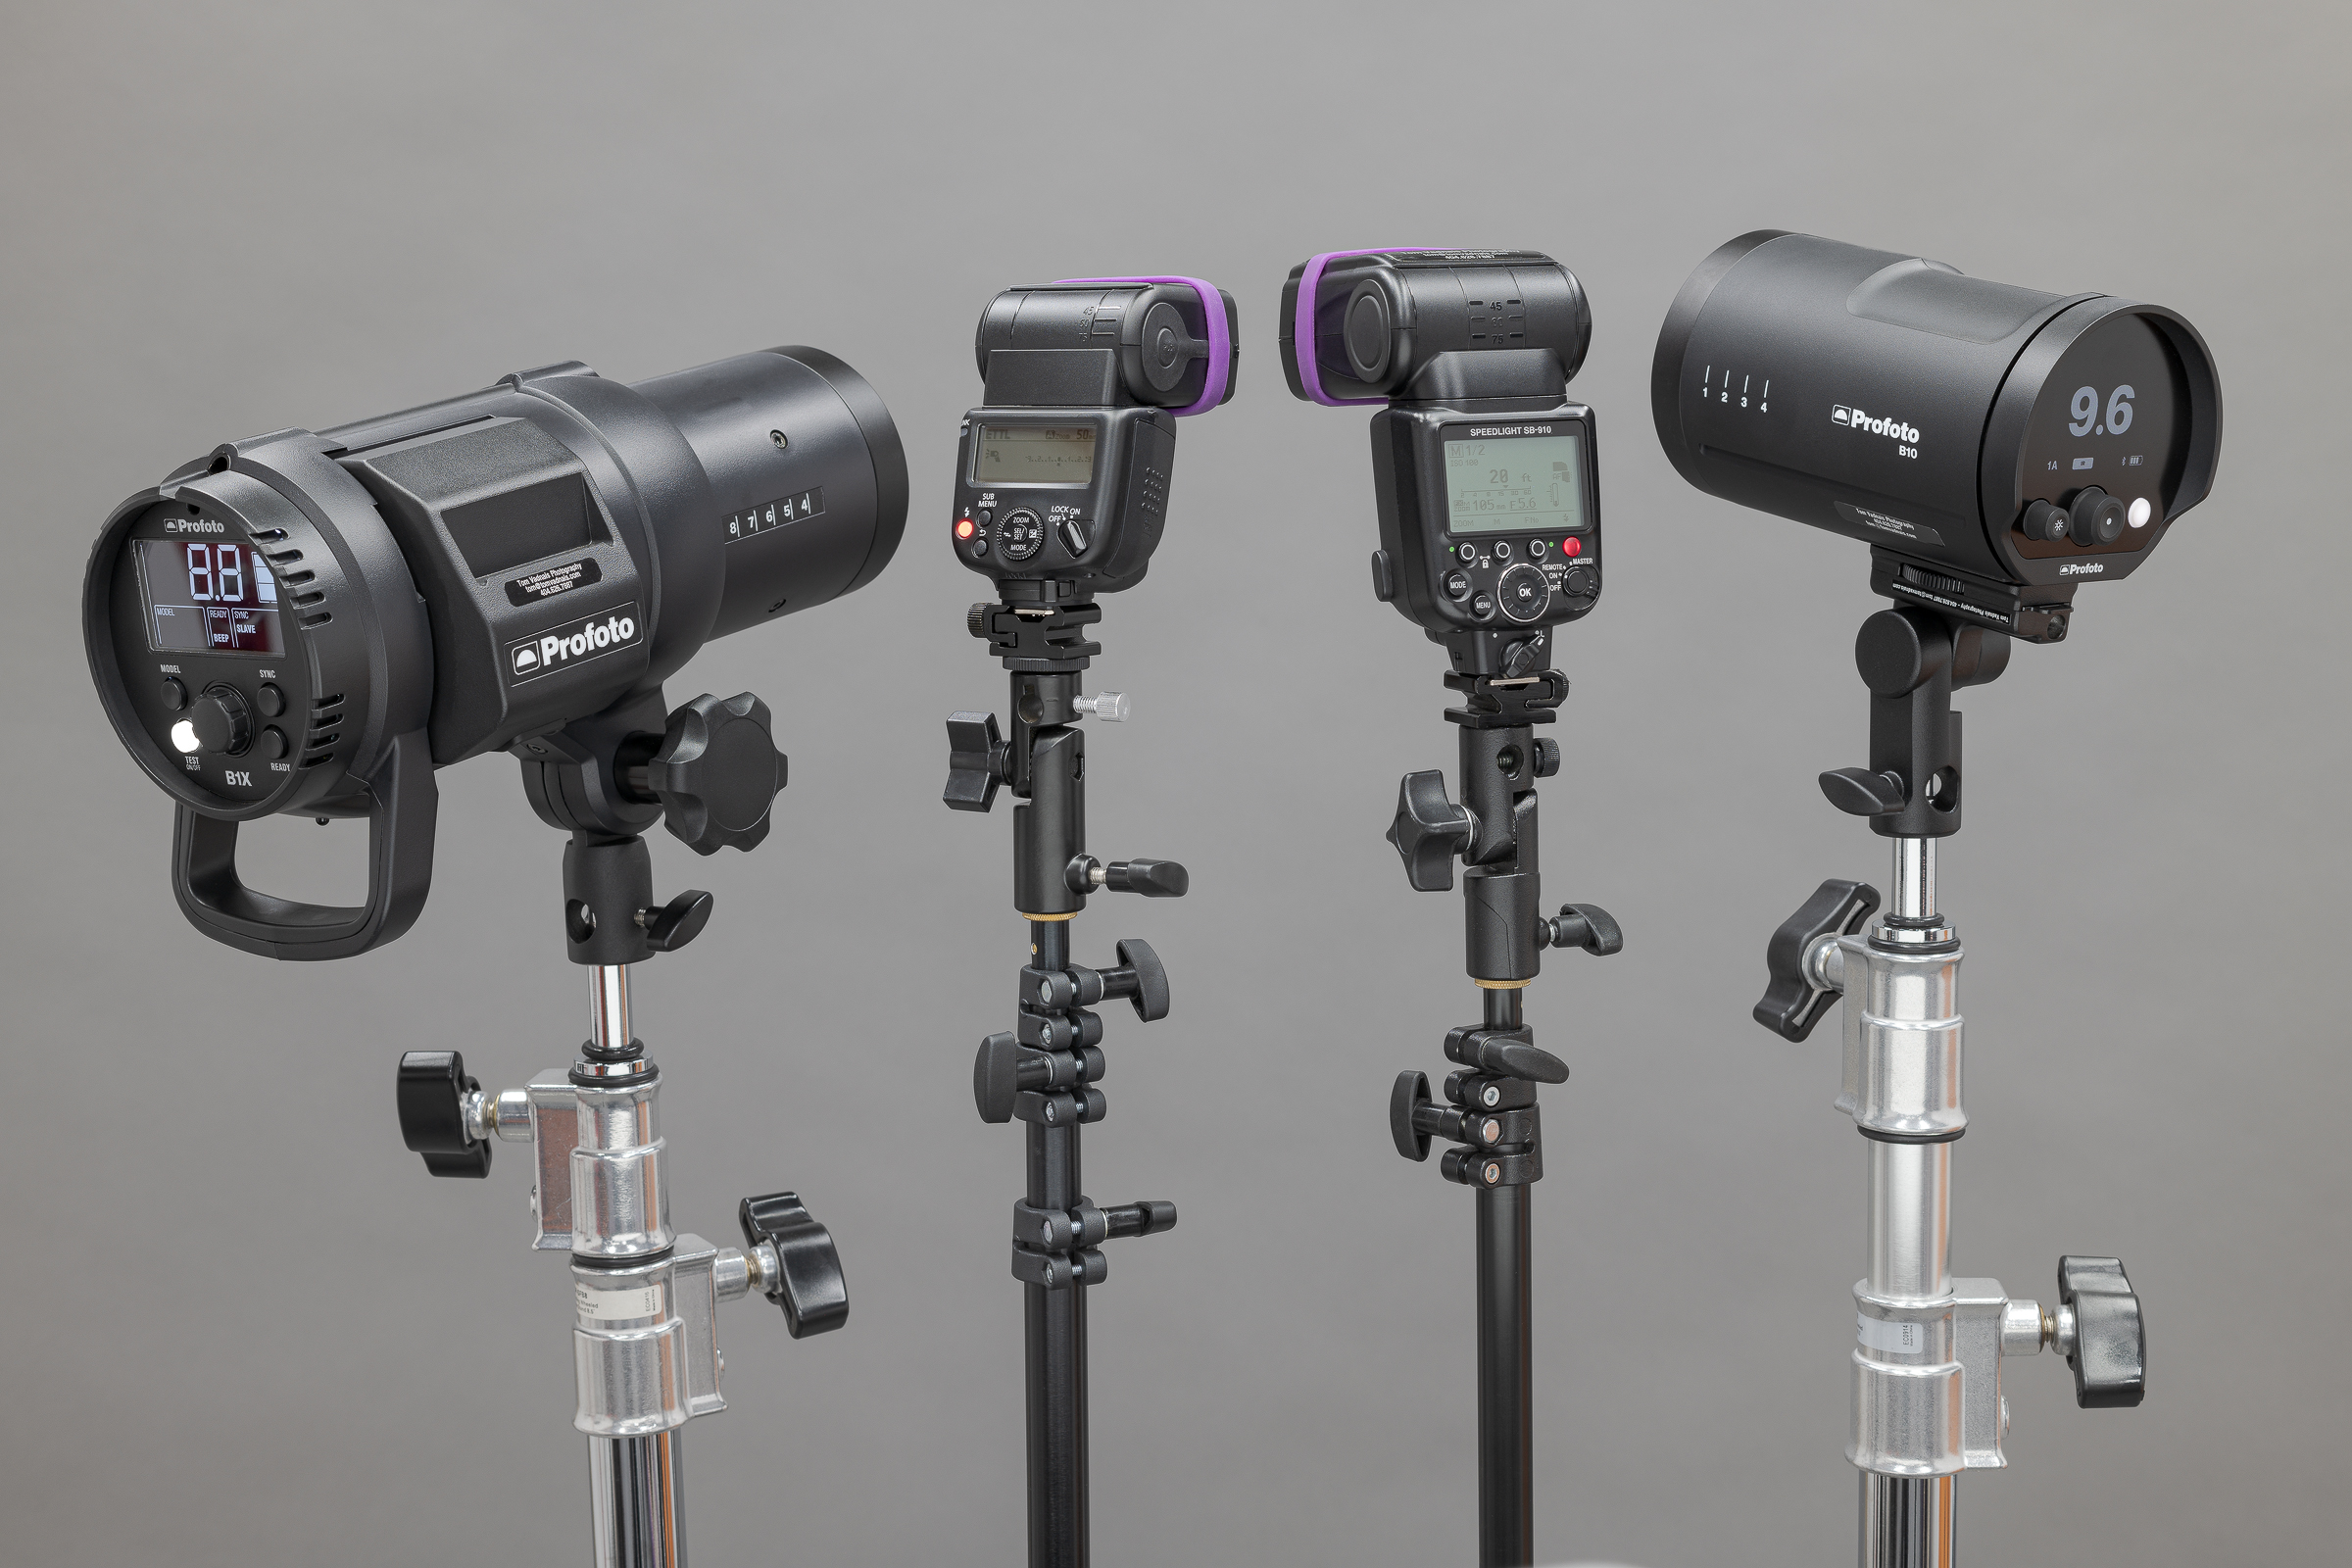
(L to R) Profoto B1x, Canon 430EX III-RT, Nikon SB-910, and Profoto B10. (Made using Nikon D850 with ZEISS Milvus 50 mm macro lens.)

In the photograph of the lighting setup in the previous post, there was a Nikon SB-910 Speedlight in the camera hot shoe and two Profoto B10 strobes on Manfrotto 5002-M travel light stands. These stands are lightweight and fold up small, yet are quite sturdy. (Click on image to enlarge, then click on back arrow to return to this post.)
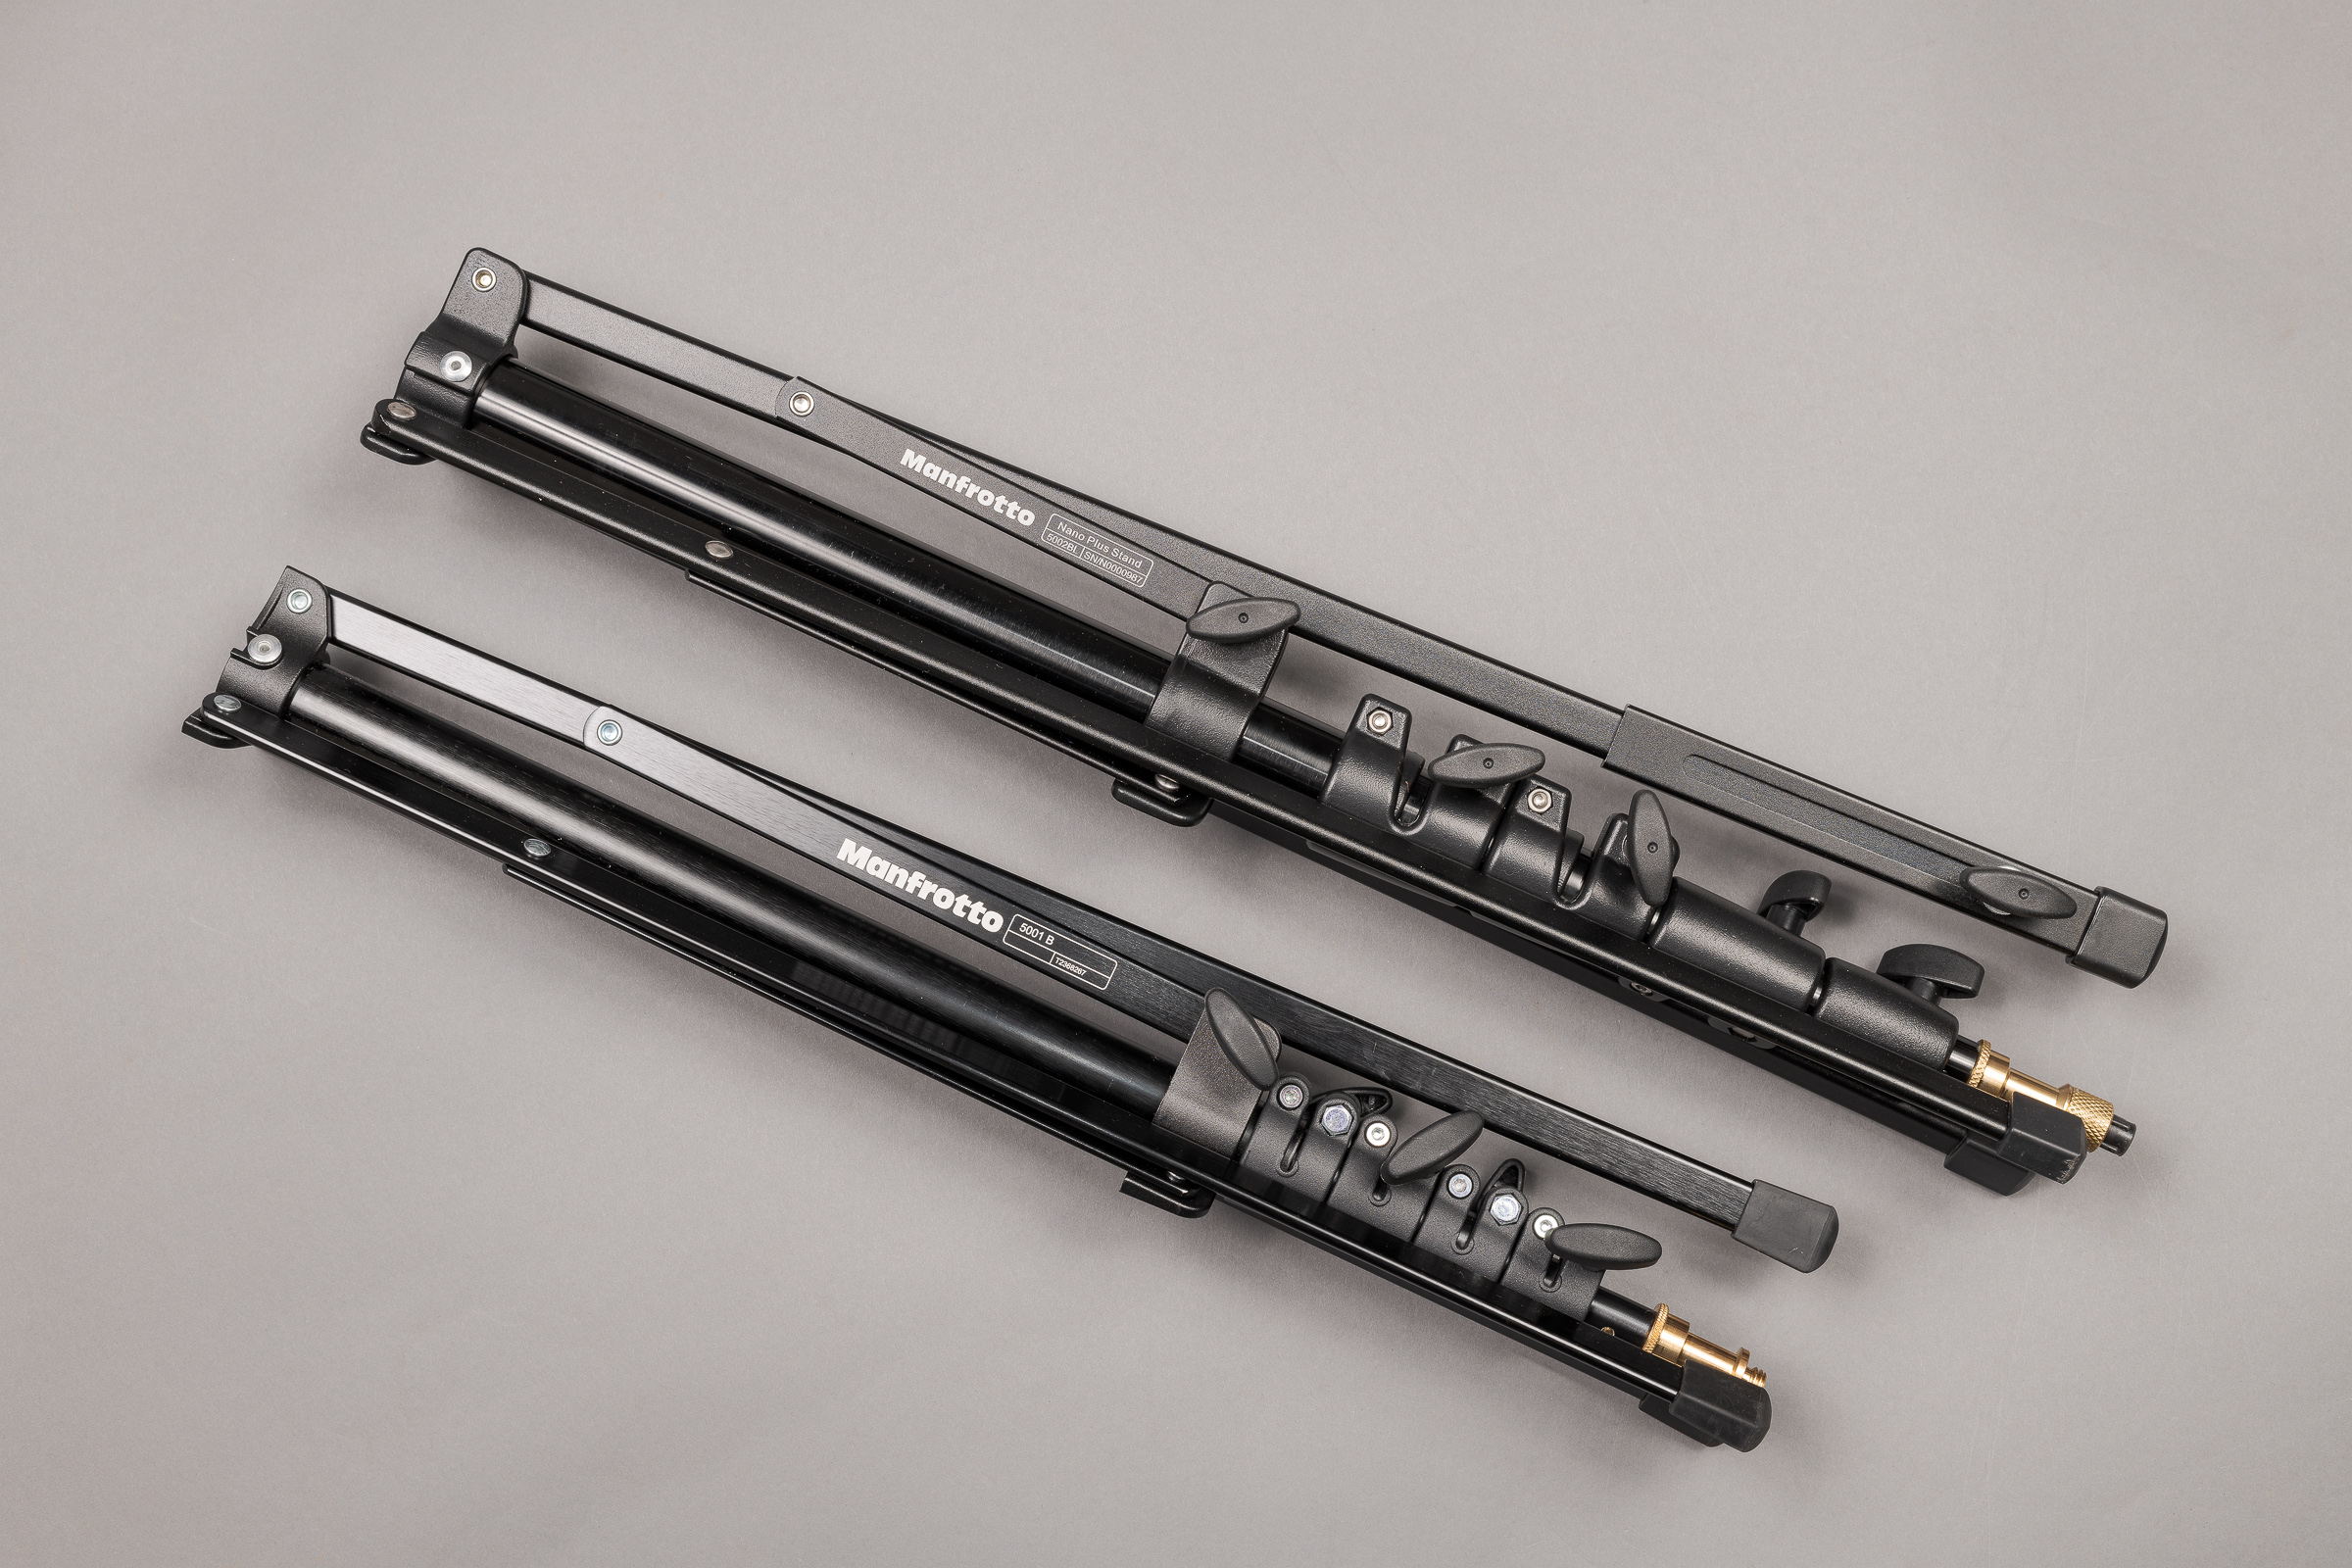
Manfrotto travel light stands 5002-M (top) and 5001 (bottom). (Made using Nikon D850 with ZEISS Milvus 50 mm macro lens. Lit by two Profoto B1x strobes firing into silver umbrellas with diffusers.)

This final image shows a Profoto B10 mounted on a Manfrotto 5001, which is slightly smaller and slightly less sturdy (though still sufficient) than a 5002-M. (Click on image to enlarge, then click on back arrow to return to this post.)
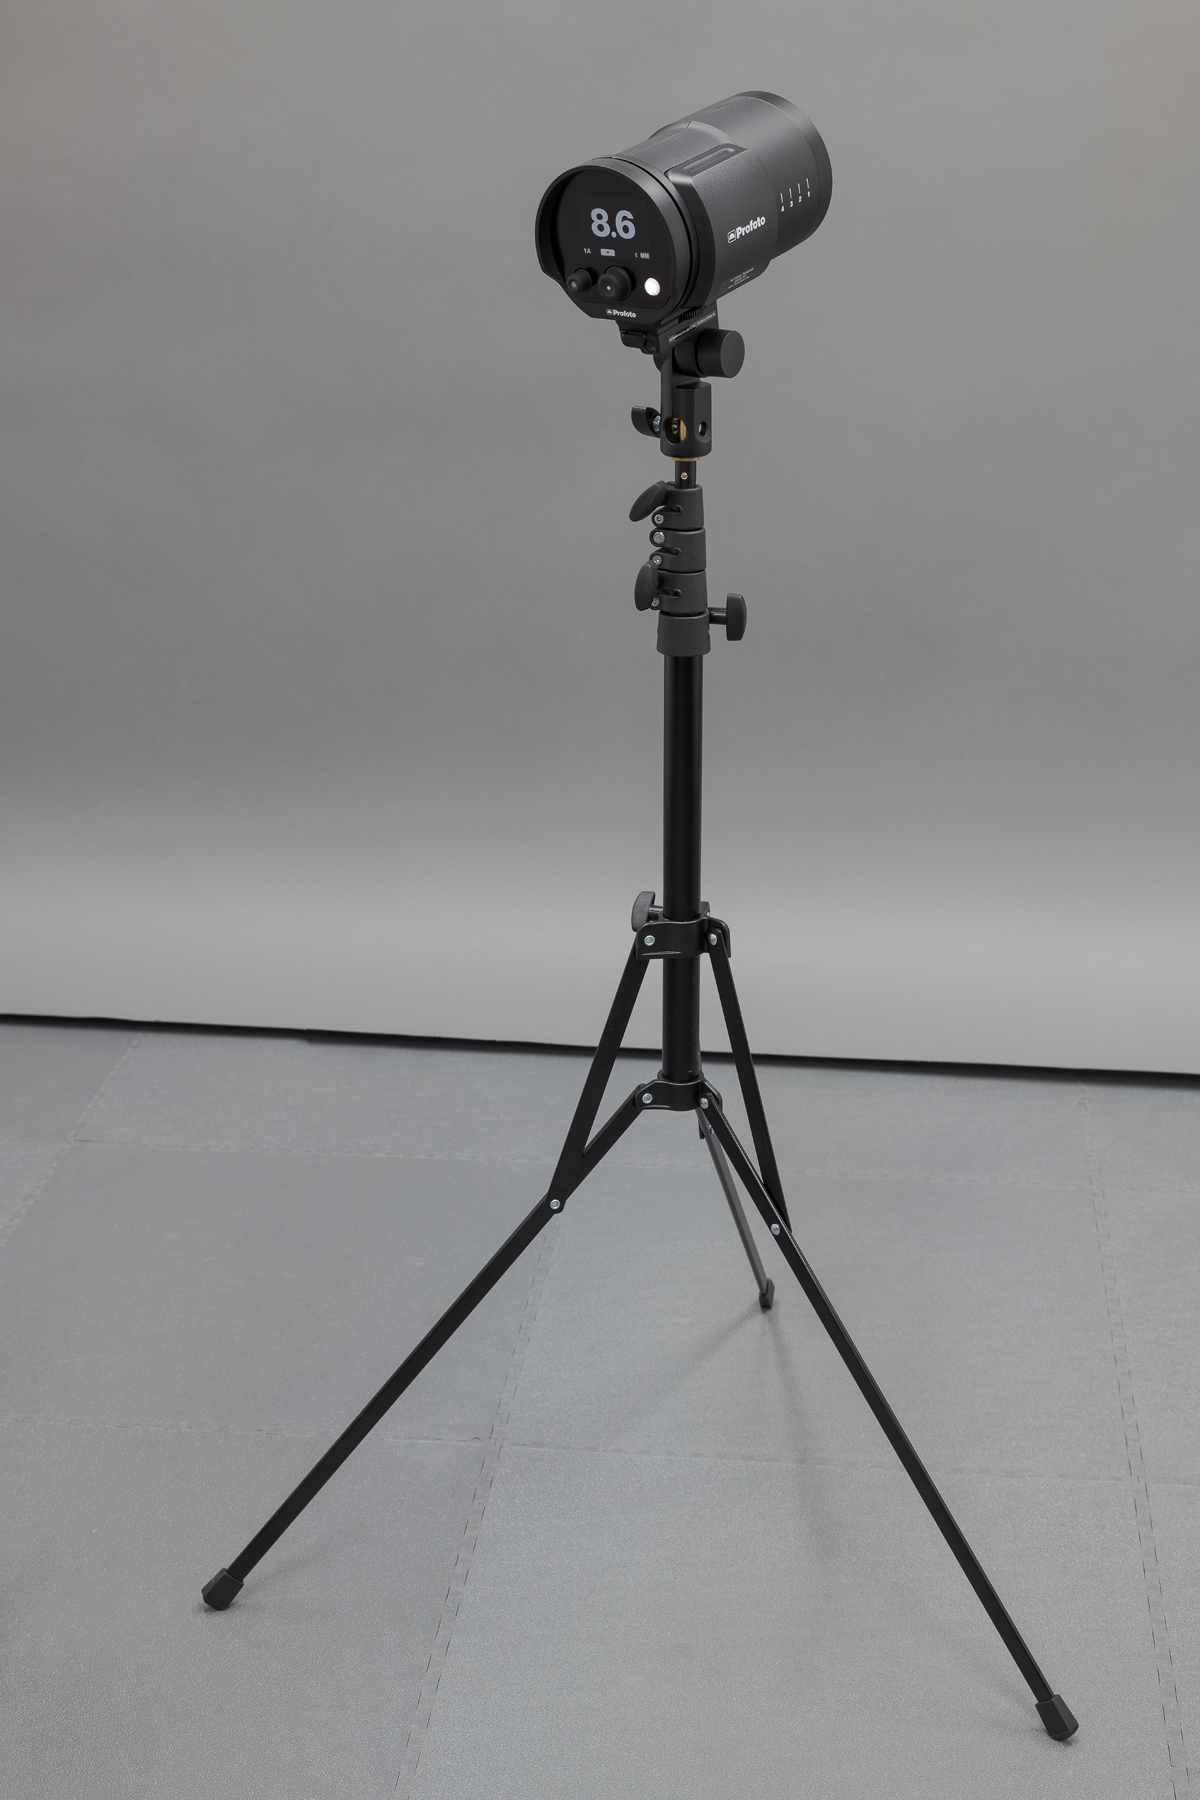
Profoto B10 on Manfrotto 5001 travel light stand. (Made using Nikon D850 with ZEISS Milvus 50 mm macro lens. Lit with two Profoto B1x strobes firing into silver umbrellas.)

In the previous post, the two B10’s were fired through their infrared slave sensors when they sensed light from the on-camera Nikon flash. All three flashes and the camera’s exposure settings were all manually set.

Why use strobes when you can use speedlights? Power is the answer. Mid-to-high end speedlights typically have power outputs between 60 and 150 Watt-seconds (Ws), while the Profoto B10 and B1x are 250 and 500 Ws, respectively. This means you’d need two-to-eight speedlights to equal one Profoto strobe. For example, you’d need sixteen 60 Ws mid-range flashes to equal the power output of the two 500 Ws strobes I use for tire photos in my Studio Lab. Not only would those be unwieldy to set up, but think of how many AA batteries you’d need!

Why is flash power important? Every one stop increase in exposure requires doubling of the light power. For forensic or testing photographs, you want to minimize noise by using the lowest ISO you can, and you want a deep depth of field by using a smaller (higher number) aperture. Both a lower ISO and a smaller aperture result in less light reaching the sensor. Consequently, the flash has to be powerful enough to ensure a proper exposure without raising ISO or opening up your aperture.

Future posts will go deeper into exposure both with and without flash. We will be using this equipment throughout.
Making Photographs in Low Light

Most accident reconstructionists and product liability engineers have had to photograph a vehicle, vehicle component, or other product in a dark area such as a warehouse, storage facility, lab, or even an office. Conditions can be even worse for building or fire investigators, especially if the power is out. By definition, what is missing in any of these situations is light!

But despite the lack of light, you might only get this one chance to inspect the evidence. You’ve got to come back with well-exposed, well-lit professional photographs—photos that accurately portray what you saw, represent you well to your clients, and reflect the quality standards of your work, especially during depositions and trials.

Unless you are trying to capture a low light scene as it is (which is a completely different discussion), you have several options to make a photo in low light.

One is light painting by moving a flashlight over your subject during a long exposure. This is tedious and time-consuming, especially if you have to make more than one or two images. It is also hit-and-miss, even if you are experienced with it. Of course you need a sturdy tripod for every shot, since the exposures are long. These long exposures also risk generating noise. So light painting might be good in an emergency, and it’s sometimes necessary for illuminating  vehicles at nighttime accident scenes.

It can work, as shown below, but it’s not recommended for making inspection photographs. This photograph of a rental car was made at dusk with no lights on in the garage. The only light came from when I walked around the vehicle constantly moving a flashlight, painting both the car and the garage bay. Note how the long (74 second) exposure made the outdoors look brighter than it was. (Click on image to enlarge, then click back arrow to return to this post.)

Light painting at f/11 and ISO 64 with shutter speed of 74 seconds. (Made using Nikon D850 with ZEISS Milvus 25 mm f/1.4 lens on RRS TVP-45 tripod.)

Another option is use high ISO sensitivities. On all digital cameras, the higher the ISO, the more noise and less dynamic range there is. With newer cameras, neither the increased noise nor the dynamic range loss are obtrusive until the middle or higher ISO values (say ISO 800 or even 1600). Here’s an example made at ISO 200,000 and cropped from the full frame. (Click on image to enlarge, then click back arrow to return to this post.)

Crop of an image made at f/16, 1/60 sec, ISO 200,000 showing noise. (Made using Nikon D850 with ZEISS Milvus 50 mm macro lens, no flash.)

As a third option, continuous light sources are better than nothing, but none are bright enough to avoid having to use a long shutter speed and/or to raise your ISO. Most fluorescent lights flicker and have an undesirable color cast. Halogen shop lights get hot and have a very warm color cast. Quality LED lights have good color control, but still aren’t bright enough. Even the larger LED panels made for photo studios don’t put out enough light, plus the brighter ones are big and unwieldy to transport and setup. Again, none of them put out enough light to allow a low ISO and a shorter shutter speed.

Flash is your best option, by far. But the tiny built-in flash on a point-and-shoot, the popup flash on a DSLR or mirrorless, or even a professional flash in your camera’s hot shoe won’t always be sufficient. You’ll need additional light.

There is a learning curve to using flash, since you can’t see the effect of the light until after you’ve made the photograph. But as long as you think about where and about how much light you need, it’s something you’ll pick up with a little practice.

Since I shoot Nikon, I always carry three Nikon Speedlights (flashes) with me. (You don’t need flashes made by your camera manufacturer, but those will always work with your camera, and are usually quite robust.) One flash goes in the camera’s hot shoe, and I put the other two where needed. I usually carry two small, lightweight, travel light stands with me so I can place the lights where they will do the most good, but I will often just prop them up on something nearby. (Within the next couple days, I will write a post about the gear I mention in this post.)

Since I do a lot of tire analysis, I often need even more light than the Speedlights can put out. Besides, Speedlights can take a long time to recharge their capacitors between shots.

Especially for tires, I use Profoto B10 battery-powered studio flashes on the road and battery-powered Profoto B1x studio flashes in my Studio Lab. Again, more on these in a post later this week.

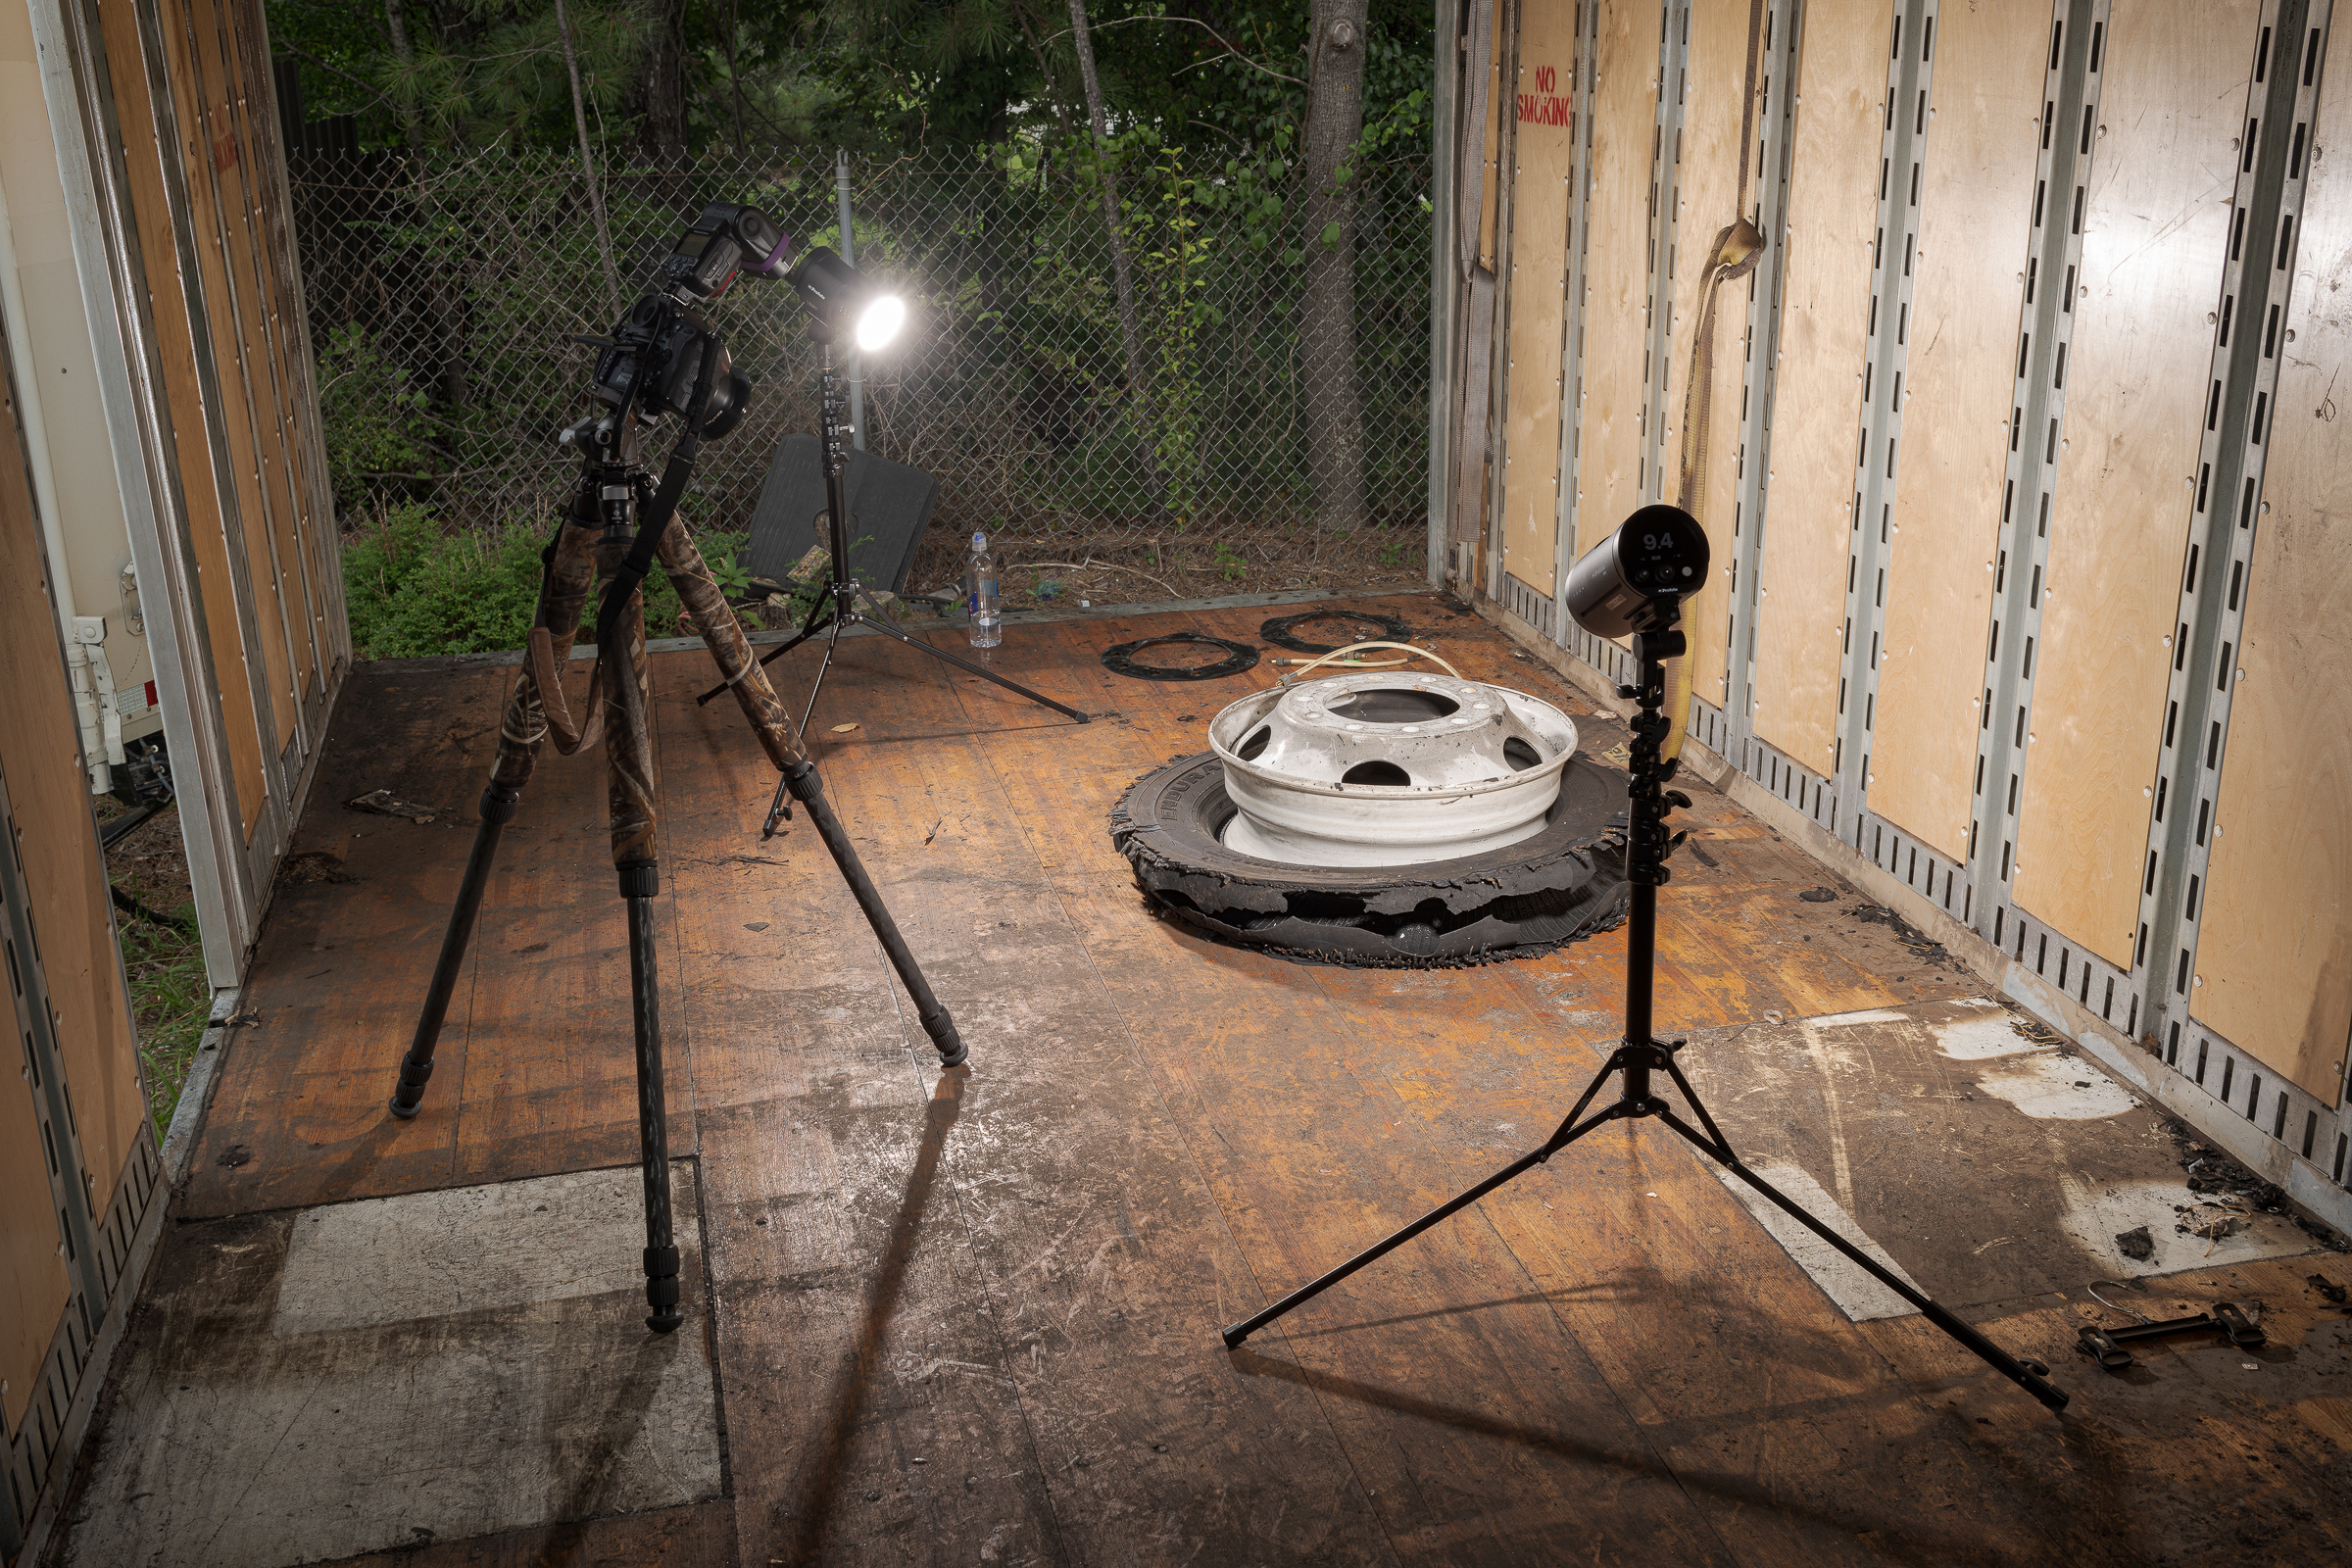
Recently, I had to inspect tires and wheels inside a semi-trailer. Even though my inspection was close to noon on a sunny day, and the trailer had a couple side doors I could open, I knew it would be pretty dark inside the trailer for photography. I set up my two Profoto B10 flashes on my travel light stands. They were fired by a Nikon SB-910 flash in my camera hot shoe. Exposure and flash powers were all set manually. (Click on image to enlarge, then click back arrow to return to this post.)

Tire and wheel inside semi-trailer. (Made using Nikon D850 with ZEISS Milvus 35 mm lens and on-camera Nikon SB-910 that also fired two Profoto B10s.)

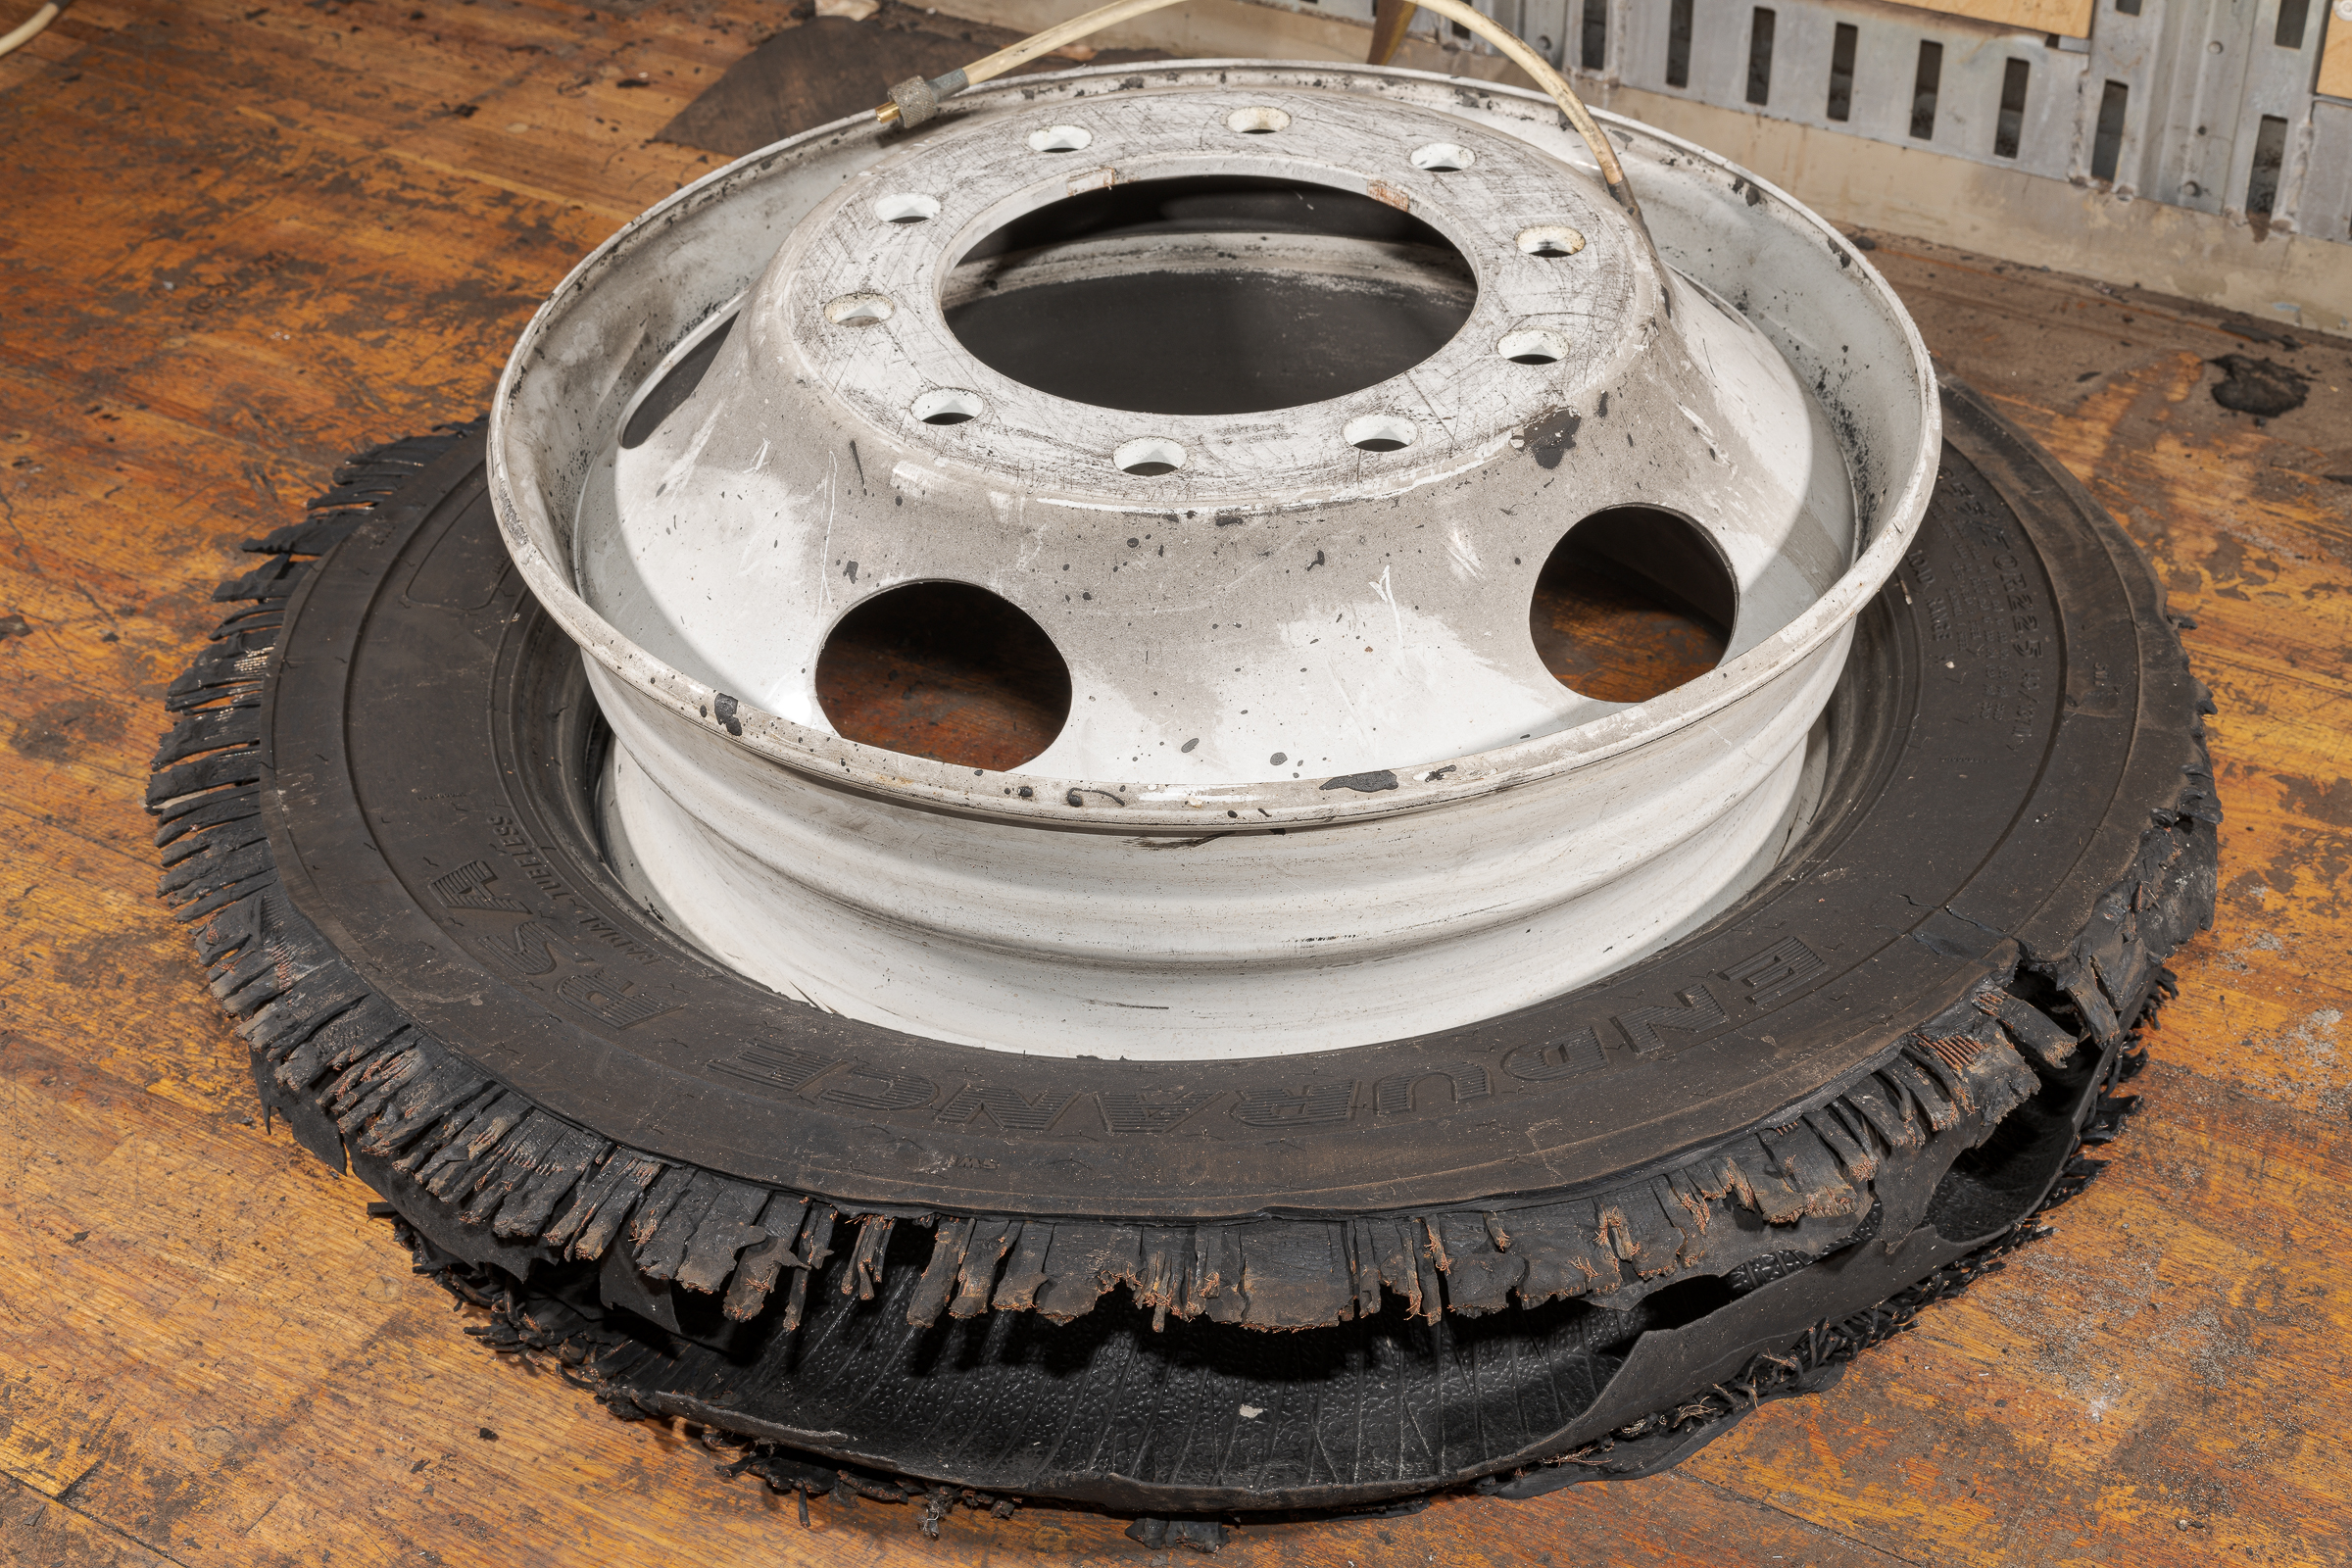
Here is a resulting image from that setup. (Click on image to enlarge, then click back arrow to return to this post.)

Tire and wheel inside semi-trailer. (Made using Nikon D850 with ZEISS Milvus 50 mm macro lens and on-camera Nikon SB-910 that also fired two Profoto B10s.)

A single flash on the camera—even Nikon’s most powerful Speedlight—could never have provided enough light to evenly illuminate this tire and wheel. The Speedlight and battery-powered strobes not only provided nice even lighting, but allowed me to shoot at ISO 64, which is the lowest on a Nikon D850. This minimized the noise and maximized the dynamic range to show the most detail possible.

Using Off-Camera Flash to Bring Out Details

A couple posts ago, I showed examples of bringing out textures in a sponge by creating shadows using an off-camera flash. Here is an example with the type of photography subject we are more likely to encounter.

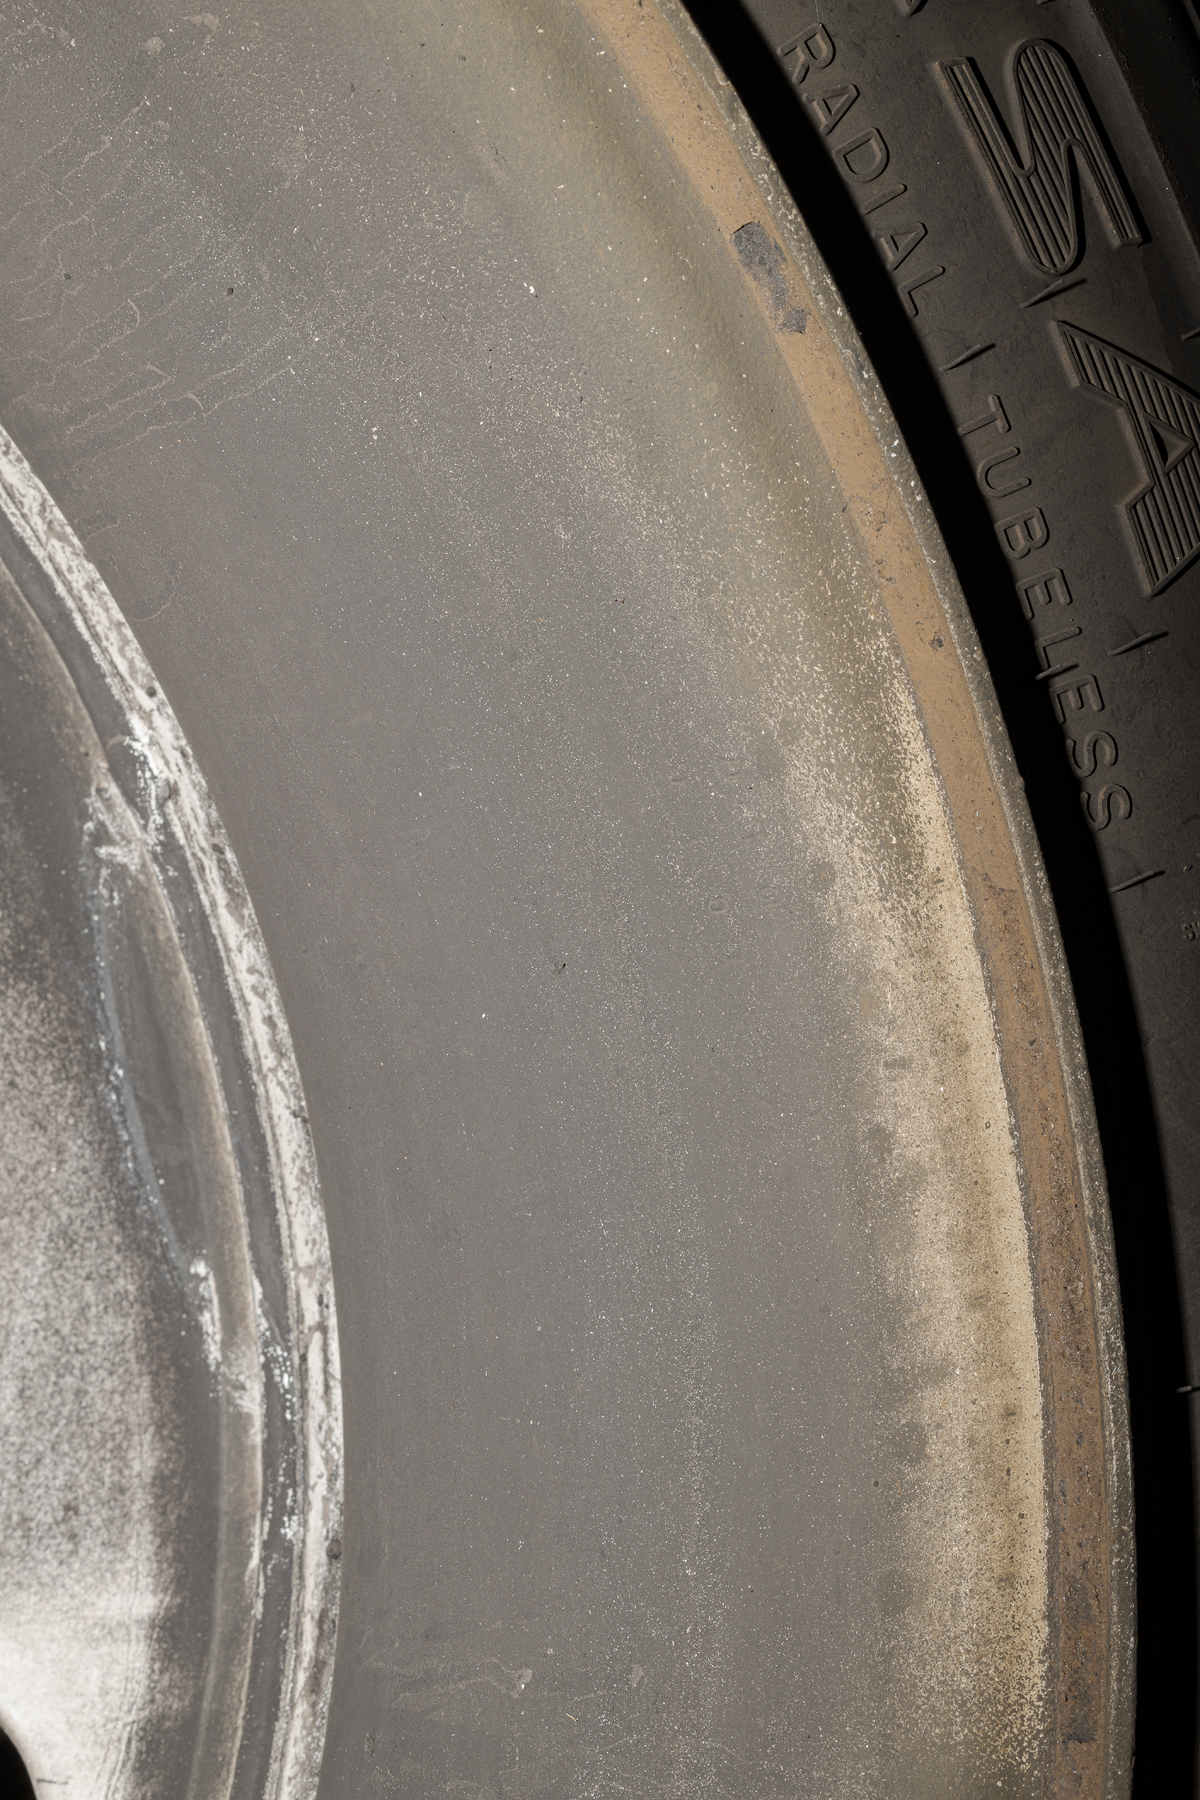
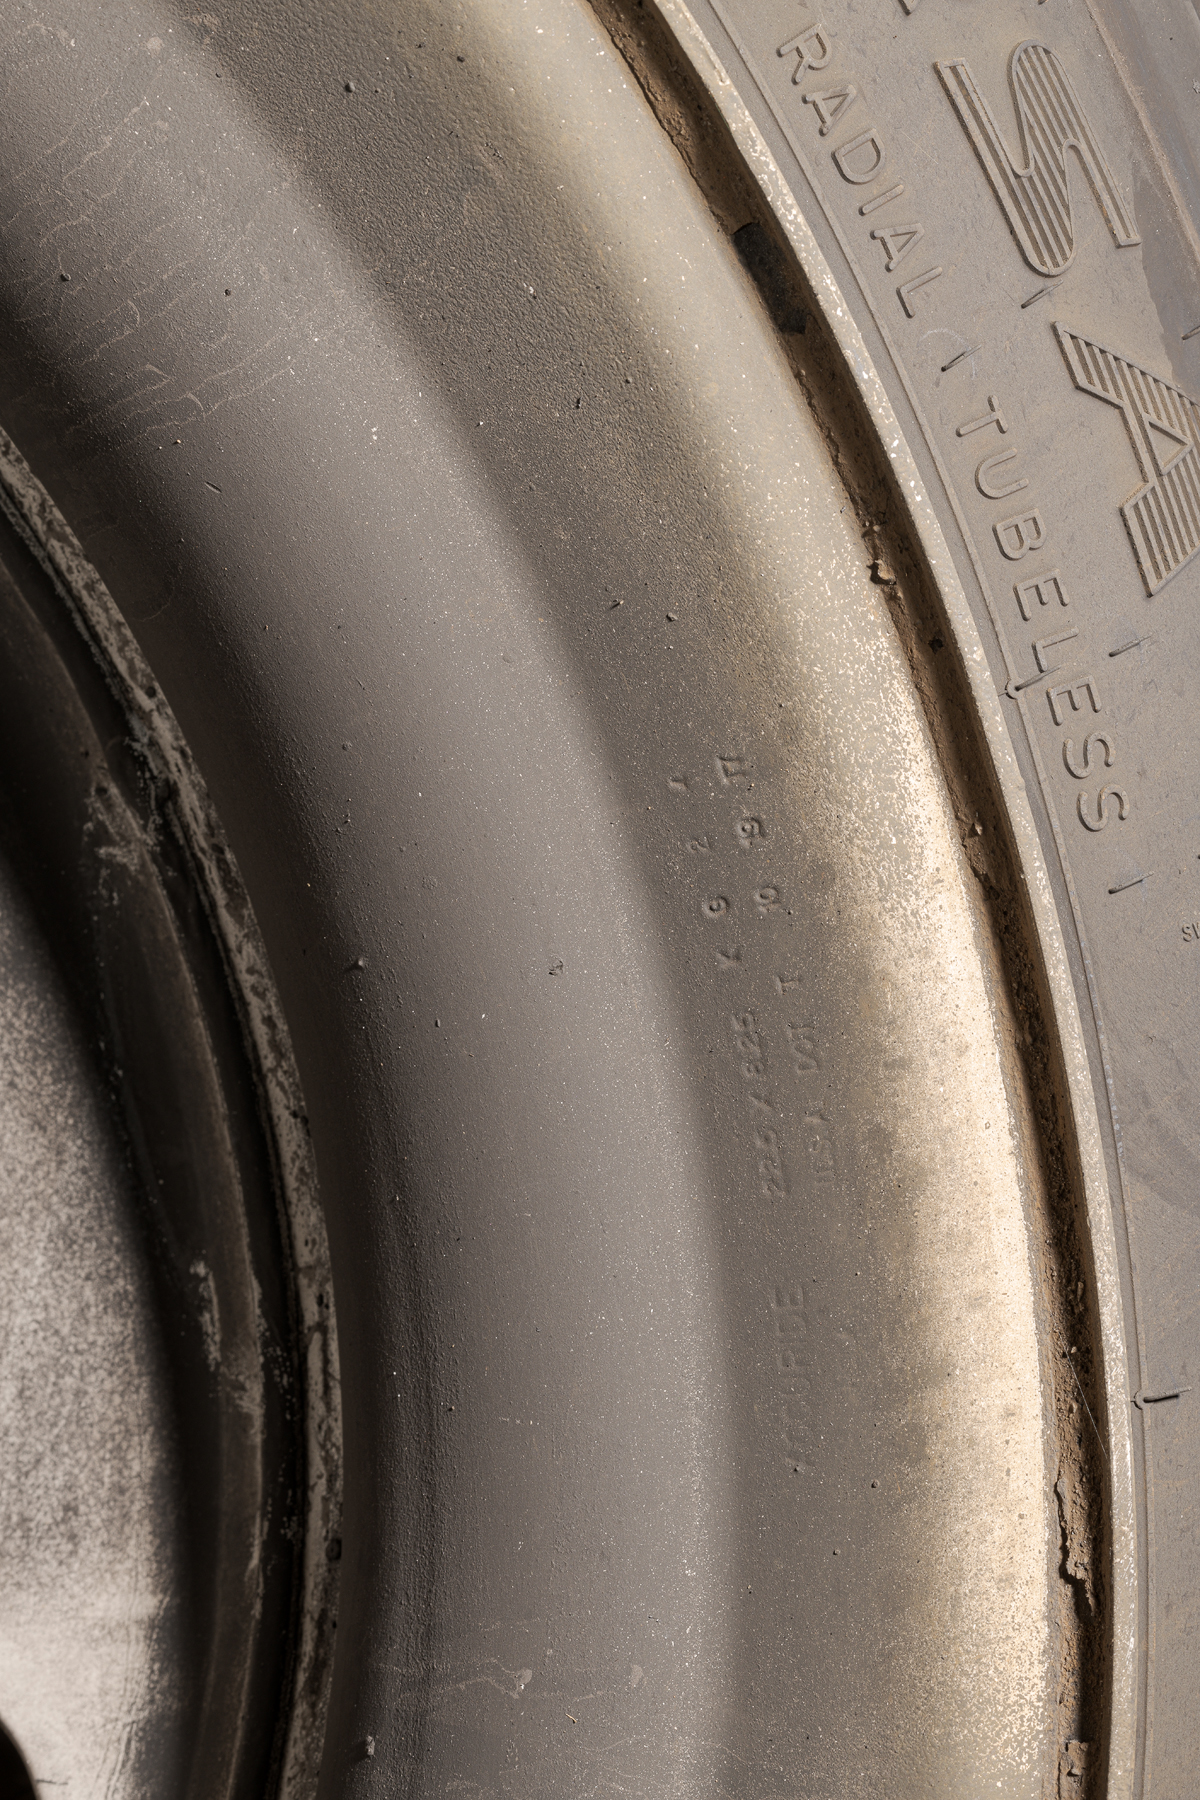
Vehicle wheels and other components are often stamped with model and serial numbers, along with with dates of manufacture. If you use a built-in flash or a flash mounted in the camera’s hot shoe, those stampings will often be invisible in your photograph. (Click on image to enlarge, then click on back arrow to return to this post.)

Stamping in wheel flange with flash in camera hot shoe. (Made using Nikon D850 with ZEISS Milvus 50 mm macro lens and Nikon SB-910 flash.)

This photo is properly exposed, but is useless in documenting the wheel. The key is to get the light at an oblique angle so it skims across the surface to create both light and shadow, just like we did with the sponge. (Click on image to enlarge, then click on back arrow to return to this post.)

Stamping in wheel flange with flash off camera almost perpendicular to the right. (Made using Nikon D850 with ZEISS Milvus 50 mm macro lens and Profoto B10 strobe to camera right.)

For this second photograph, I used a Profoto B10 strobe to the camera’s right, almost perpendicular to the stamping. I fired that strobe with the flash in my camera hot shoe, but I made sure the hot shoe flash did not affect the exposure. I used a B10, but could just as easily used another Nikon flash to get the exact same effect. I had already been using the B10 for other shots, so I just used that. In fact, it would have been even easier with second Nikon flash, since I could set the hot shoe flash to Master with no light output while the other flash would be set to Remote with either manual or TTL flash.

This second image is also properly exposed, but now the direction of the light makes this photo useful. Now you can see it is a 22.5 x 8.25 Accuride wheel manufactured 10/19/17.

The point is that you need to consider both the amount and direction of light to properly illuminate a subject. Light illuminates your subject, but the shadows give it definition. Shadows are essential in a 2-D depiction of a 3-D subject, especially when you need to show textures or depth.

Using a Polarizer on a Large RV

I posted an example earlier illustrating the effects of using a polarizer and a fill flash on a car in a junk yard. In this post, you’ll see the effect of a polarizer on a large, slab-sided vehicle like a trailer or an RV.

Many people believe that polarizers are only effective on sunny days, and when the sun is at a 90° to the camera lens. But as these examples will show, a polarizer is just as effective in multiple directions on a heavy overcast day.

These images will also show that, just as on sunny days, the polarizer eliminated different amounts of reflected glare depending on the angle of the camera to the RV. As you will see when you look through and rotate a polarizer, the glare effectively moves around the scene. It’s up to you to decide what is the most important part of your image, and to rotate the polarizer until you eliminate the glare or get it just where you want it.

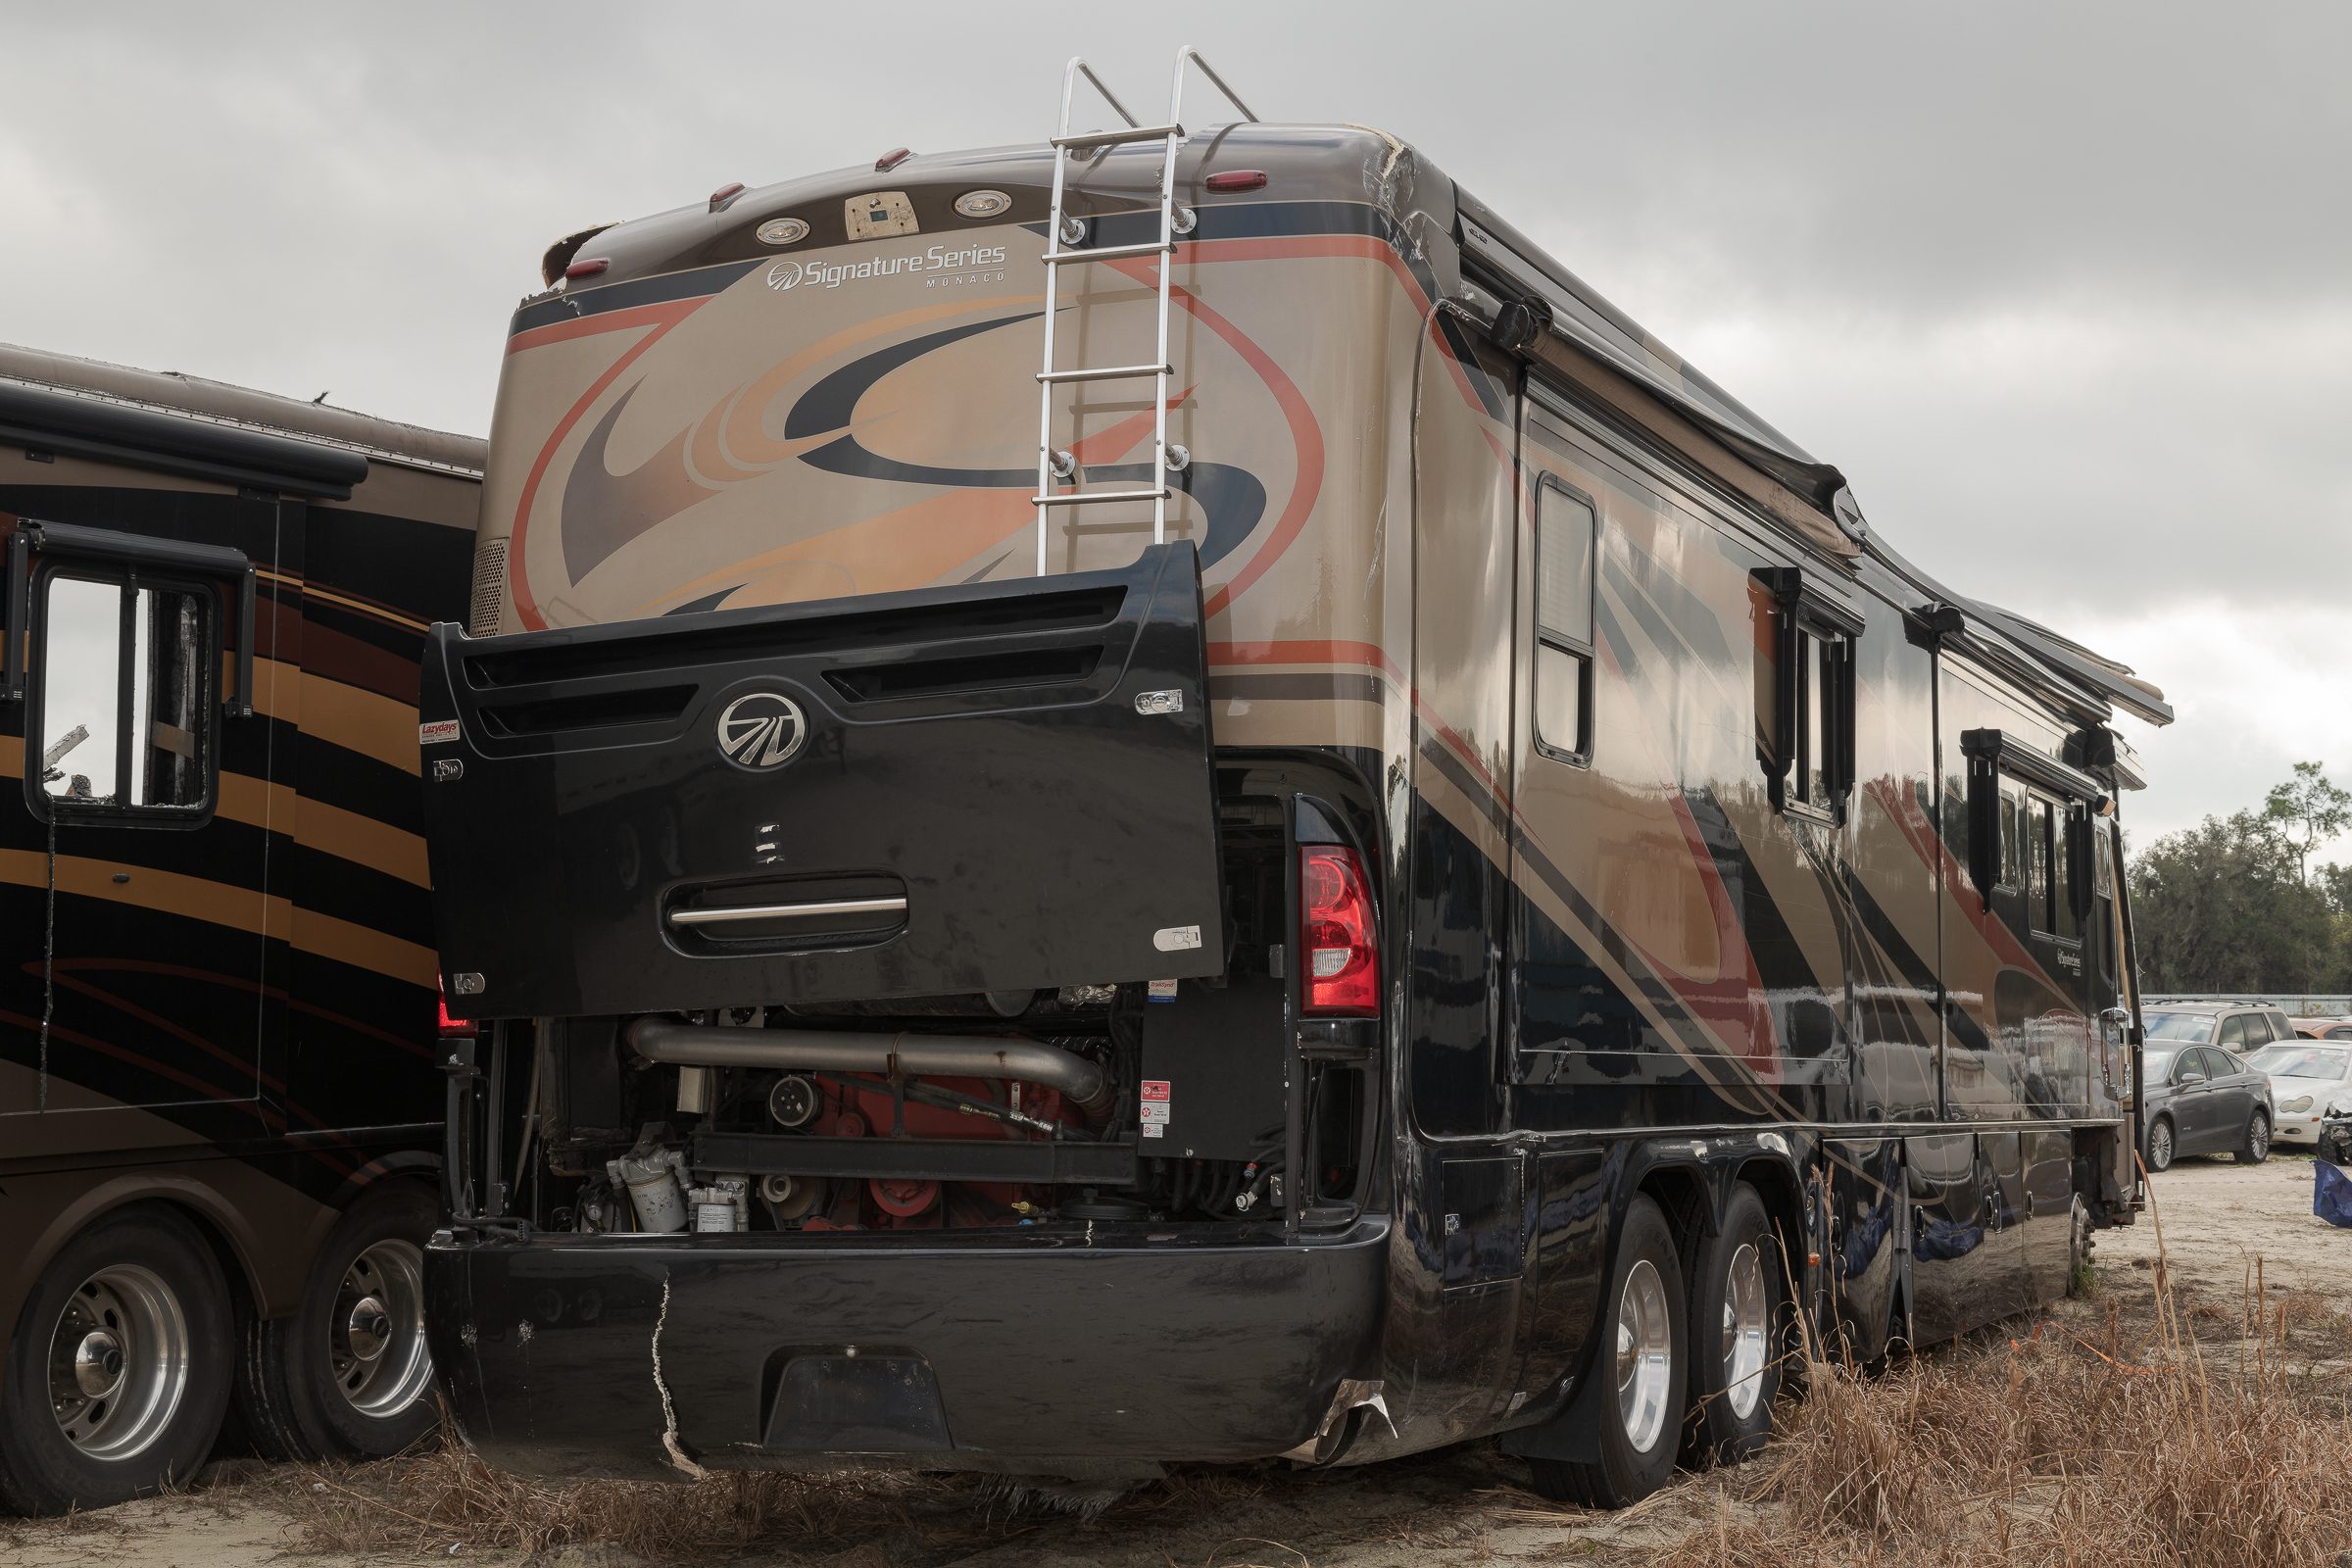
I inspected this RV in a salvage yard in Florida on a very cloudy day. [Click on the image to enlarge it, then click on the back arrow to return to the post.]

RV with polarizer minimized. (Nikon D850 with ZEISS Milvus 50 mm f/2 macro lens and Nikon SB-910 fill flash.)

As with all of my vehicle photos, I used both a polarizer and a fill flash. In this image, you can see the thick overcast sky and the bright glare reflected on the side of the RV. I had the polarizer on my lens, but for illustration, I rotated it to minimize its effect. That’s what the RV looked like to the naked eye.

Keeping the camera and fill flash settings the same, I rotated the polarizer while looking through the viewfinder until I reduced the glare as I wanted. [Click on the image to enlarge it, then click on the back arrow to return to the post.]

RV with polarizer optimized. (Nikon D850 with ZEISS Milvus 50 mm f/2 macro lens and Nikon SB-910 fill flash.)

As you can see, there was very little glare left along the side of the RV, which allowed its true colors to show through.

Moving around toward the 3/4 right rear position, I made another pair of photographs to illustrate the effect from a different angle. First the polarizer is minimized. Again, notice the reflections and the glare. [Click on the image to enlarge it, then click on the back arrow to return to the post.]

RV with polarizer minimized. (Nikon D850 with ZEISS Milvus 50 mm f/2 macro lens and Nikon SB-910 fill flash.)

From this angle, I could not completely eliminate the glare regardless of how much I rotated the polarizer, so I chose the area where I wanted to eliminate the glare, and set it there. [Click on the image to enlarge it, then click on the back arrow to return to the post.]

RV with polarizer optimized. (Nikon D850 with ZEISS Milvus 50 mm f/2 macro lens and Nikon SB-910 fill flash.)

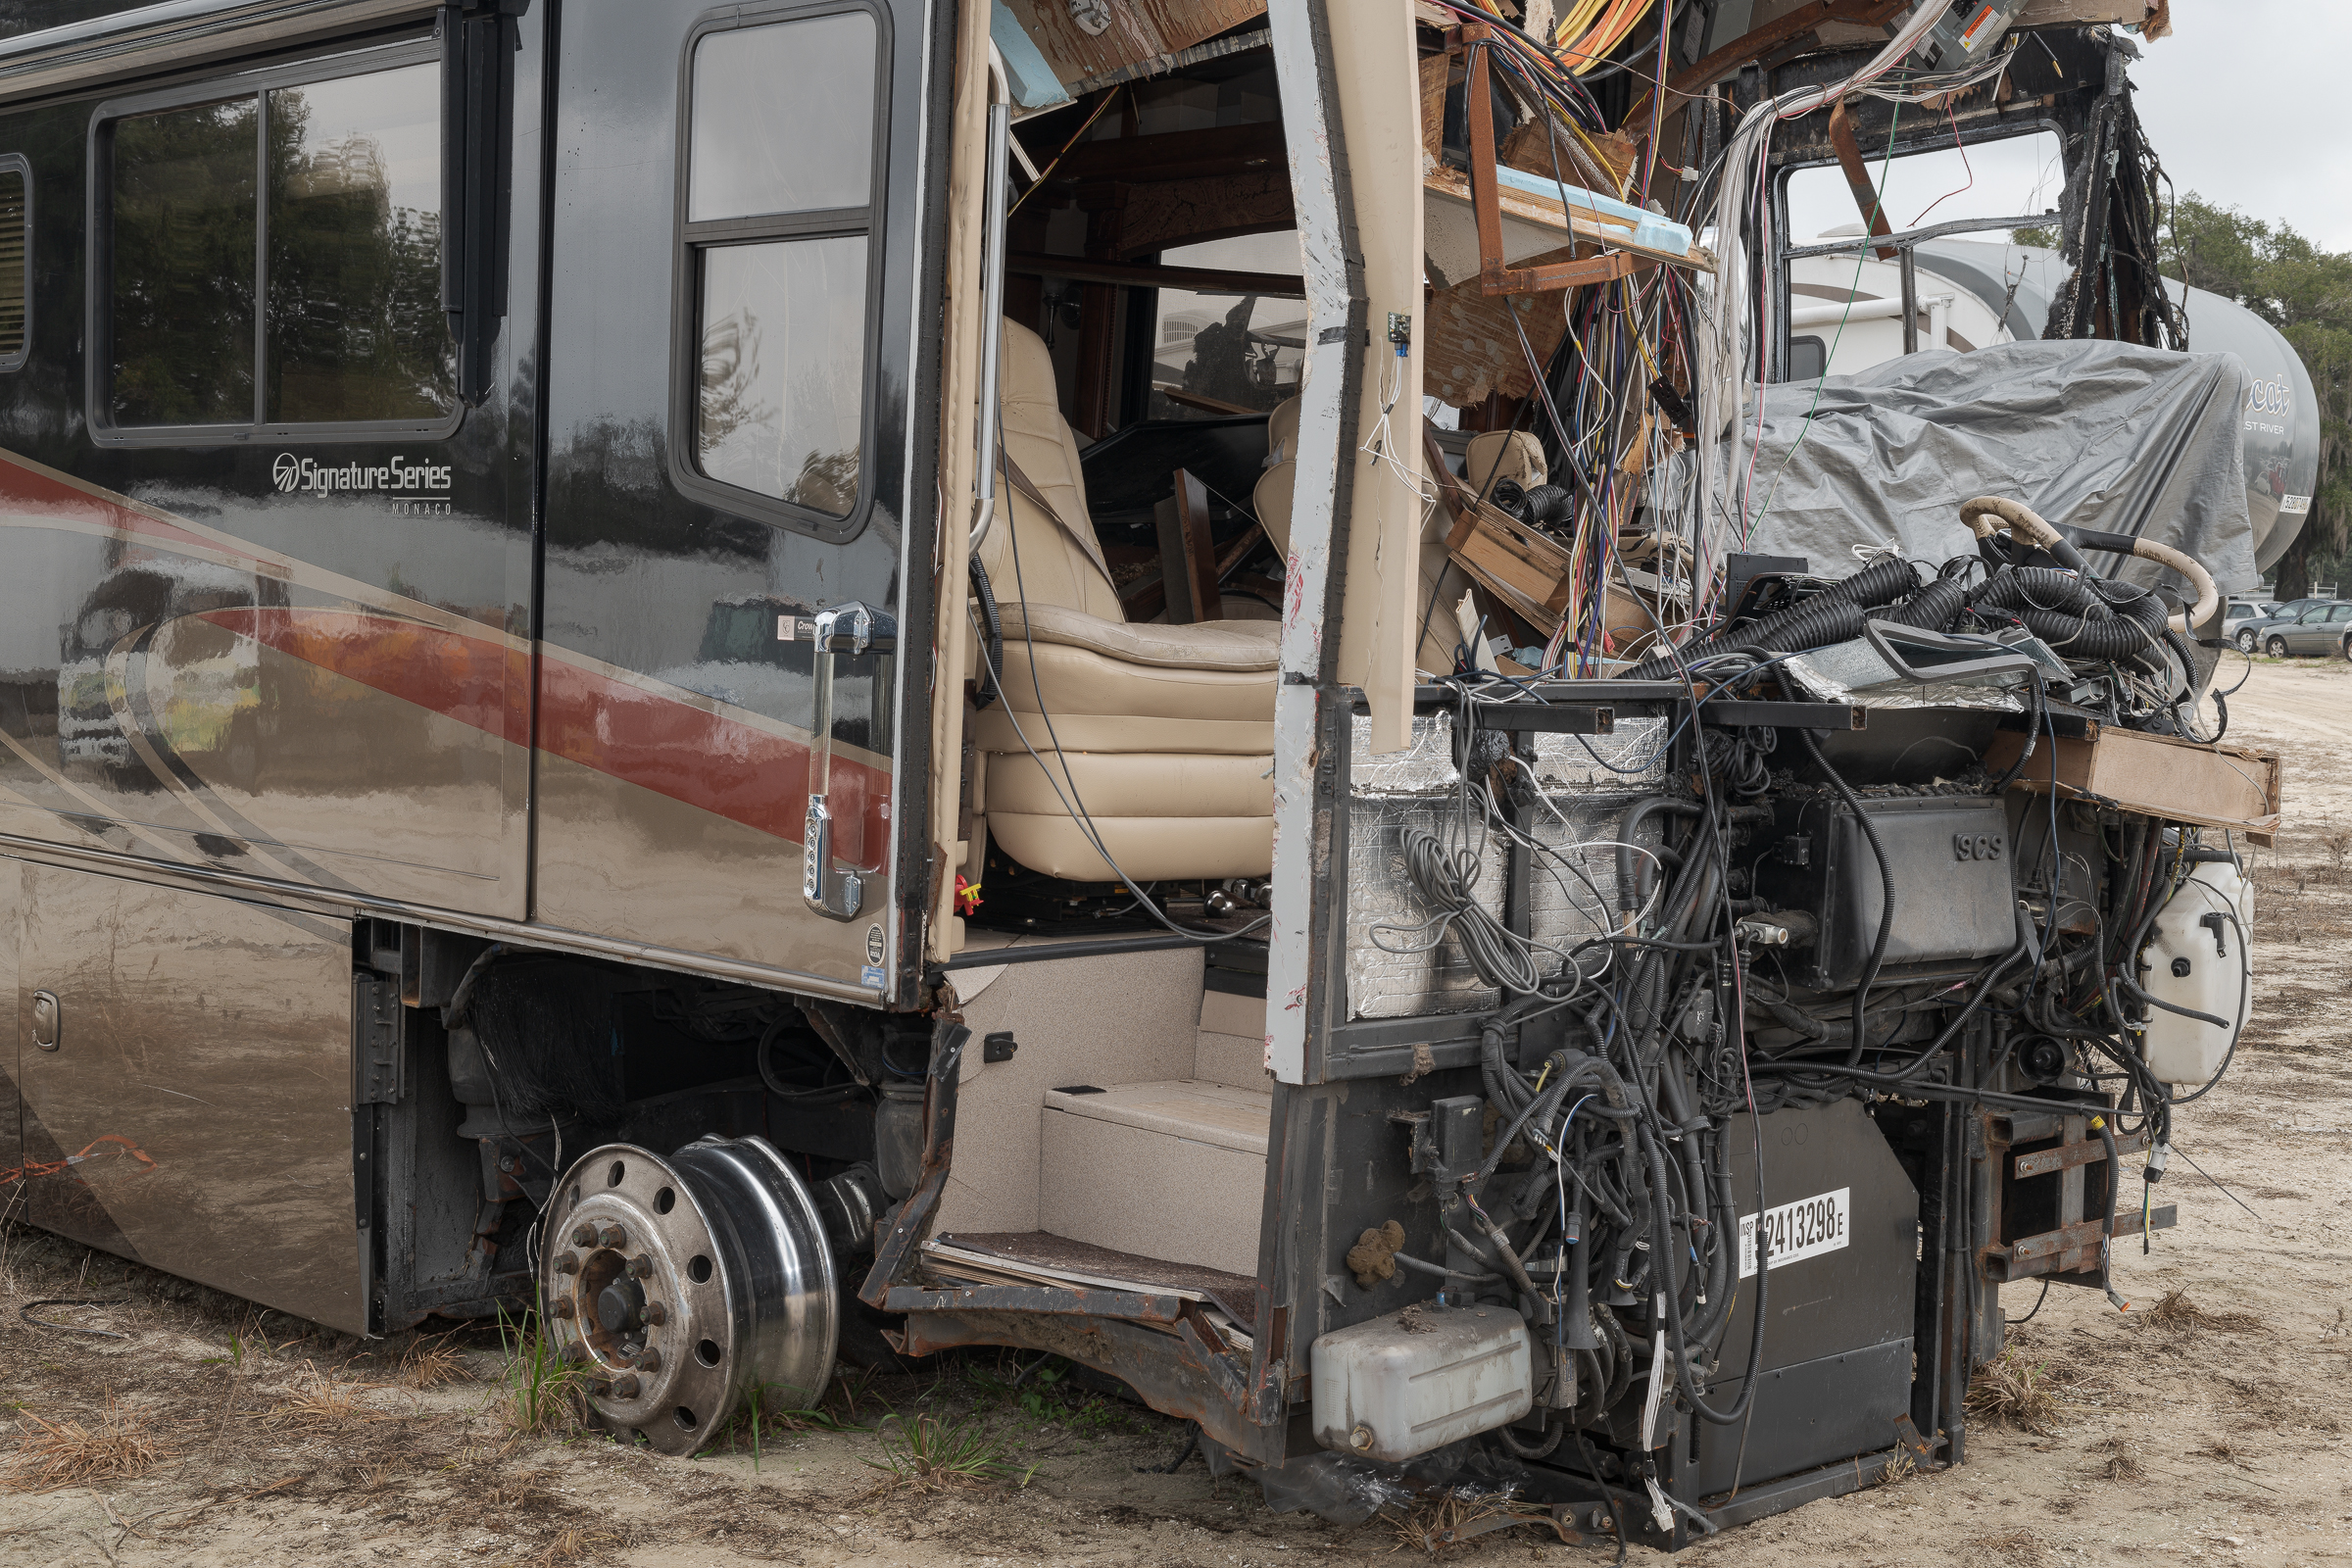
From the right front, the side of the RV was again partially obscured by glare. [Click on the image to enlarge it, then click on the back arrow to return to the post.]

RV with polarizer minimized. (Nikon D850 with ZEISS Milvus 50 mm f/2 macro lens and Nikon SB-910 fill flash.)

From this angle, I was able to rotate the polarizer into a position that eliminated the glare on both the right side and the front end. Notice how you can even see through the side windows now. [Click on the image to enlarge it, then click on the back arrow to return to the post.]

RV with polarizer optimized. (Nikon D850 with ZEISS Milvus 50 mm f/2 macro lens and Nikon SB-910 fill flash.)

Here are the takeaways:

-1- Use a polarizer when you want to eliminate reflected glare off of vehicles.

-2- Use fill flash with a polarizer to bring out detail in vehicle photos.

-3- Polarizers are effective on overcast days when light is scattered everywhere. Polarizers are not just for sunny days.

-4- Polarizers can be effective at angles other than 90° to the light source.

-5- The only way to determine the best setting for a polarizer is to rotate it until it gives you the effect you want.

-6- Last but most important, you MUST rotate your polarizer before each shot to get the desired effects.

Nailing an Ultra Macro Photo

During my analysis of a failed tire, I noticed what looked like a tiny, tiny nail in one of the sidewalls. I looked inside the tire, but couldn’t see if the tip had penetrated the innerliner. I gingerly felt around the inside to detect if the tip had protruded through. It had. Now I had to document that.

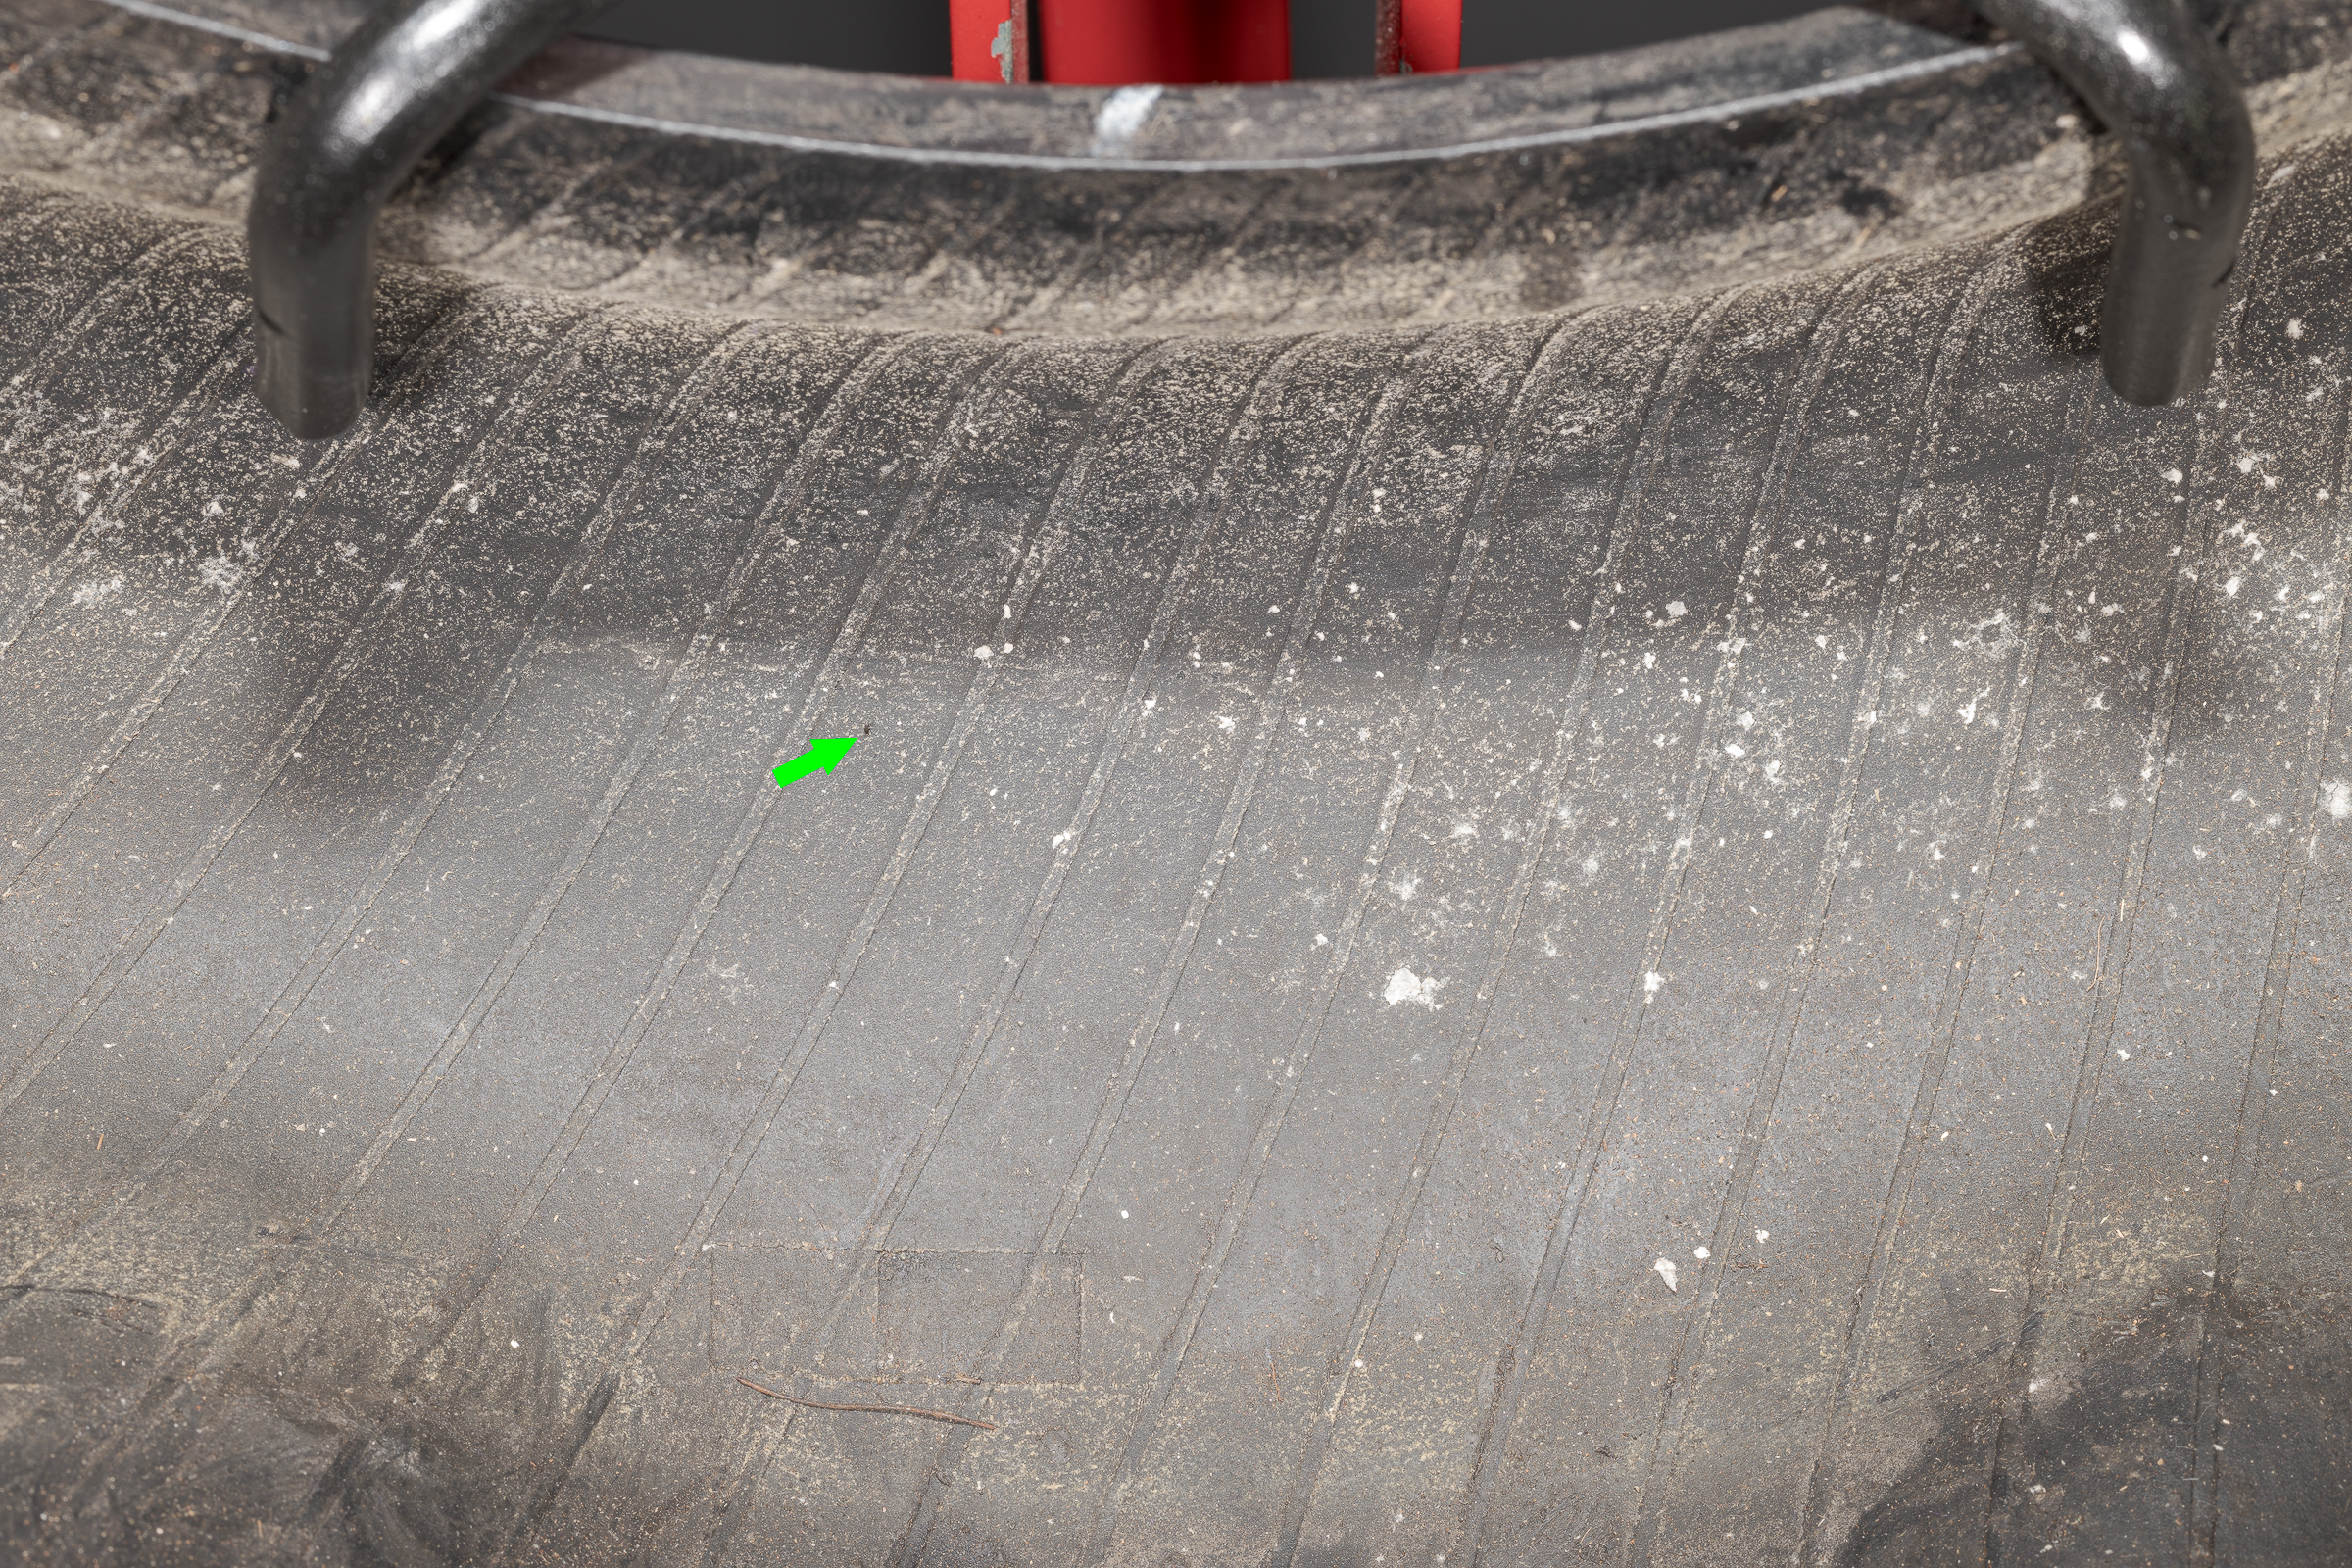
Photographing the head of the nail on the outside was easy, but photographing the tiny tip on the inside was quite a challenge. It was both minuscule and inaccessible. Here is a photo  of the nail made with my usual lens, the ZEISS Milvus 50 mm f/2 macro. (Click on any image to enlarge. Then click on back arrow to return to the post.)

Arrow highlights point of tiny nail through tire innerliner. (ZEISS Milvus 50 mm f/2 macro lens on Nikon D850.)

Even with the arrow, it’s impossible to get any useful information about the nail tip from this photo.

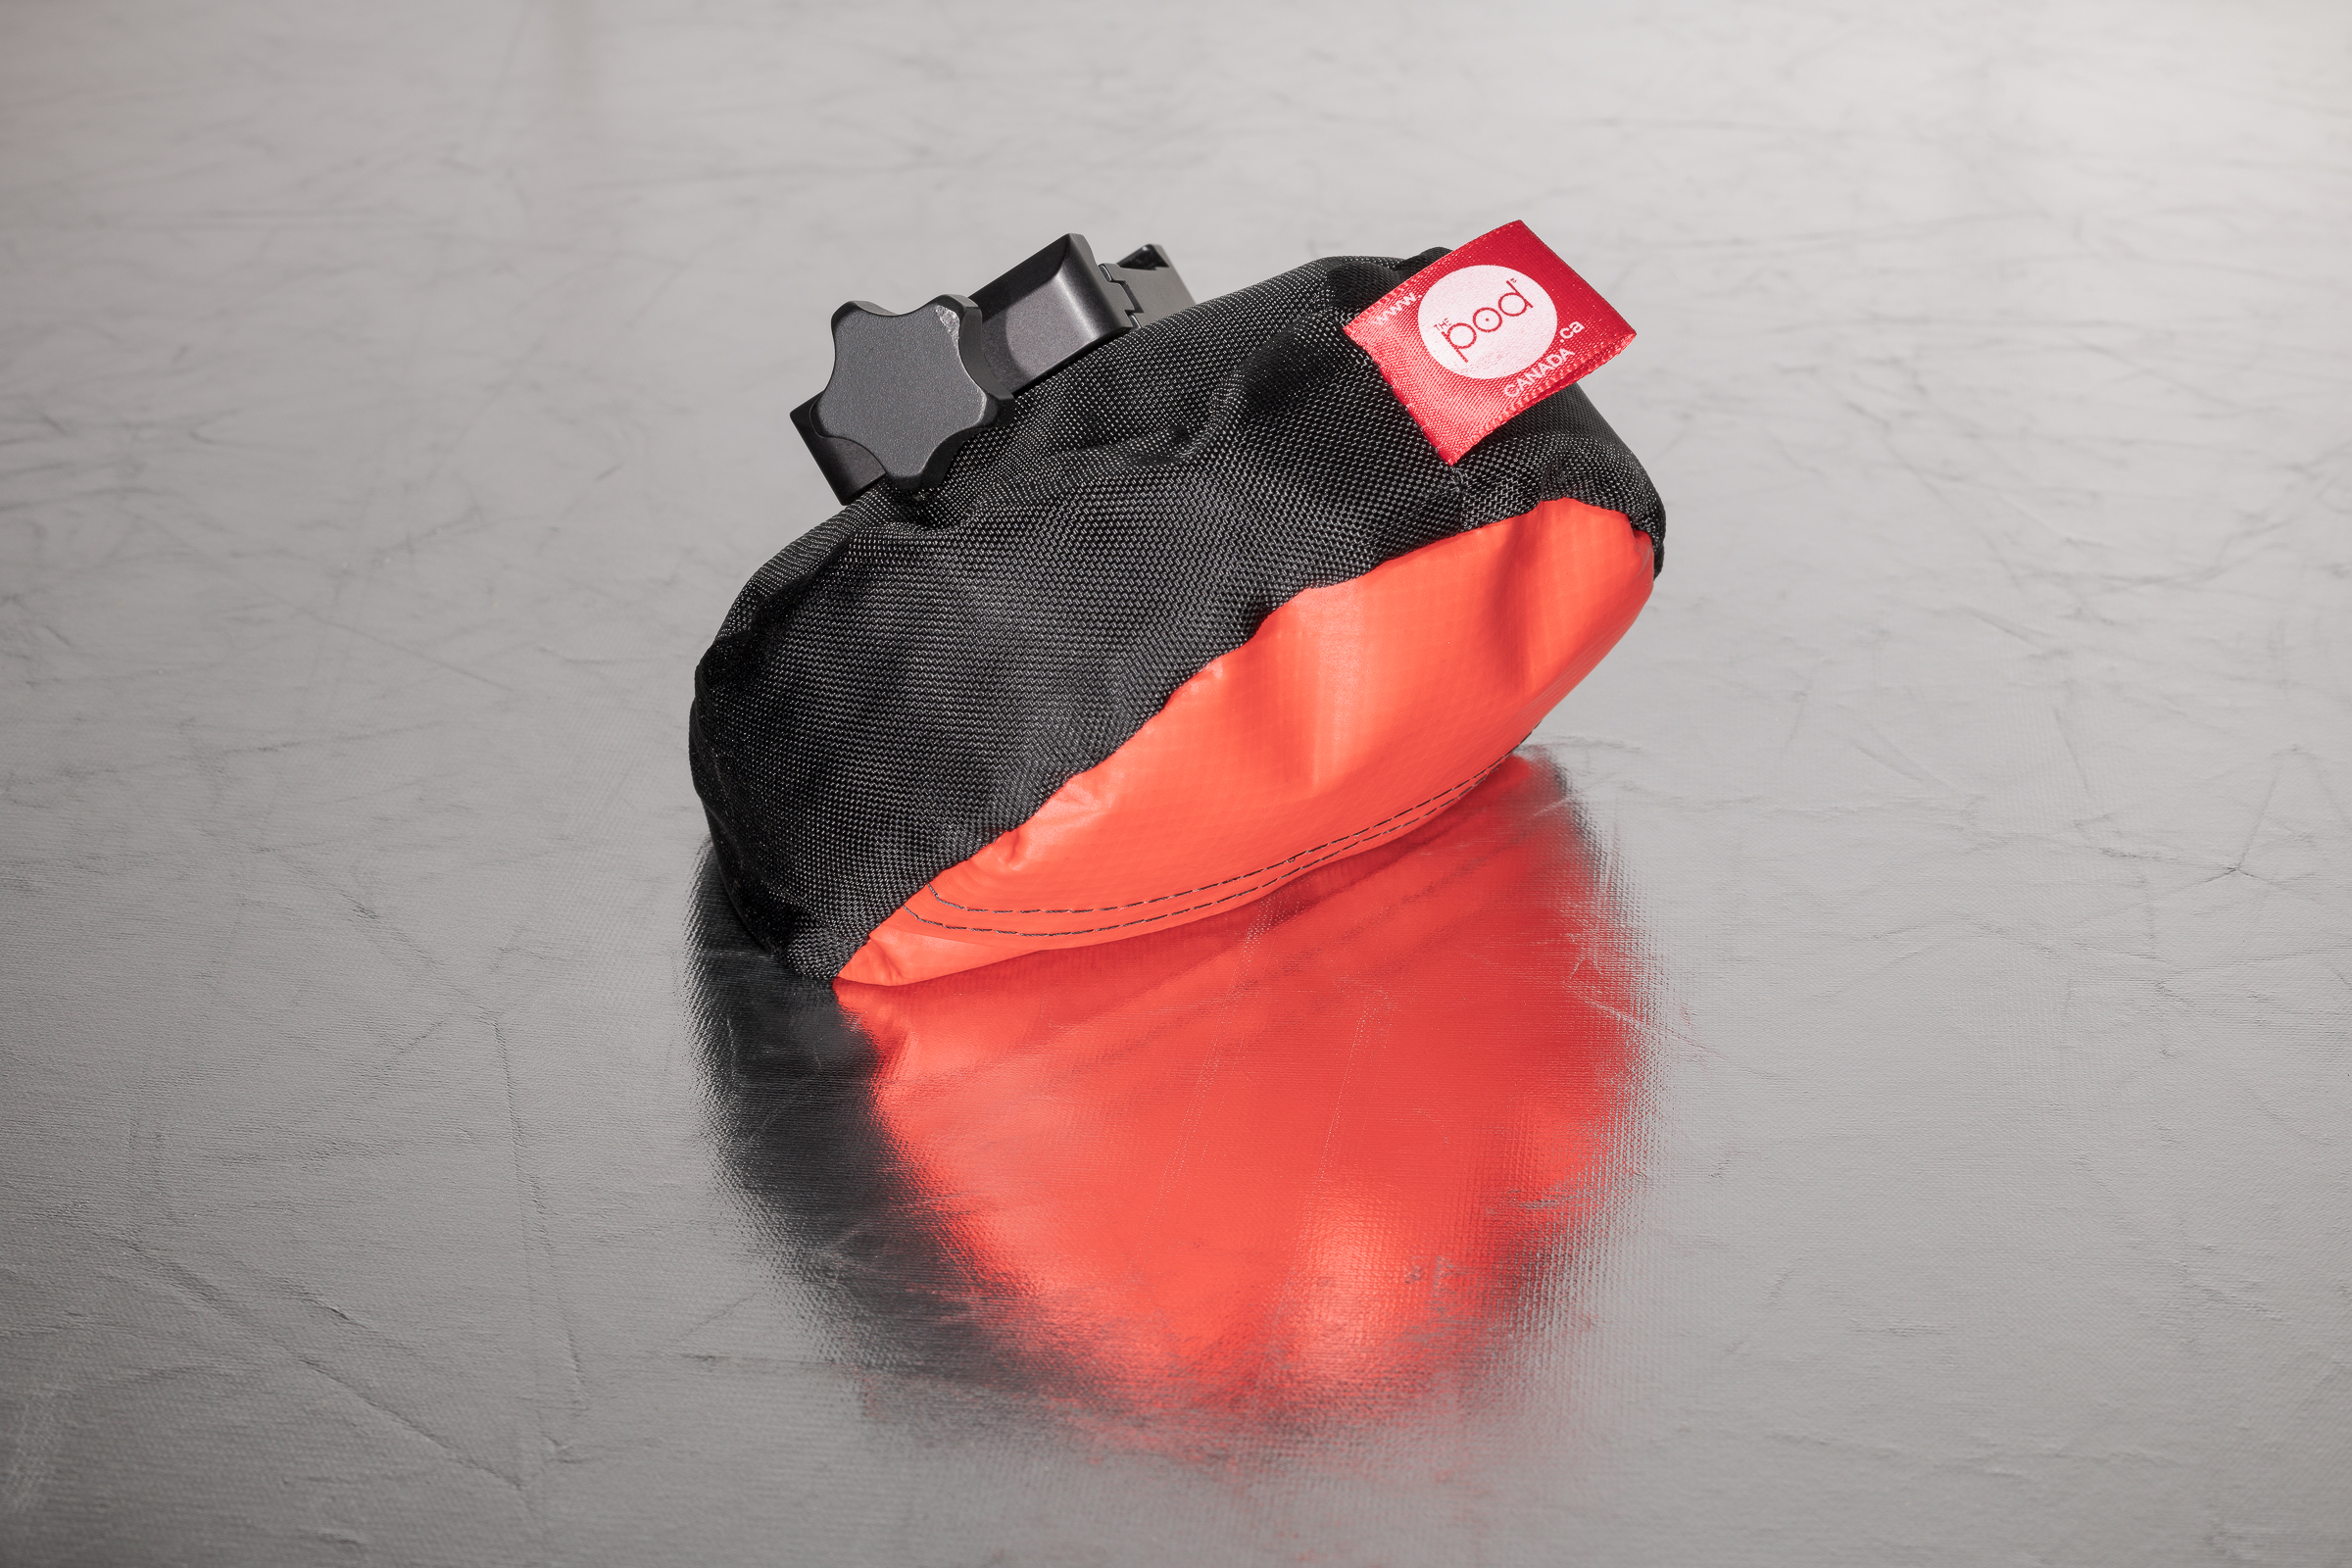
I photographed that nail tip with several other combinations of lenses, lights, and camera supports, but couldn’t get close enough to it optically. Then I remembered my beanbag called “The Pod” (now sold as either The Red Pod or The Green Pod) to which I had added an Arca-Swiss-type quick release clamp.

The Pod beanbag with Arca-Swiss style quick release clamp. (ZEISS Milvus 50 mm f/2 macro lens on Nikon D850.)

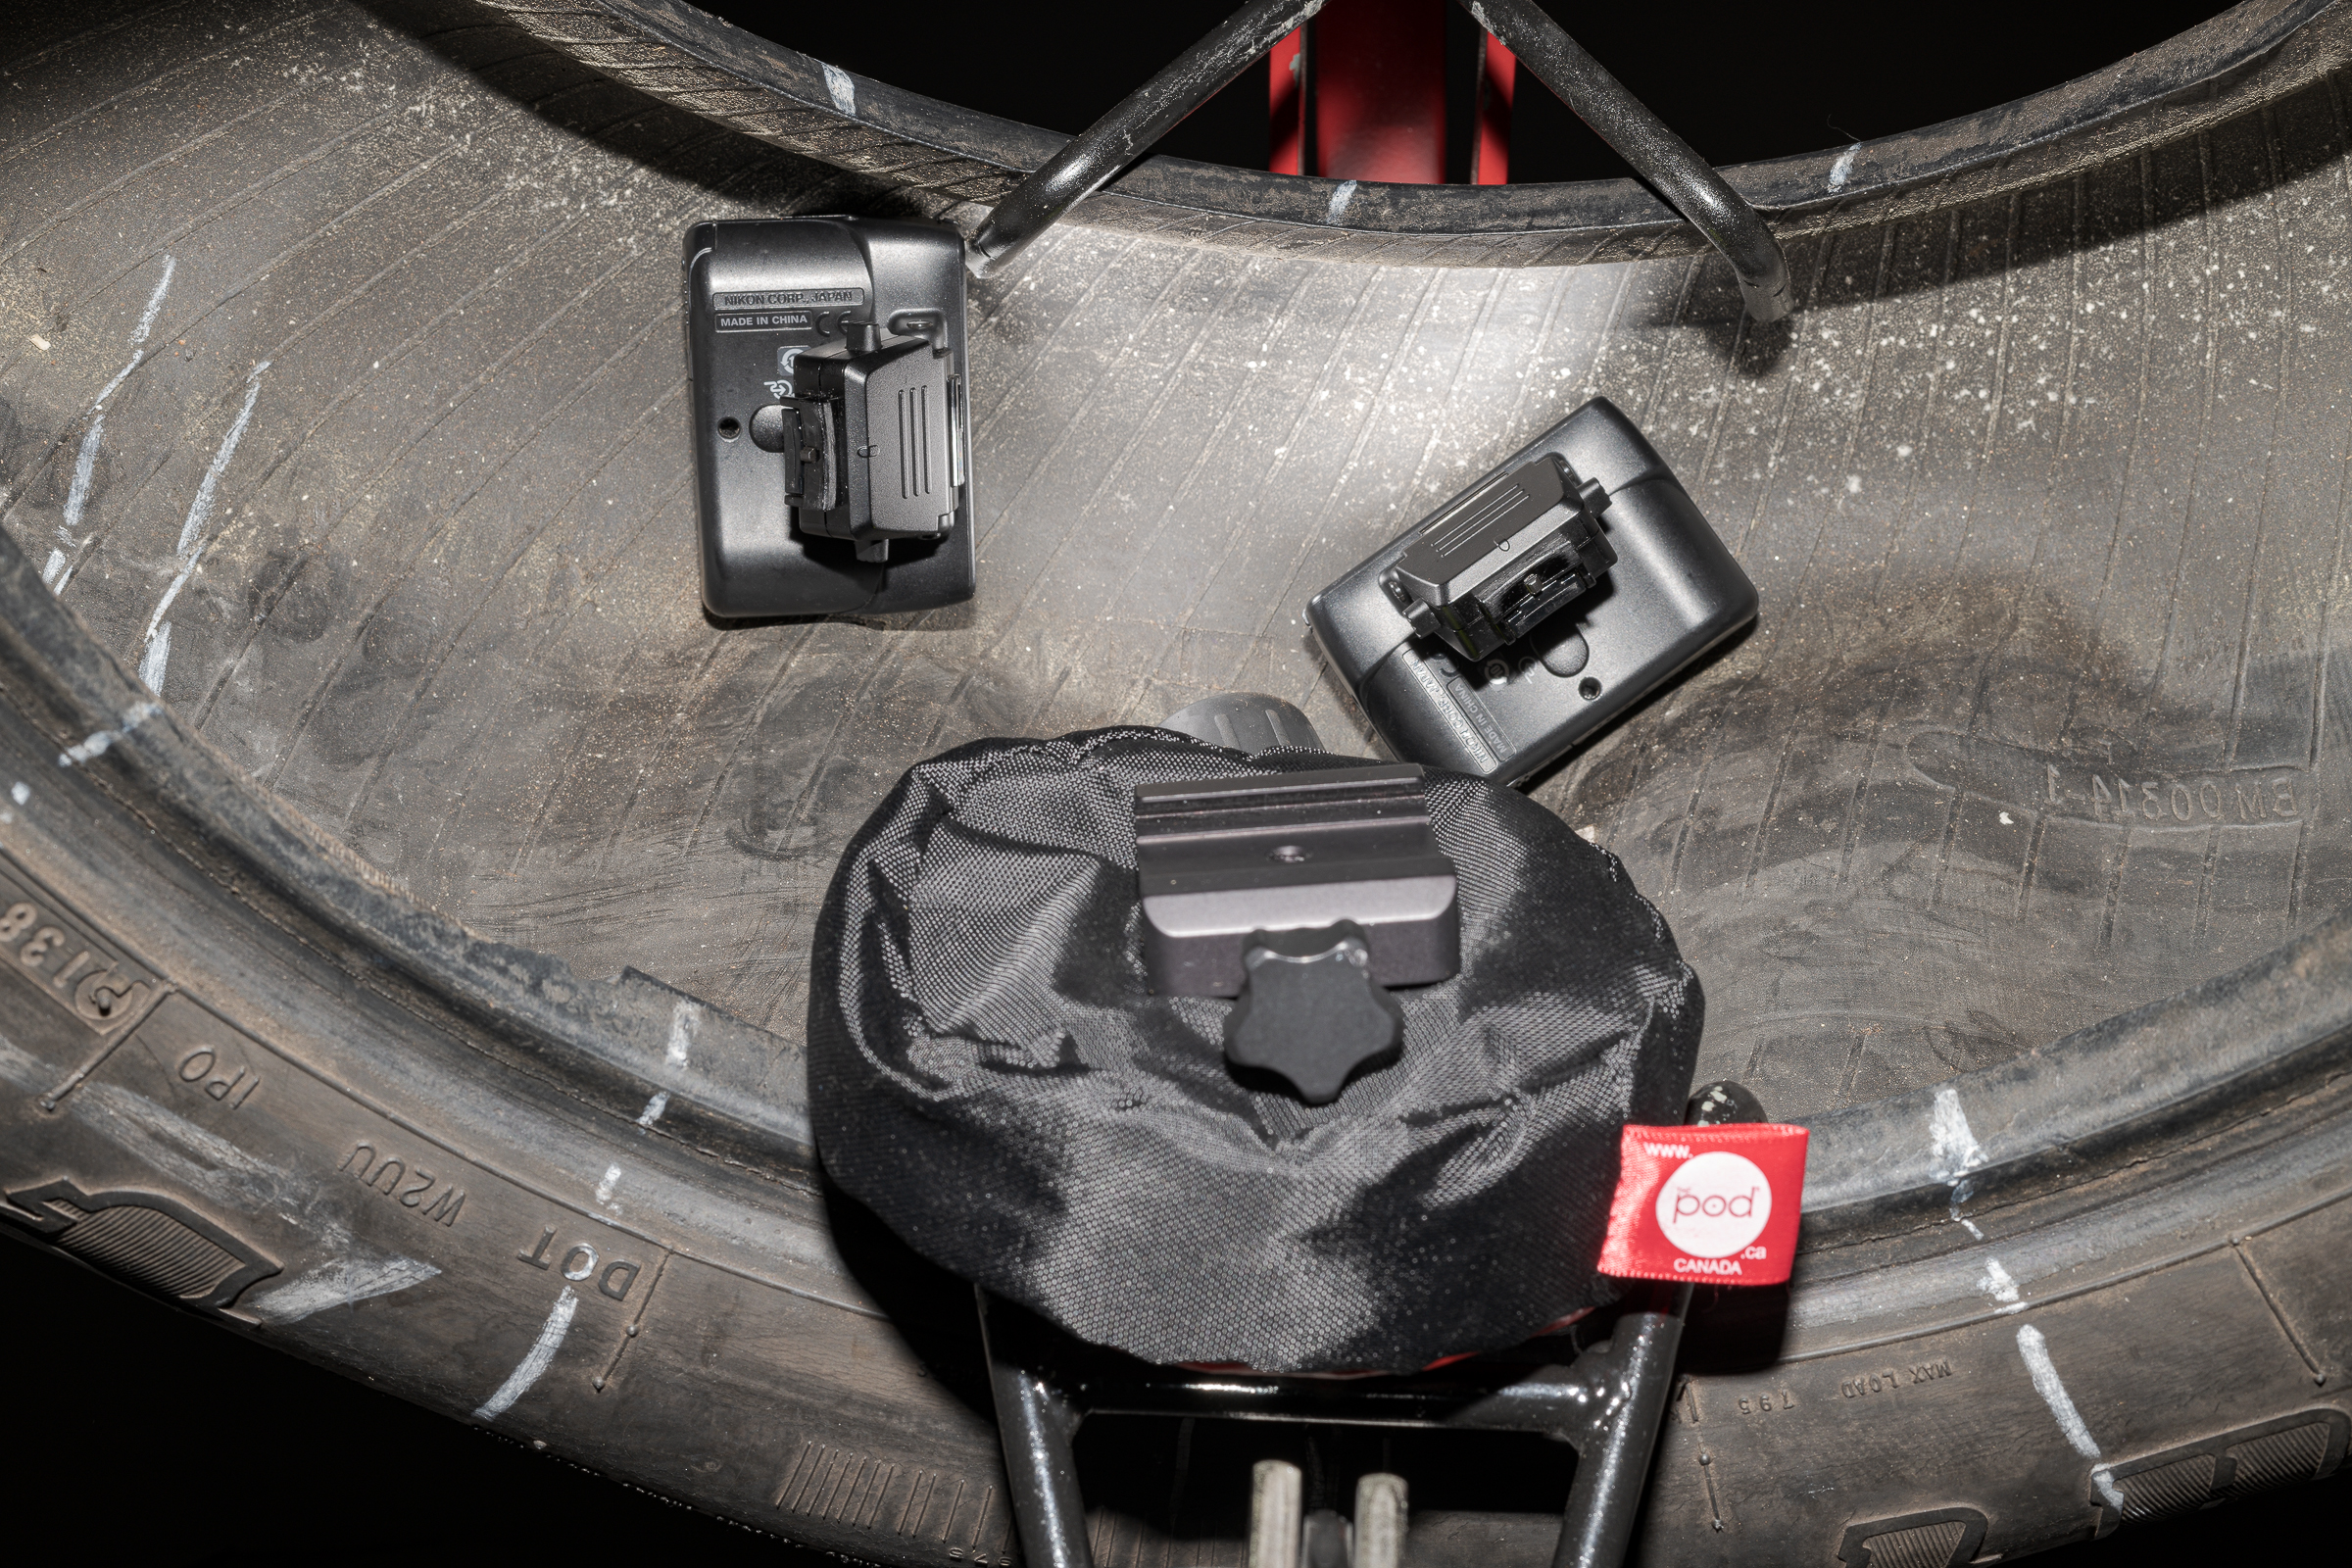
To get the camera lens closer to the nail, I propped the beanbag with a mounted Nikon D850 and the Laowa 25 mm 2.5 to 5x Ultra Macro lens (which I discussed and showed in previous posts) on the opposite side bead. I removed two Nikon SB-R200 macro flashes from the R1C1 ring and placed them on either side of the nail tip. This photo shows the positions of The Pod and the flashes with the camera, lens, and on-camera SB-910 flash removed.

Setup for tiny nail end using The Pod and two Nikon SB-R200 flash units. Laowa 25 mm 2.5 to 5x Ultra Macro lens on Nikon D850 removed from The Pod to show setup. (ZEISS Milvus 50 mm f/2 macro lens on Nikon D850.)

Below is the resulting single-shot, uncropped, full-frame image with the incredible Laowa Ultra Macro lens. A single shot was necessary because the beanbag setup was not rigid enough to allow for focus stacking of multiple images.

Full frame, uncropped close-up of tiny nail. (Laowa 25 mm 2.5 to 5x Ultra Macro lens on Nikon D850.)

Compare the size of the nail tip in the the top and bottom photos, and recall both were full-frame, uncropped images. Considering there was such a significant enlargement of the subject, the detail in the bottom photo was remarkable despite the limited depth of field and the less-than-rigid support from the beanbag as opposed to a tripod.  I’d say that about nailed it!

Use a Polarizer at Accident Sites

Except when making night photographs, I almost always use a polarizing filter (polarizer) when photographing accident sites. Rotating a polarizing filter removes glare and increases saturation relative to the angle of rotation.

Fortunately, to determine the amount of rotation you need for the effect you want, simply look through the polarizer (through the threaded side if you’re holding it, or through the viewfinder or rear LCD once it’s mounted on your lens) as you turn the outside ring. There are no settings or calculations or other analysis you have to do to get the effect you want. But, like polarized sunglasses, polarizing filters decrease the light, so you will have to adjust your exposure accordingly. Most polarizers require an additional one-to-two stops of exposure to compensate.

Speaking of sunglasses, make sure you remove your sunglasses—especially if they are polarized—before looking through your polarizer. Otherwise, you won’t be seeing the actual effect of your filter. In fact, if they line up, you won’t see anything; it will all go black.

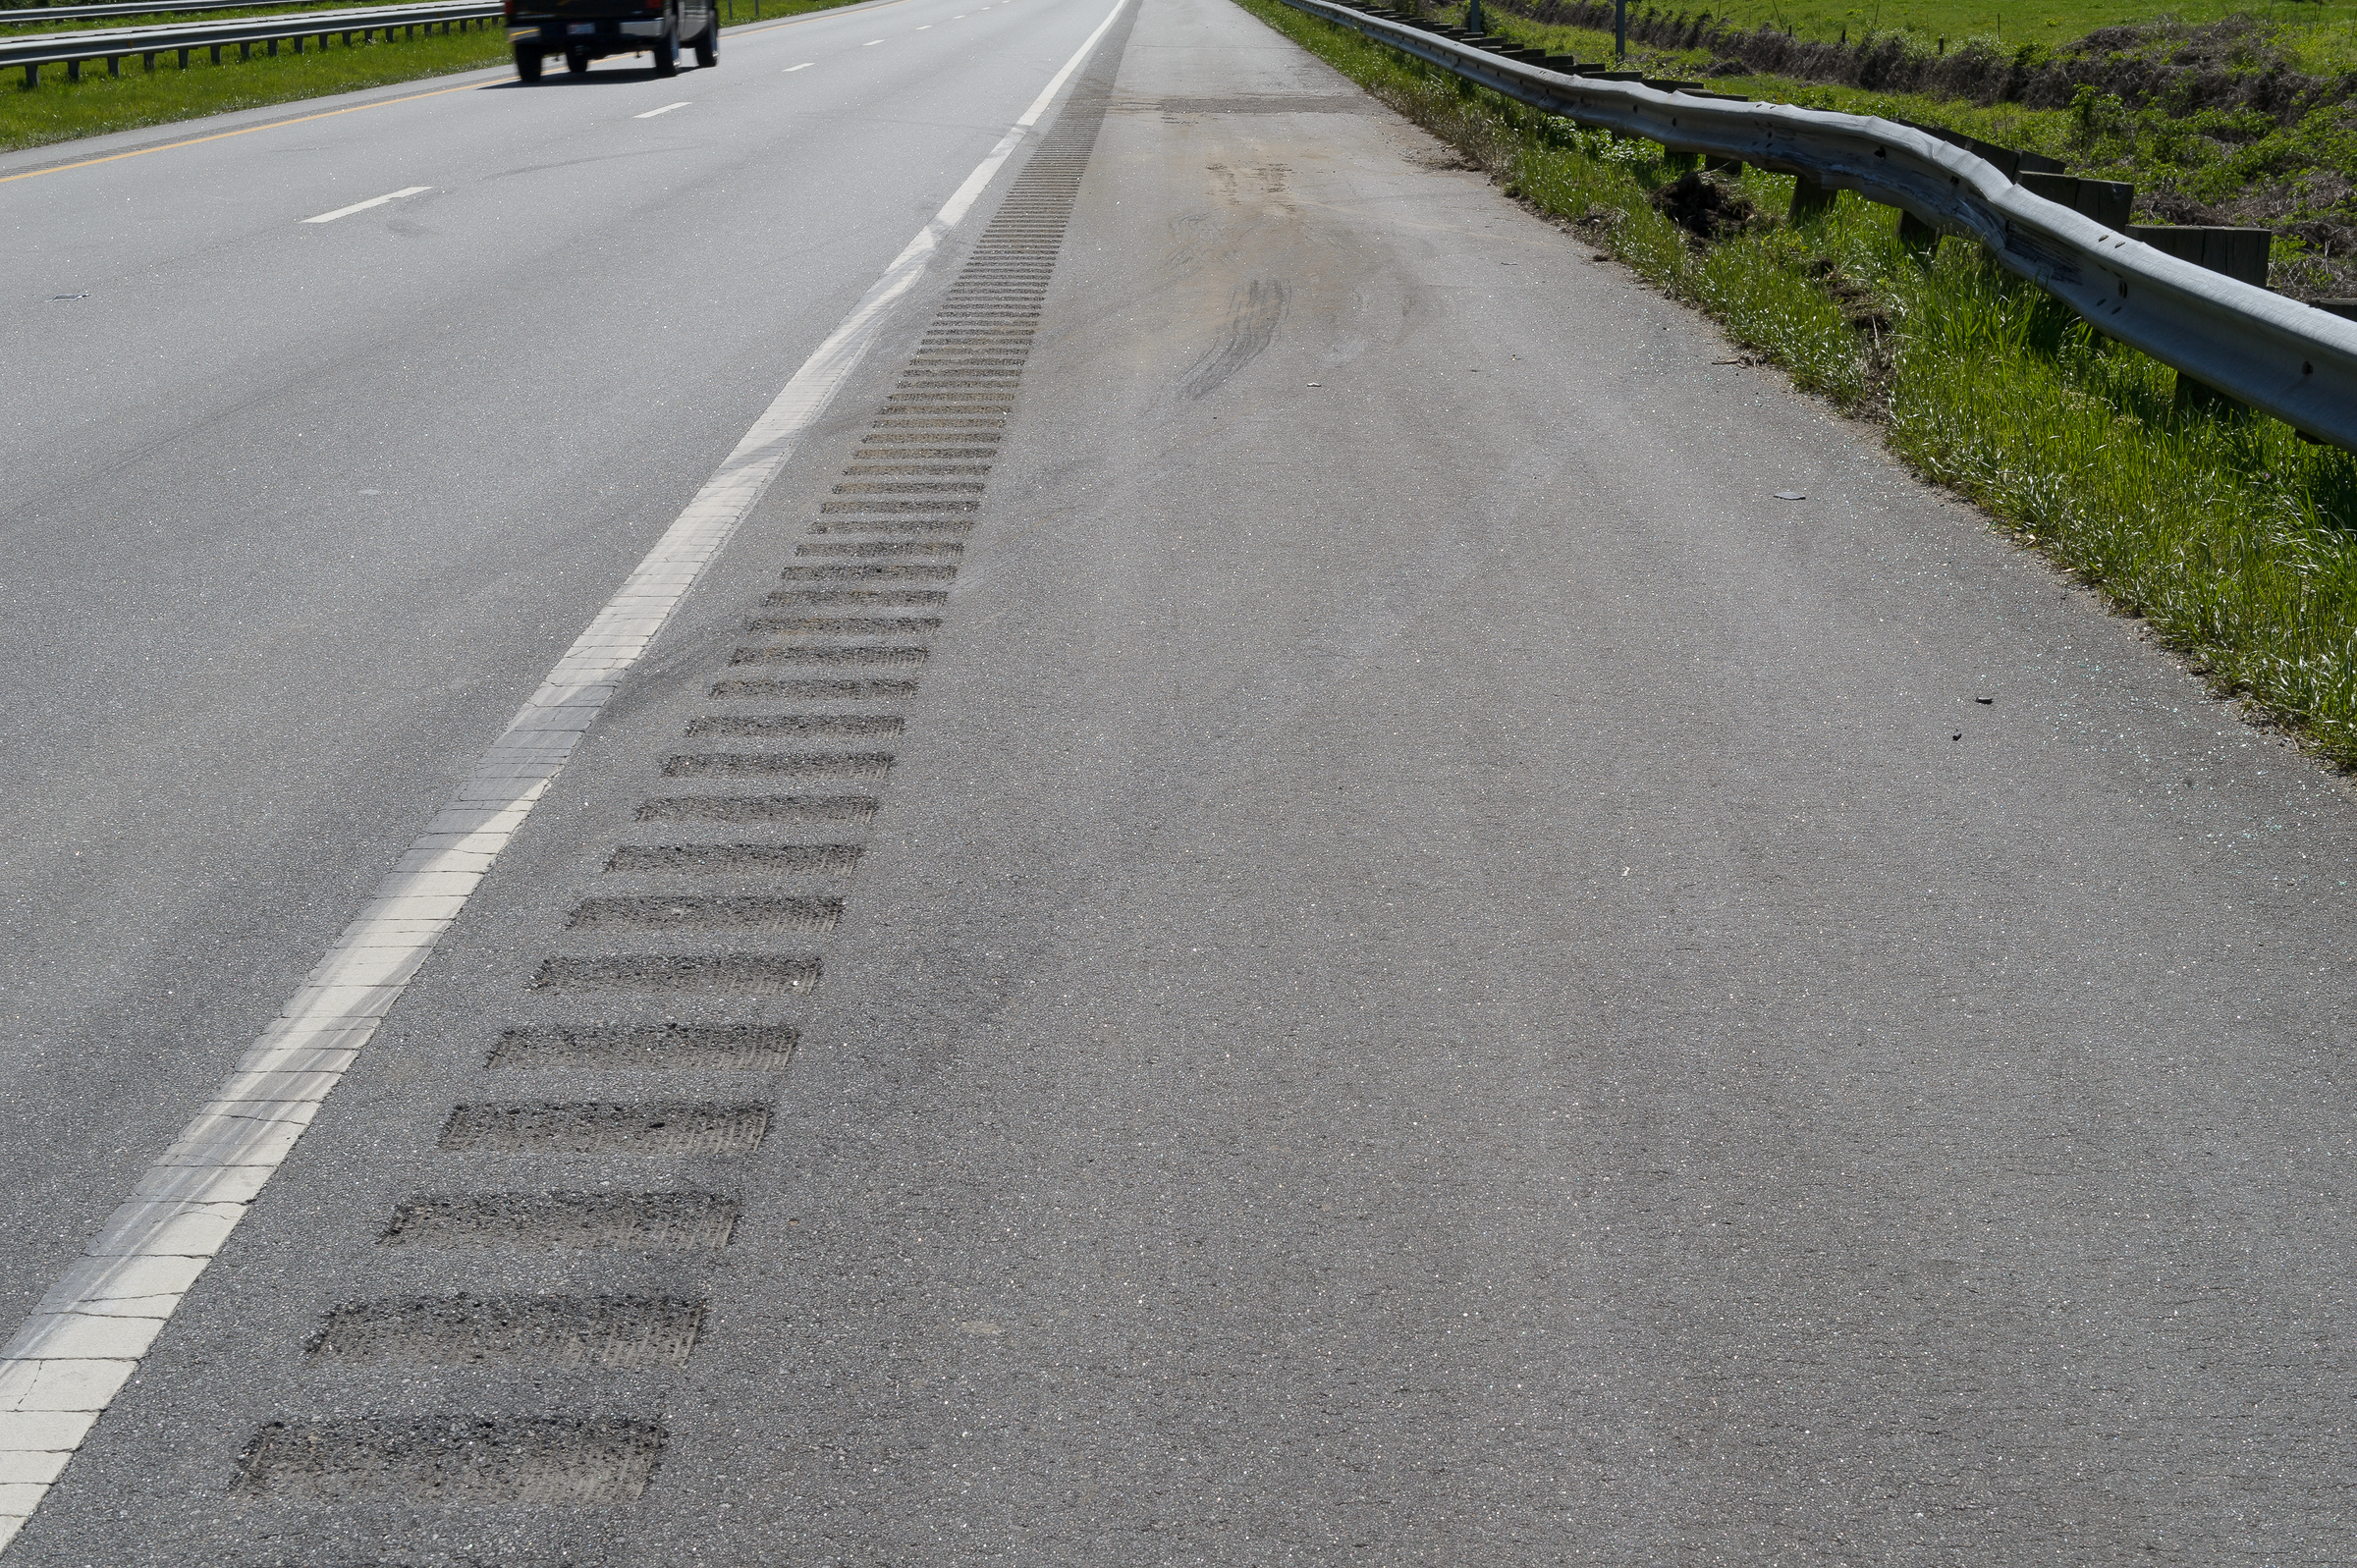
While a polarizer will take the glare off of roads, grass, and trees at accident sites, it has its greatest effect on tire marks. In this first image, you can tell there are multiple tire marks on the road, but they lack definition. The photograph is properly exposed, but glare obscures any detail. (Click on an image to enlarge. Click on back arrow to return to this post.)

Tire marks without polarizer. (Nikon 24-70 mm lens on Nikon D3s.)

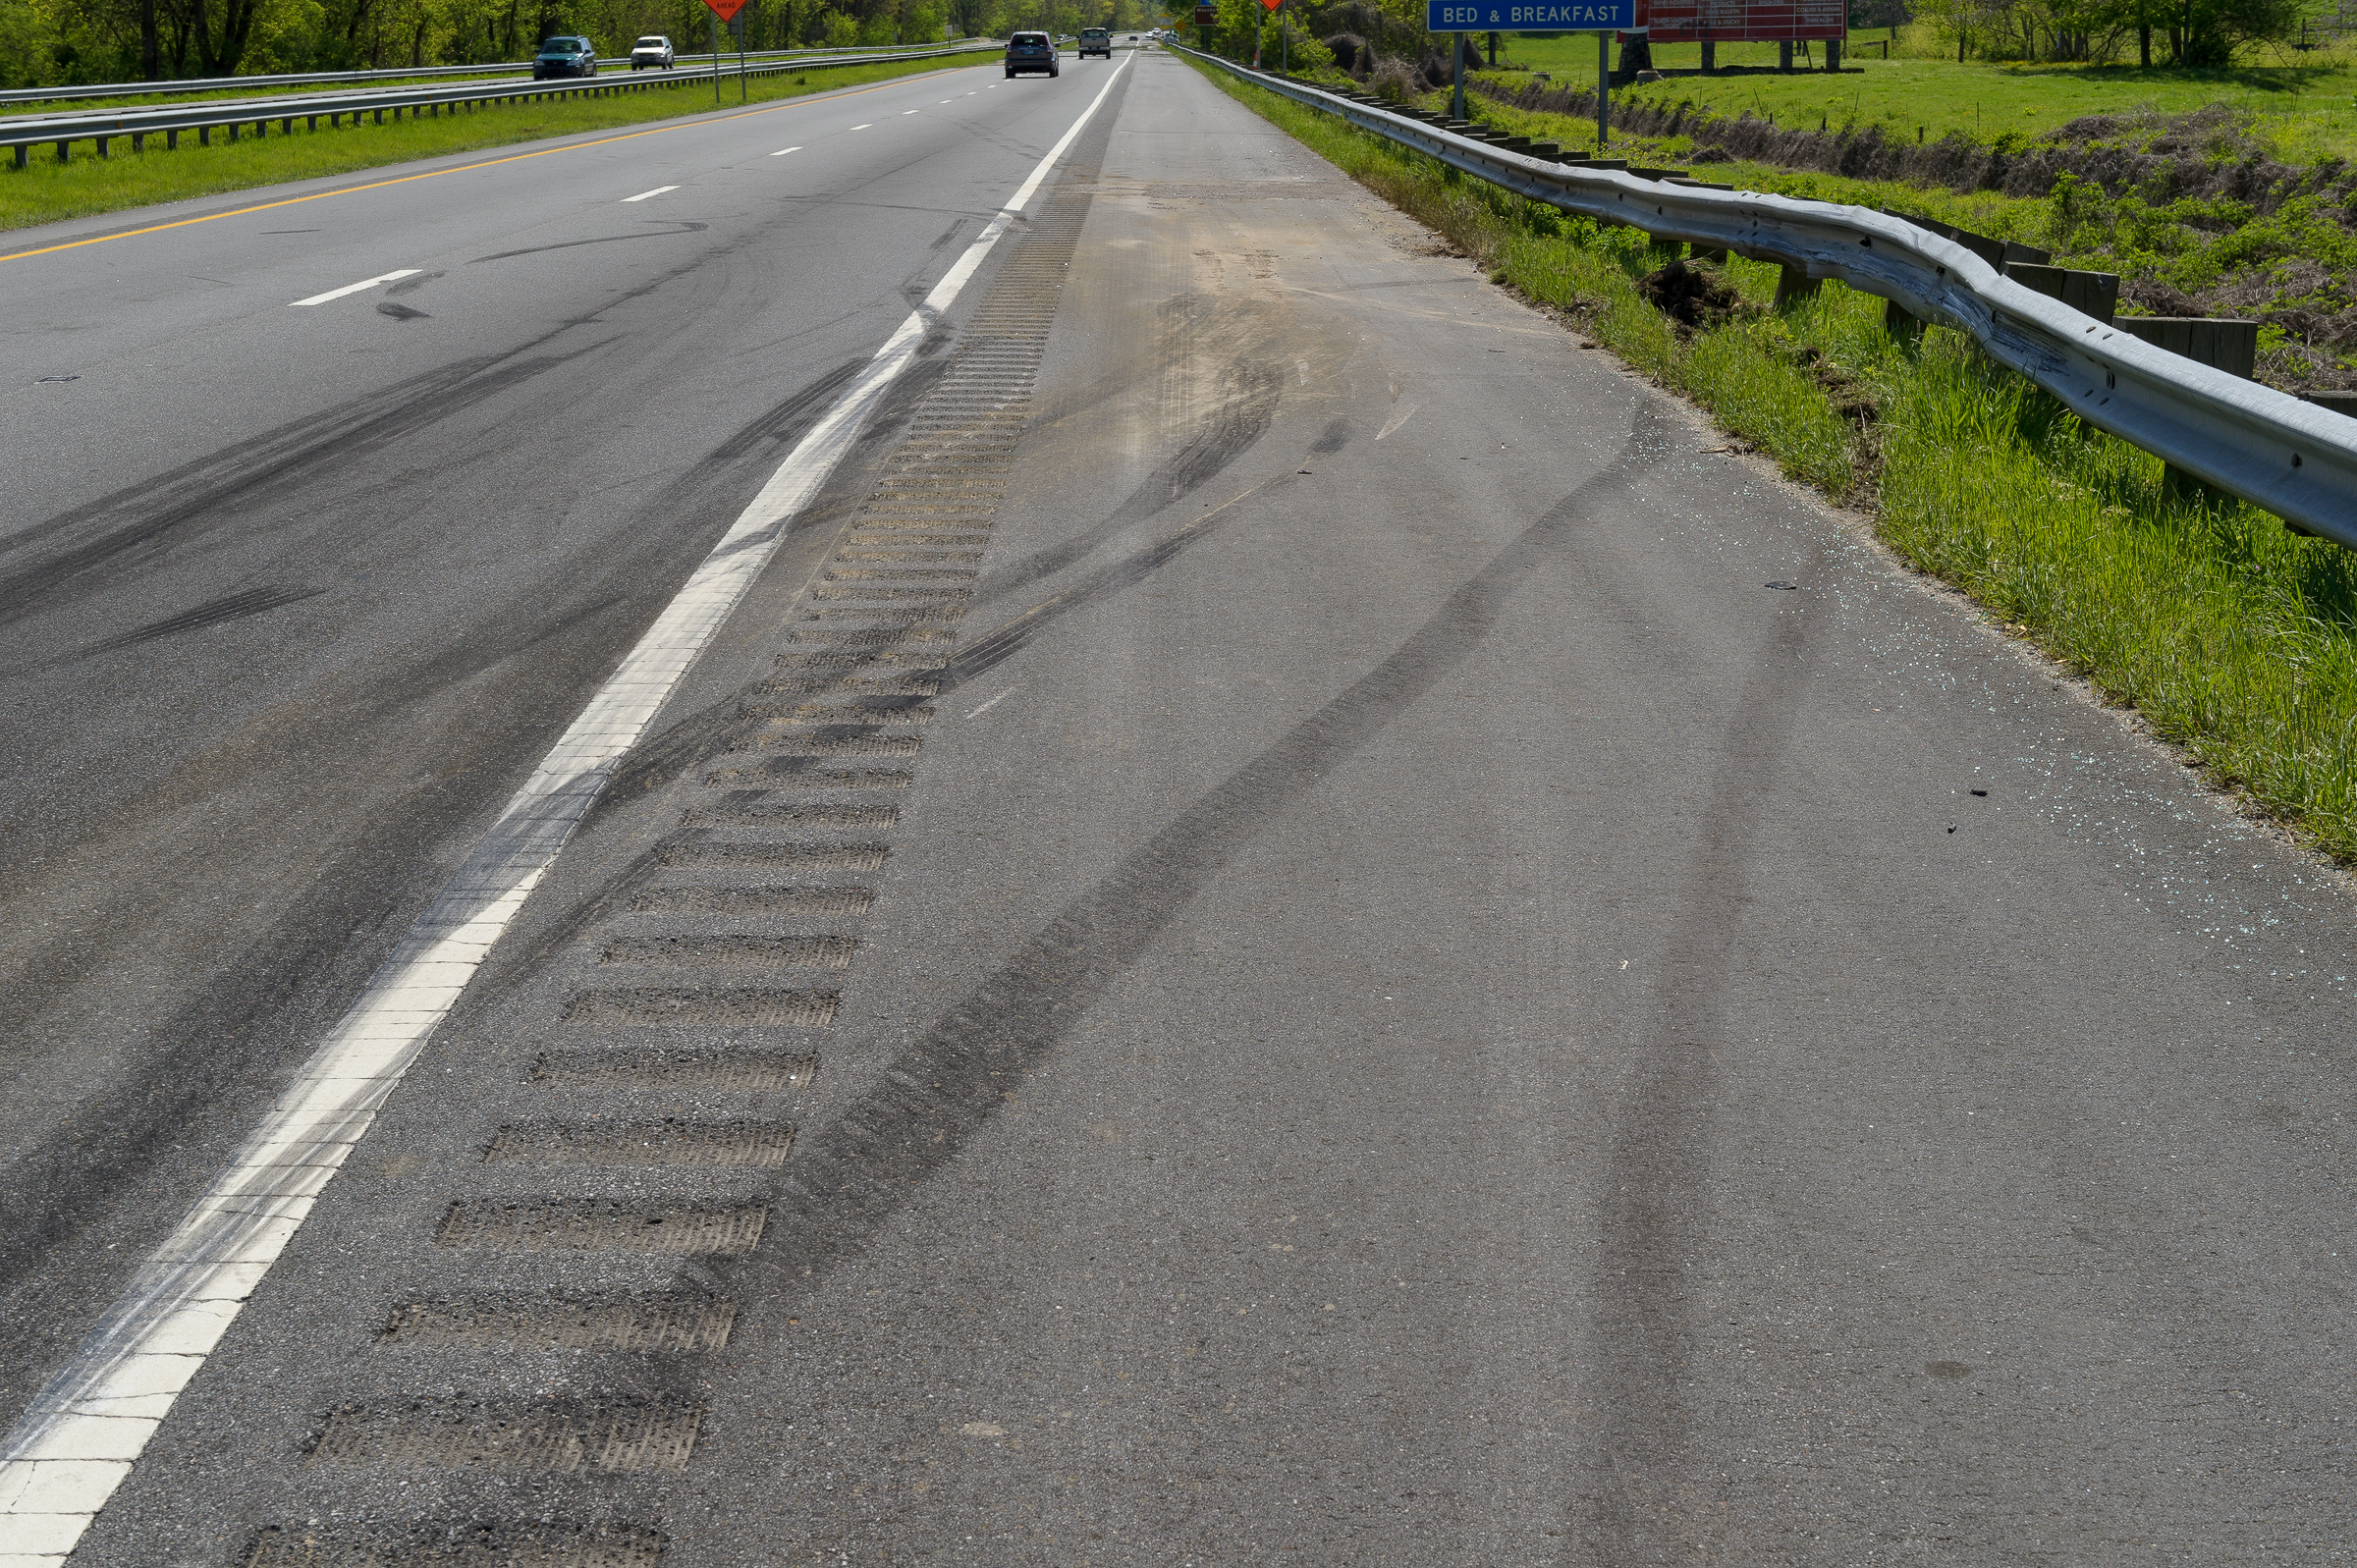
For this second image, I attached a polarizer to the front of the lens, and rotated it until I got the maximum detail in the tire marks. I had to brighten the exposure to compensate for the light lost with the polarizer. This is rarely an issue when your camera is on a tripod, but if your polarizer loses two stops of light, it might be difficult to keep the shutter speed high enough to handhold the camera.

Tire marks with polarizer. (Nikon 24-70 mm lens on Nikon D3s.)

This photograph obviously shows much more detail than you could ever extract from the first image. This increase in detail from reduction of glare is what makes a polarizer one of the three most important accessories for automotive forensic photography, along with flash and a tripod.

It’s important to remember to rotate the polarizer between each shot, and to compensate for any light loss by adjusting your exposure. It is also important to remember that a polarizer is the only filter whose effects you can’t replicate in post-processing.

Photography for Accident Reconstruction, Product Liability, and Testing Class Outline

From August 12 through 14, 2019, I will be teaching the third Photography for Accident Reconstruction, Product Liability, and Testing class for SAE. This time it will be at Southeast Toyota Technical Center in Jacksonville, FL. We’ll cover a lot of material in the three days, and you’ll come away making better quality, more professional photographs from that point on, regardless of the location or lighting conditions. After all, your photographs are at least as important as any other part of your work. You’re a professional, and your photographs should reflect that professionalism. After this class, they will.

Here’s a detailed outline of the class: SAE Forensic Photography Class Outline_2019-07.

Please contact me if you have any questions or would like more information about the class.

Another Example with Laowa 25 mm Ultra Macro Lens

This post shows another example image using the amazing Laowa 25 mm Ultra Macro lens. In an earlier post, I discussed what that lens is, and how to best use it. For this example, I made a 5X image of a small torn flap of rubber from a failed tire.

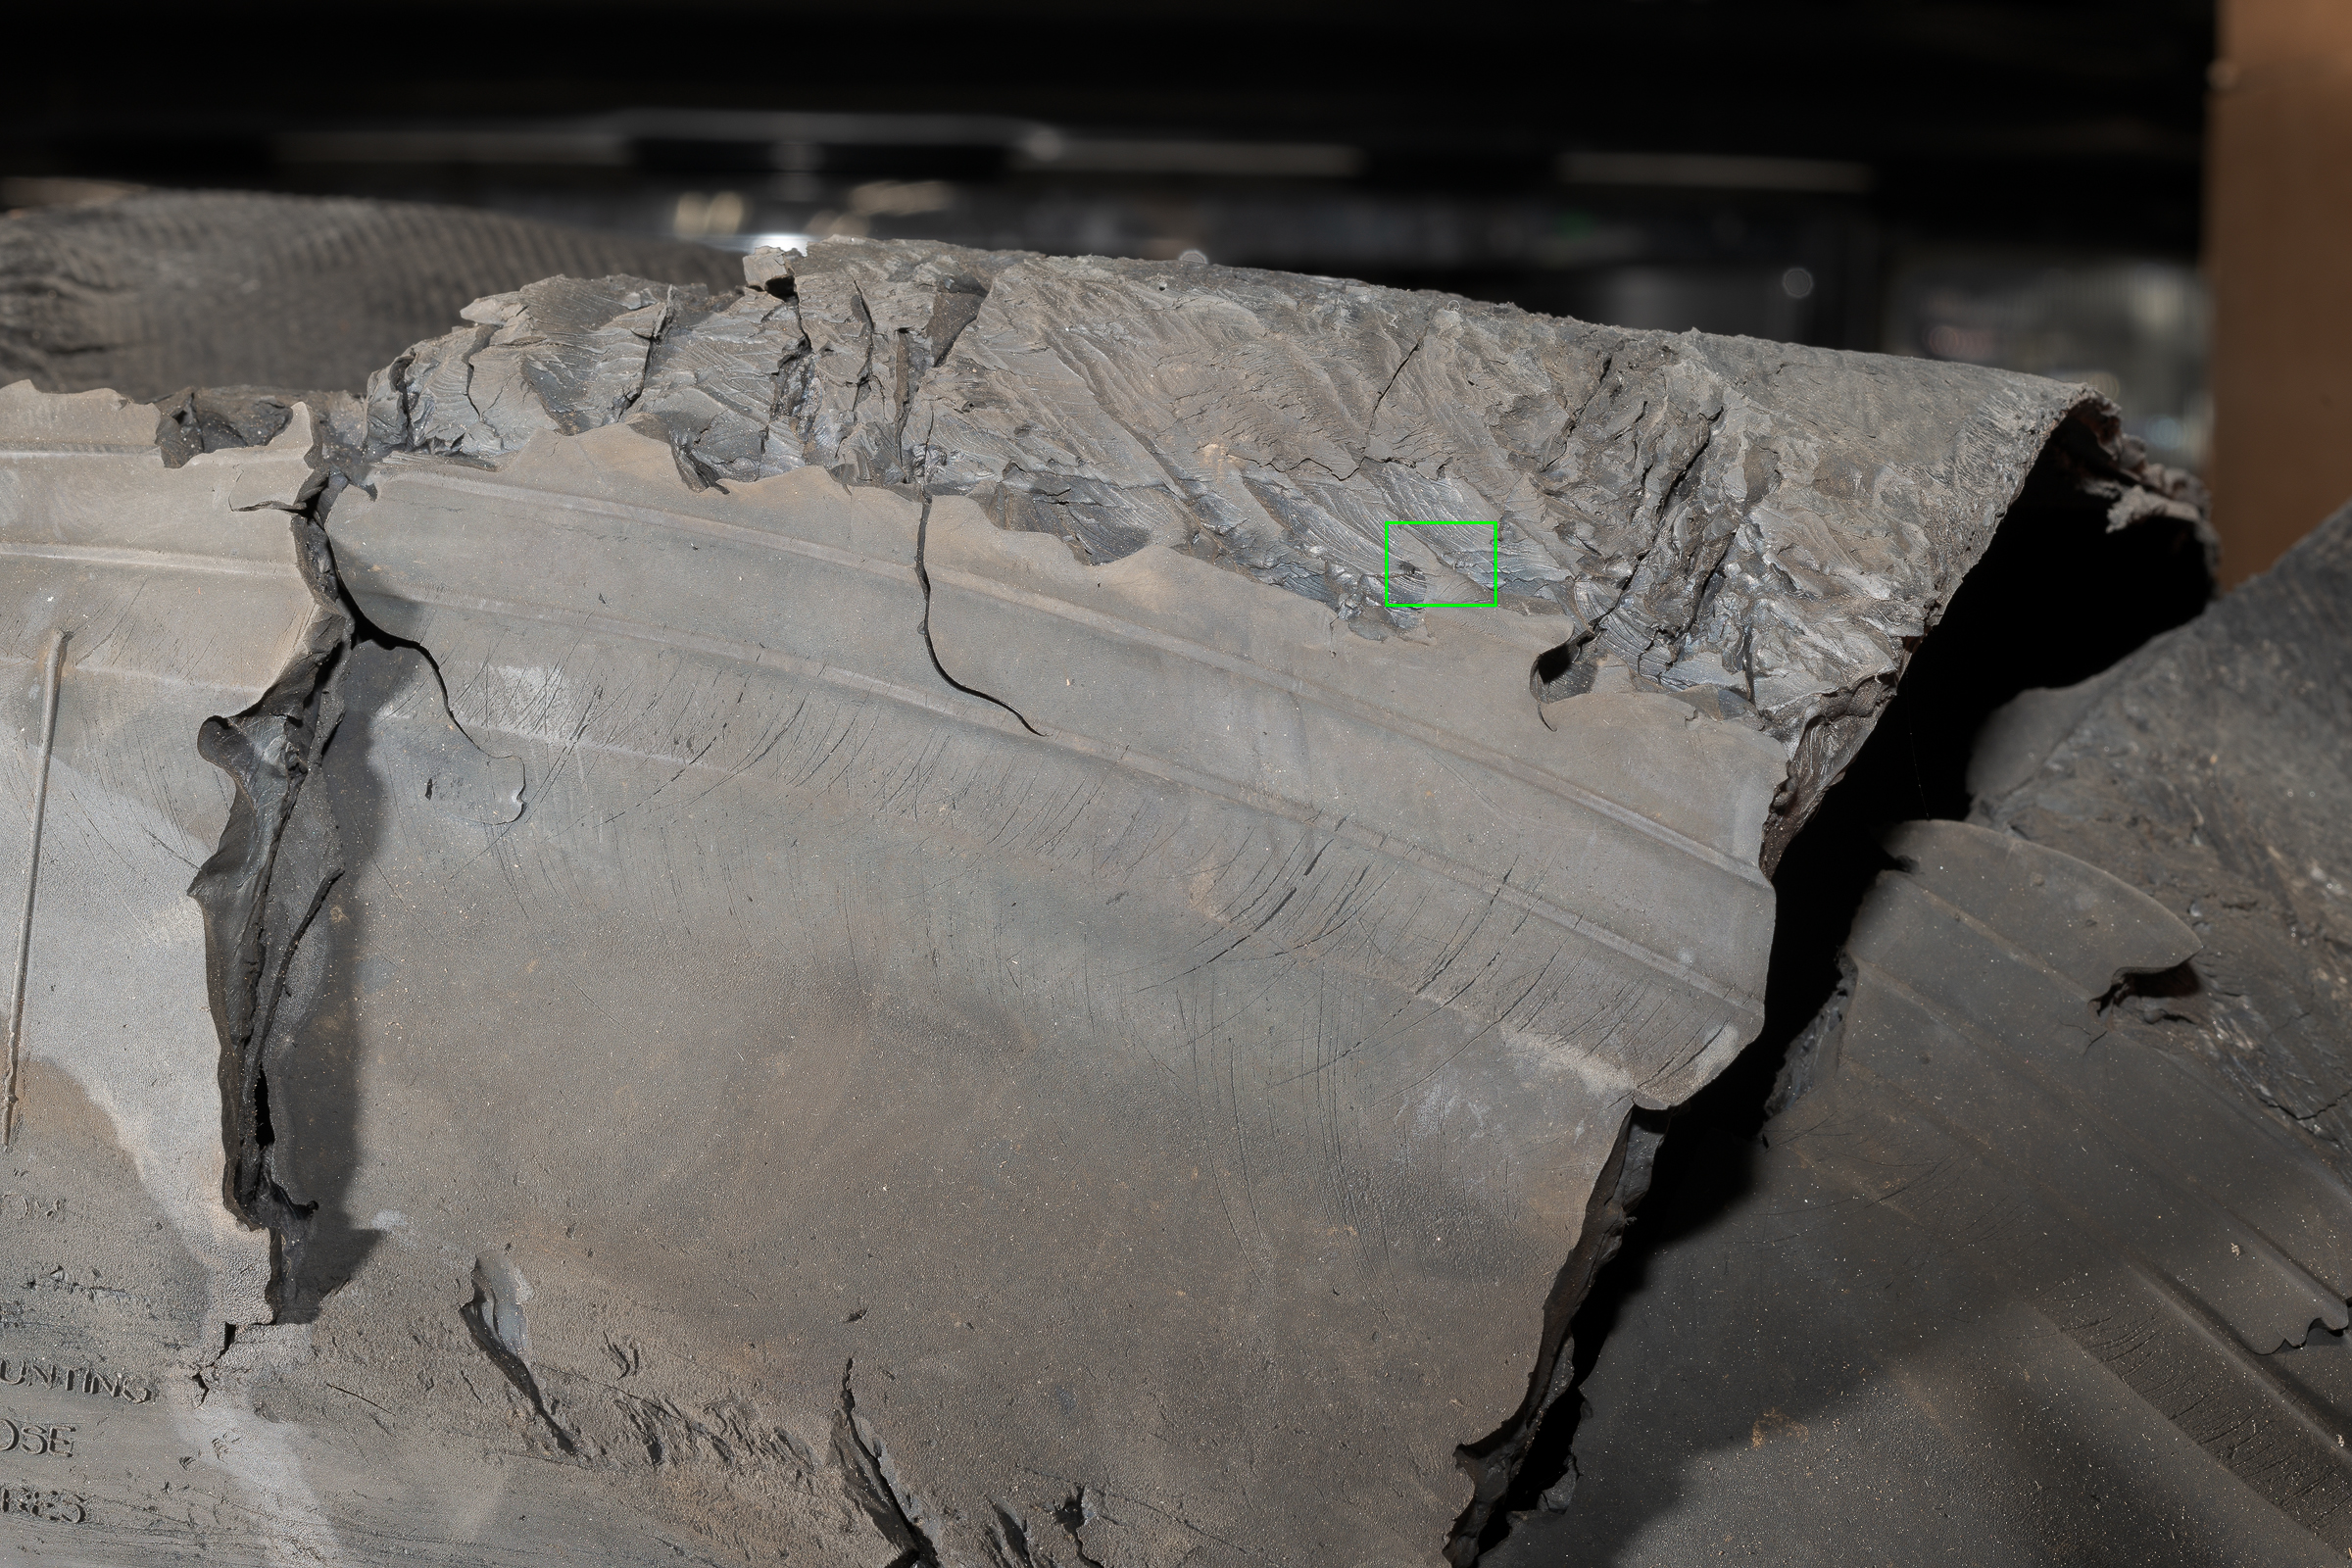
The green box in this first image highlights the tiny flap I wanted to make an extreme close-up photograph of.

Selection showing area of flap piece on tire. Made with ZEISS Milvus 50 mm macro lens on Nikon D850.

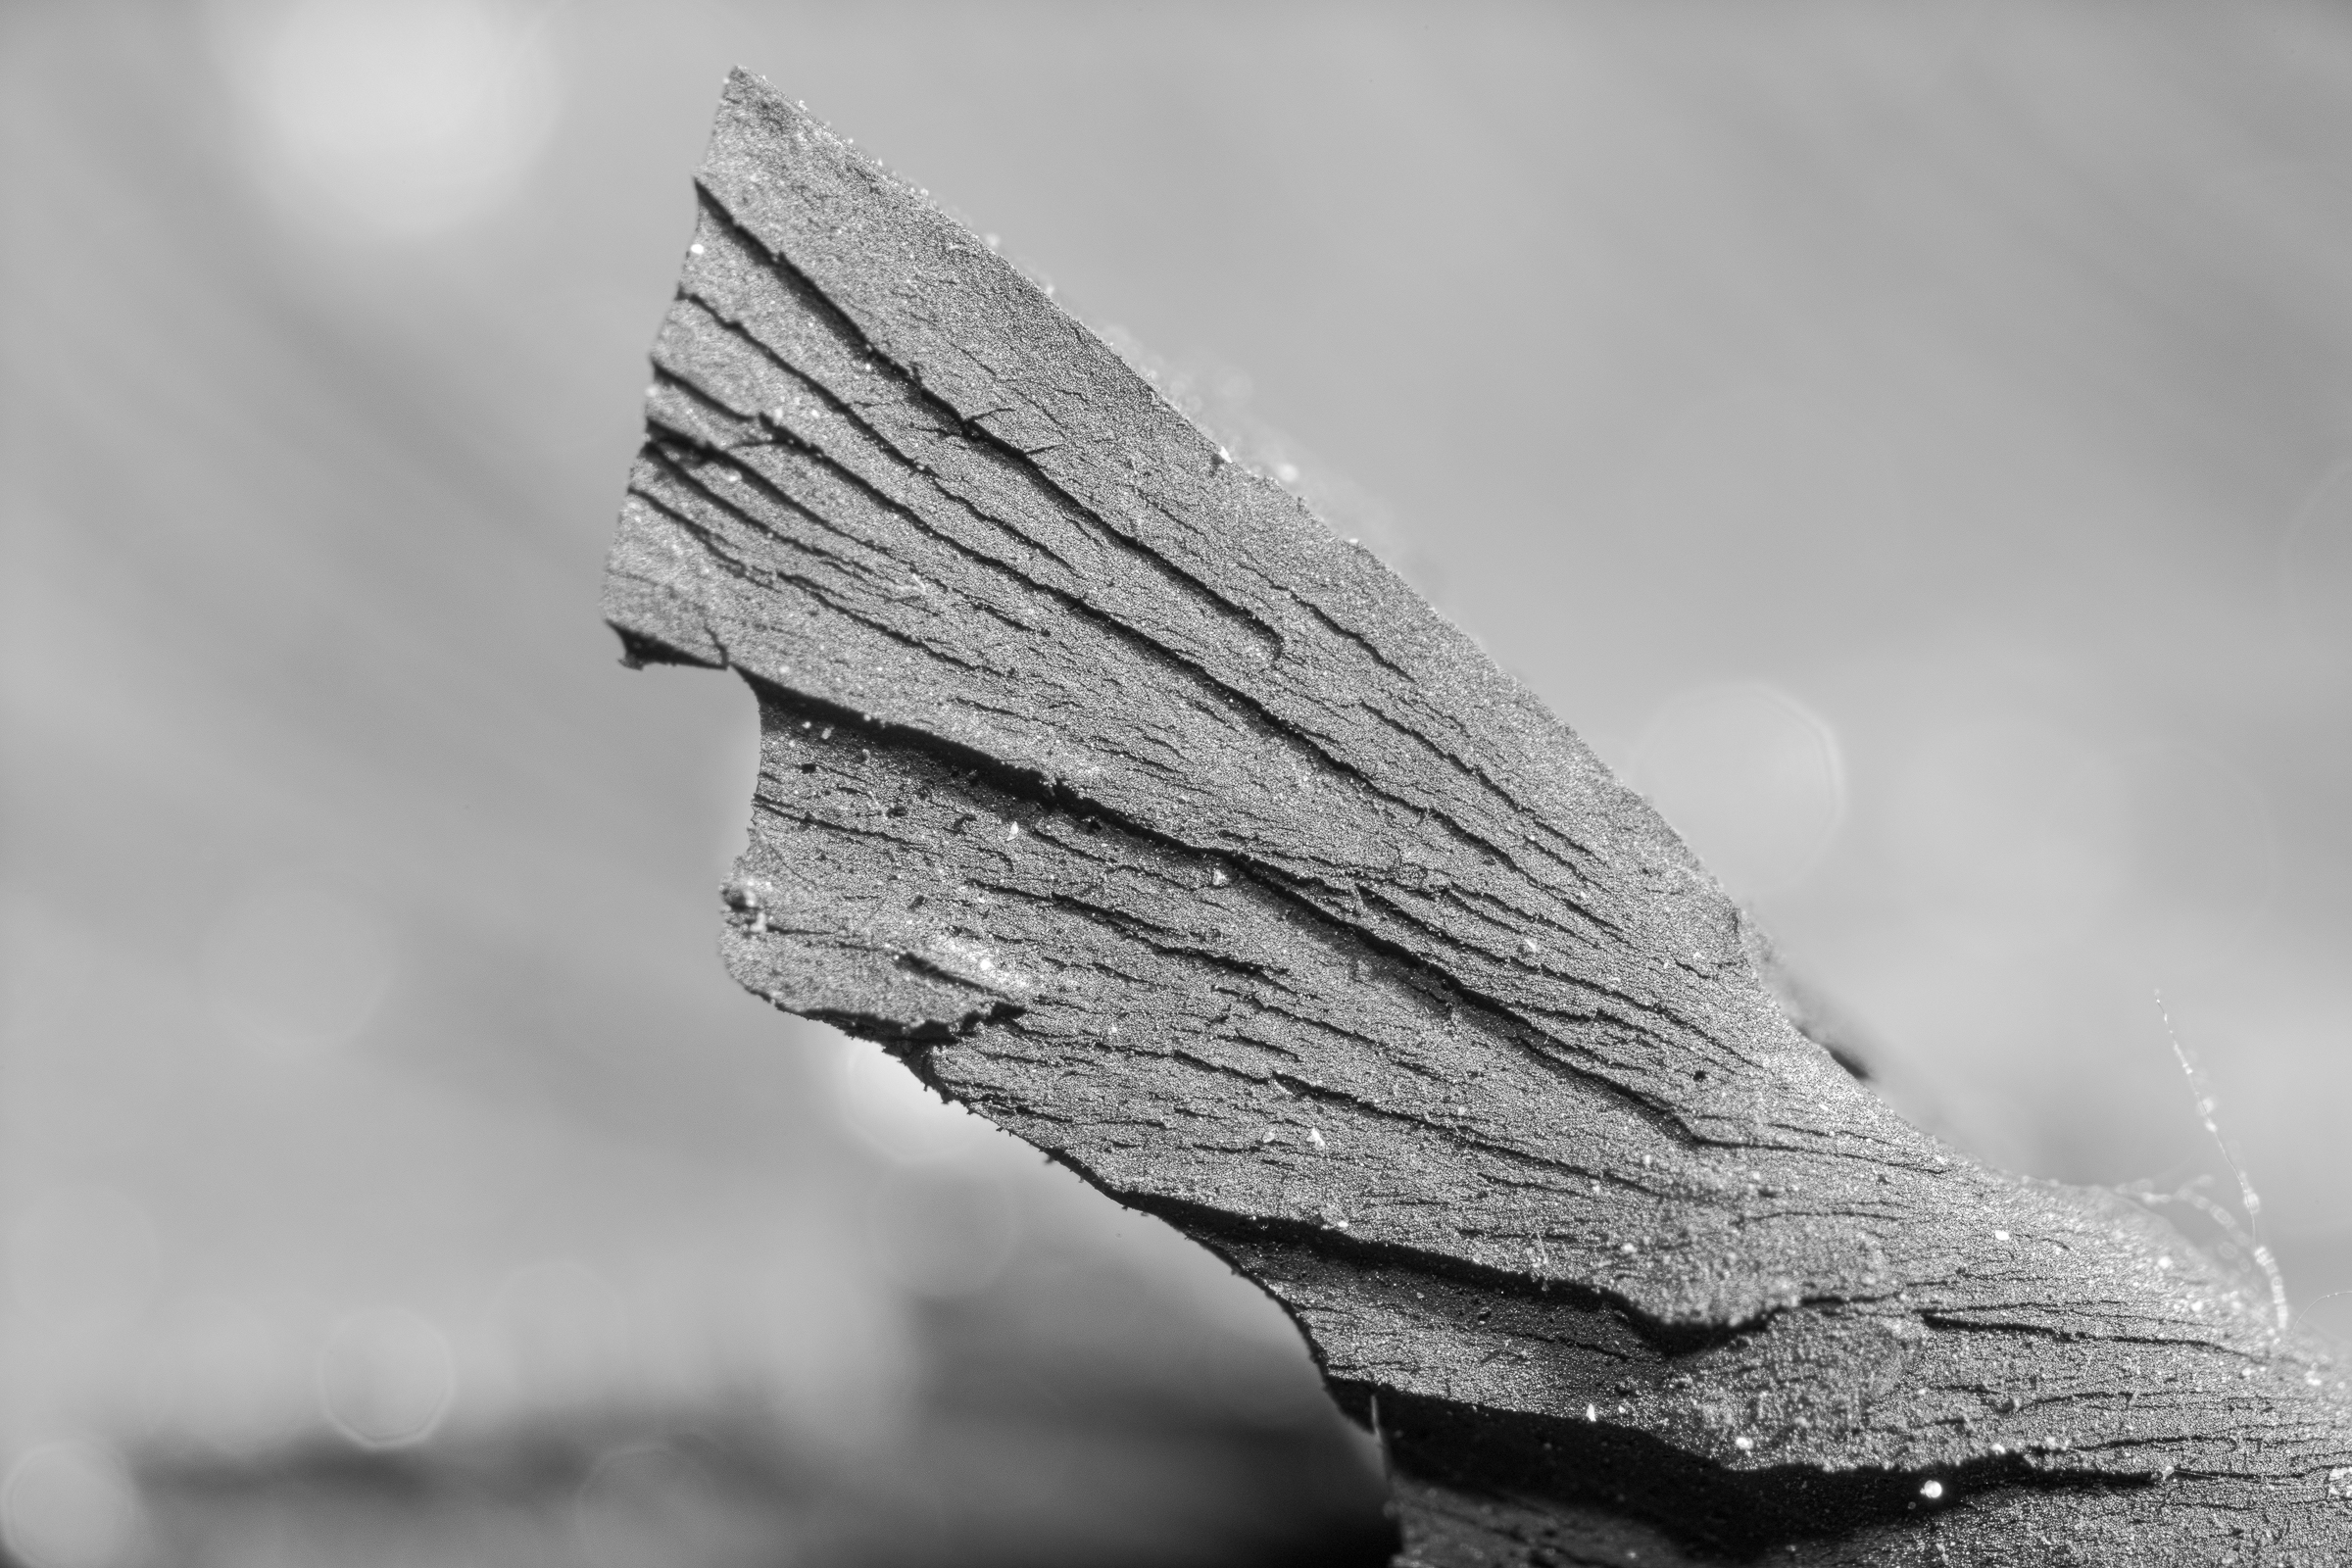
To illuminate the flap, I used a Nikon SB-910 flash mounted on my Nikon D850 camera hot shoe to control off-camera lights. I zoomed the lens all the way out to 5X magnification (5:1 reproduction ratio) to get the greatest enlargement possible. I then moved the camera on a pair of Really Right Stuff focusing rails until I was able to fill the frame with that tiny flap. Here is the result:

Close-up of flap piece on tire. Made with Laowa 25 mm Ultra Macro lens on Nikon D850 with flash.

That is the full size image; there was no cropping. The flap was covered with small dots of colors from the oils in the rubber compound. I felt these colored dots interfered with the subject, so I turned the image black & white.

You’ll notice that both the tip and the base of the flap are going out of focus. This is due to the inherent limited depth of field with such high magnification. It would have been easy to make everything appear to be in focus by taking a couple additional photographs at different focus points, then blending them together in focus stacking software such as Photoshop, Helicon Focus, or Zerene Stacker. But the purpose of this photo was to demonstrate the lens by itself.

Using this lens can’t be done on automatic, but if you align, focus, expose, and light properly, it’s an amazing performer at an amazingly low price.

Laowa 25 mm f/2.8 2.5-5X Ultra Macro Lens

Wow, that’s quite a name for a great, unique lens, and that name should make sense by the time you finish reading this.

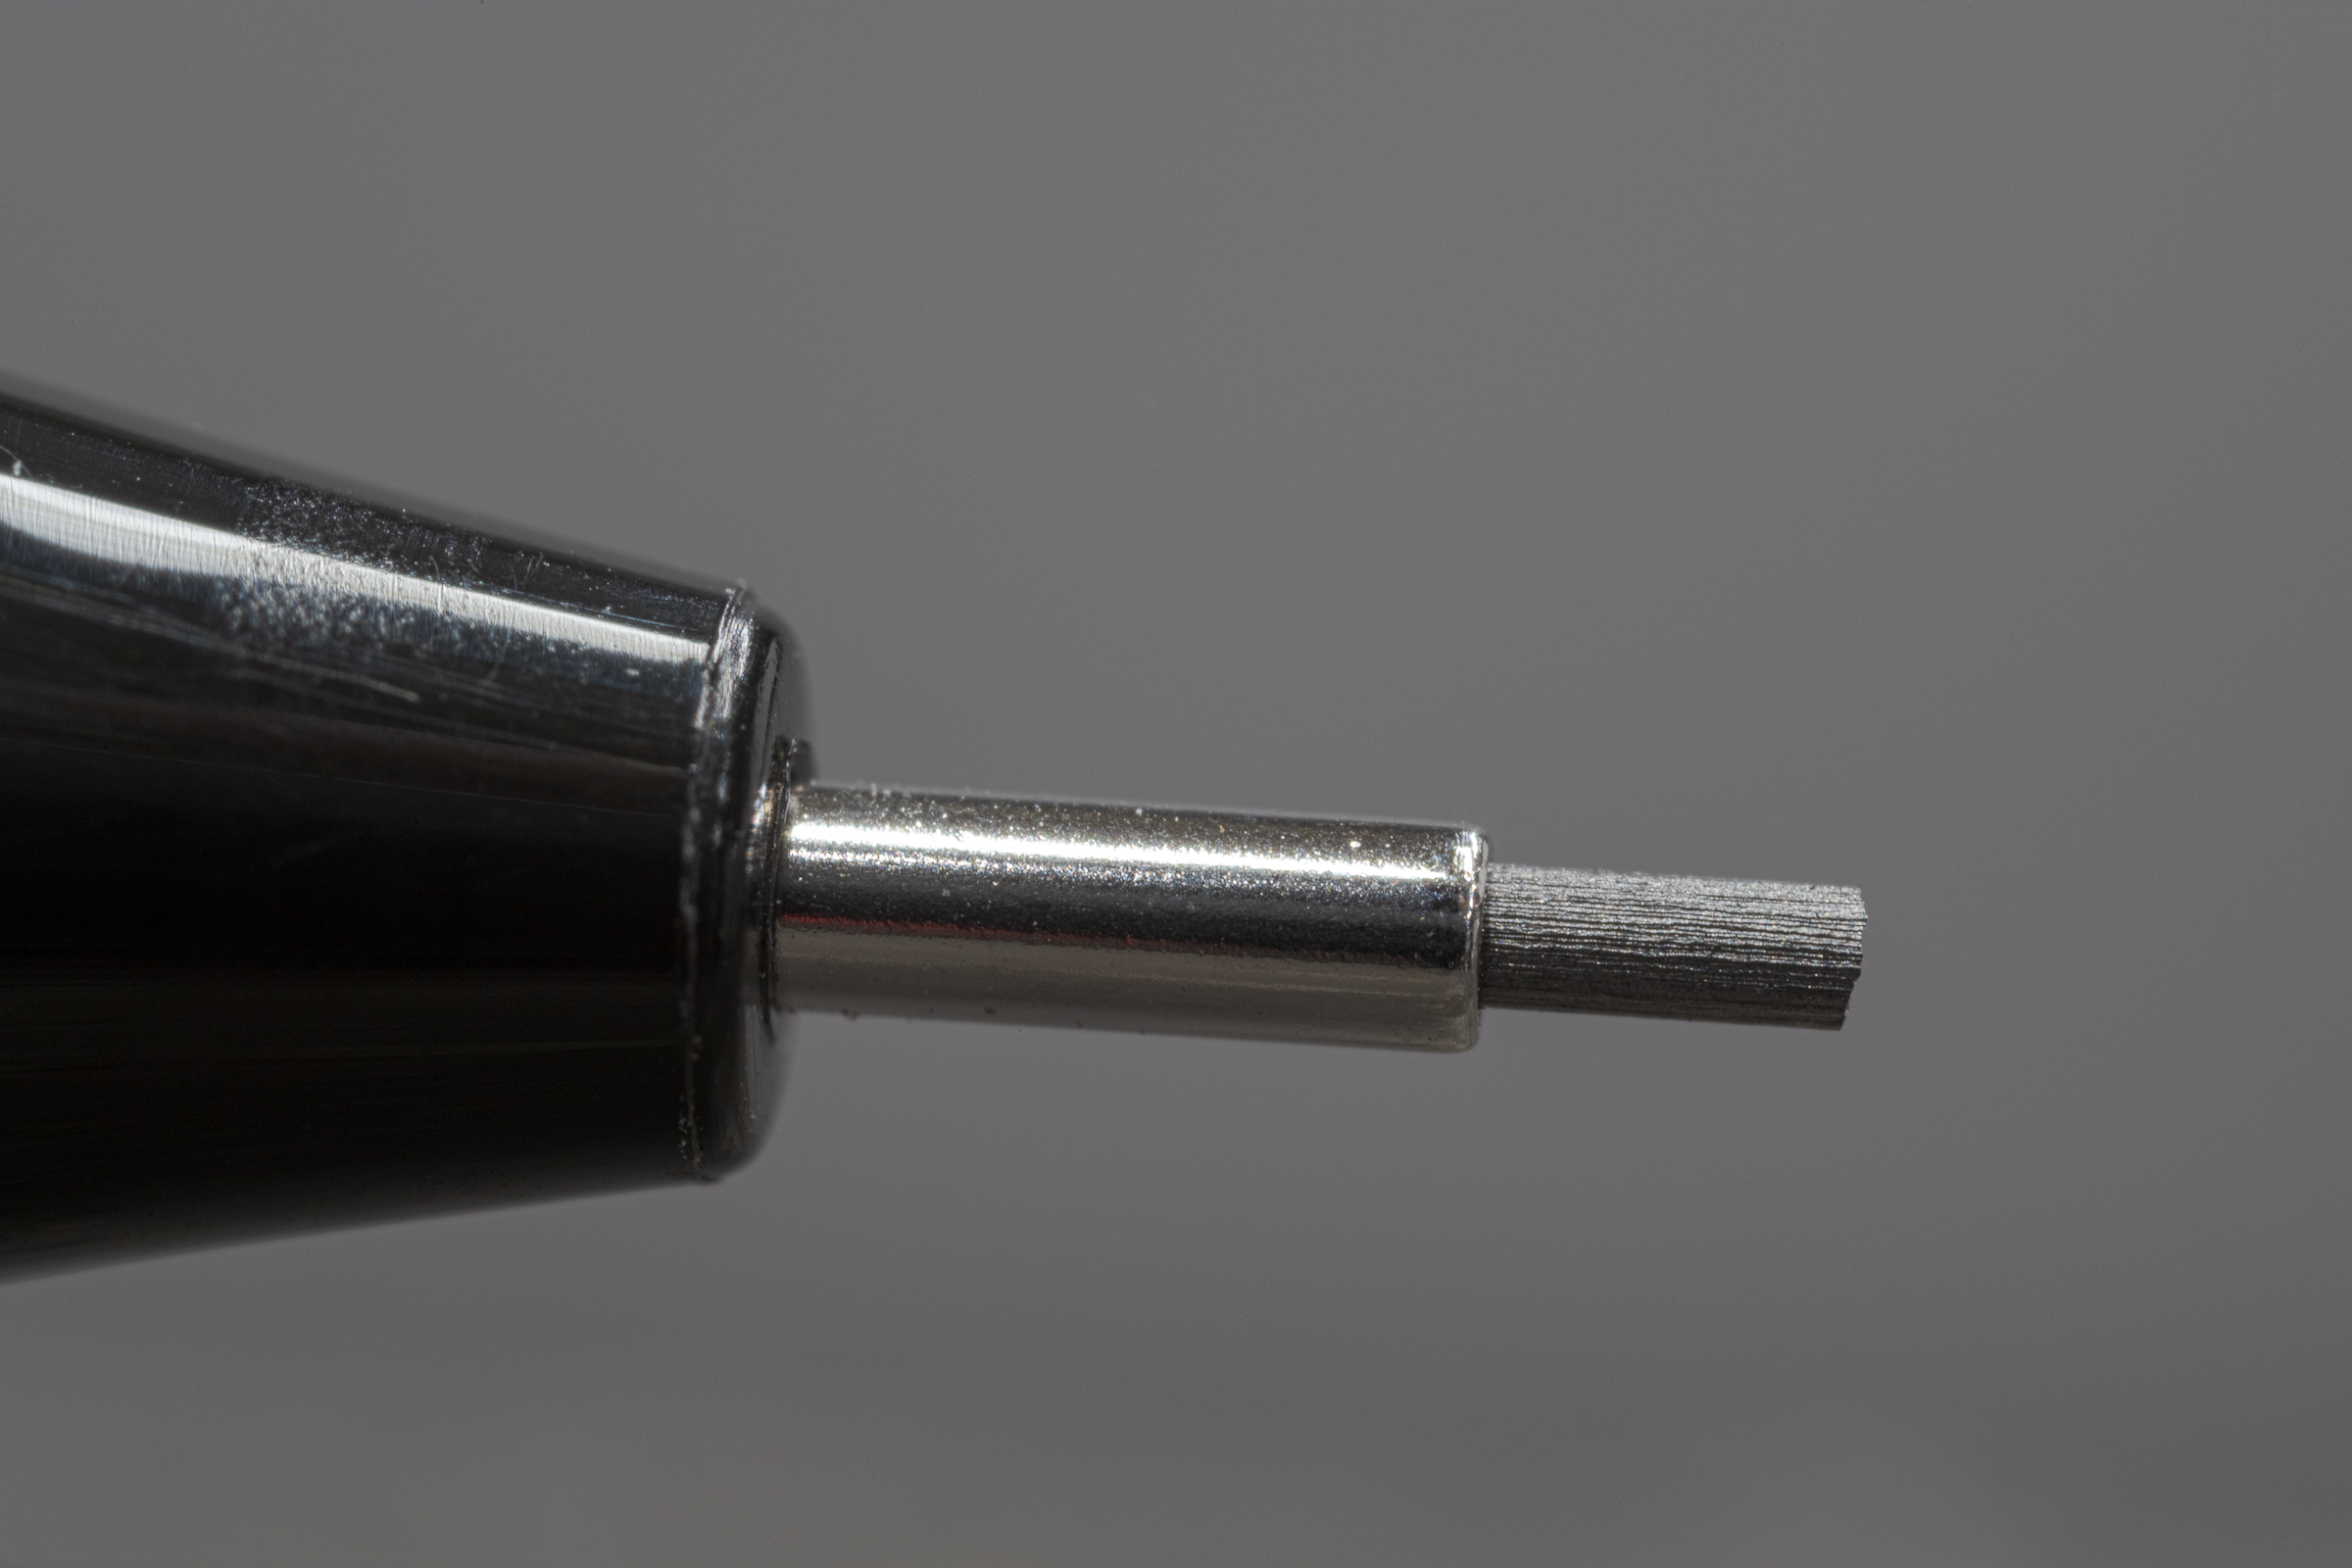
This photograph is a single shot of a 0.5 mm pencil lead at 4X magnification (4:1 reproduction ratio) made with that lens on a Nikon D850. I made it in my studio lab without using flash. The lens aperture ring was at f/11. I set the ISO at 160 and the shutter speed at 2.5 seconds. It is a full-frame image. In other words, it has not been cropped. (Click on any image to enlarge, then click back arrow to return to this post.)

0.5 mm pencil lead. Made with Laowa 25 mm Ultra Macro lens on Nikon D850.

By definition, a macro lens captures an image at 1:1 or 1X or life size, which all mean the same thing: the subject will be the same size on your sensor as it is in real life. Since a full frame sensor (FX in Nikon world) is a 1″ x 1.5″ rectangle, the subject, or piece of the subject you’re showing, would have to be no more than 1.5″ wide or 1″ high.

Most macro lenses have a reproduction ratio of either 1:1 (life size) or 1:2 (half life size). These may also be referred to as a 1X or 1/2X magnification, respectively.

My 60 mm and 105 mm Nikon macro lenses (“Micro-NIKKOR” in Nikon-speak) both have a 1:1 reproduction ratio. My usual lenses are ZEISS Milvus 50 mm and 100 mm macro lenses (ZEISS calls them Makro-Planar) have maximum reproduction ratios of only 1:2, or half life size. While either 1:1 or 1:2 is just fine for much of the photography I do, I often need greater magnification for certain details—especially for tire or other product analysis photos.

If you have a camera with a high resolution sensor, you could crop the image to just the area you want to show. But by cropping, you will be throwing away pixels and restricting the size of the image you can print or project as a trial exhibit. That negates the benefit of a high resolution camera. It’s much better to capture the image full frame without cropping so you keep all the resolution your camera can deliver.

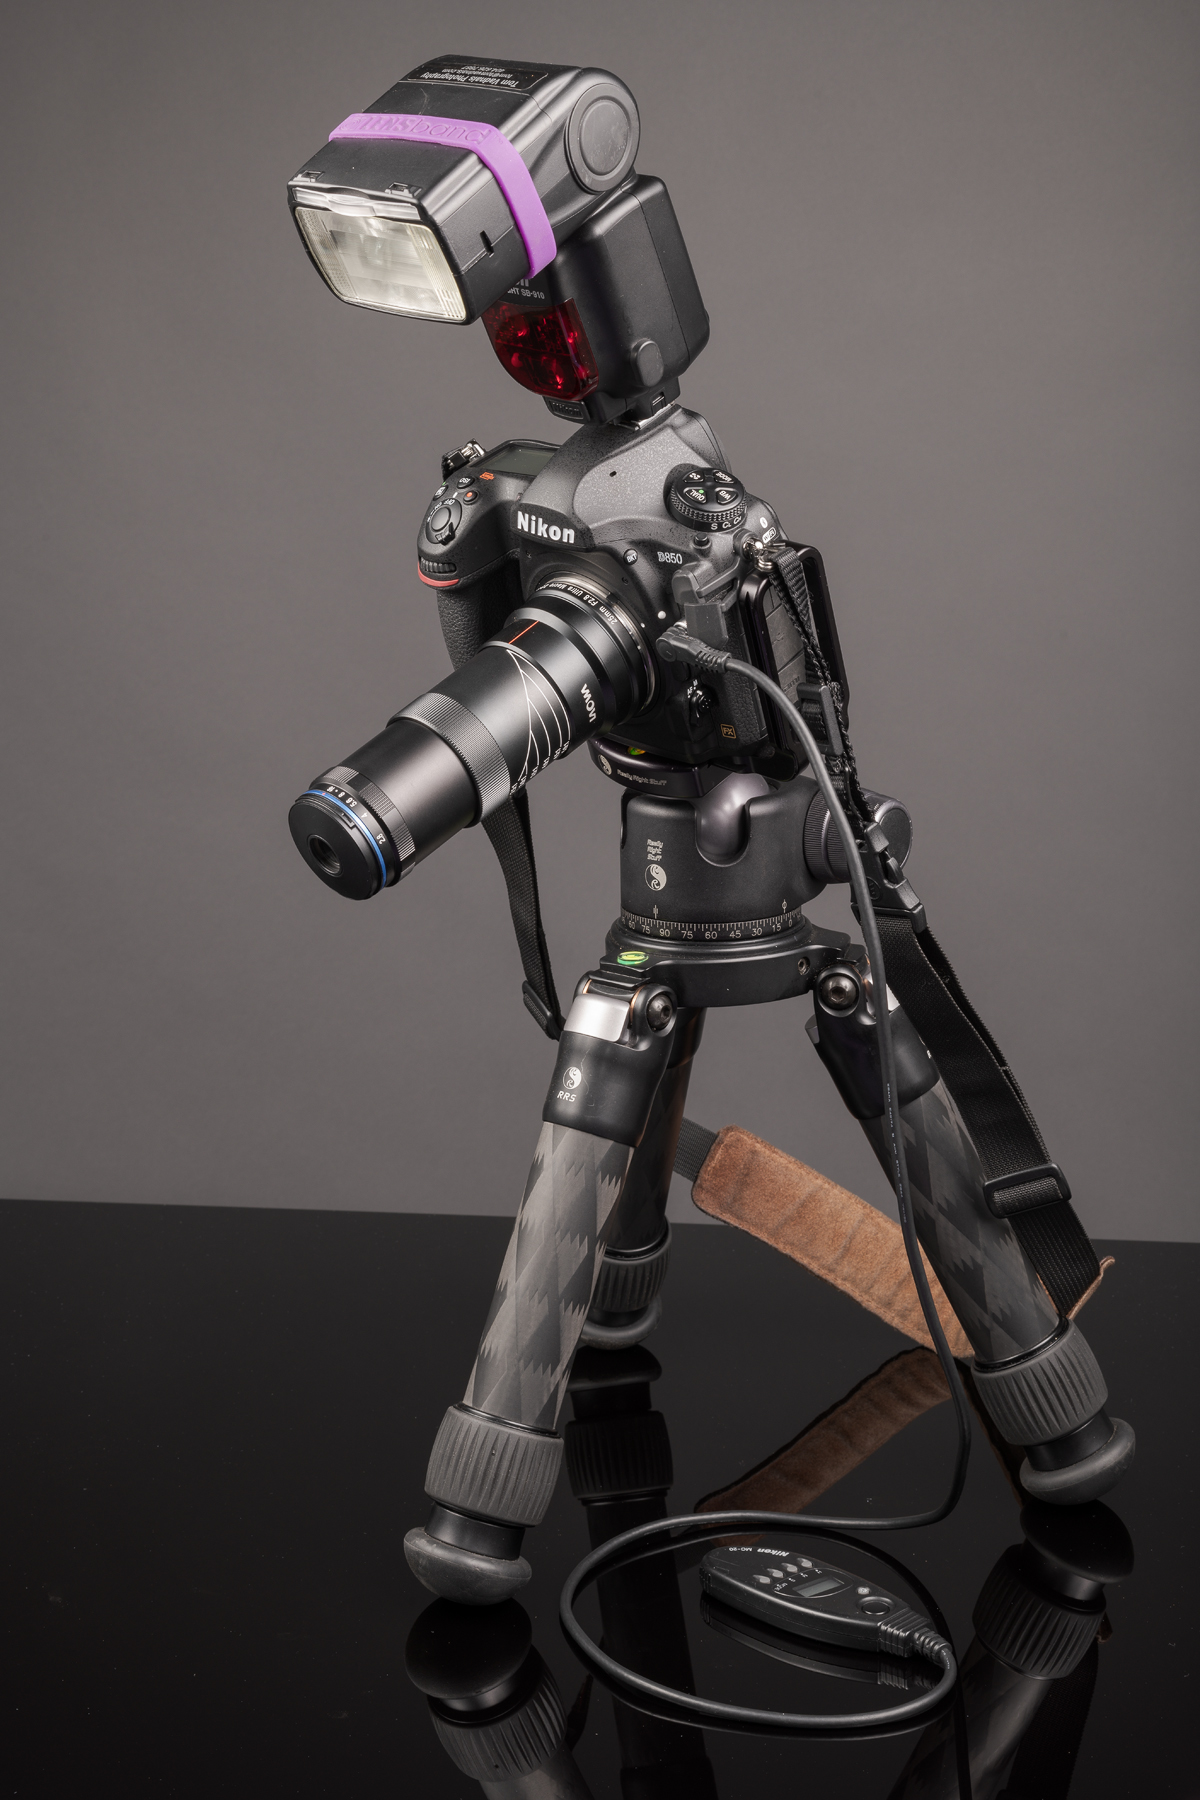
After trying all kinds of lenses and attachments, I found the Laowa 25 mm f/2.8 2.5-5X Ultra Macro lens works incredibly well. And it’s inexpensive at only $399 (http://www.venuslens.net/product/laowa-25mm-f-2-8-2-5-5x-ultra-macro-2/) or at B&H Photo Video (https://www.bhphotovideo.com/c/product/1399602-REG/venus_optics_ve2528n_laowa_25mm_f_2_8_2_5_5x.html). This lens is available in Nikon F, Canon EF, Pentax K, and Sony FE mounts. Adapters will allow it to be used on most other DSLR and mirrorless cameras.

Laowa 25 mm f-2.8 2.5 to 5x Ultra Macro on Nikon D850. Made with ZEISS Milvus 50 mm macro lens on Nikon D850.

Now, this is not a lens that you just pop on your camera and start taking incredible macro photos with. It’s a fully manual lens that does not communicate with your camera. It also doesn’t have a focus ring. So auto exposure and autofocusing are out.

Here are some considerations to keep in mind when using this lens:

-1- You need lots of light or very long shutter speeds for any kind of macro work. And the greater the magnification, the more light you need. This can be tricky with the small working distances involved.

-2- Raising your ISO won’t often be a great option because any additional noise will destroy the fine details you’re trying to capture.

-3- With high magnification, both your subject and your camera need to be perfectly still. That often means clamping down your subject and definitely means using a good, sturdy tripod for your camera.

-4- There is no focusing ring on the Laowa lens. You focus by moving the lens closer to or further away from your subject. Handholding is completely out of the question. Even with a good tripod, it can be quite tedious. You’ll really benefit from a macro focusing rail. It works best with Live View zoomed in to 100%. You’ll also want to illuminate your subject with a flashlight while you focus.

-5- You set the aperture on the lens, then adjust the ISO and shutter speed to match your lighting. You’ll need some experimentation and practice to get your exposure correct. This will become easier with experience.

-6- While stopping down your aperture increases depth of field (DOF), it also increases diffraction, which destroys the fine details you are trying to capture. The greater the magnification, the less DOF you have at any given aperture. If you can’t get adequate DOF at a given magnification, you should consider focus stacking a series of photographs. That involves taking multiple images with varying focus points, then blending them in Photoshop, Helicon Focus, or Zerene Stacker. More on focus stacking in a later blog post.

-7- To ensure the greatest DOF in a single image, or just a few images, it is best to photograph with your camera as perpendicular to your subject as possible. The greater the angle your camera is to your subject, the shallower the DOF will appear. To keep an offset subject all in focus would require multiple shots stacked in post-processing.

Why are Full Frame DSLRs called 35mm Equivalents?

Digital single-lens reflex (DSLR) cameras have either full-frame or cropped sensors. A full-frame DSLR sensor (called FX by Nikon) yields an image size approximately 24 mm x 36 mm, just like 35mm SLR film cameras did. Crop sensor cameras are usually 1.5x (DX for Nikon) or 1.6x (APS-C for Canon), but can be 1.2x or 1.3x.

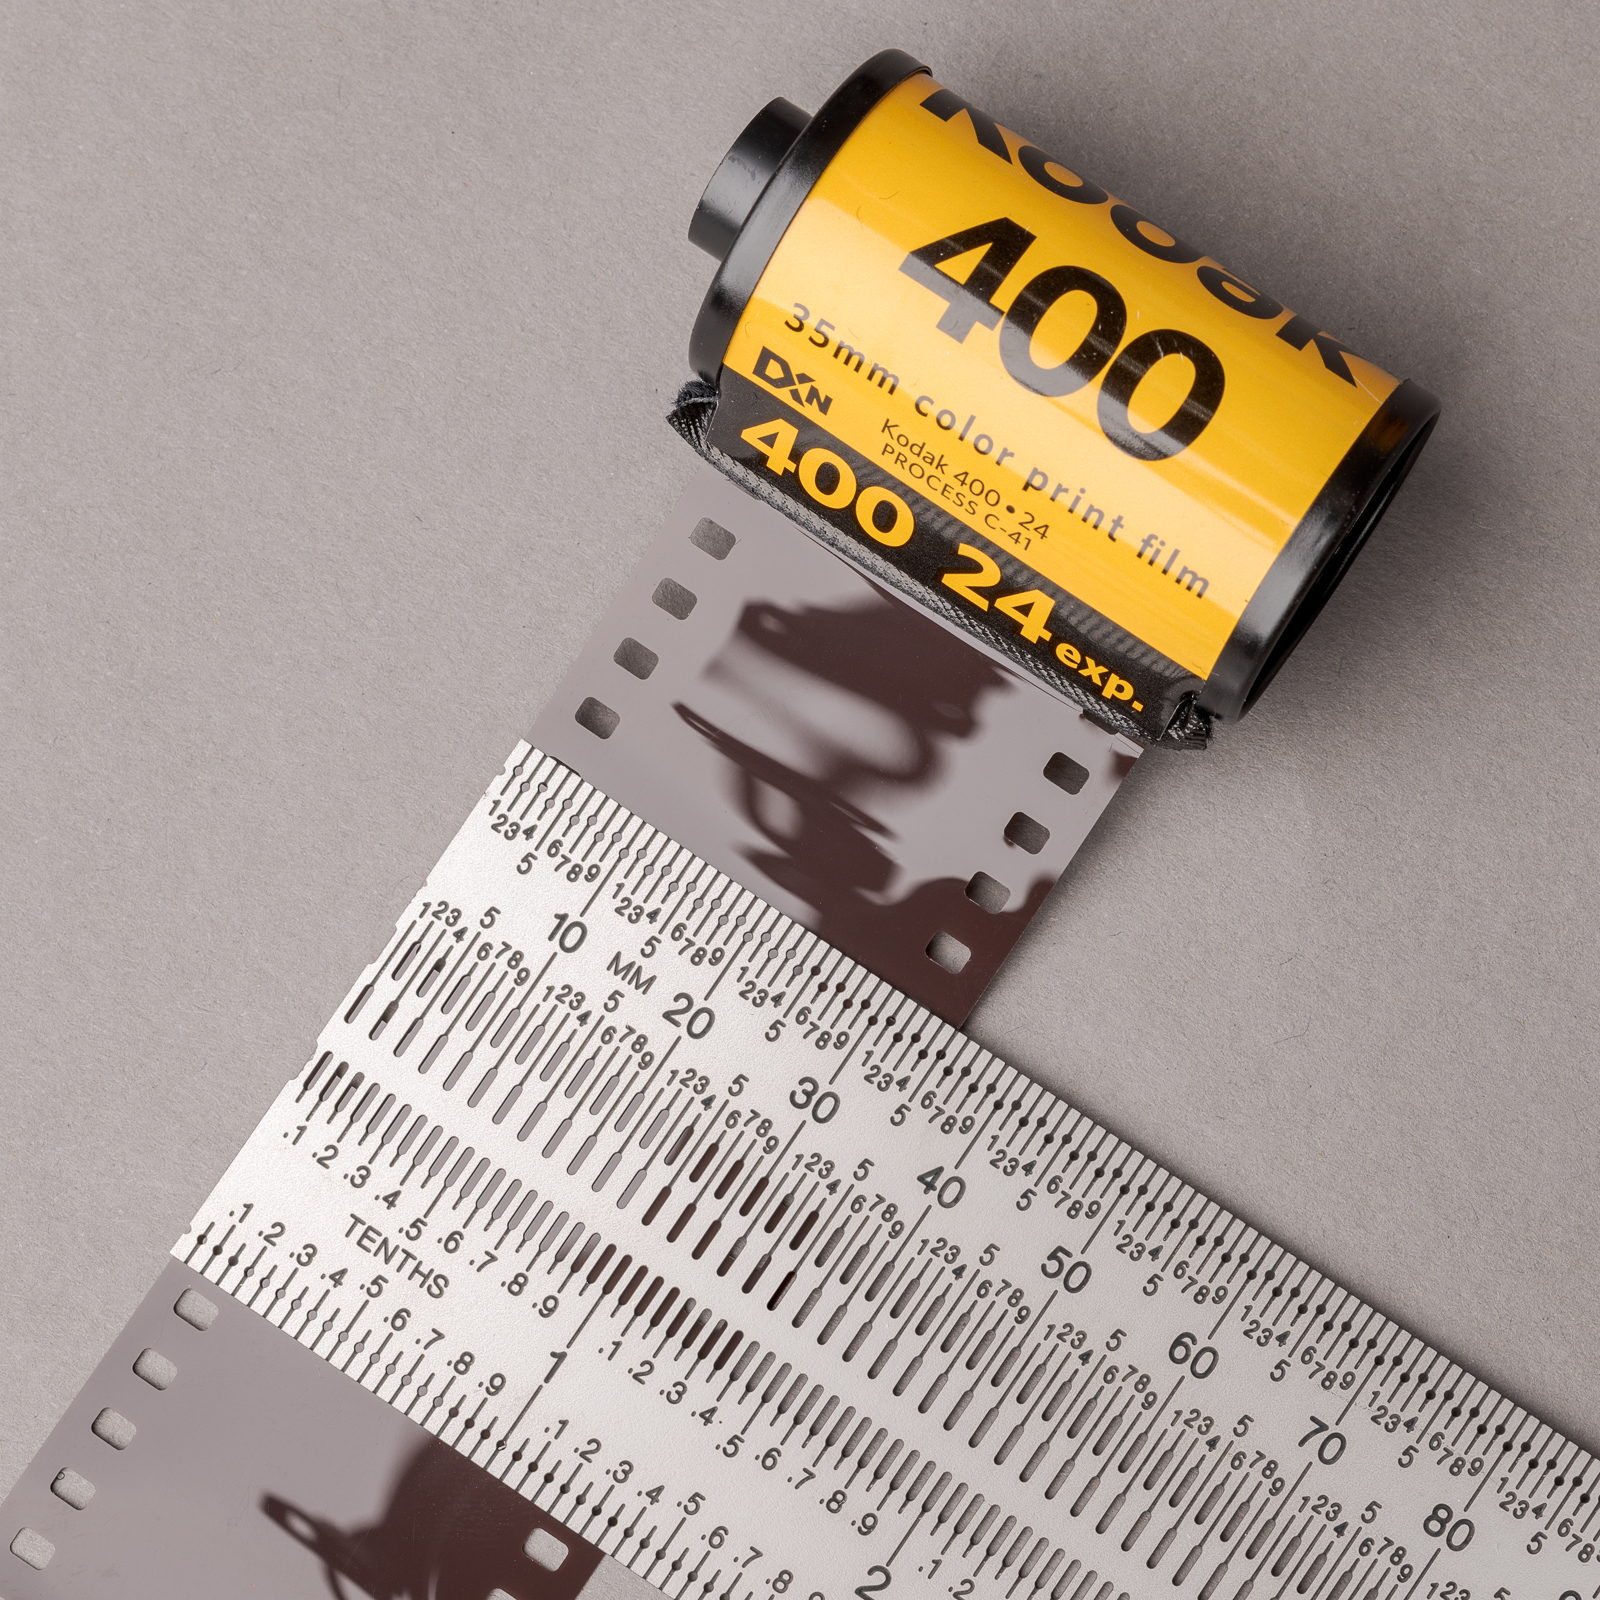
If the full-frame image size is 24 mm x 36 mm, why is it called 35mm? It’s obviously not the length of either side. The diagonal is 43.3 mm, so it’s not that either. (Click on image to enlarge, then click back arrow to return.)

35mm film width. (Made with ZEISS 50mm f/2 macro lens on Nikon D850.)
As the photograph shows, it turns out that 35 mm refers to the width of the film strip, including the sprocket holes.

While the “35 mm” designation has no direct relevance to the digital sensor size, it is still useful when referring to the focal length of lens. The diagonal, horizontal, and vertical angles of view of a given lens are the same with a full-frame digital sensor as they are on a 35 mm film camera. For example, the ZEISS Milvus 50 mm f/2 macro lens has a horizontal angle of view of 38 degrees on a full-frame digital sensor just as it does on a 35 mm film camera. The cropped sensor equivalent values will be the subject of another post.