Truck Tire Revs/Mile in HVEDR Downloads

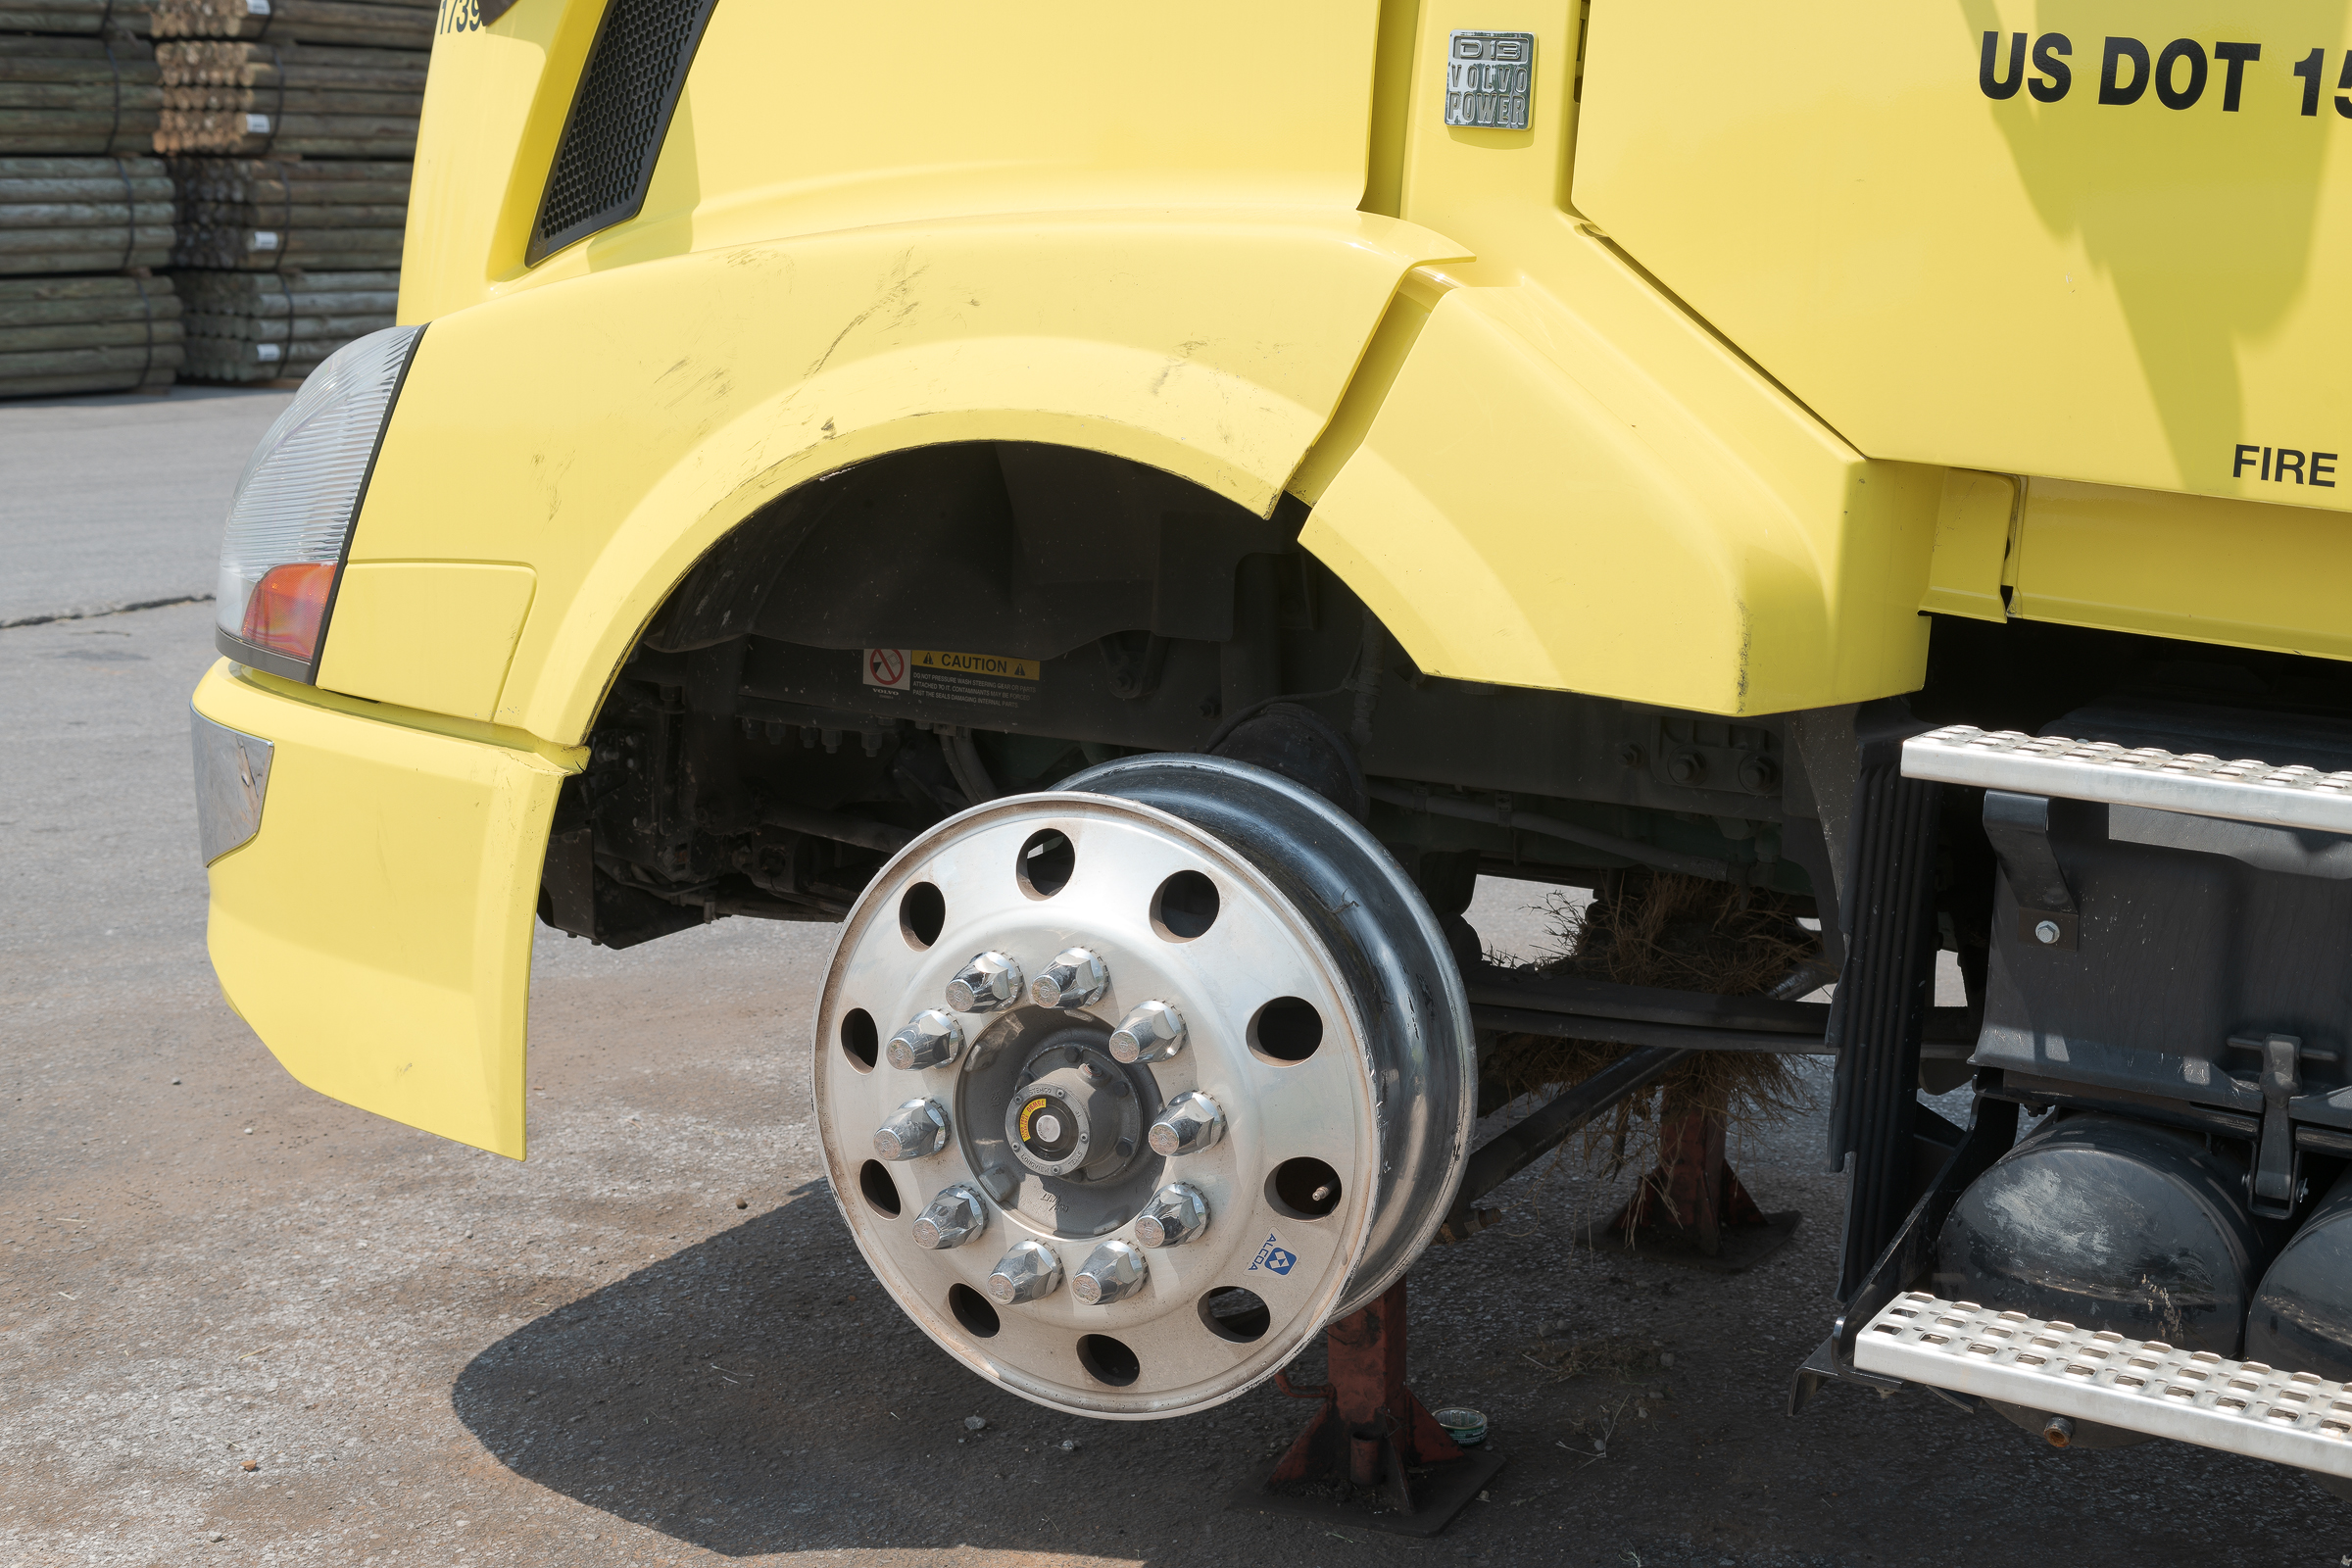
When inspecting a truck and downloading its HVEDR, it is important to document the actual tire parameters. This includes not only confirming tires sizes, but their load ranges. You must confirm that the tire sizes and load ranges match those on the safety certification label on the door jamb and in the values programmed into the HVEDR.

In its 2023 Truck Tire Data Book, Michelin summarizes the effects of different revs/mile in this Rule of Thumb: “When going from a lower Tire Revs./Mile [sic] to a higher Tire Revs./Mile, the actual vehicle speed is less than the speedometer reading. When going from a higher Tire Revs./Mile to a lower Tire Revs./Mile, the actual vehicle speed is greater than the speedometer reading.”

The revs/mile differences between load ranges in a given tire size might not be large, but they do exist—even in the same line of tires. For example, Michelin lists two 11R22.5 X Multi D tires: one load range G and the other load range H. For the load range G tire, Michelin lists the revs/mile as 496 while it lists 494 revs/mile for the load range H tire. Likewise, for the 11R22.5 Michelin X Line Energy Z tire line, the load range G revs/mile was 502 and the load range H was 503.

So just between two Michelin tire lines, there is a range of revs/mile from 494 to 503 for 11R22.5 tires. Not only that, but for one tire line, revs/mile were higher for the LRH tire than the LRG, while for the other tire line, the opposite was true.

At first it may seem that all tires of the same size would have the same revs/mile. But variations in tire construction, tread design, and tread depth can result in small variations in the actual revs/mile of a specific tire of the same size.

Tire companies determine the revs/mile from the test procedures set out in SAE Recommended Practice J1025. J1025 specifies speed (45 mph), load, inflation pressure, ambient temperature, configuration, break-in, warm up, surfaces, measurement devices, and test distances required for each test.

The four revs/mile values of the four 11R22.5 Michelin tires above weren’t far apart, but it is best to check and confirm. And even though a small difference in revs/mile may not end up being significant in your analysis, you want to confirm that the truck tires sizes and load ranges matched what was used when programming the HVEDR.

Many trucks have a variety of tire brands, sizes, load ranges, or a mixture of original and retreaded tires. In some cases, the truck may be gone or repaired, and all you have to work with is the HVEDR report itself. When you have tire variations or unknown tires, you might consider researching the ranges of any relevant tire property, like revs/mile, then running a sensitivity analysis to quantify the effect that range of values might have on any subsequent analysis involving data from the report.

Takeaways:

-1- During a truck inspection, don’t just document the tire manufacturer(s) and tire size(s), but be sure to include the tire load range(s). Compare their properties with the programmed values in the HVEDR report.

-2- If there are variations in the truck’s tires, check the various tire properties against the HVEDR programmed values.

-3- Using those tire property variations, it might be useful to perform a sensitivity analysis to quantify the effect of a range of revs/mile or other variable.

-4- To learn how to apply HVEDR data, I highly recommend SAE International class C1901 Advanced Applications of Heavy Vehicle EDR Data taught by Wes Grimes, Greg Wilcoxson, Dave Plant, and Brad Higgins:  https://www.sae.org/learn/content/c1901/

SAE Automotive Forensic Photography Class – April 2023

SAE International has scheduled my next Photography for Accident Reconstruction, Product Liability, and Testing (C1729) class at their excellent Troy, MI facility from April 4-6, 2023: https://www.sae.org/learn/content/c1729/

It’s a great facility and is quite easy to access on W Big Beaver Rd just off I-75. It’s about 45 minutes from the Detroit airport. There are plenty of hotels and a lot of great restaurants in every price range.

The link above provides a detailed course outline. We’ll also get hands-on time to practice with exposure, flash, polarizers, tripod use, and more.

If you have any questions or would like more details, please feel free to email or call.

I look forward to seeing you there!

Photographing into the Abyss with the Laowa Probe Lens

Well, maybe not the abyss, but into a recess….

I needed to document the bolt holes on a wheel that came off the front of a pickup to show whether or not the wheel had been loose on its studs.

After making overall photos of the wheel and tire assembly, I made close-ups of the mounting surface and bolt holes from the back of the wheel. But on the outside of the wheel, the bolt holes were too deeply recessed to use a standard macro lens.

It was important to photograph the lug nut mating surface at the bottom of each recess, but it was nearly impossible both to get light down each recess and to fill the image frame with each hole. I wanted to get sharp, detailed, full frame images of the mating surface—not images cropped from a larger view.

The solution was the unique Laowa Probe lens. (I have previously discussed another unique Laowa super macro lens. I’ve found Laowa lenses to be well made and optically excellent.)

As the photo below shows, the Probe is a 16-inch long tube with a small diameter 24 mm lens surrounded by tiny LED lights at its end. You use a small USB power brick to power those LED lights. Laowa supplies a USB cable with a built-in dimmer switch, but you must supply the power brick. [Click on photo to enlarge, then click on back arrow to return to this post.]

Nikon D850 with Laowa 24mm f/14 2X Macro Probe macro lens made with Nikon Z 7II with Nikon Z 24-70 mm f/2.8 lens and two Profoto B1x studio flashes. f/16, 1/200 sec, ISO 200.

Laowa offers the Probe with several different mounts for many popular DSLR and mirrorless cameras. I used the Nikon F-mount version of the Probe lens on my Nikon D850. Note that all versions of the Probe require manual focusing and exposure; there are no electronic connections between the Probe and any camera.

Fortunately, the lens barrel fit perfectly into the recessed bolt hole, allowing me to get a full frame image of the mounting surface at the bottom. All I had to do was to adjust the intensity of the LEDs, adjust the exposure, and click the shutter. [Click on photo to enlarge, then click on back arrow to return to this post.]

Nikon D850 with Laowa 24mm f/14 2X Macro Probe macro lens made with Nikon Z 7II with Nikon Z 24-70 mm f/2.8 lens and two Profoto B1x studio flashes. f/16, 1/200 sec, ISO 200.

To steady the lens, manually focus, and keep the lens perpendicular to the bottom of the recess, I had the camera mounted on my rolling studio camera stand, which acted like an easily-adjusted tripod on wheels.

As you’ll see, the next two images made with the Probe lens required 0.5 and 0.3 second exposure times, respectively. That range of shutter speeds required that the camera  be secured on a tripod to eliminate camera shake. Raising ISO to get handholdable shutter speeds would introduce noise, reduce detail, and reduce dynamic range. That would defeat the whole purpose of using the Probe to get sharp, detailed full frame images.

The first image I made for each paired hole (the wheel was drilled for two bolt patterns) was to show the bolt hole pair, while concentrating on the appropriate bolt hole. [Click on photo to enlarge, then click on back arrow to return to this post.]

Nikon D850 with Laowa 24mm f/14 2X Macro Probe. f/unrecorded, 0.5 sec, ISO 64.

I then slid the end of the Probe deeper into the recess to fill the frame with details of the mounting surface. [Click on photo to enlarge, then click on back arrow to return to this post.]

Nikon D850 with Laowa 24mm f/14 2X Macro Probe. f/unrecorded, 0.3 sec, ISO 64.

I know of no other way to have attained this image without significant cropping and the inherent loss of detail and resolution.

Although it’s not a lens I use all that often, I’ve found the Probe unmatched for photographing inaccessible labels, fasteners, or other components, too. The built-in LED lights around the lens make it a really useful tool.

If you have (or anticipate) a singular need for it, you can rent one in just a day or two from someone like LensRentals.com at: https://www.lensrentals.com/catalog_search?q=laowa+probe.

Takeaways:

-1- The Laowa Probe (along with the more recent Peri-Probe) lens is a unique, specialized macro lens that can allow you to photograph areas that are otherwise inaccessible.

-2- The Laowa Probe lens allows you to capture all the resolution and detail of full frame images that would be lost with a significant crop.

-3- If you are stymied about how to photograph a challenging subject, you might be able to find a commercially available specialized solution.

-4- While it is preferable to have specialized lenses at your disposal, you can always rent lenses (or other photography gear) for infrequently encountered situations. Of course, you might find yourself using even seemingly specialized lenses more often if you own them and have them readily available.


Perspective: The Effect of Focal Length on both Subject and Background

Perspective is the relationship between the elements in your photograph. The only way to change perspective is to move the camera. In fact, any time you move the camera, your perspective automatically changes. Conversely, staying in one place and zooming in or out doesn’t change perspective; it only crops the image differently.

This series of photographs demonstrates perspective change by using a 24-70 mm zoom lens and changing the camera position while using four increasingly long focal lengths: 24, 35, 50, and 70 mm . All were made from my standing eye height. The goal was to keep the subject car the same size in each image by moving the camera further away at each longer focal length.

When the resulting images are viewed at the same distance, you’ll note two effects from increasing camera distances while using longer focal lengths: -1- the car appears to change shape and compress, and -2- the background and other vehicles seem to be getting closer to the subject car.

This spectacular 1937 Cord Model 812 Beverly Sedan was photographed at the Savoy Automobile Museum in Cartersville, GA. Like most car museums, neither tripods nor flash are allowed. This requires using high ISO and slow shutter speeds to obtain your images. Fortunately, almost all full frame  and some cropped sensor mirrorless cameras have amazingly effective in-body stabilization, which allows handholding the camera at low (slow) shutter speeds that were almost impossible before.

While these examples were made at a car museum, the principles apply exactly the same for any vehicle—or any subject—anywhere.

For this first image—made with a 24 mm focal length—I was quite close to the car. Note how long the hood looks and how far away the DeLorean and the background appear. [Click on image to enlarge, then click back arrow to return to post.]

Made at Savoy Automobile Museum, Cartersville, GA, using handheld Nikon Z 7II with 24-70 mm f/2.8 lens at 24 mm. Exposure: f/9, 1/30 sec, ISO 1600.

Stepping backward with a 35 mm focal length, the Cord looks less distorted, and the background vehicles seem closer. Of course, no vehicles were moved between any of these images. [Click on image to enlarge, then click back arrow to return to post.]

Made at Savoy Automobile Museum, Cartersville, GA, using handheld Nikon Z 7II with 24-70 mm f/2.8 lens at 35 mm. Exposure: f/9, 1/30 sec, ISO 1600.

Moving further away using a 50 mm focal length appears to once again shorten the hood and wheelbase of the Cord, while bringing the background even closer. [Click on image to enlarge, then click back arrow to return to post.]

Made at Savoy Automobile Museum, Cartersville, GA, using handheld Nikon Z 7II with 24-70 mm f/2.8 lens at 50 mm. Exposure: f/9, 1/30 sec, ISO 1600.

Back even further with a 70 mm focal length apparently compresses the Cord even more and brings the DeLorean and background closest yet. [Click on image to enlarge, then click back arrow to return to post.]

Made at Savoy Automobile Museum, Cartersville, GA, using handheld Nikon Z 7II with 24-70 mm f/2.8 lens at 70 mm. Exposure: f/9, 1/30 sec, ISO 1600.

Takeaways:

-1- When you move your camera, the perspective of your resulting image changes.

-2- When viewing images from the same distance, moving your camera closer to your subject with a wider focal length makes your subject appear distorted and your background objects farther apart.

-3- Again, when viewing images from the same distance, moving your camera farther away from your subject with a longer focal length makes both your subject and background elements to appear more compressed.

Camera Position May Result in Unintentionally Deceptive Image

Although the effect is usually unintentional, a single image may be deceptive!

In the photograph below, both the height and the angle of the camera seem to indicate that the subject SUV was a two-door model. But actually, there was no such vehicle as a two-door 2004 Chevrolet Trailblazer. In fact, the subject shown here was even the extended EXT version of the standard four-door. (Note the top of the chopped off B-pillar visible above the window frame, which is the clear giveaway that it is actually a four-door SUV.) [Click on image to enlarge, then click back arrow to return to post.]

2004 Chevrolet Trailblazer EXT LT 4WD 3/4 side view. (Nikon D850 with ZEISS Milvus 50 mm f/2 macro lens with polarizer, fill flash, and tripod. f/13, 1/40 sec, ISO 125.)

It is standard practice to make multiple photographs around every subject vehicle. It’s also often necessary to make images at different heights and angles. No one who sees all of our photographs will be deceived. The problem is when you get only one or maybe a couple photos of a subject you either haven’t or can’t inspect yourself.

Using the same prime ZEISS 50 mm lens at the same tripod height, the photo below clearly shows the vehicle was a four-door. [Click on image to enlarge, then click back arrow to return to post.

2004 Chevrolet Trailblazer EXT LT 4WD side view. (Nikon D850 with ZEISS Milvus 50 mm f/2 macro lens with polarizer, fill flash, and tripod. f/13, 1/30 sec, ISO 125.)

This unintended deception isn’t an issue when you’re making your own photographs, but it can be a problem if you’re trying draw conclusions based on a limited number of photographs provided to you. This frequently happens when the vehicle has been destroyed or is otherwise unavailable, and only one or a couple photographs—often made with a cell phone—are all the evidence that remains.

Takeaways:

-1- Be careful making conclusions based on a single photograph.

-2- Make a series of images around the entire circumference of any vehicle or subject you are documenting.

SAE Accident Reconstruction Digital Summit Presentation Slides

Thanks to Matt Wasowski of SAE for putting together such an excellent digital accident reconstruction conference, and thanks, Matt, for allowing me to present. Thanks to all those who attended, too. Sorry about my abrupt exit; it was a technical glitch on my end.

As promised, here are the slides from my talk: Tom Vadnais Photography SAE Presentation_2022-03-30. Bonus: You’ll see there are some additional slides that I had to remove from the talk to get it to fit the alloted time. No additional charge for those extras! Ha, ha.

Please don’t hesitate to call or e-mail if you have any questions about what we covered or about my upcoming SAE class. I hope I get to meet you personally at my class July 12-14, 2022, at Mecanica Scientific Services in Oxnard, CA.

SAE Photography Class — July 12-14, 2022

With live classes now returning to SAE, I’m excited to announce that my next Photography for Accident Reconstruction, Product Liability, and Testing class will be July 12-14, 2022 at Mecanica Scientific Services’s fantastic classroom facilities in Oxnard, CA. Special thanks to Mecanica’s John Steiner for hosting this class for the third time!

Here’s a link for more information and to register: SAE Photography Class July 2022.

The class has ten major subject modules that build upon each other. We’ll explore in-depth about gear, light, camera fundamentals, settings, post-processing, and much, much more. You’ll come away not just knowing about, but actually understanding how to make better, more consistent, and more useful photographs during all your inspections and analyses, regardless of lighting conditions.

Please call or e-mail me directly if you have any questions or need more information.

I hope to see you there!

SAE Accident Reconstruction Digital Summit

SAE International is hosting a FREE Accident Reconstruction Digital Summit on March 29 and 30, 2022. There will be presentations on a wide variety of current issues and areas of interest to anyone working in or with accident reconstructionists, including law enforcement, engineers, attorneys, and insurance adjusters.

From 1:45 to 2:15 pm EDT on Wednesday, March 30, I’ll be presenting on the importance of using a tripod, a polarizer, and a flash during inspections in the field, in storage facilities, and in the lab. The use of those tools can result in superior images—in the camera—with detail and data you can’t extract or replicate later in post-production. Best of all, you can put those three tools to work immediately, which will make your photographs consistently better and more useful.

Here’s a link to the Summit: SAE Accident Reconstruction Digital Summit. Again, registration is free and available here: SAE Accident Reconstruction Digital Summit Registration. I hope to virtually see you there!

By the way, my presentation will be just a snippet of what we’ll cover in my three-day SAE Forensic Photography class. Now that SAE will be resuming in-person classes this summer, I’ll post the next class dates as soon as they are finalized.

Best Time to Photograph a Wreck Site

While this is hardly news, on sunny or lightly overcast days, the positions and sizes of the shadows of trees, buildings, signs, poles, fences, guardrails, etc., change throughout the day. At certain times, these shadows can make it difficult to clearly show tire marks, paint marks, or gouges in your photographs. The worst is when there is a pattern of light and shadow across your scene.

This first image was made at 10:21 am on a mostly sunny morning. (Click on image to enlarge. Then click back arrow to return to this post.)

Tree shadows at 10:21 am on 09/04/21. (Made with ZEISS 50 mm f/2 macro lens on Nikon D850 on RRS TFC-24L tripod with BH-40 ball head. f/11, 1/8 sec, ISO 64.)

This view was made looking south, so the morning sun would have been to left, or east. The dense line of trees on the eastern edge of the road cast a shadow across the entire road with bright spots through the openings in the branches. These bright spots can interfere with details or evidence you might want to show.

Returning to that same scene at 2:45 pm that afternoon, the overcast had burned off. Even though the sun was quite bright, it was at an angle that evenly illuminated a lot more of the road, with only some shadows at the left. (Click on image to enlarge. Then click back arrow to return to this post.)

Tree shadows at 2:44 pm on 09/04/21. (Made with ZEISS 50 mm f/2 macro lens on Nikon D850 on RRS TFC-24L tripod with BH-40 ball head. f/11, 1/60 sec, ISO 64.)

By late afternoon that day, it had become too overcast for deep shadows, so I went back a couple afternoons later to capture what that scene would look like later on a sunny day.  The image below was made at 6:52 pm. (Click on image to enlarge. Then click back arrow to return to this post.)

Tree shadows at 6:52 pm on 09/09/21. (Made with ZEISS 50 mm f/2 macro lens on Nikon D850 on RRS TFC-24L tripod with BH-40 ball head. f/11, 1/15 sec, ISO 64.)

Those seemingly innocuous trees to the west (right of the photo) were now casting long, separated shadows across the road. These shadows would obviously make it more difficult to show gouges, tire marks, or even paint marks on the pavement.

Time permitting (i.e., it’s not a rapid response), it’s worth checking out where the sun and any shadows would be before you set out to inspect a scene.

For many years, I’ve been using The Photographer’s Ephemeris (TPE) https://photoephemeris.com/en to determine where the sun is going to be in relation to any accident site. (It’s now a subscription service, and well worth the small cost.) It’s extremely valuable if you need to show whether the sun could have been in the eyes of any drivers or witnesses.

And as in this case, it’s also useful for determining when you have the best chance of getting clean site images with minimal shadows. Below are the three TPE screen captures that show what information you get.

The first shows where the sun was when the 10:21 am photo (top one above) was made. (Click on image to enlarge. Then click back arrow to return to this post.)

TPE 10:21 am on 09/04/21.

The line of the sun is shown as the narrow gold line coming in from the lower right toward the pin marking where my tripod had been set up. Note that while the photographs were made looking south, the TPE diagrams have north at the top. So the morning sun in the east will be from the left side in the photos and from the right side in the TPE diagrams. (Just FYI, the wider yellow line at the upper right was the sunrise angle while the wider orange line at the left was the sunset angle.)

This diagram showed that at 10:21 am on 09/04/21, the sun would have been coming in from the eastern side of the road through a thick area of trees, which is exactly what was shown in the top photograph.

At 2:45 pm on the same day, the sun was beyond the thick trees to the east, yet below the tree line to the west. This should result in a photograph with minimal shadows on the road, as the second photo above shows. (Click on image to enlarge. Then click back arrow to return to this post.)

TPE 2:45 pm on 09/04/21.

When I went back a couple days later at 6:52 pm, the TPE diagram showed that the sun would now be far enough west that it would come through the line of single trees to the west once the sun got low enough in the sky. Once again, that is precisely what the third photo above illustrates. (Click on image to enlarge. Then click back arrow to return to this post.)

TPE 6:52 pm on 09/09/21.

TPE gives both the azimuth and altitude of the sun. In this post, I’m only using the azimuth for direction, and applying a general knowledge of how high the sun will be from experience. For a question about whether the sun was in a driver’s eye, you’ll have to use both azimuth and altitude. That’s a future post.

TPE has many more sophisticated applications, including using AI to show where the sun or moon will be in a scene. It’s well worth getting and exploring all of its features. (I have no ties to TPE nor receive any compensation from them. It’s just a great tool I highly recommend.)

Takeaways:

-1- Before you photograph your wreck site, it’s often worth determining when the sun will cause the fewest or shortest shadows on your road.

-2- The Photographer’s Ephemeris is well worth using when you need to know where the sun will be at specific times on specific dates.

Including References in Accident Site Photographs

Photographs of collision sites in most intersections, or in residential or commercial areas, will have recognizable elements that orient a viewer to that area. Conversely, many stretches of rural roads, interstates, or other limited-access highways have few, if any, distinctive features. While it will be assumed that your photos show the road where the wreck occurred, without visible landmarks, it may be difficult for viewers to relate to the area. Signs, bridges, guardrails, and other roadside objects can be helpful—but only if you include them in your photographs.

As an example, the top of a fireworks store is partially visible at the top of the image below, but it isn’t visible enough for a viewer to determine where this photograph was made. [Click on photograph to enlarge, then click on Back arrow to return to this post.]

Accident site with truck blocking sign. (Nikon D810 with ZEISS Milvus 50 mm f/2 macro lens.)

By the way, this photograph was made for two purposes. First, it showed the roadway in the direction the accident vehicles were coming from. Second, it showed an oncoming vehicle as it crested the hill (vertical curve) on the approach to the area of impact to give a sense of the sight distances involved.

While the fireworks store is a partial clue, the timing of the tractor trailer in the above photo obsured an exit sign, visible below, that would definitively place where the photo was made to someone generally familiar with the area. [Click on photograph to enlarge, then click on Back arrow to return to this post.]

Accident site with sign as reference. (Nikon D810 with ZEISS Milvus 50 mm f/2 macro lens.)

Unless you intend to depict the effect of obscuring an element at a site, which sometimes you may wish to do, it is worth making a habit of reviewing your images while you’re still in the field to ensure you haven’t accidentally masked an important feature you meant to show.

Five takeaways:

-1- You should make photographs of the approach to a wreck scene to establish where the vehicle or vehicles came from.

-2- If a hill, curve, tree line, building, etc., obscures the view of an approaching vehicle, in any direction, you may want to capture the view both without any vehicles and then with a vehicle just coming into view to assist in visualizing the visibility distance.

-3- Especially on a rural road or on a limited-access highway, photographs including signs or other roadside features can help a viewer relate to where the photo was made.

-4- You can time your photographs so that passing vehicles will or will not obstruct certain roadside features at an accident site, depending on what you are trying to illustrate in each photo.

-5- You should include unobstructed permanent roadside objects in at least one photograph so you won’t be embarrassed by failing to fully document a wreck site.