Photographs of collision sites in most intersections, or in residential or commercial areas, will have recognizable elements that orient a viewer to that area. Conversely, many stretches of rural roads, interstates, or other limited-access highways have few, if any, distinctive features. While it will be assumed that your photos show the road where the wreck occurred, without visible landmarks, it may be difficult for viewers to relate to the area. Signs, bridges, guardrails, and other roadside objects can be helpful—but only if you include them in your photographs.
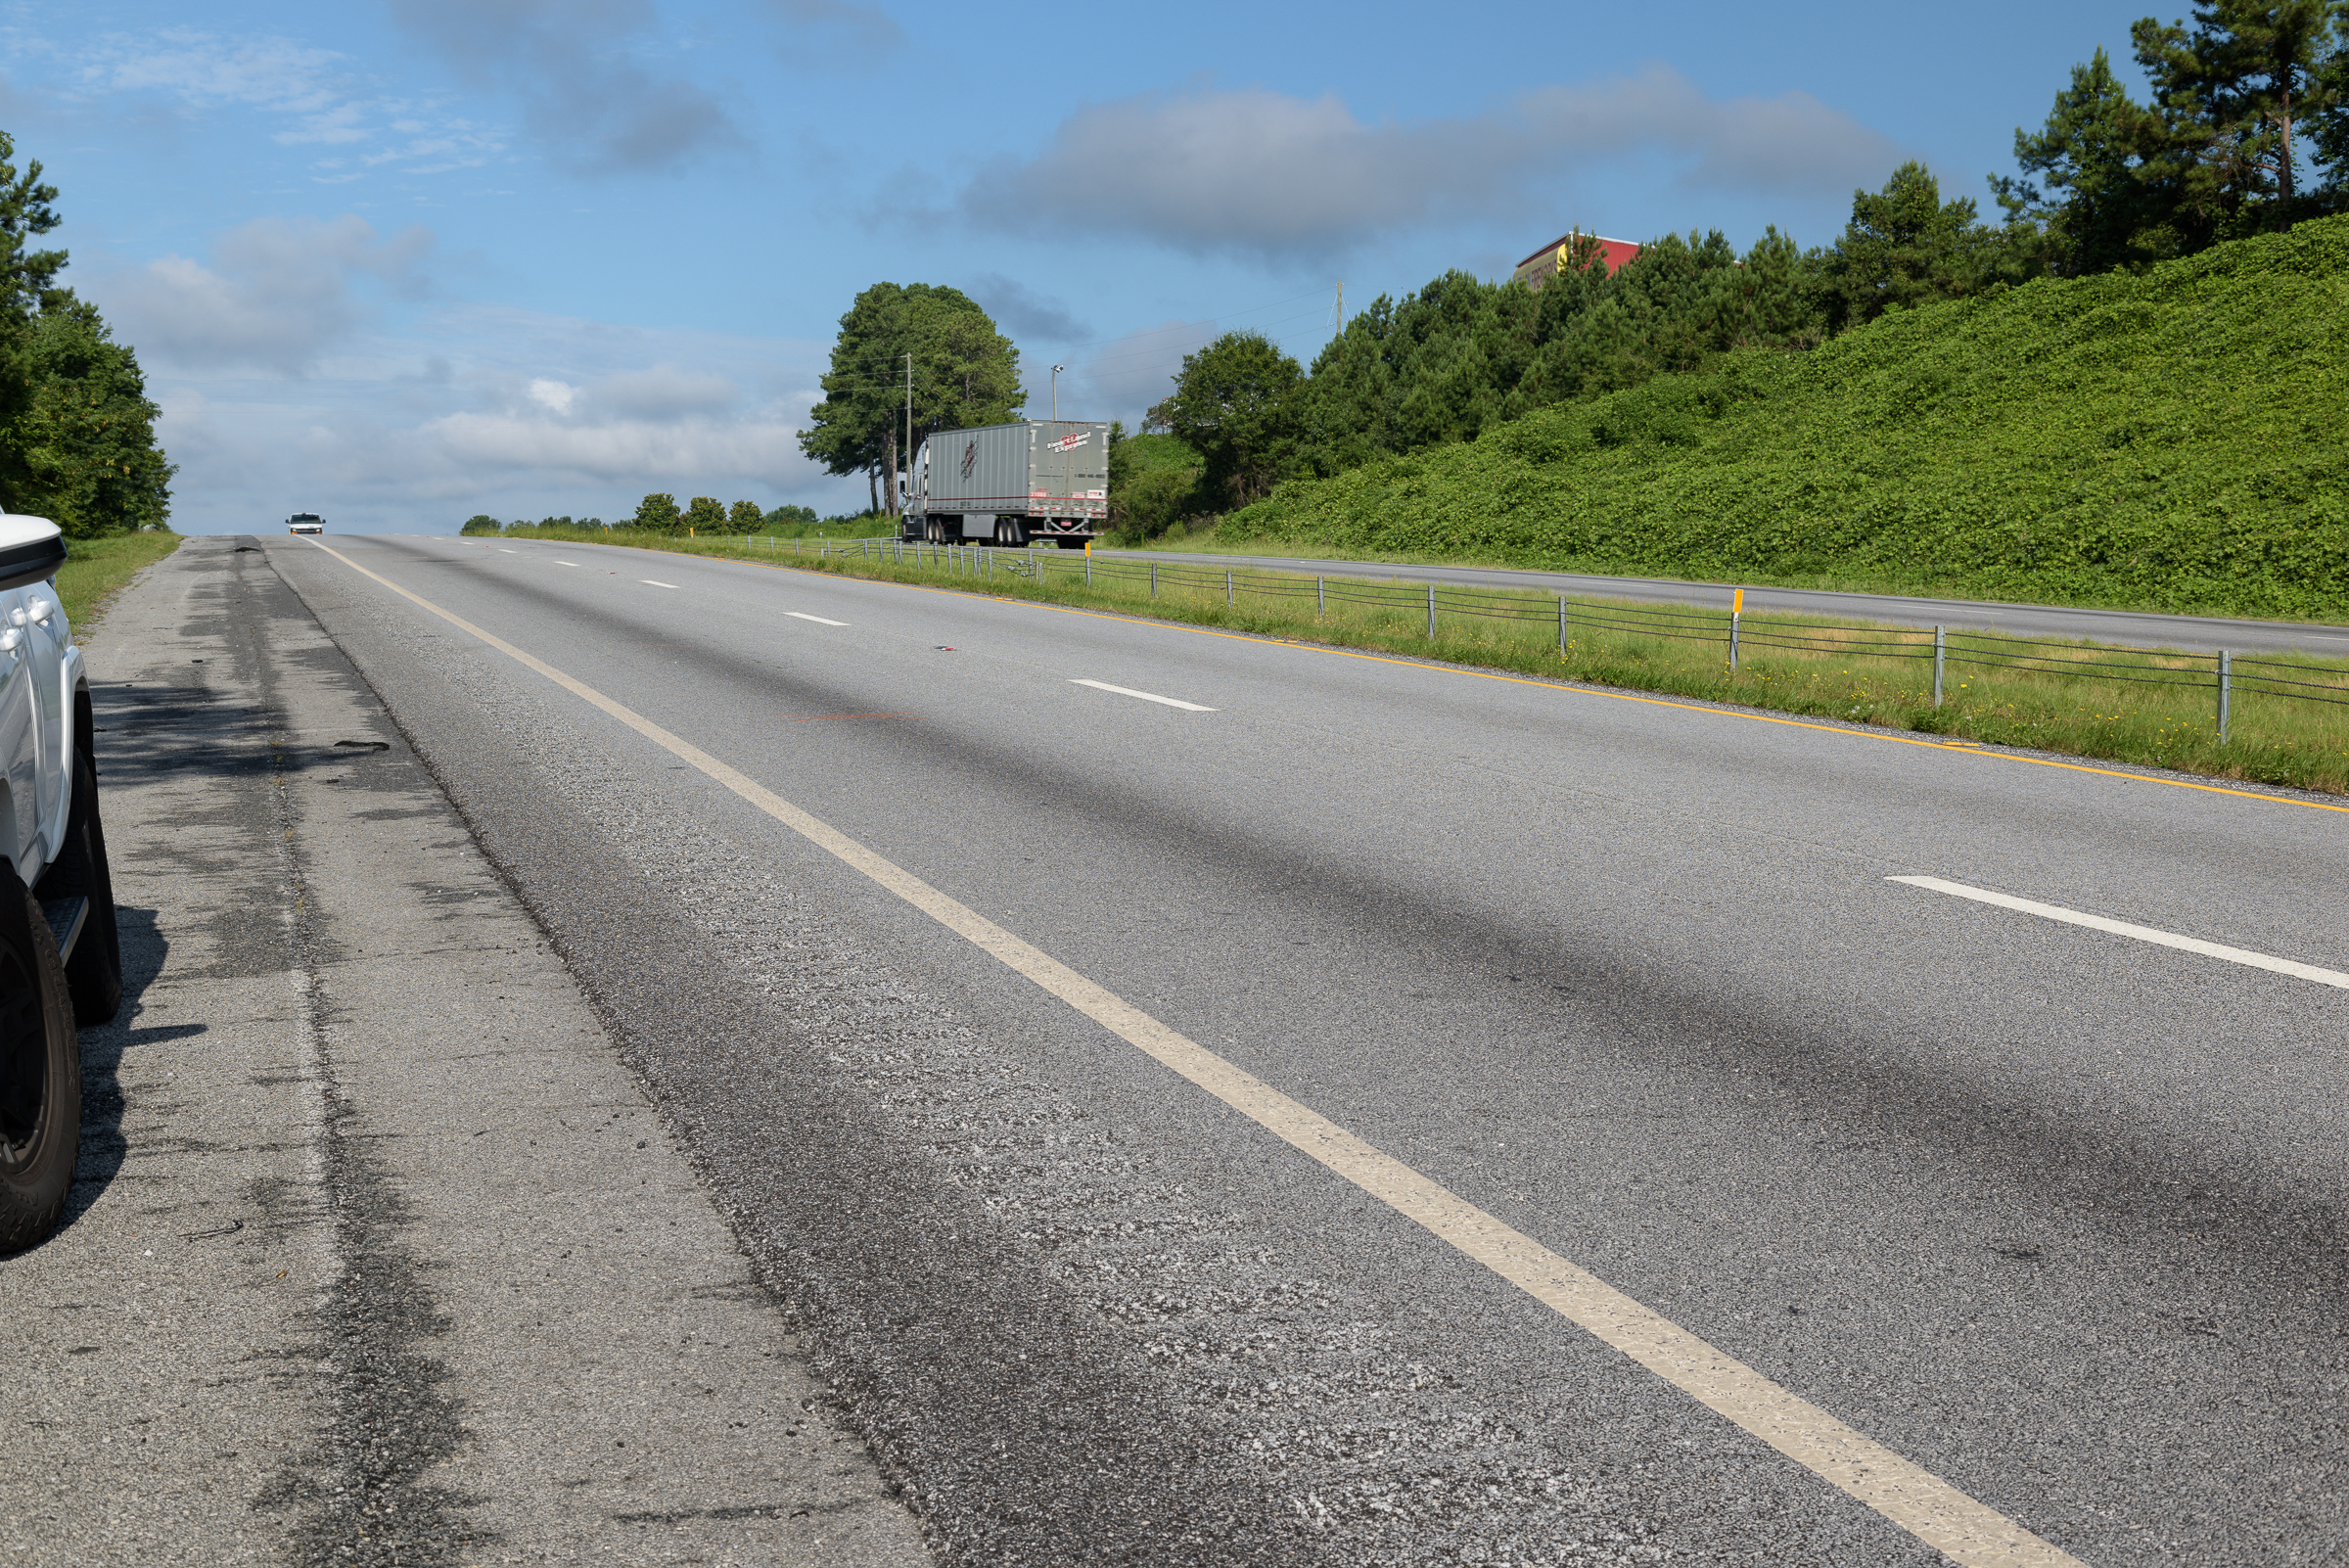
As an example, the top of a fireworks store is partially visible at the top of the image below, but it isn’t visible enough for a viewer to determine where this photograph was made. [Click on photograph to enlarge, then click on Back arrow to return to this post.]
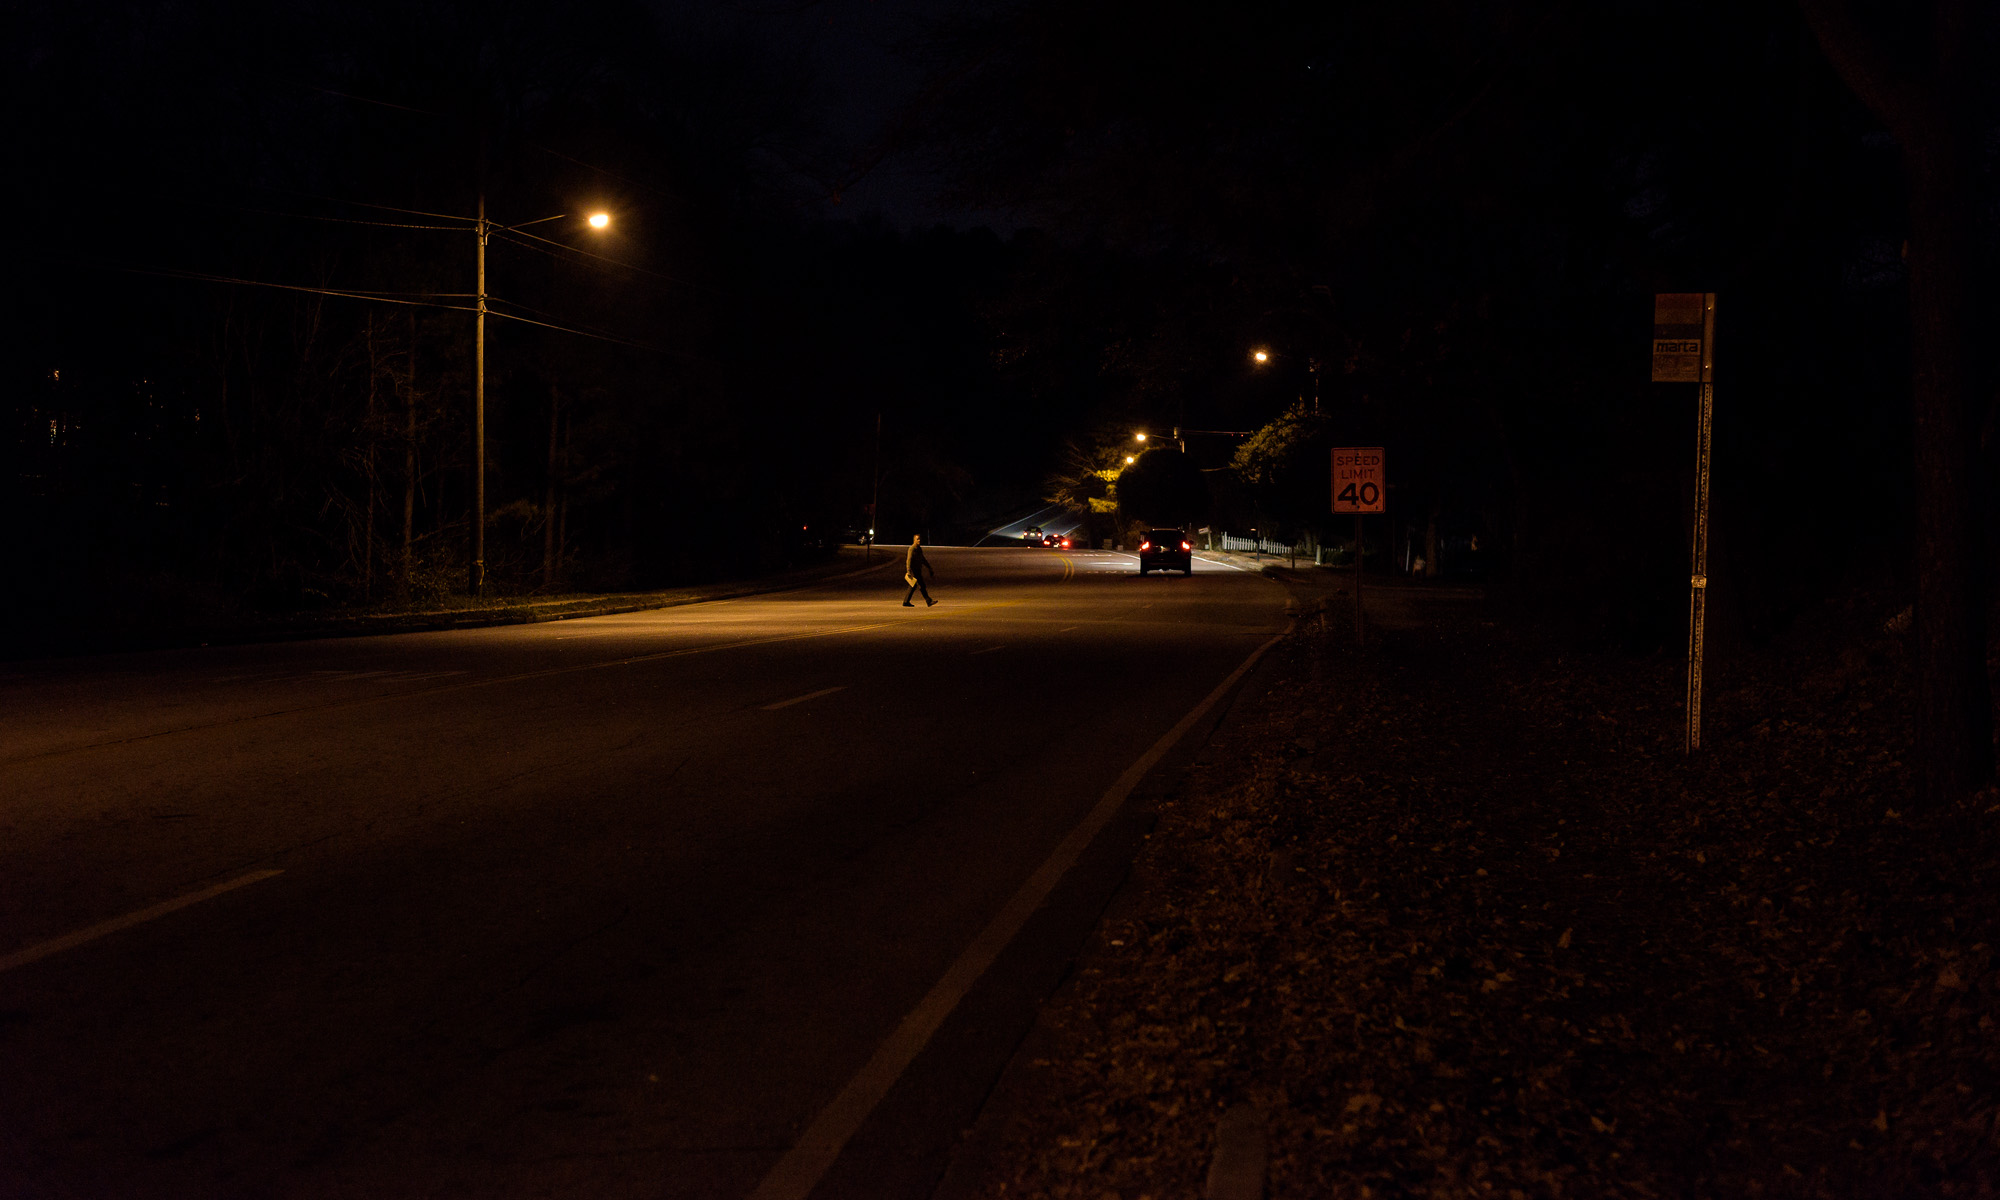
Accident site with truck blocking sign. (Nikon D810 with ZEISS Milvus 50 mm f/2 macro lens.)
By the way, this photograph was made for two purposes. First, it showed the roadway in the direction the accident vehicles were coming from. Second, it showed an oncoming vehicle as it crested the hill (vertical curve) on the approach to the area of impact to give a sense of the sight distances involved.
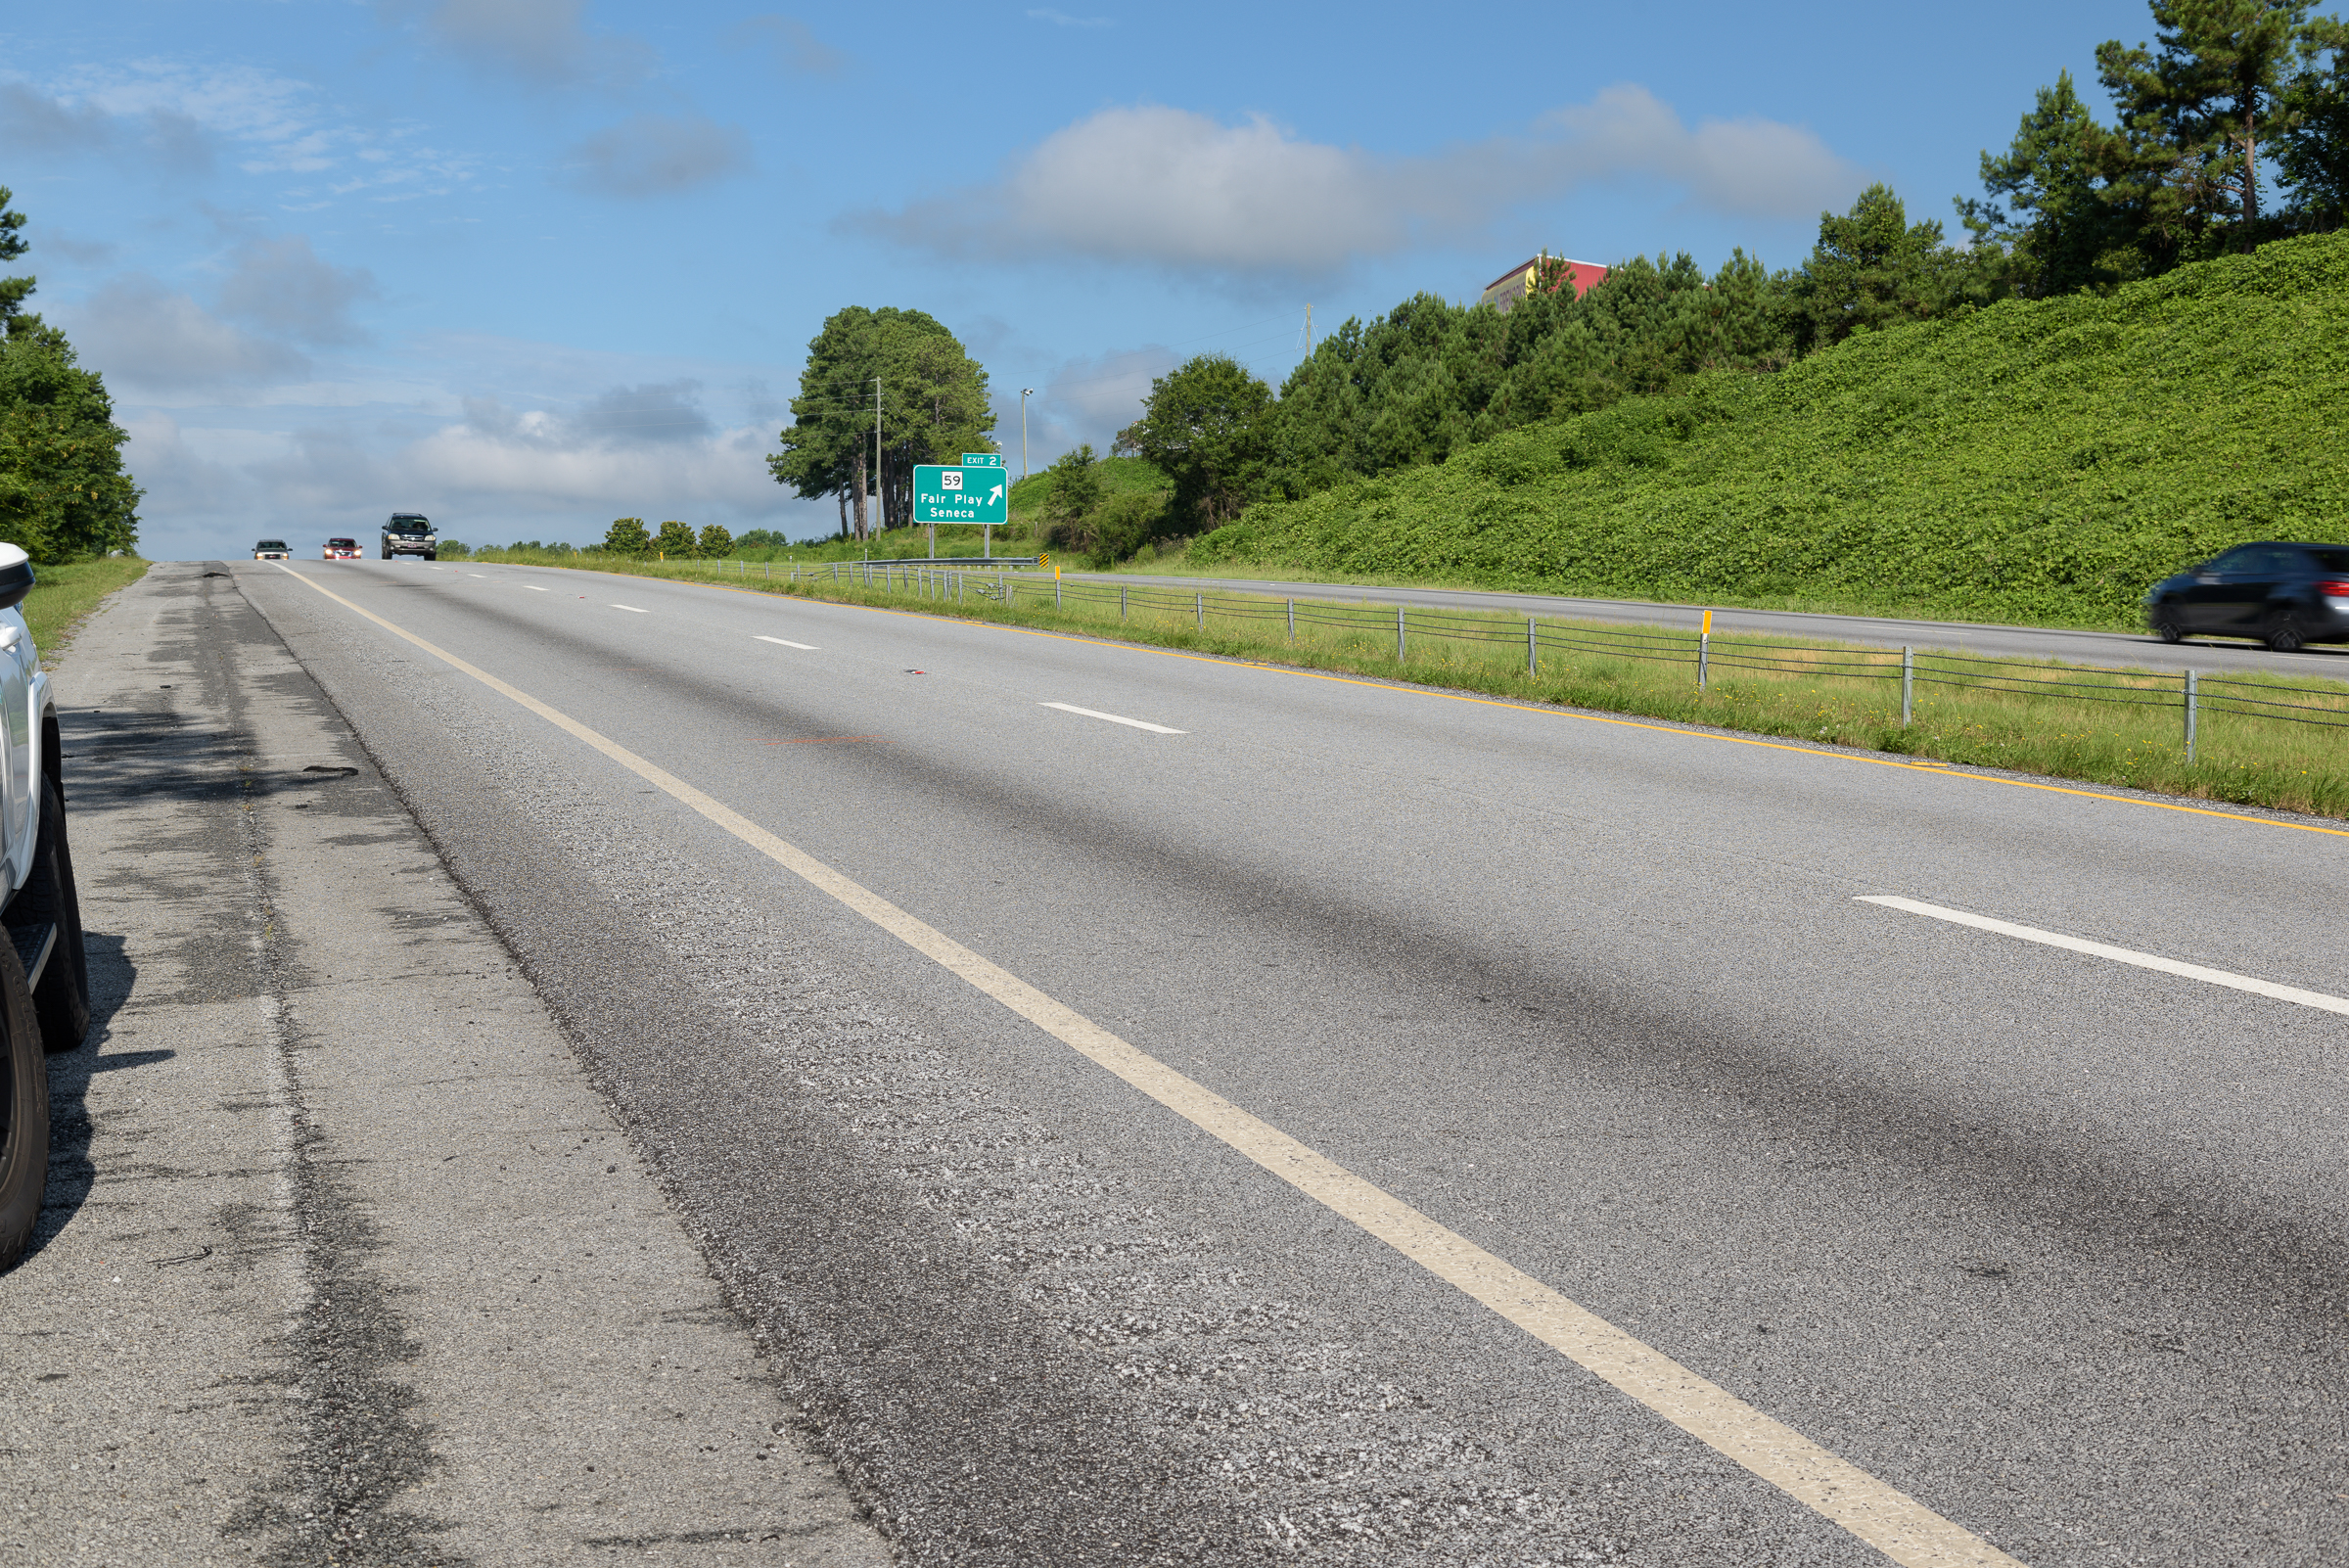
While the fireworks store is a partial clue, the timing of the tractor trailer in the above photo obsured an exit sign, visible below, that would definitively place where the photo was made to someone generally familiar with the area. [Click on photograph to enlarge, then click on Back arrow to return to this post.]
Accident site with sign as reference. (Nikon D810 with ZEISS Milvus 50 mm f/2 macro lens.)
Unless you intend to depict the effect of obscuring an element at a site, which sometimes you may wish to do, it is worth making a habit of reviewing your images while you’re still in the field to ensure you haven’t accidentally masked an important feature you meant to show.
Five takeaways:
-1- You should make photographs of the approach to a wreck scene to establish where the vehicle or vehicles came from.
-2- If a hill, curve, tree line, building, etc., obscures the view of an approaching vehicle, in any direction, you may want to capture the view both without any vehicles and then with a vehicle just coming into view to assist in visualizing the visibility distance.
-3- Especially on a rural road or on a limited-access highway, photographs including signs or other roadside features can help a viewer relate to where the photo was made.
-4- You can time your photographs so that passing vehicles will or will not obstruct certain roadside features at an accident site, depending on what you are trying to illustrate in each photo.
-5- You should include unobstructed permanent roadside objects in at least one photograph so you won’t be embarrassed by failing to fully document a wreck site.
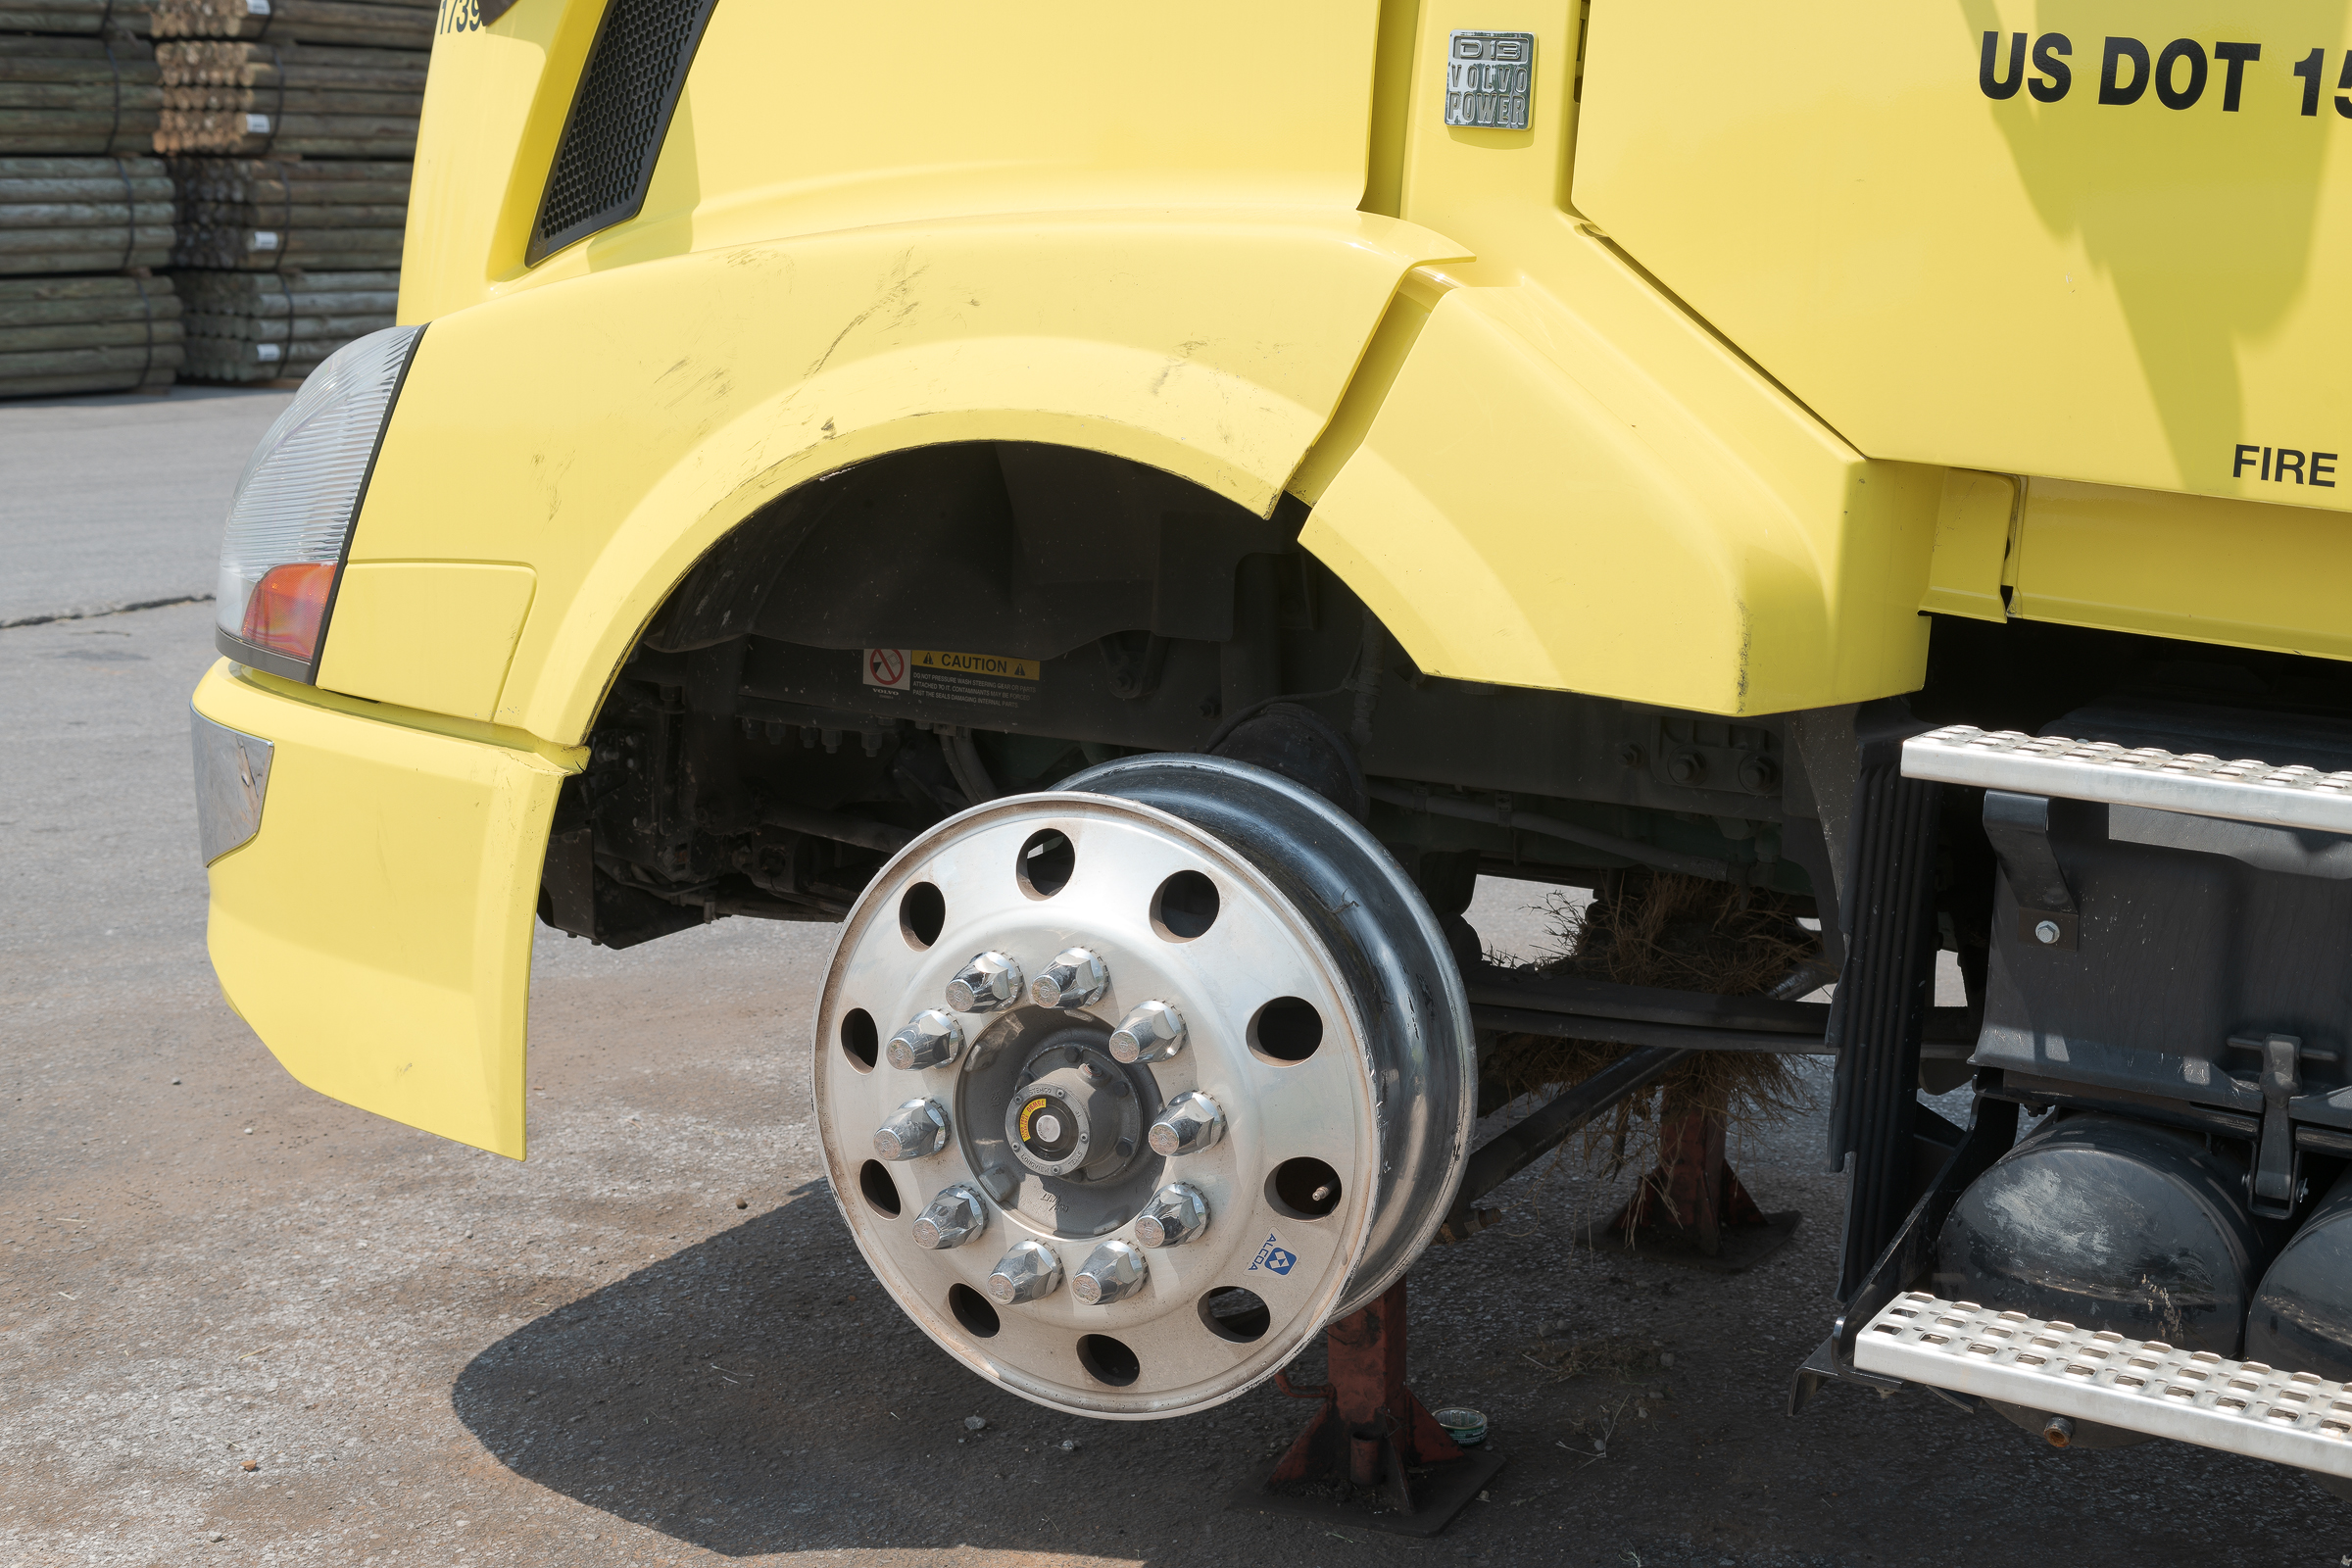
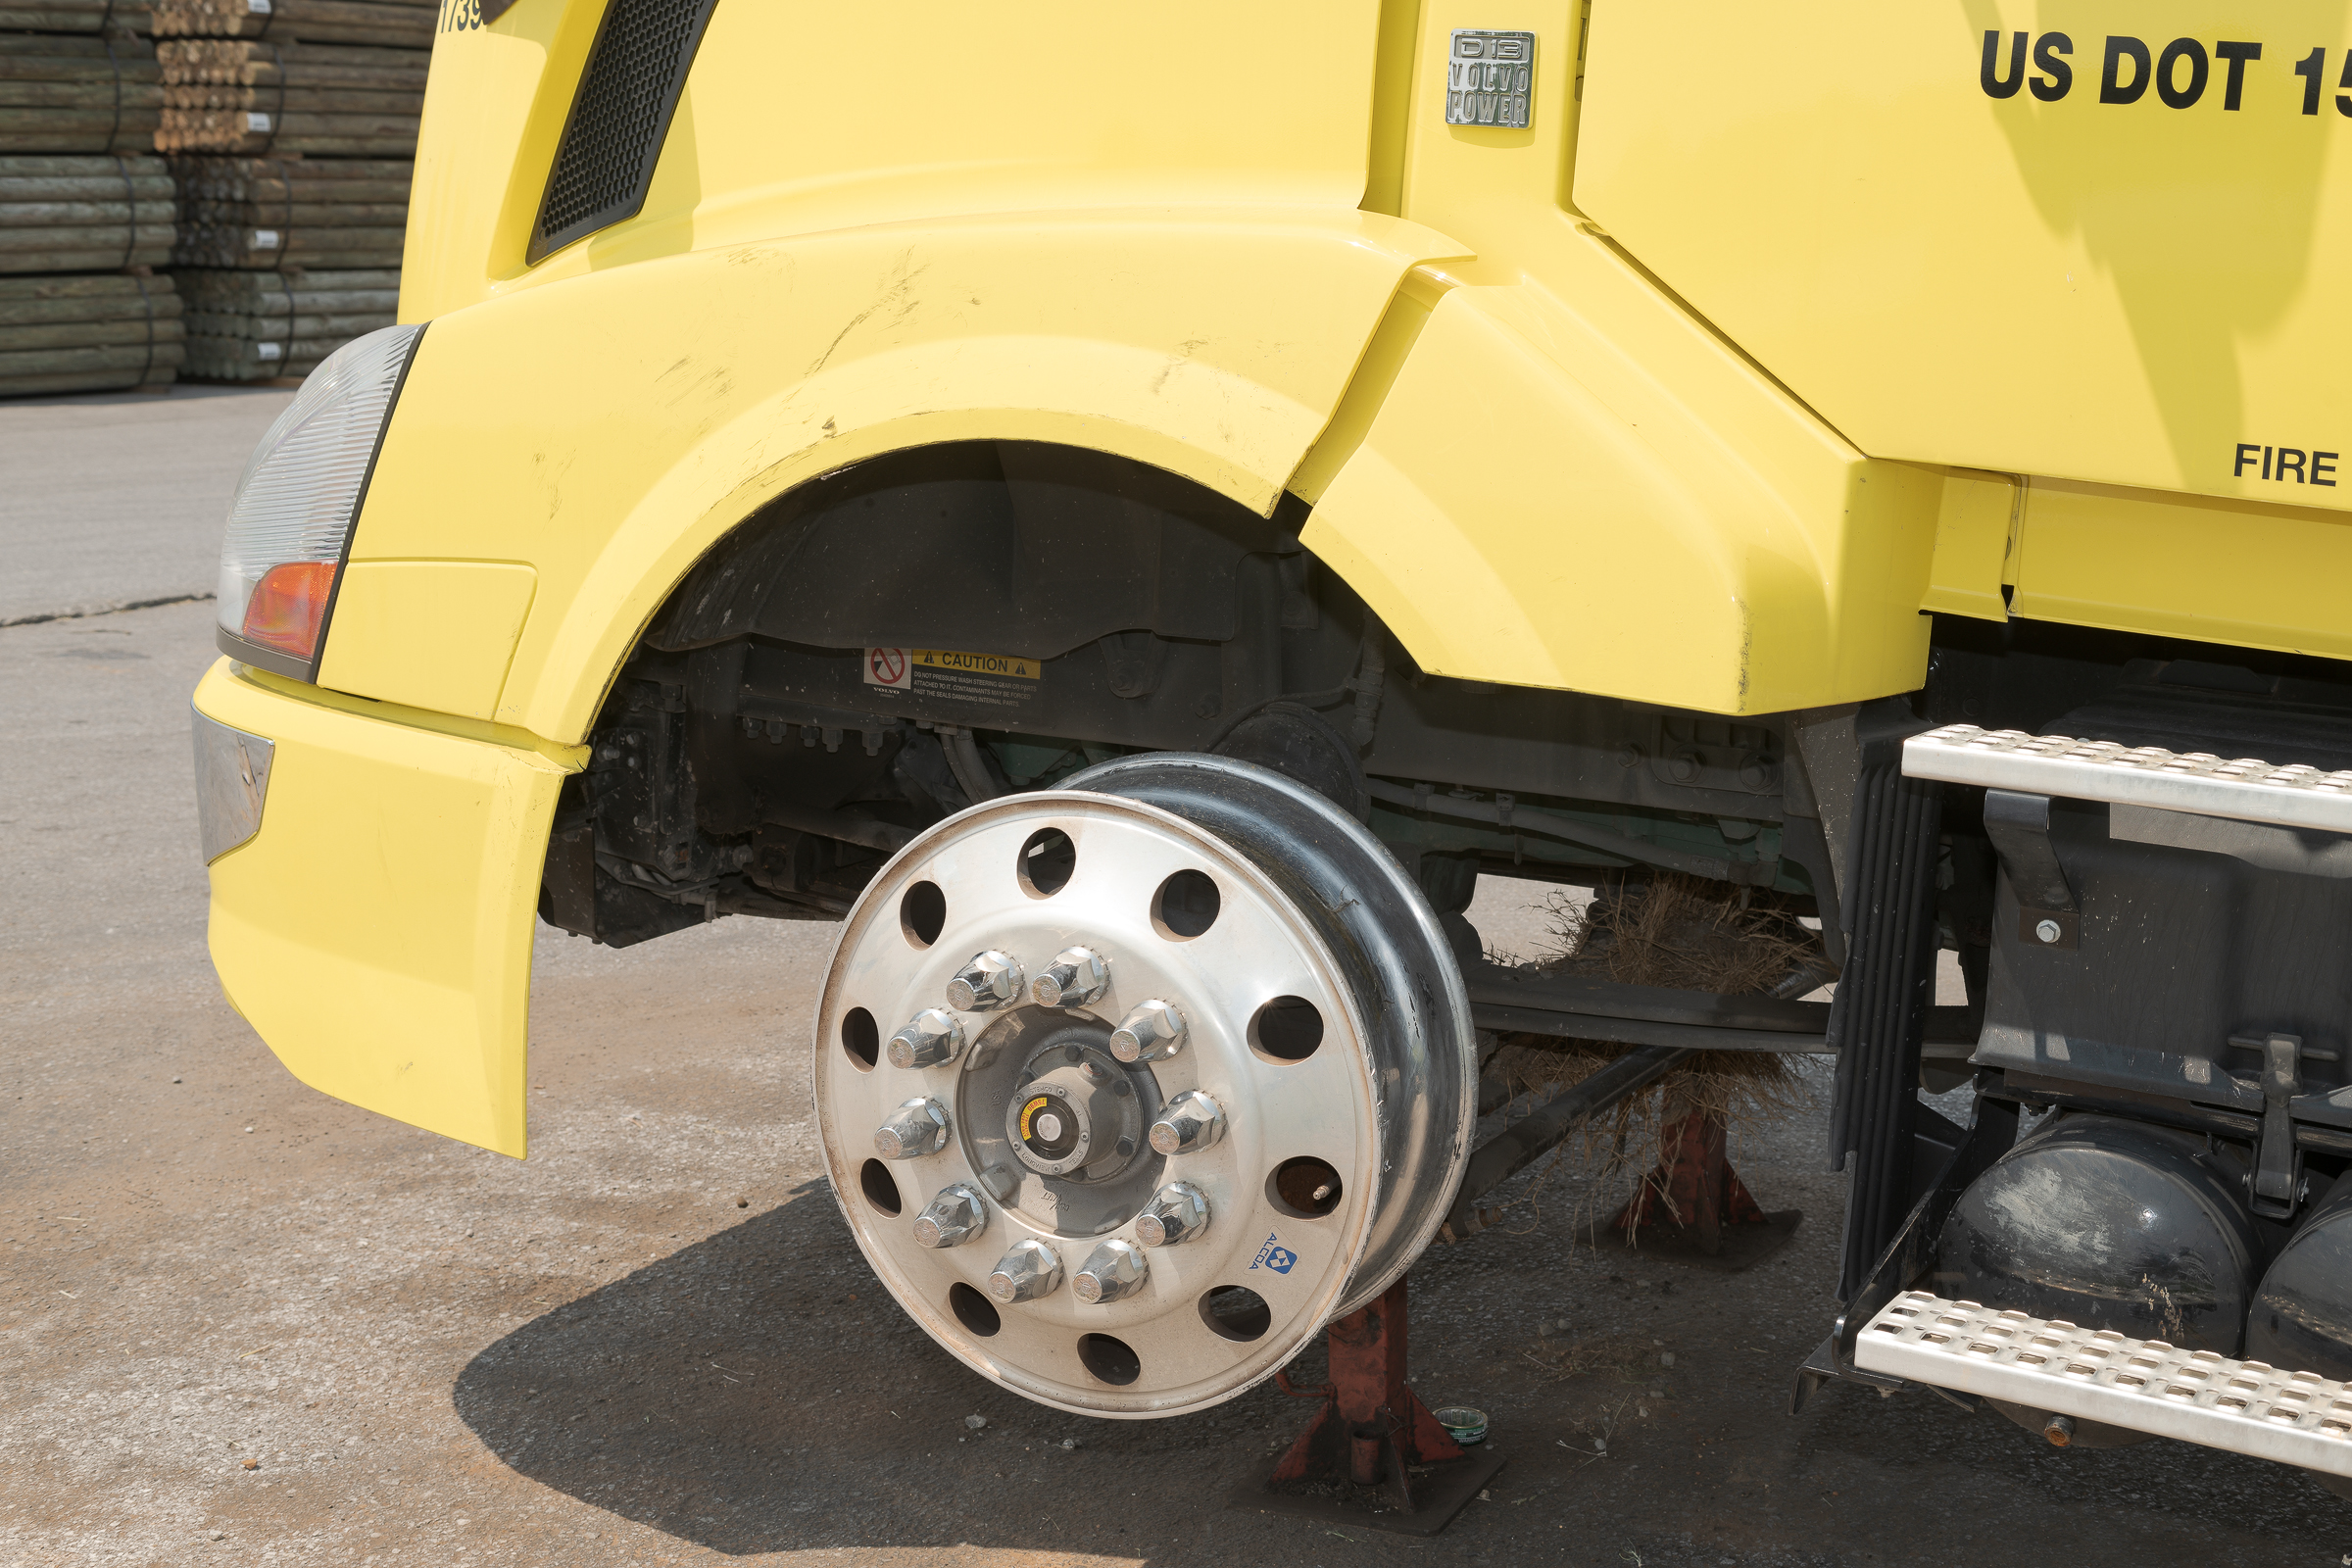
Fill Flash helps bring out details in the shadowed area of high-contrast subjects. This first photo of the left front of a truck tractor without flash doesn’t have much detail under the fender. [Click on image to enlarge, then click on back arrow to return.]
Left Front of Truck with No Flash (ZEISS Milvus 50 mm macro lens on Nikon D850 at f/10, 1/50 sec, ISO 64.)
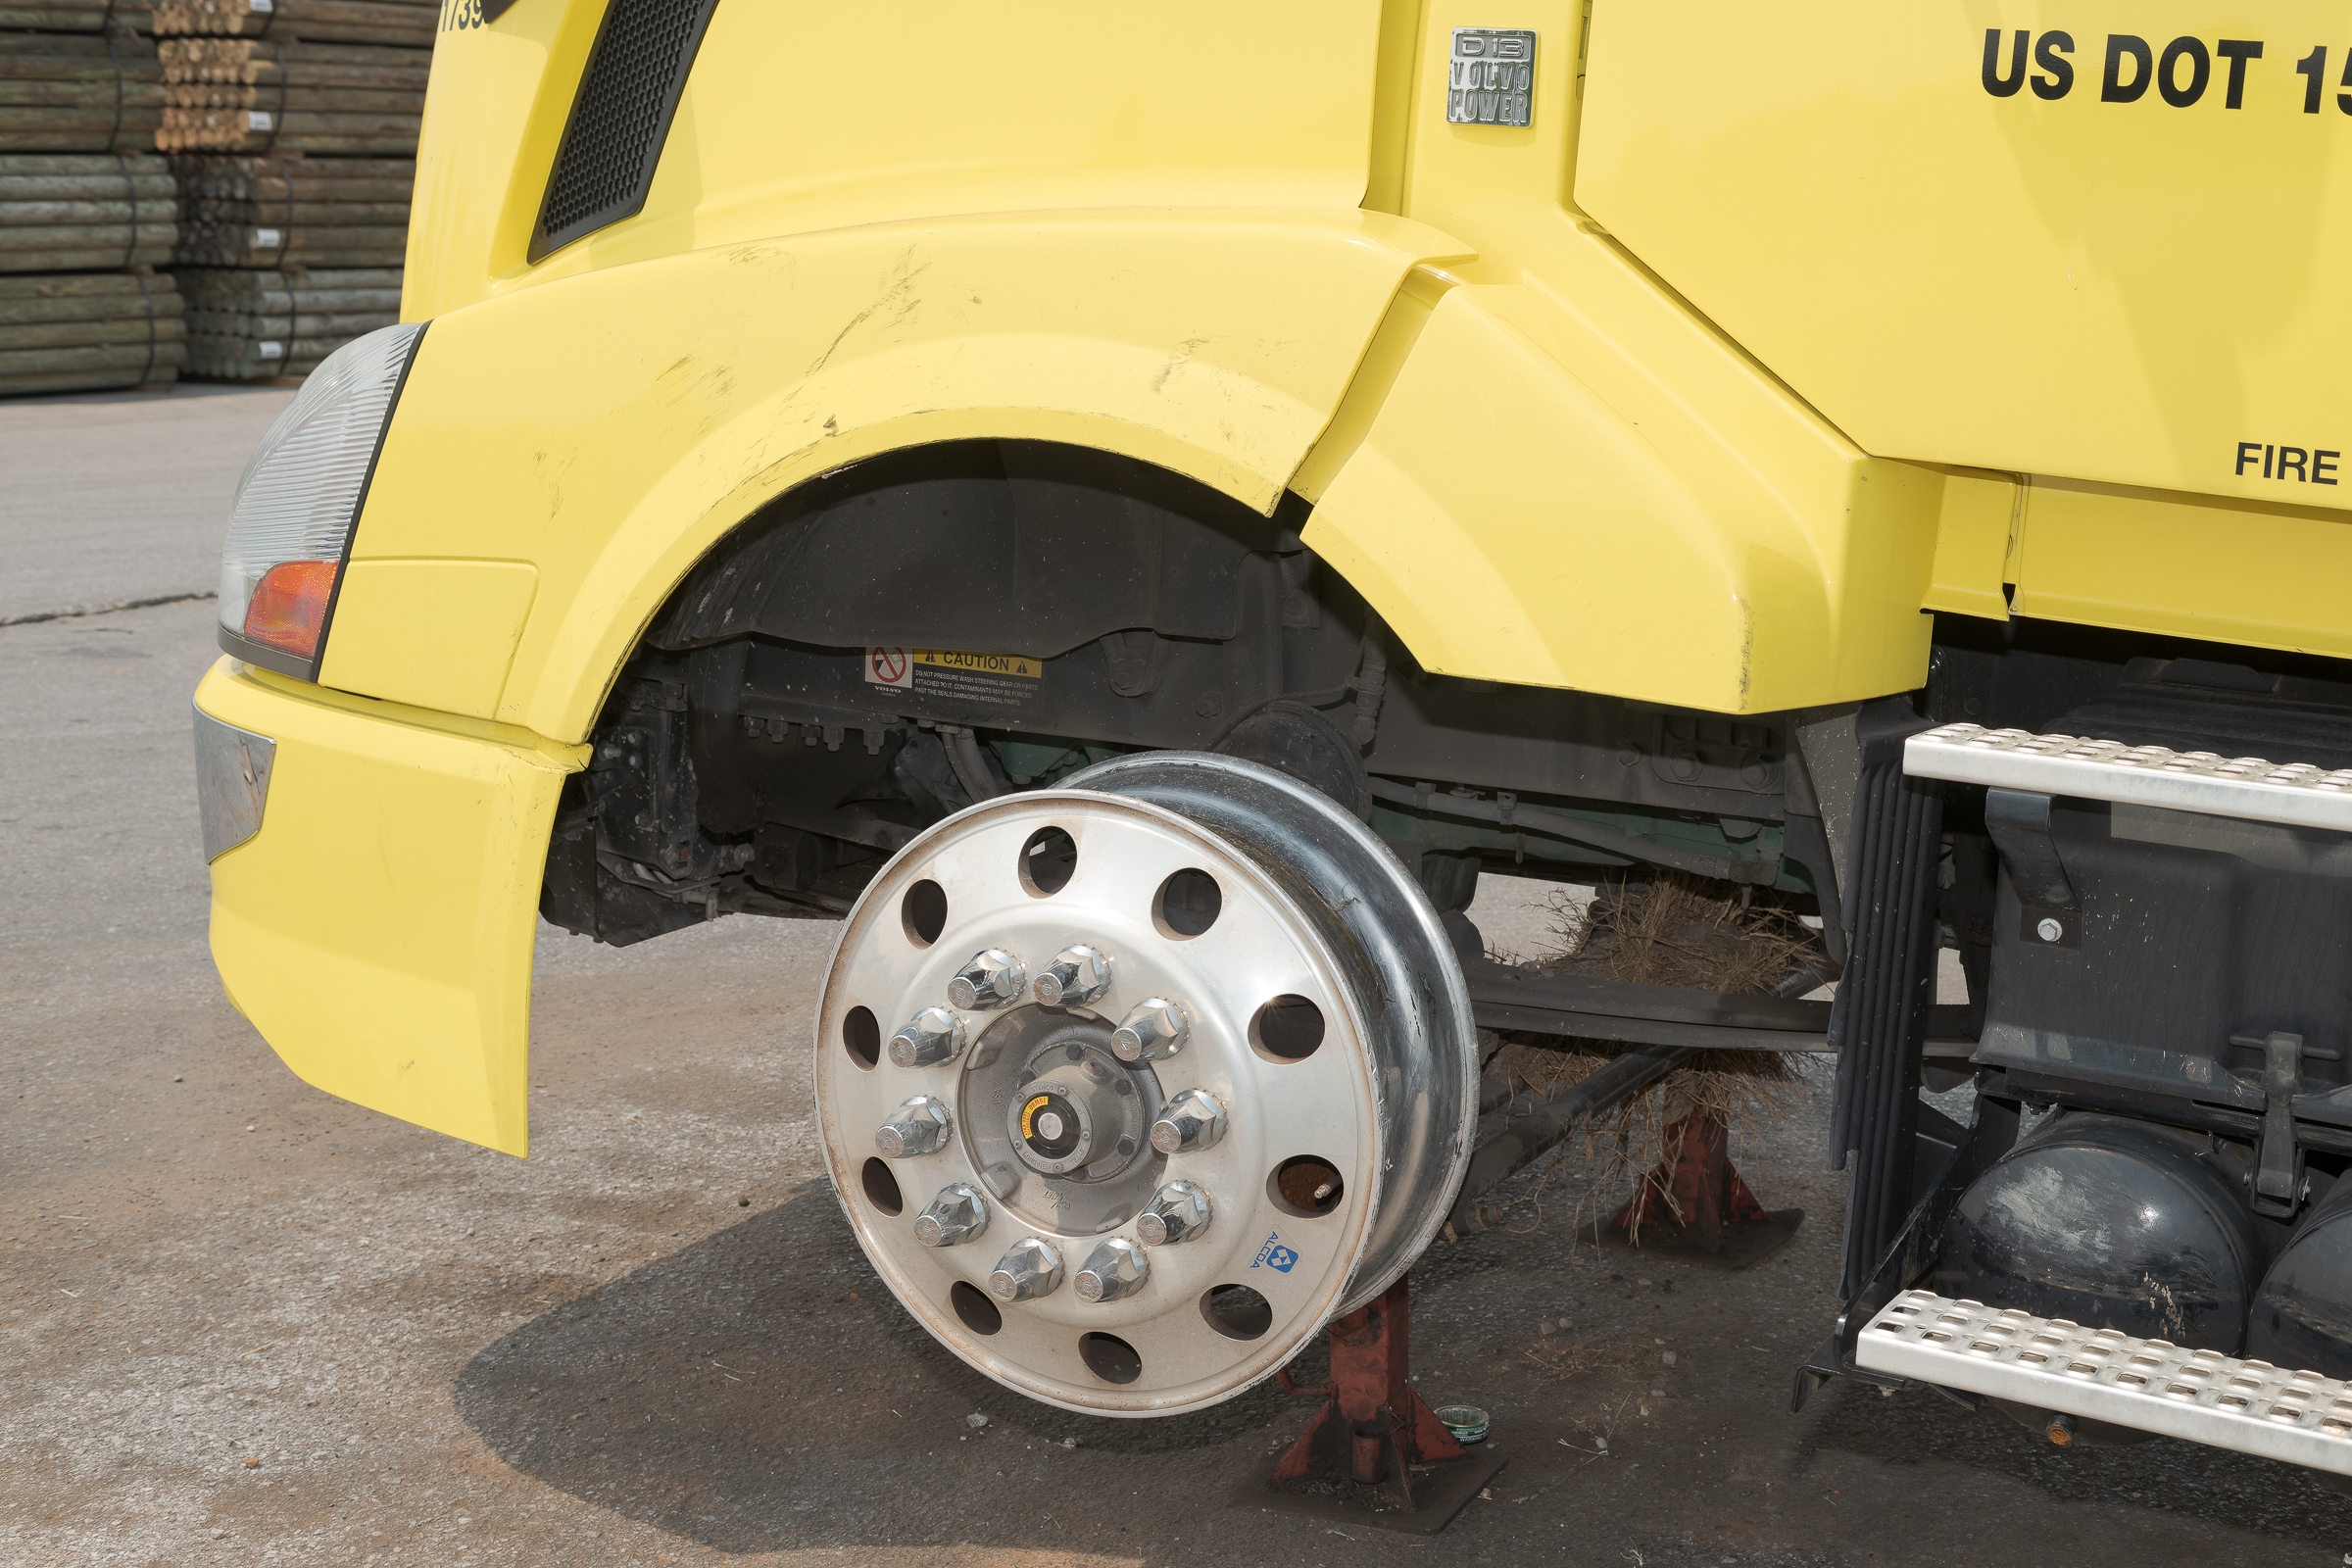
To bring out some detail, a flash was added at a reduced power output for this second image. (It’s more noticeable in an enlarged image.) Fill flash isn’t intended to light the entire image frame, but only to lighten very dark areas. [Click on image to enlarge, then click on back arrow to return.]
Left Front of Truck with Medium Fill Flash (ZEISS Milvus 50 mm macro lens on Nikon D850 with Nikon SB-910 flash at f/10, 1/50 sec, ISO 64.)
While there was a little more detail in the suspension and frame, raising the flash power added even more light under the fender. Again, it’s best to enlarge the image to see the effect. [Click on image to enlarge, then click on back arrow to return.]
Left Front of Truck with More Fill Flash (ZEISS Milvus 50 mm macro lens on Nikon D850 with Nikon SB-910 flash at f/10, 1/50 sec, ISO 64.)
Note that all three photographs were made at the same exposure of f/10, 1/50 second, and ISO 64. The images differ because the amount of fill flash was different. This showed the flash was supplemental or “fill” meaning flash filled in the shadows without altering the overall exposure.
Before you make any photograph, look for areas that are too dark to show details you may want. By varying the power of the flash, you can bring out as much detail as you choose, without affecting the overall exposure.
Two takeaways:
-1- Fill flash adds light in the shadows without affecting the overall exposure, which stays the same.
-2- You can control the amount of shadow detail you want to show by changing the output of your flash, or its flash power.
Note: This is an updated and enhanced version of a post originally made in July 2018.
In an earlier post, I showed how shooting a sponge with a side flash gave depth to its surface that couldn’t be shown using a direct flash. I used a sponge since sponges are small, readily available, and easy to practice with anywhere. In this post, I’ll show how a side flash gives depth to an automotive subject—namely, a tire tread.
For this first image, I didn’t use any flash, but adjusted the camera for a proper exposure for the ambient light. It’s properly exposed, but the depth and extent of the cuts and chips out of the tread aren’t apparent. (Click on photo to enlarge, then click on back arrow to return to this post.)
Perpendicular to tread with no flash. (Made with ZEISS Milvus 50 mm f/2 Macro lens on Nikon D850 at f/16, 4.0 sec, ISO 100.)
This photo was made in my Studio Lab, which has so many LED shop lights overhead people say it looks like an operating room. Even though the room looks bright to our eyes, there is not as much ambient light for photography as you might think. In fact, to make the image above required a 4.0 second shutter speed, which obviously precluded handholding the camera. (I also increased the ISO 2/3 stop from 64 to 100.)
For the second shot, I added a Profoto B1x flash to each side, almost perpendicular to the camera, shooting across the tread. I triggered them with a Nikon SB-910 flash in the hotshoe that was pointed straight up at a very low power so it would not contribute to the exposure. (Click on photo to enlarge, then click on back arrow to return to this post.)
Perpendicular to tread with one flash to each side. (Made with ZEISS Milvus 50 mm f/2 Macro lens on Nikon D850 at f/16, 1/200 sec, ISO 64. One Profoto B1x strobe to each side triggered by a Nikon SB-910 flash in the camera’s hot shoe.)
Diffused ambient light and direct flash lighting both evenly light your subject, which fills in the shadows, which, in turn, reduces the appearance of any textures. On the other hand, side flash enhances texture by creating shadows.
[Technical aside #1: With cross-light from the added side flashes, the shutter speed was 9 2/3 stops faster at 1/200 second and the ISO was 2/3 stop less at 64, for a total of 10 1/3 stops less light than the first shot. If the flashes were turned off for the second photo, that exposure would have resulted in a pure black image. The flashes were adjusted to give the proper amount of light for the exposure. This is called a full flash image, where all of the light is provided by flash. This differs from a fill flash image where the light from any flash enhances the ambient exposure, but flash isn’t the only light source. More on this later.]
[Technical aside #2: For an equivalent ambient light image, instead of a 4.0 second shutter speed and ISO 100, you could use 1/60 second shutter speed and ISO 256,000. The 1/60 second shutter speed may allow you to handhold the camera, but ISO 256,000 is guaranteed to be extremely noisy and noticeably lacking in dynamic range. Not a good alternative at all.]
Four major takeaways:
-1- As with the earlier sponge example, flash light coming from the side brings out texture by creating shadows.
-2- Both diffused ambient light and direct flash lighting flood every surface with the same light, obscuring texture and depth differences.
-3- Indoor ambient light may look bright to our eyes, but it will require very long exposures or an extremely high (and noisy) ISO to make the photograph.
-4- You must adjust your exposure accordingly when going between ambient light and full flash lighted images.
Where you place your camera determines the relative positions of objects in your frame. It’s important to be aware of any unintended impressions by the juxtaposition of the objects you are showing. This is best avoided by making photographs from enough different angles to give a complete and accurate representation of the positions of all the elements.
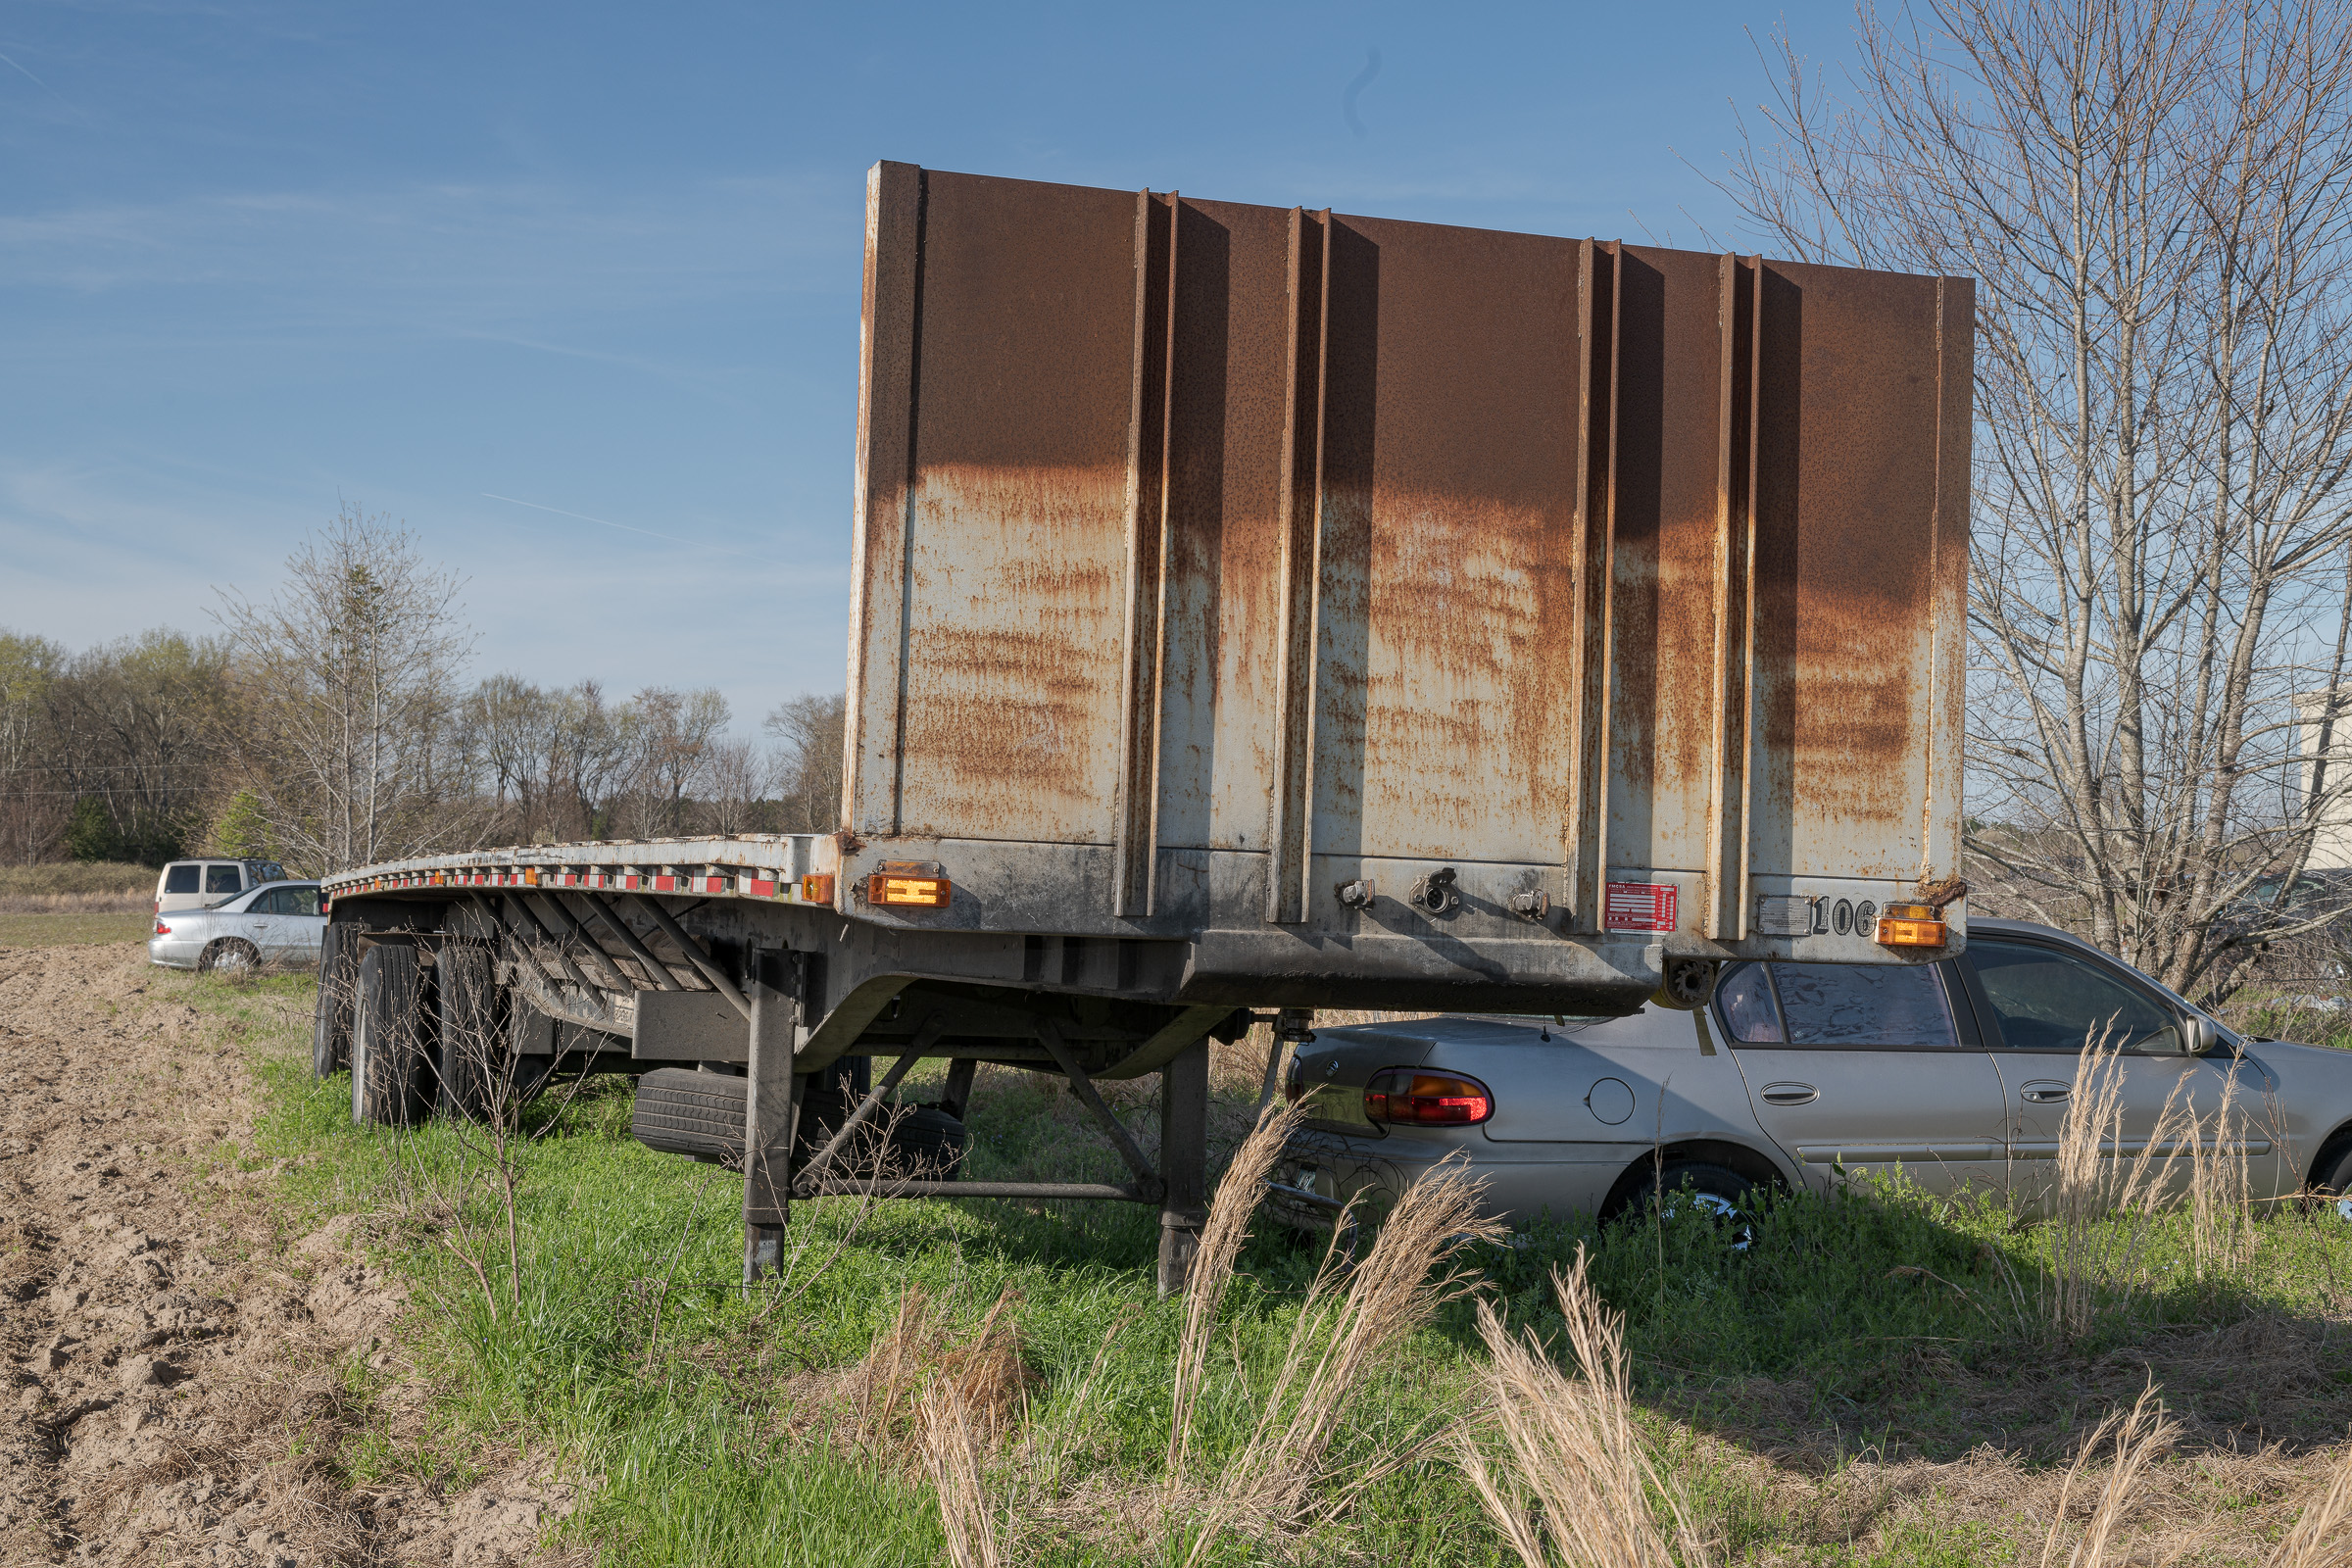
The subject of these photographs was a disused flatbed semi-trailer. It was in a rural field with a number of other discarded vehicles . None could be moved.
All of these photographs were made with the same 50 mm lens on the same full frame sensor camera so there was no variation in the field of view between the images. As mentioned, neither the trailer nor the car were moved. My camera was on a tripod (as always) so all the photos were made from the same camera height.
In the first photo, how far under the trailer do you think the rear of the gold car was? Was its rear bumper against the left landing leg of the trailer? (Click on the image to enlarge, then click on the back arrow to return to the post.)
Juxtaposition of trailer and car #1. (Made using Nikon D850 with ZEISS Milvus 50 mm f/2 macro lens, Nikon SB-910 flash, and Really Right Stuff TVC-24L tripod. Exposure: f/14, 1/30 sec, ISO 64.)
Moving the camera to the right showed the car’s rear bumper was not against the landing leg, but can you estimate how far the trunk lid was under the side of the trailer? (Click on the image to enlarge, then click on the back arrow to return to the post.)
Juxtaposition of trailer and car #2. (Made using Nikon D850 with ZEISS Milvus 50 mm f/2 macro lens, Nikon SB-910 flash, and Really Right Stuff TVC-24L tripod. Exposure: f/14, 1/30 sec, ISO 64.)
Further right, looking directly at the front of the trailer, the car’s rear bumper was actually quite far from the trailer’s landing leg, and its trunk lid doesn’t look nearly as far under the trailer as in the two previous photos. (Click on the image to enlarge, then click on the back arrow to return to the post.)
Juxtaposition of trailer and car #3. (Made using Nikon D850 with ZEISS Milvus 50 mm f/2 macro lens, Nikon SB-910 flash, and Really Right Stuff TVC-24L tripod. Exposure: f/14, 1/30 sec, ISO 64.)
Moving even farther to the right, you can now see that none of the rear of the car was under the side of the trailer. Again, neither vehicle was moved during this sequence. (Click on the image to enlarge, then click on the back arrow to return to the post.)
Juxtaposition of trailer and car #4. (Made using Nikon D850 with ZEISS Milvus 50 mm f/2 macro lens, Nikon SB-910 flash, and Really Right Stuff TVC-24L tripod. Exposure: f/14, 1/30 sec, ISO 64.)
Three takeaways:
-1- Be aware of possible deception from a single photograph, both when making the photos yourself, and when evaluating photos provided to you. If the first image had been from a wreck scene, you certainly don’t want to opine that the rear of the car ended up under the trailer!
-2- Take multiple images from different camera positions (different perspectives) to give a complete and accurate depiction of your subjects and their relationships to other objects in the frame.
-3- As mentioned in previous posts, using a tripod for every image not only insures a sharp image, but allows careful framing and a consistent look between images all made at the same height.
On Thursday, April 1, 2021 (and, no, it wasn’t an April Fools joke), I had the honor of being interviewed by Eugene Liscio of ai2-3D for his Forensics Talks YouTube channel.
Forensics Talks YouTube interview by Eugene Liscio
For almost an hour, we talked about a wide range of topics related to tire, vehicle, and accident reconstruction photography. Among the subjects we discussed were the importance and use of a tripod, a polarizer, and flash. We also touched on both kinds of night photography and on post-processing.
I hope you will find the information we discussed useful. The interview also gives an idea of a couple of the topics which we demonstrate and discuss in depth in my SAE class which, by the way, will be resuming as in-person classes this year.
Here’s a link to that class: SAE C1729. I’ll post the dates of the new classes as soon as we finalize them.
Often, you’ll find you need to photograph underneath a small flap, tear, or partially broken piece. It’s quite difficult to hold the piece steady, align the lights, keep the piece perpendicular to the camera, frame the image, focus, and hold the camera steady simultaneously. Unless you have unusually long arms, many times it will be impossible to even look through the viewfinder or at the rear LCD while holding both the camera and piece, much less holding them both still and properly aligned.
You’ll want to frame your subject without cutting off important parts of it, showing lots of excess space to any side, or ending up with strange subject angles. Particularly with close-up and macro images, you’ll also want to maximize the depth of field by keeping your camera sensor perpendicular to the piece.
The only reliable and repeatable way to ensure you can get the camera where you need it—while keeping everything aligned and stationary—is to hold the piece with a clamp and support your camera with a tripod, studio stand, or even a beanbag. When both the camera and the subject are held still, you can frame the subject through the viewfinder or with the LCD, adjust the lights, and take test shots until you get your lighting just where you need it. (Click on the image to enlarge it, then click the back arrow to return to this post.)
Setup for photos of sidewall flap. (Made using Nikon D850 with 55 mm ZEISS Otus lens. Lighting: Two Profoto B1x studio strobes. Exposure: f/16, 1/200 sec, ISO 64.)
For the torn sidewall rubber of the tire above, I used a Wimberley The Plamp II with its base clamped on the tire bead and its smaller subject clamp on the rubber flap. This securely held the flap in place so I could compose the shot and ensure the camera sensor was perpendicular to the underside surface of the flap. In my Studio Lab, I use a Foba camera stand to both place and support the camera precisely where I need it. In the field, I would use a tripod.
I held the off-camera flash in my left had so I could aim it where I wanted it, and tripped the camera’s shutter with a remote shutter cord in my right hand. (A self-timer could work, too.)
This resulting image below was an overall view of the flap and tire carcass ply surfaces that had pulled apart. It was made with a ZEISS Milvus 50 mm macro lens. (Click on the image to enlarge it, then click the back arrow to return to this post.)
Sidewall flap. (Made using Nikon D850 with 50 mm ZEISS Milvus macro lens. Nikon R1C1 flashes with Nikon SB-910 to left side. Exposure: f/16, 1/200 sec, ISO 64.)
For overall lighting, I used two Nikon SB-R200 macro flashes on the R1C1 ring around the lens with one below and one to the right of the lens. To show the texture on the sidewall rubber and the polyester carcass cords, I used a Nikon SB-910 flash off camera to the left. (All the remote flashes were controlled via infrared from a Nikon SB-910 flash on camera in master mode.)
In the closer image below, I repeated the process using a ZEISS Milvus 100 mm macro lens to fill the frame with the torn surface textures. For a good composition, I had to reposition the camera, which was straightforward with the Foba camera stand. (Click on the image to enlarge it, then click the back arrow to return to this post.)
Sidewall flap. (Made using Nikon D850 with 100 mm ZEISS Milvus macro lens. Nikon R1C1 flashes with Nikon SB-910 to left side. Exposure: f/16, 1/200 sec, ISO 64.)
Main takeaways:
-1- Flaps and pieces should be held steady with some sort of clamp. It’s almost impossible to hold them in place by hand.
-2- Securely support the camera in position for the best composition and maximum depth of field using a tripod, studio stand, or even a beanbag.
-3- Align camera so its sensor is perpendicular to your subject to maximize depth of field.
-4- Use sidelighting in addition to overall lighting to show texture (or lack of texture).
To facilitate my tire, wheel, and product analysis and photography, I set up my Studio Lab in my basement. Although it continues to evolve, it had fortuitously been set up and in use for nine years before the COVID-19 pandemic of 2020 brought most travel and meetings to a halt. In fact, long before the pandemic, I have preferred having tires, wheels, and other products shipped to me for analysis and/or photography in my Studio Lab rather than traveling to where they might be stored.
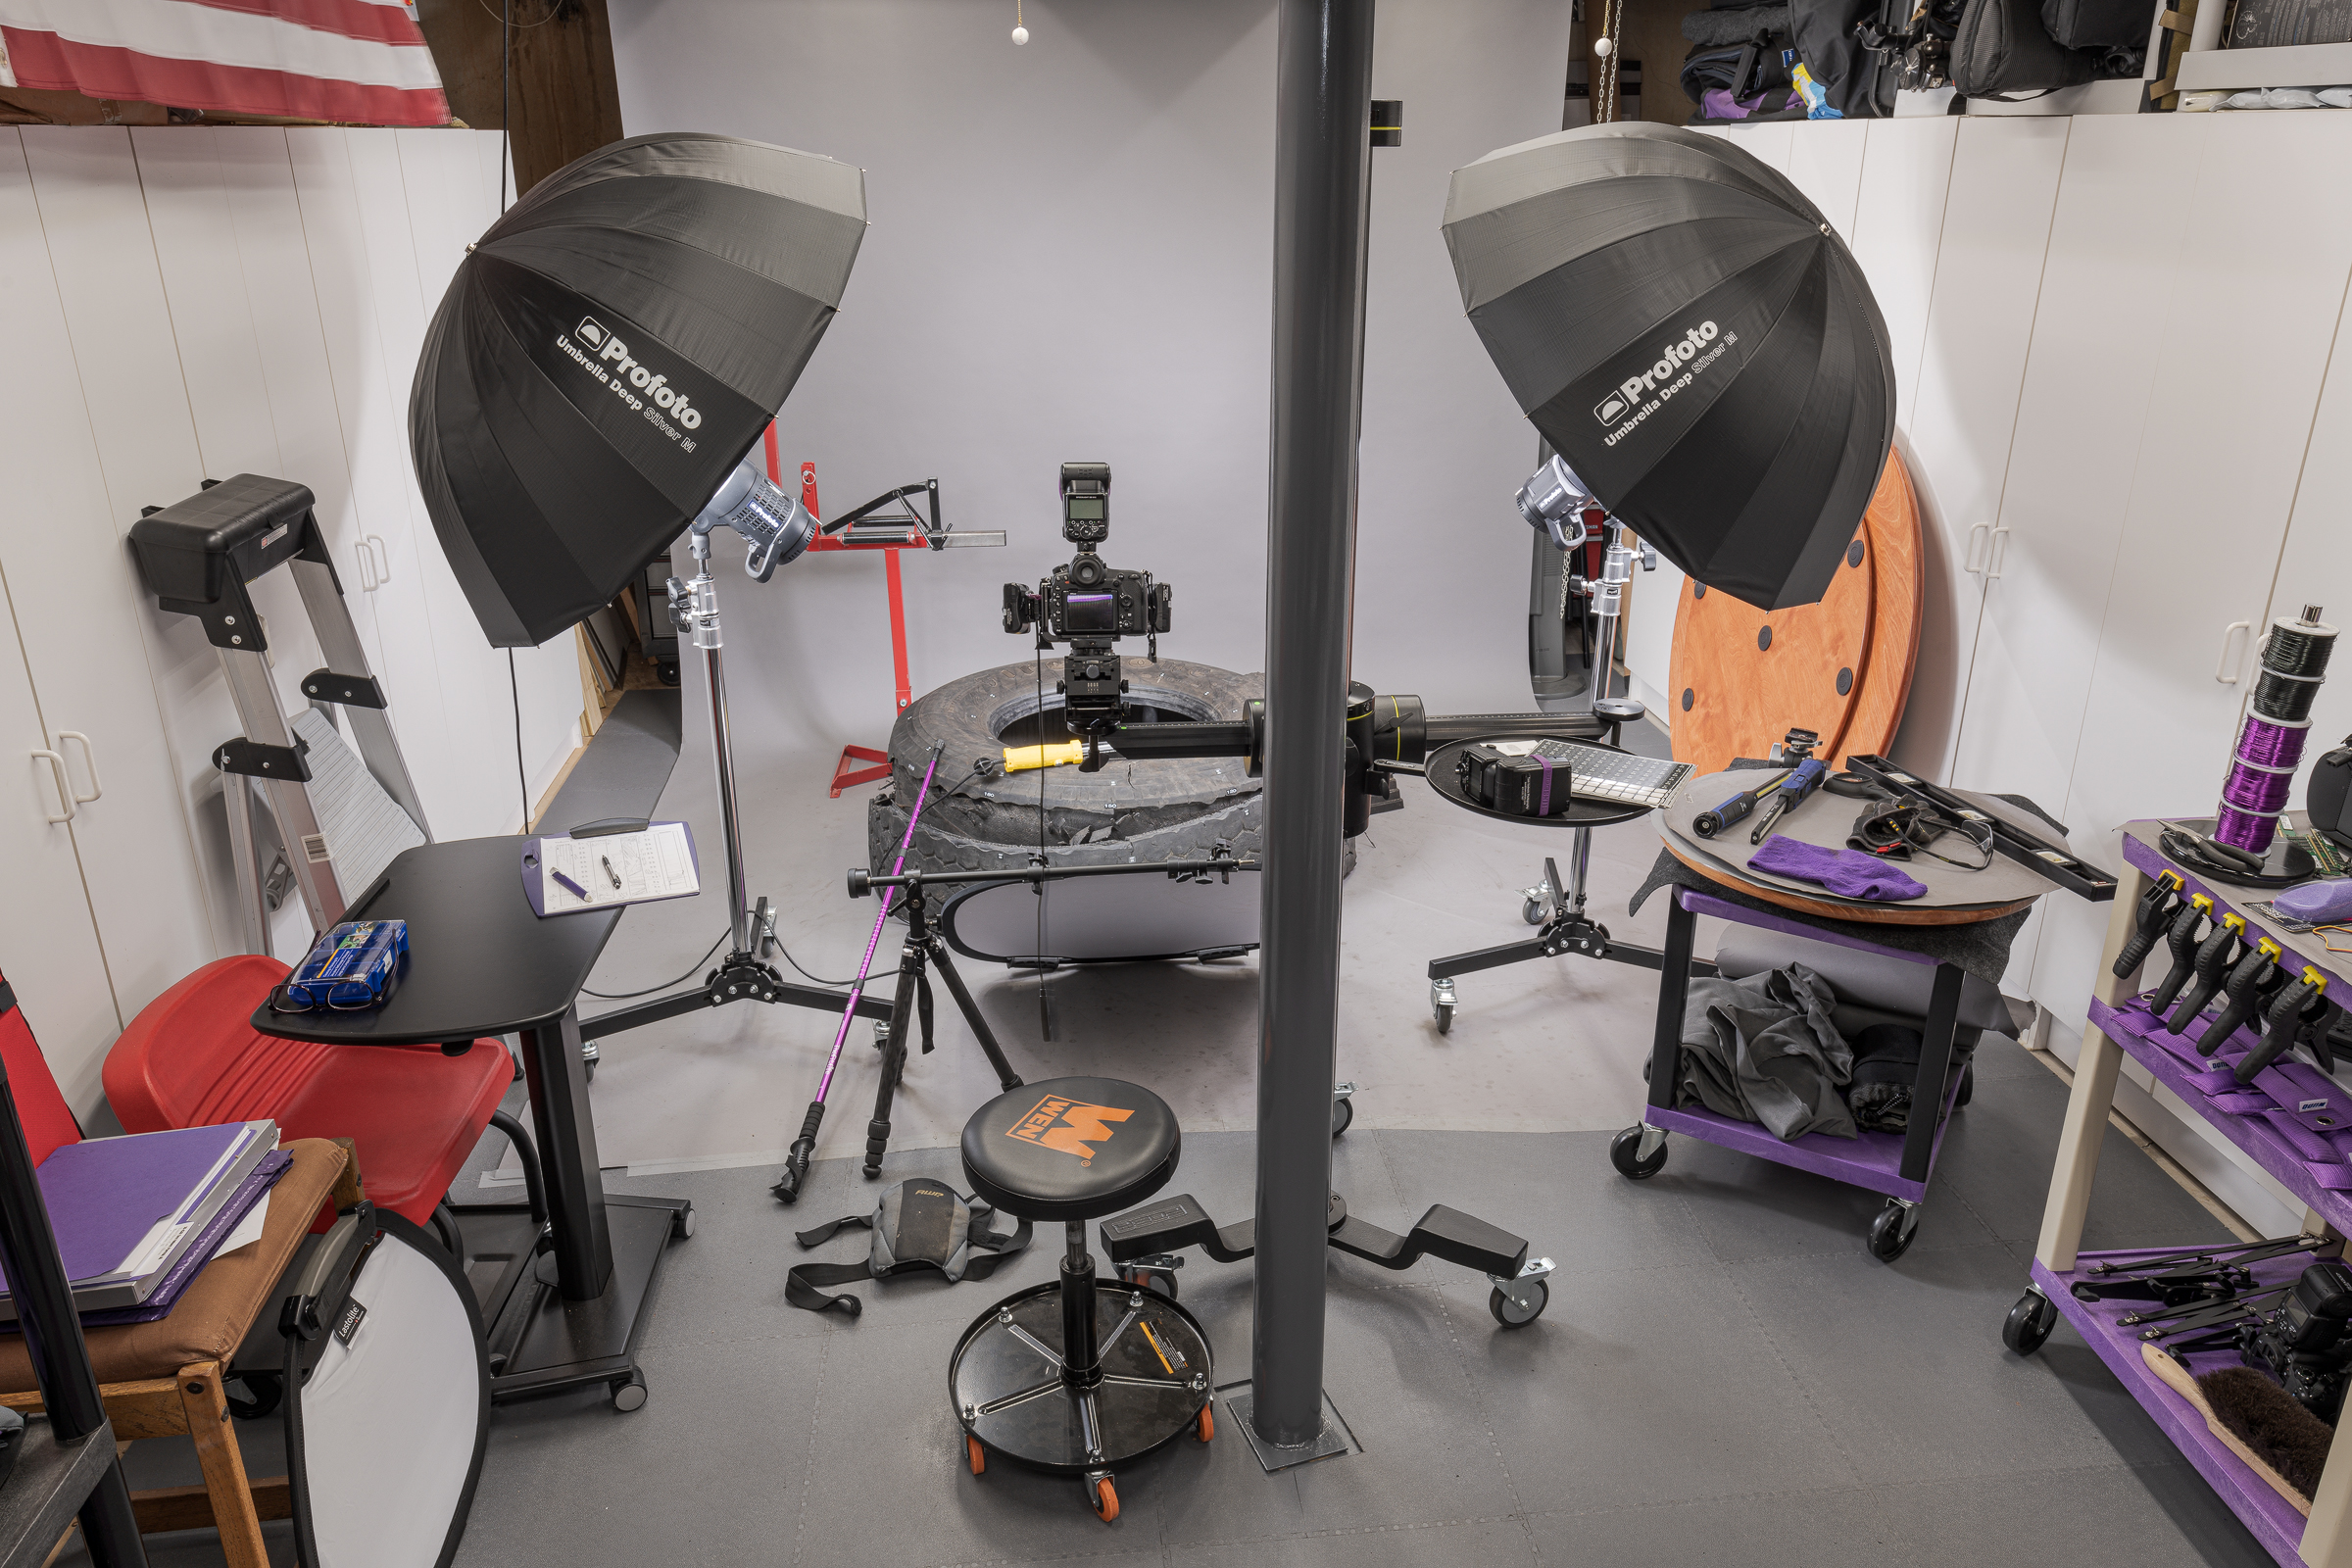
In my Studio Lab, I have all the inspection and photography equipment I need to do a complete analysis and documentation, regardless of what I encounter. Besides, I can leave any setup in place for several days if needed. (Click on an image to enlarge it. Then click back arrow to return to this post.)
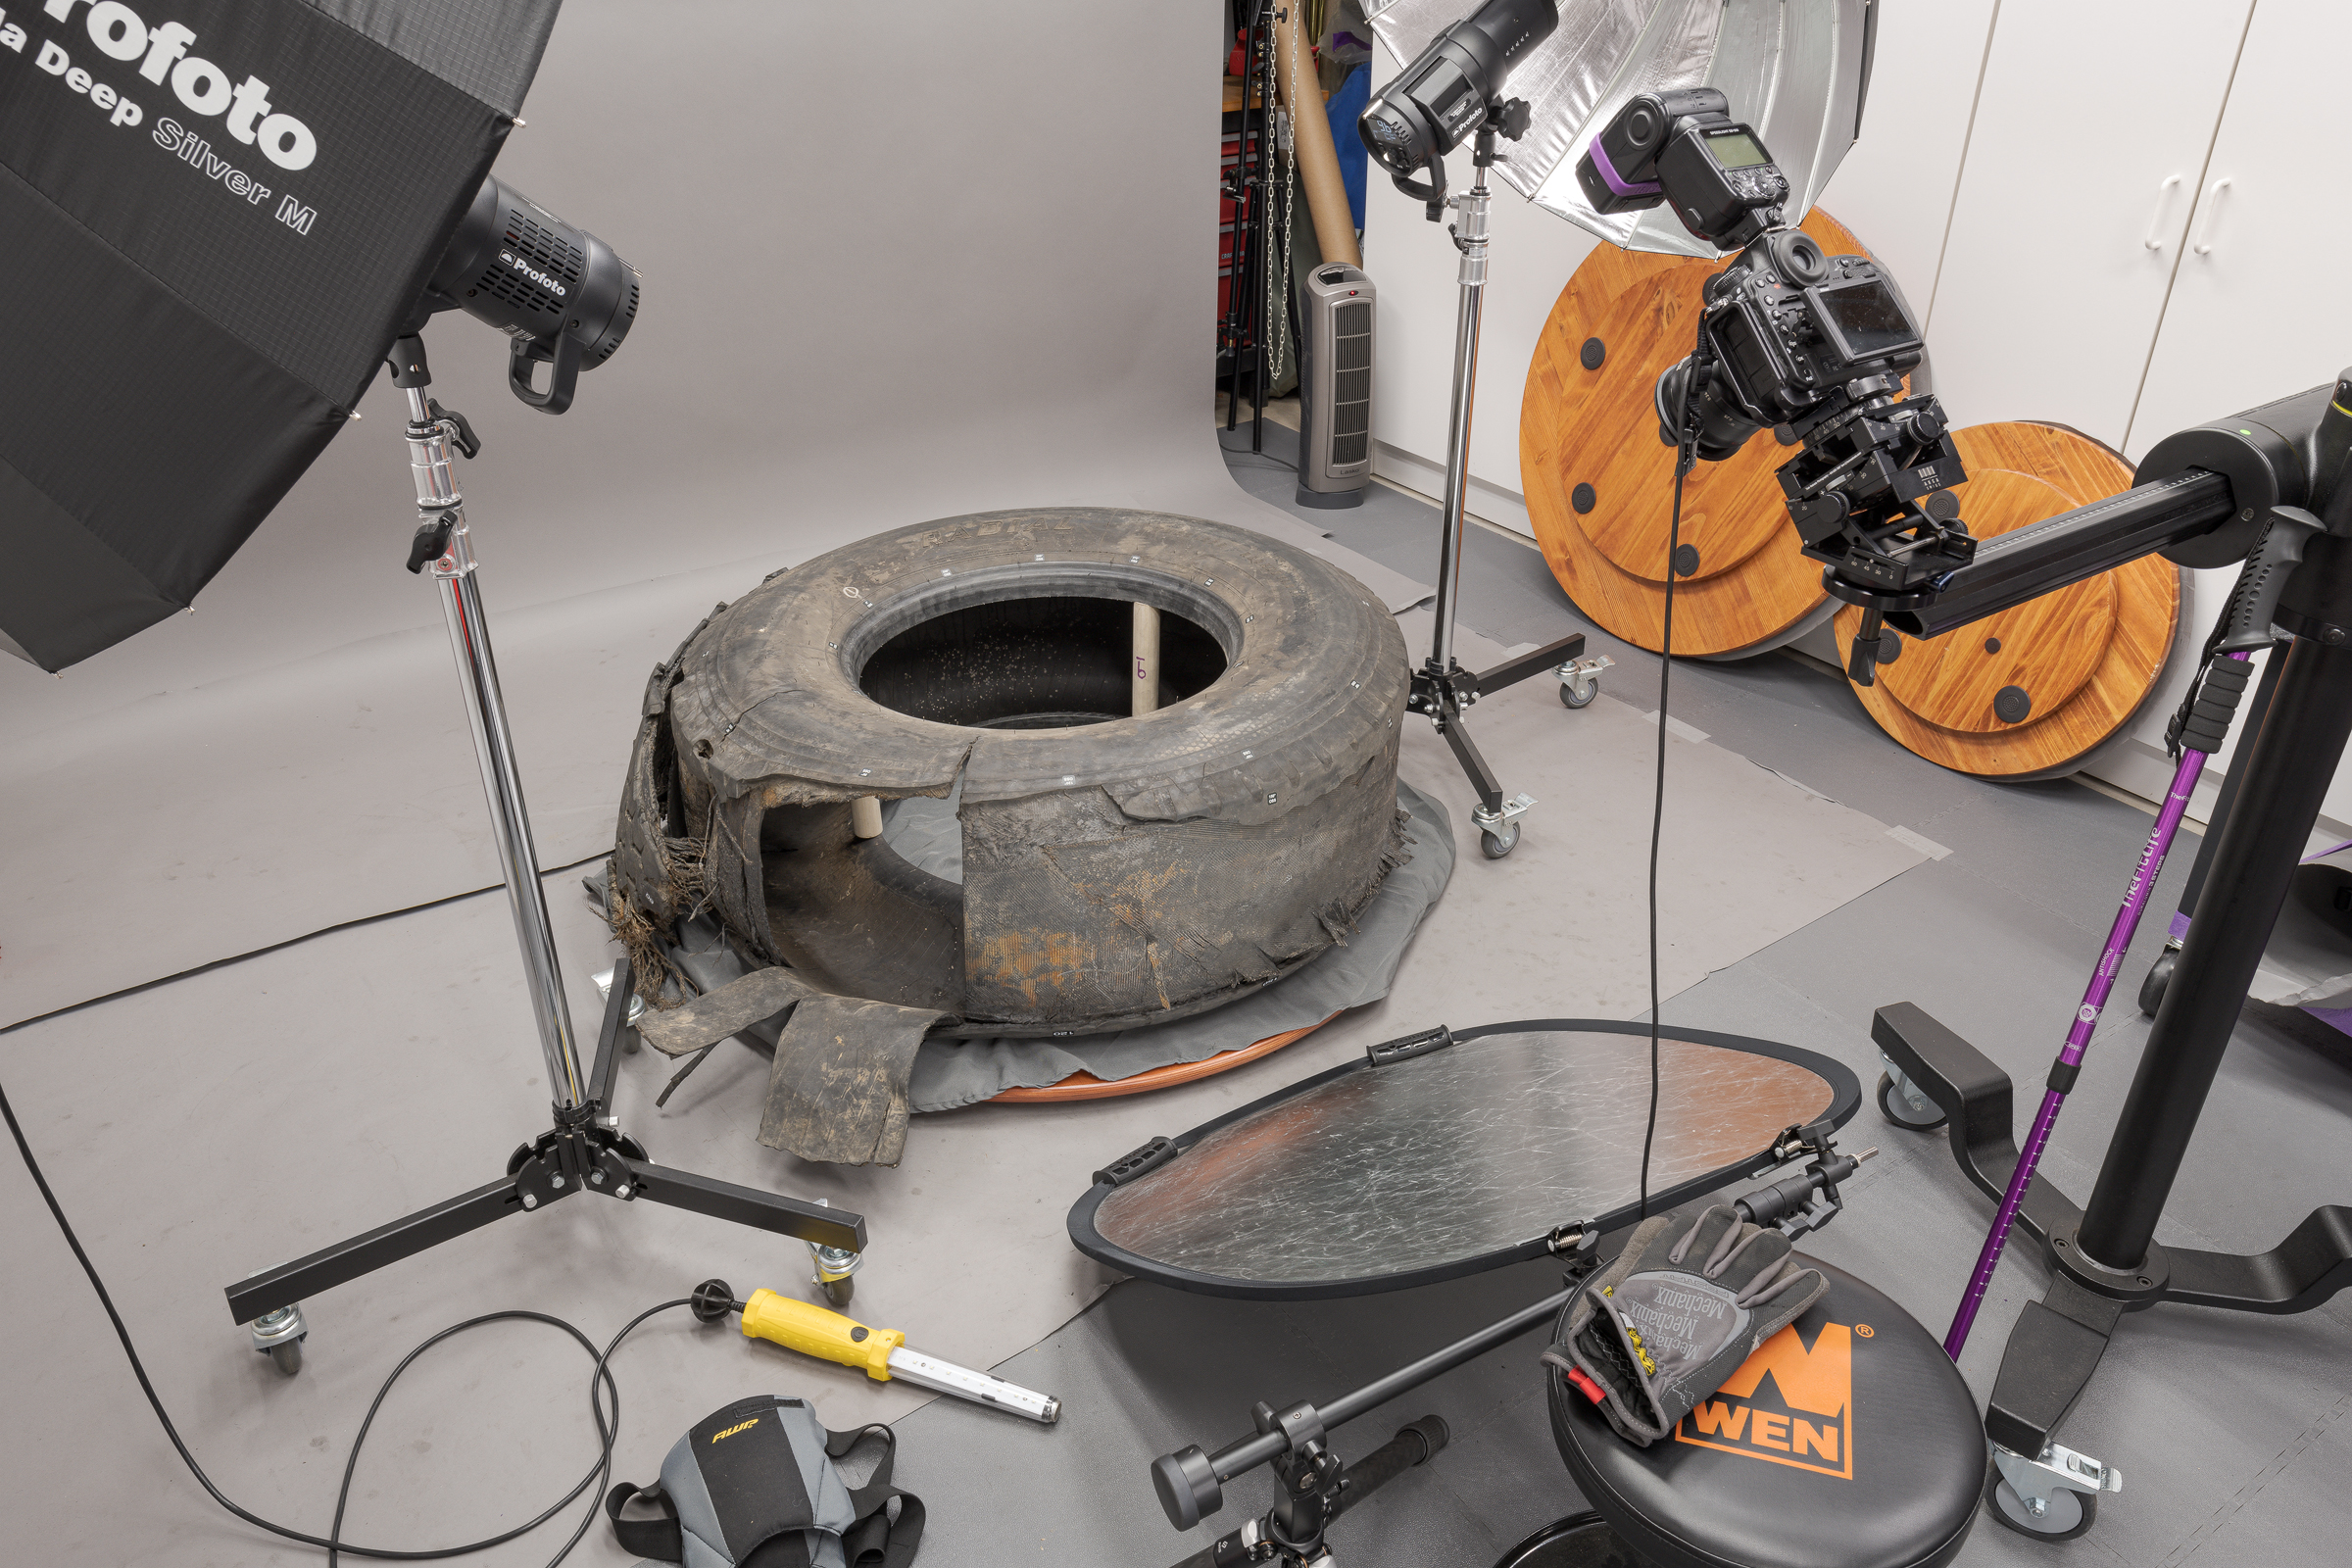
Tire analysis setup includes camera with flash on studio stand, two studio strobes into silver umbrellas, silver reflector, and gray background paper with tire on lazy susan. (Made with ZEISS Milvus 25 mm f/1.4 lens on Nikon D850 with SB-910 flash firing the two studio strobes, f/16, 0.5 sec, ISO 64.)
Although it is partly obscured by the support pole in the photograph above, I mount a camera on one end of the sliding arm of a Foba rolling studio stand. One of my favorite pieces of gear, a studio stand is much faster to adjust and move than a tripod. The arm rotates around, slides back and forth on, and moves up and down on a solid pole mounted to a base with three lockable wheels. These adjustments allow a camera to be brought and held in the exact position needed—both rapidly and securely.
I then mount as many lights as required on rolling light stands, floor stands, C-stands, or clamps. Having the camera and lights on rolling stands makes it quick and easy to change their positions. My large collection of reflectors and reference scales can be held in position with a variety of clamps, as needed.
I also use one of three wooden or four plastic lazy susans, depending on the size of the tire, wheel, or product. I cover the lazy susans with gray paper or cloth, and use a neutral gray background paper from a large ceiling-mounted roll.
Because tires and wheels are usually neutral in color—shades of black, gray, silver, or white—the neutral gray background neither clashes nor contaminates the subjects. With other products, I may use gray, black, or white backgrounds.
I’ve installed so many LED shop lights overhead that a couple visitors have described the area as bright as an operating room. Even with this much light, I still use a number of handheld LED lights during inspections, and to assist with composition and focusing while photographing. (Click on an image to enlarge it. Then click back arrow to return to this post.)
Tire analysis setup includes camera with flash on studio stand, two studio strobes into silver umbrellas, silver reflector, and gray background paper with tire on largest lazy susan. (Made with ZEISS Milvus 25 mm f/1.4 lens on Nikon D850 with SB-910 flash, f/16, 0.6 sec, ISO 160.)
I will describe lighting for specific items in future posts, but for tires, I generally use two Profoto Pro-B3 750 W/s studio strobes—both mounted on rolling light stands.(For tires, I now use the strobes without umbrellas to get even more contrast and details.) A Godox TT685IIN flash affixed to the hot shoe a Nikon Z 8 mirrorless camera triggers both studio strobes, along with supplemental remote Godox TT685IIN’s and/or Godox MF-12 macro flashes, if required. A silver Profoto reflector bounces light onto the tread or belt surface.
If you’re wondering, I use the purple trekking pole to rotate a tire while I’m sitting on the Wen mechanic’s rolling seat behind the camera. Using that pole allows me to look at the image through the grid on the camera’s rear LCD while I precisely line up the position stickers on the tire with the gridlines.
The cable hanging from the camera is the remote shutter release. With this, I can trip the shutter without touching the camera to insure there is no motion blur in the photo.
I will share more of the techniques and gear I use in future posts.
In the last post, I showed some lighting solutions to use when your subject is in low light. In this post, I will briefly describe some of the supports and the lights I referred to. Flash is a big and interesting subject, and I have an entire module on flash photography in the photography class I teach for SAE (SAE C1729). Or, I should say, will resume teaching once this pandemic eases.
I will expand on each of these in future posts, but wanted to give the basics here. First and foremost is using a good tripod. There is nothing better you can do to improve your photographs than to use a tripod. I use a tripod in any kind of light for almost every image of any subject, including accident sites, vehicles, tires, and other products. A good tripod is even more essential when the light levels are low.
It used to be unusual to see someone with a tripod at an inspection. But with so many scanners now being used, tripods have become quite common. So there goes one excuse for not carrying and using one!
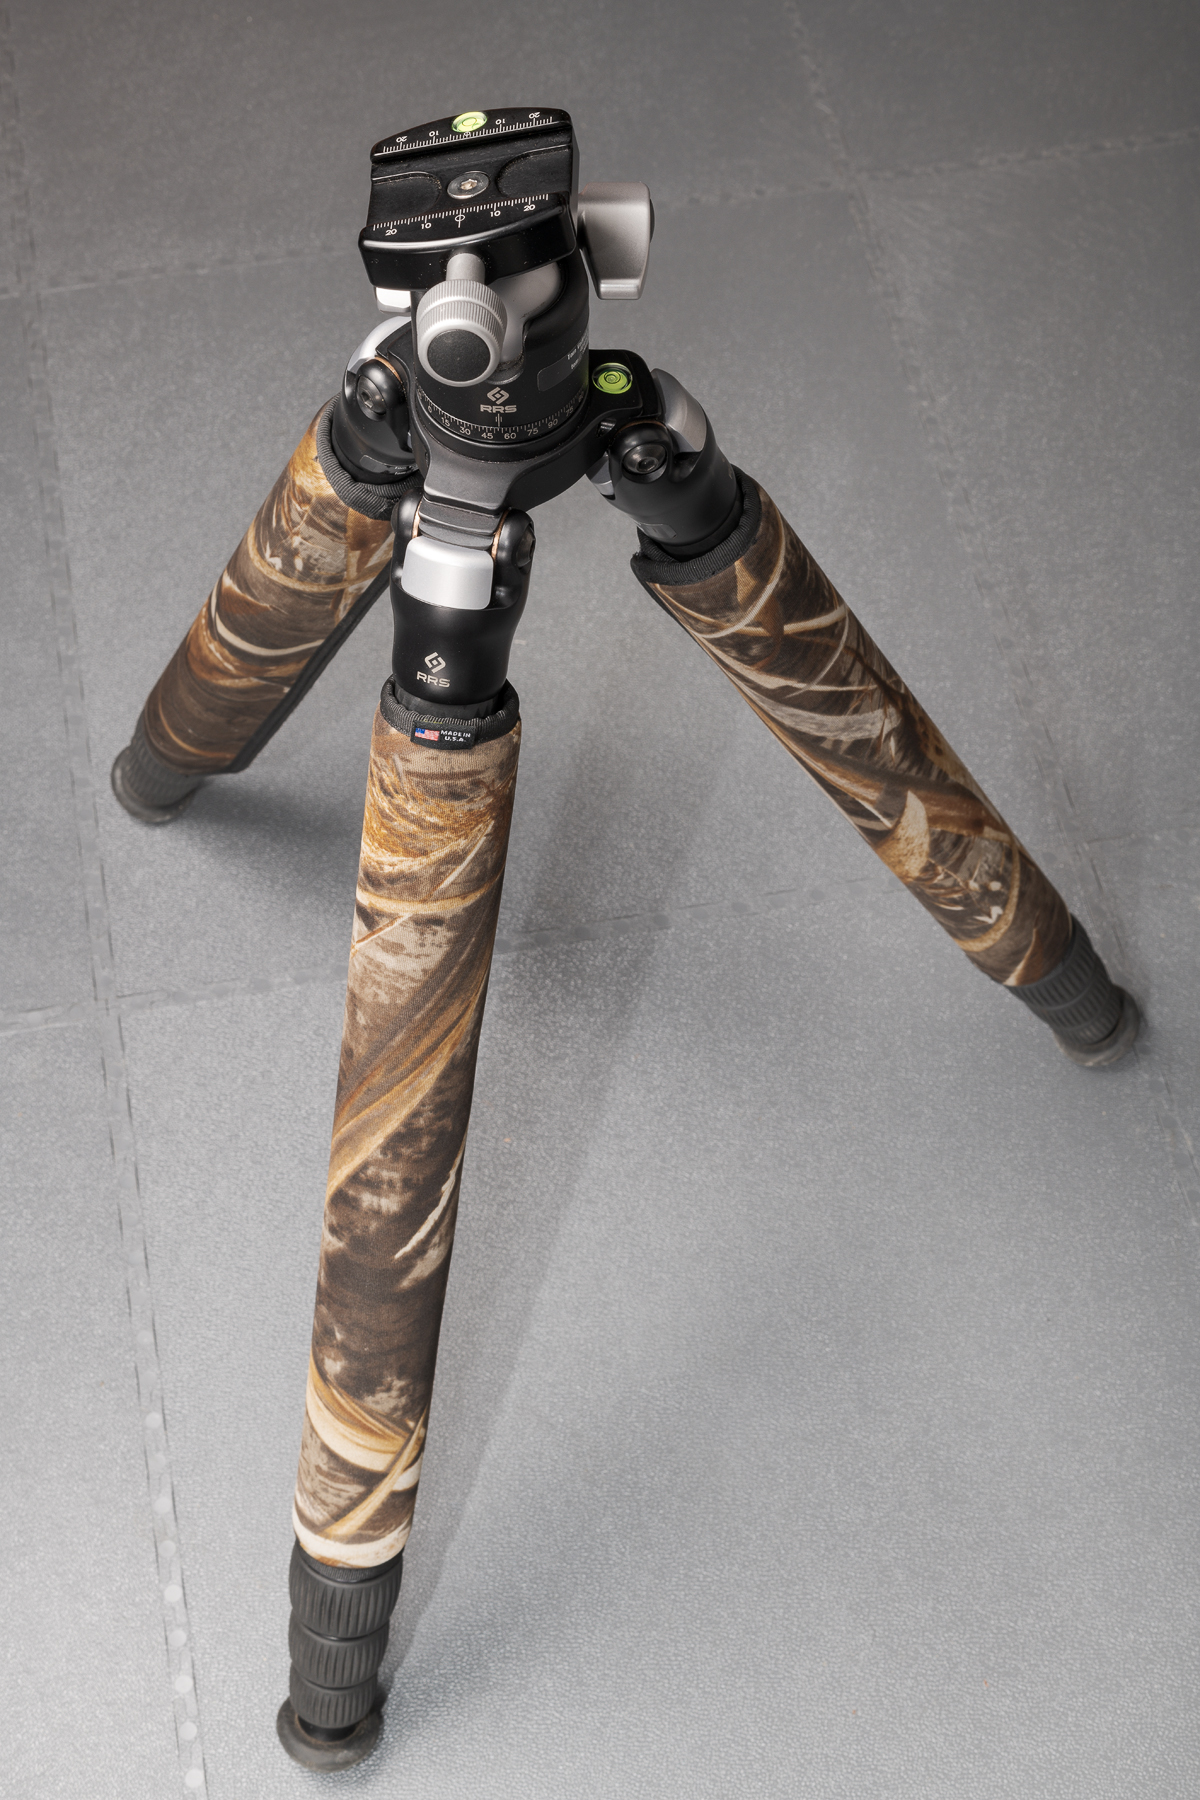
I have a post all about tripods in the works, but for now I’ll just mention the Really Right Stuff (RRS) TVC-24L with a RRS BH-40 ball head that I use for all inspections out of my Studio Lab. It is compact and lightweight, yet it extends quite high, which is essential. All of my tripods have LensCoat LegWraps for insulation (from both hot sun and freezing temperatures) and for comfort in carrying. (Click on image to enlarge, then click on back arrow to return to this post.)
Really Right Stuff (RRS) TVC-24L tripod with RRS BH-40 ball head. (Made using Nikon D850 with ZEISS Milvus 50 mm macro lens. Lit with two Profoto B1x strobes firing into silver umbrellas.)
While future posts (and classes) will discuss flash techniques in detail, in this post I will focus on the equipment I used in the previous post.
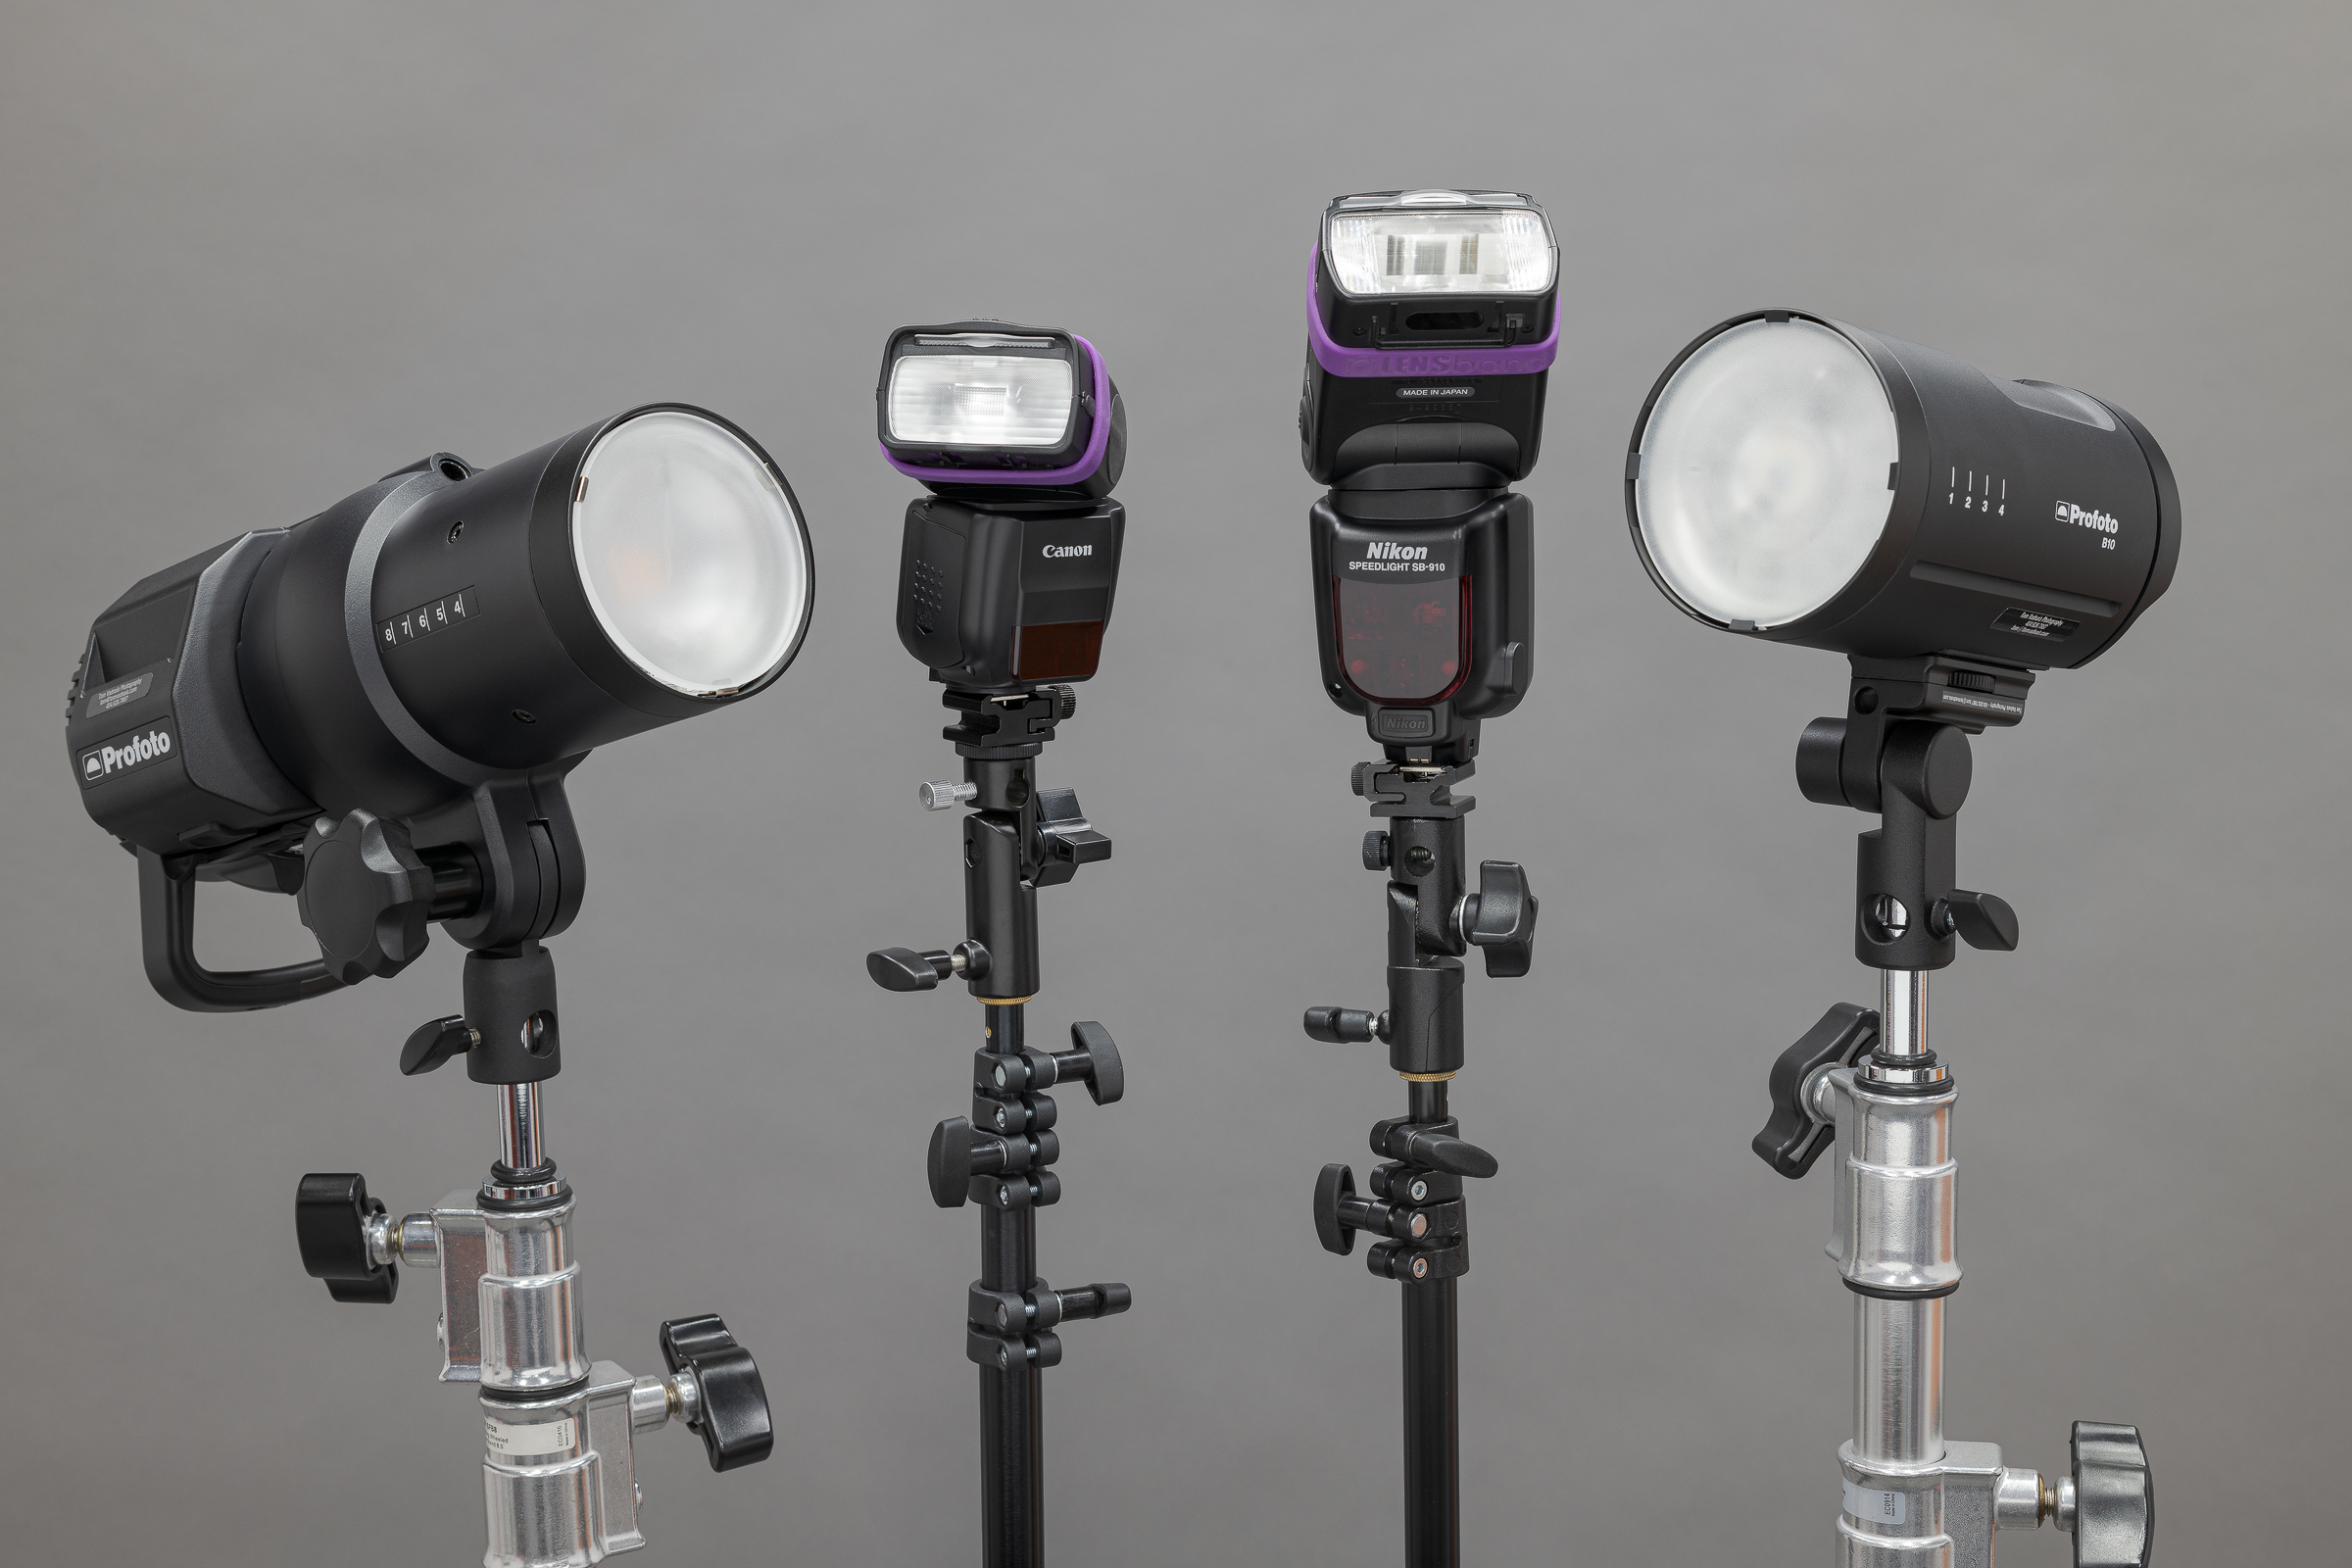
Flashes that fit in your camera’s hot shoe are generically called speedlights or flashes. In fact, Nikon calls their flashes Speedlights while Canon calls theirs Speedlites. Larger studio-type flashes are referred to as strobes. Here are some examples from the front. All are battery powered. (Click on image to enlarge, then click on back arrow to return to this post.)
(L to R) Profoto B1x, Canon 430EX III-RT, Nikon SB-910, and Profoto B10. (Made using Nikon D850 with ZEISS Milvus 50 mm macro lens.)
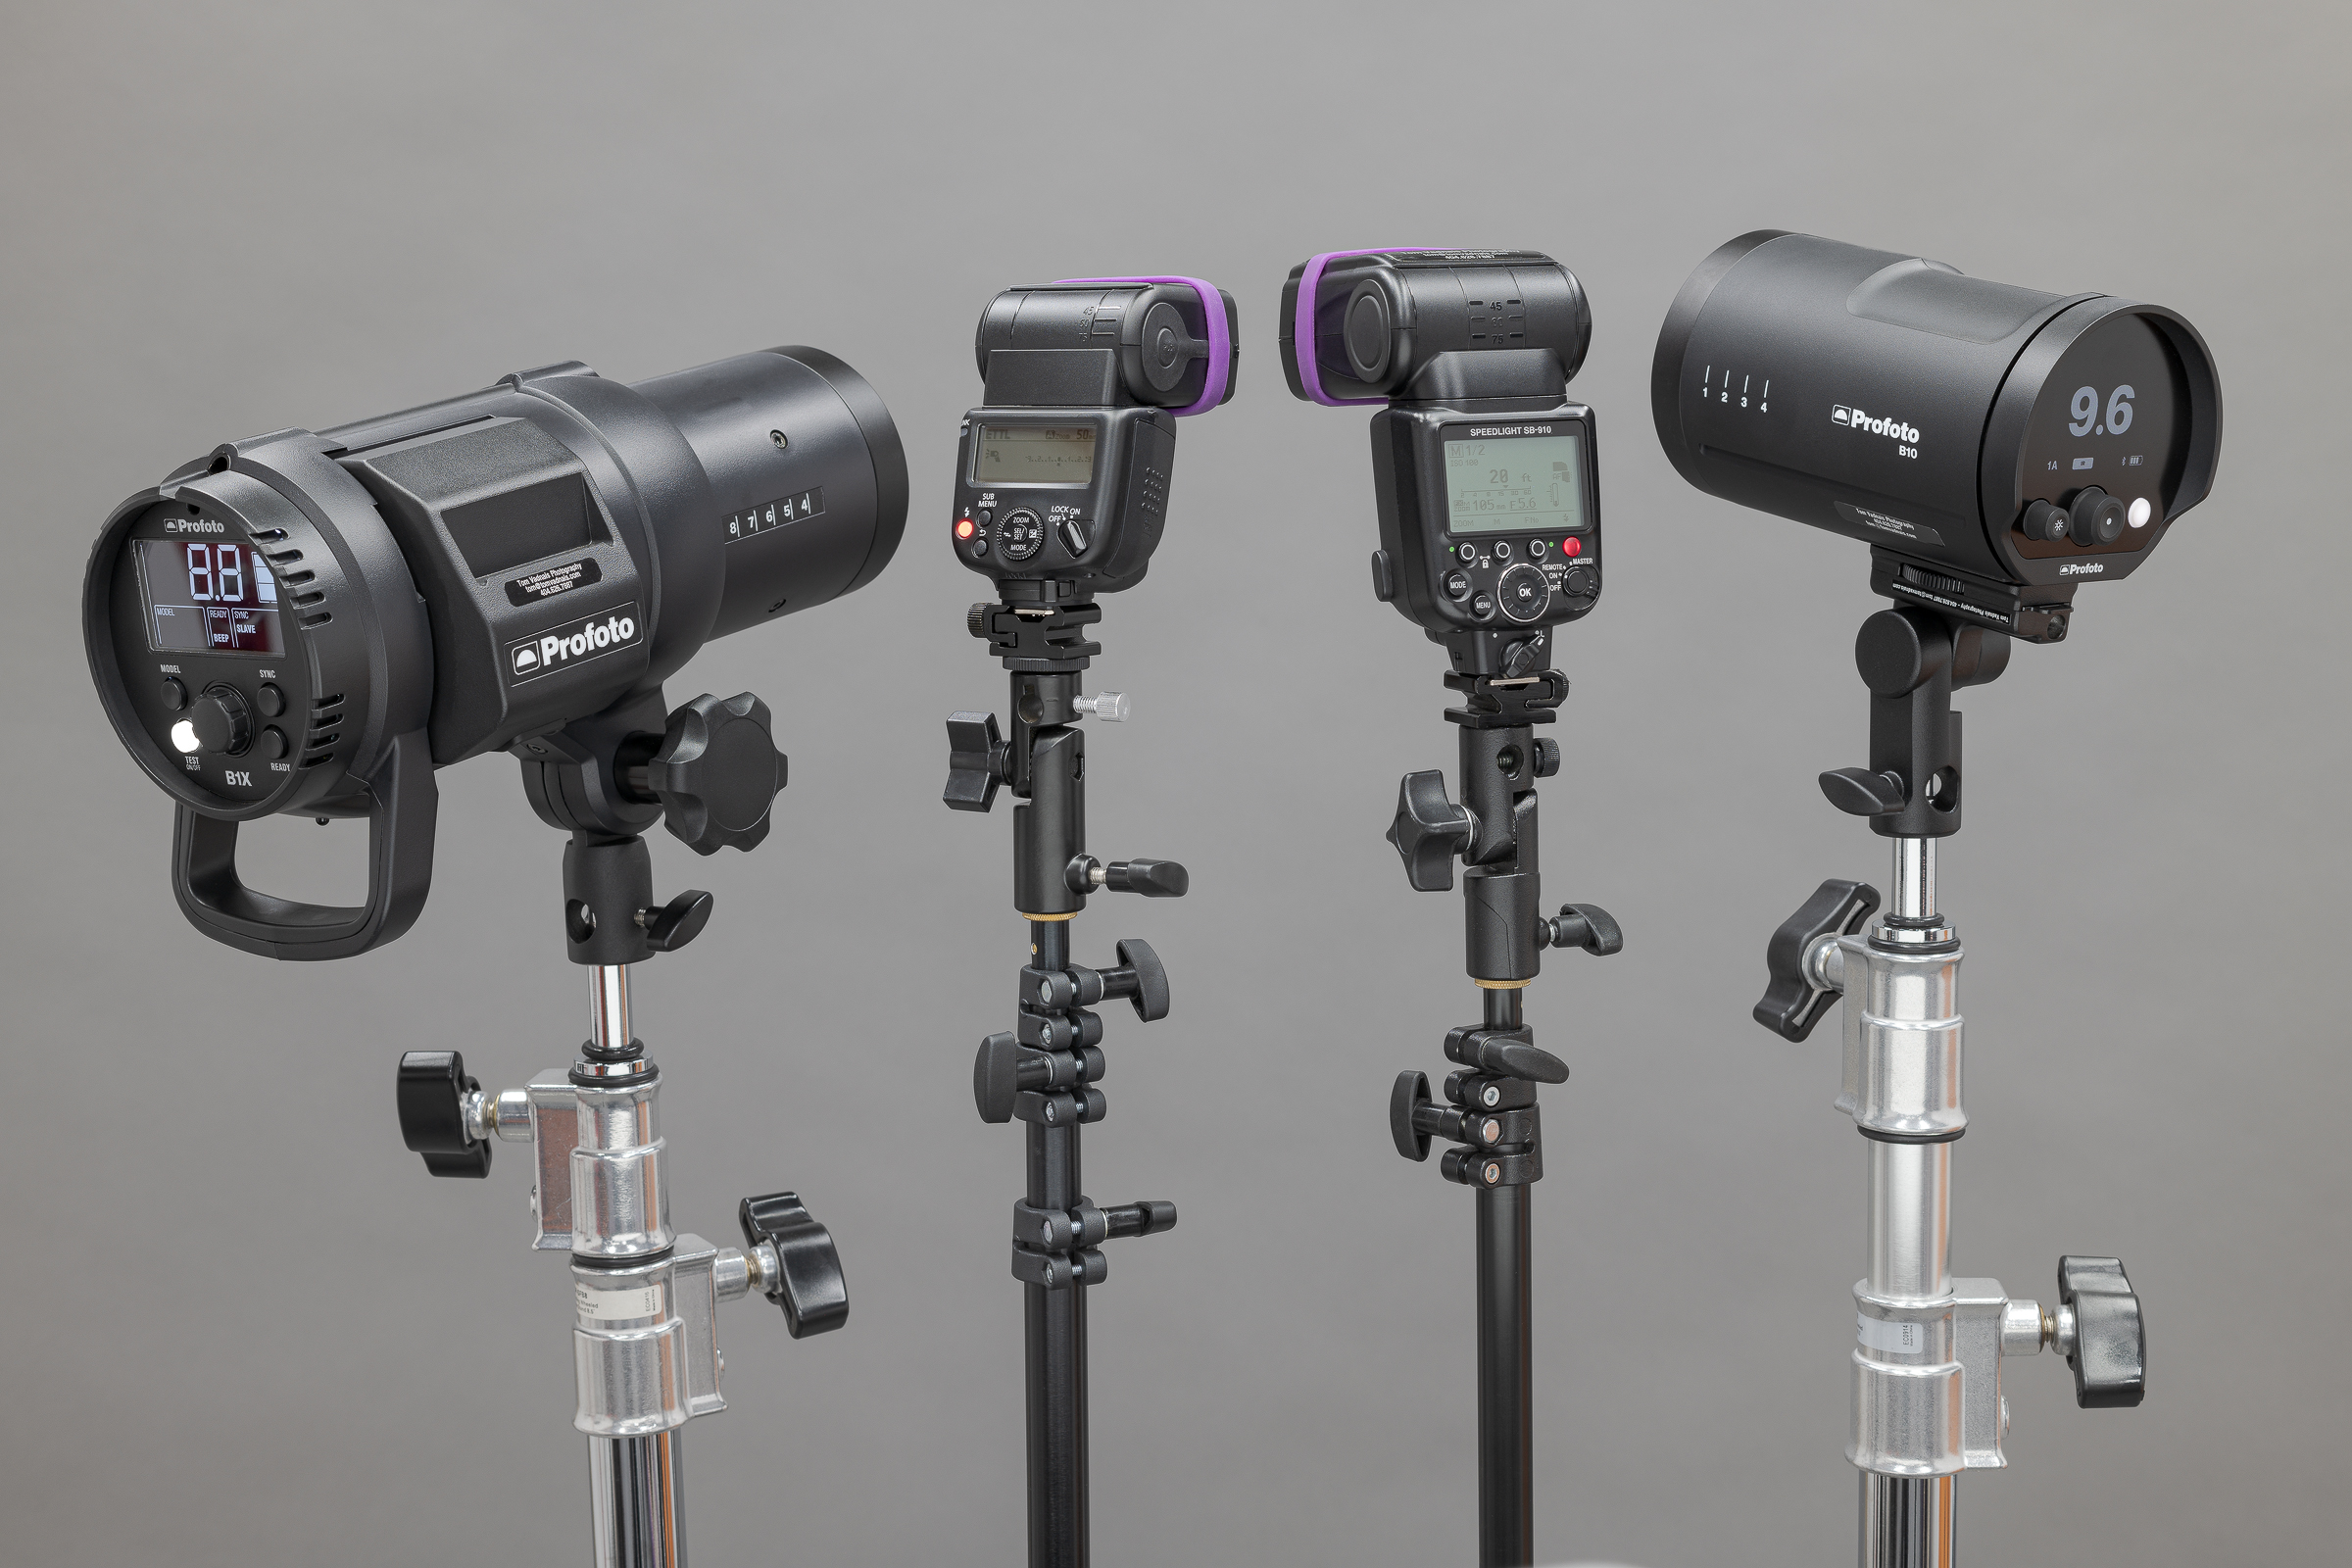
And here they are from the rear. Note that the speedlight flashes can be mounted in a camera hot shoe or on a light stand. (Click on image to enlarge, then click on back arrow to return to this post.)
(L to R) Profoto B1x, Canon 430EX III-RT, Nikon SB-910, and Profoto B10. (Made using Nikon D850 with ZEISS Milvus 50 mm macro lens.)
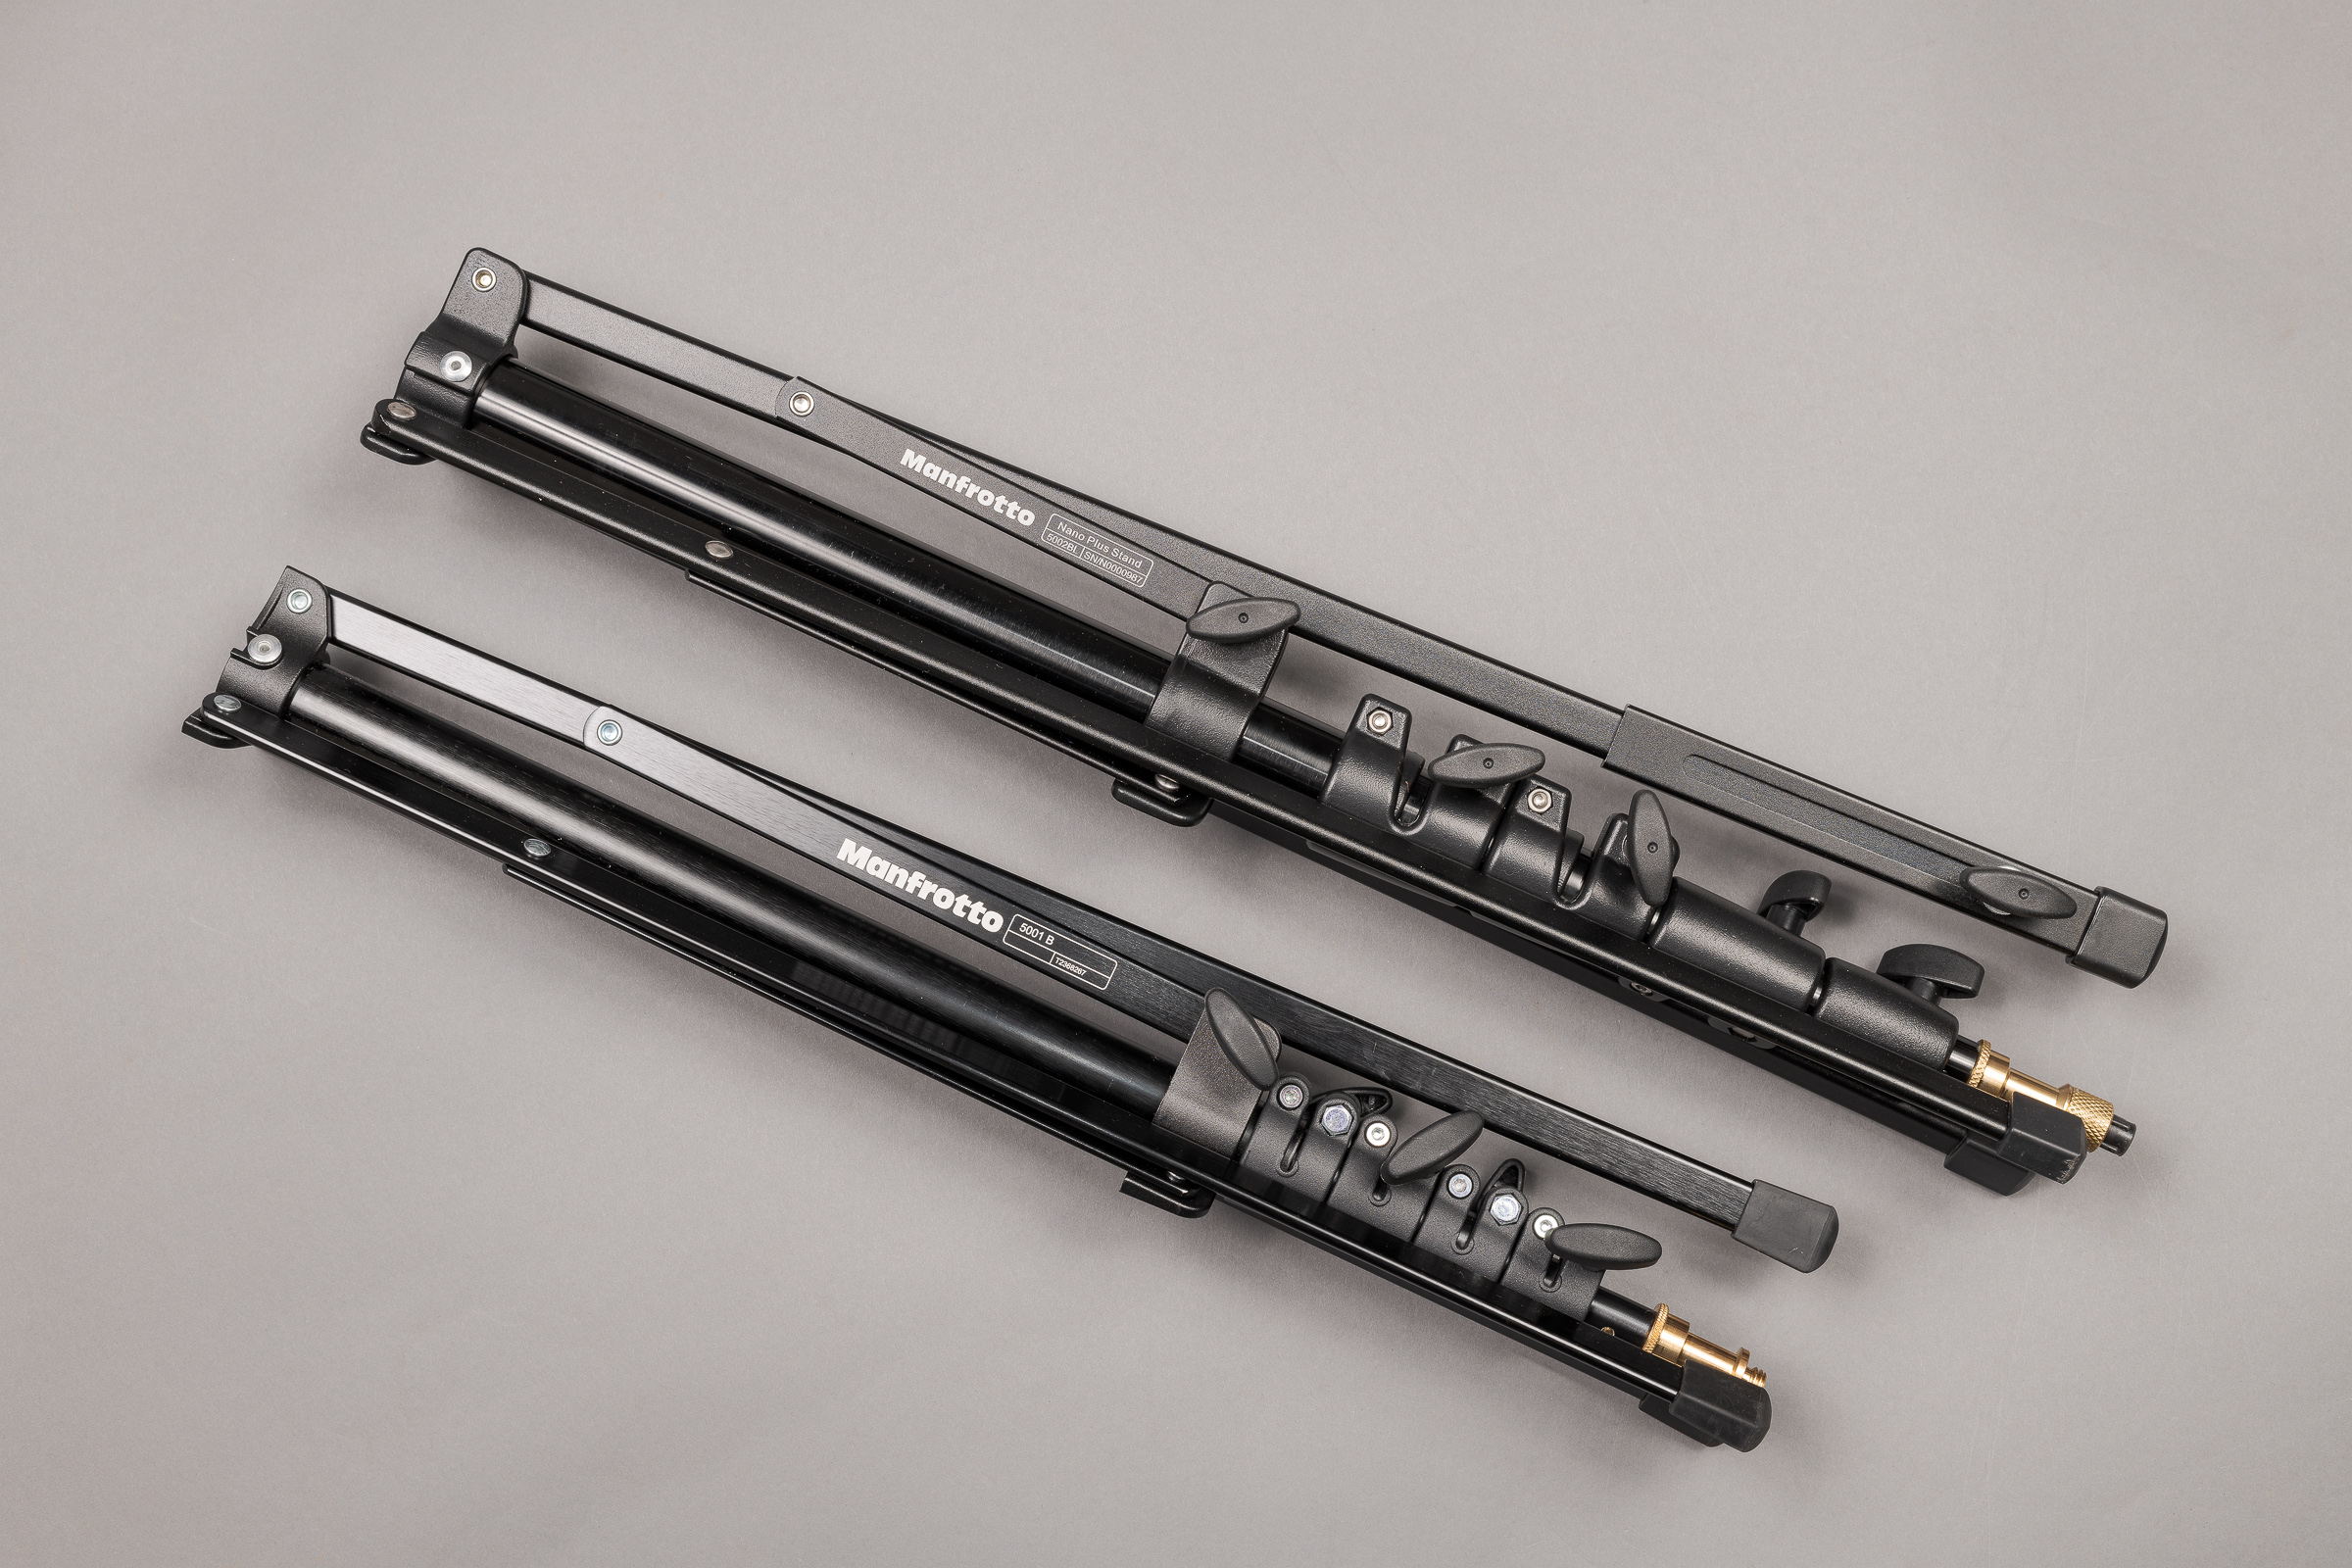
In the photograph of the lighting setup in the previous post, there was a Nikon SB-910 Speedlight in the camera hot shoe and two Profoto B10 strobes on Manfrotto 5002-M travel light stands. These stands are lightweight and fold up small, yet are quite sturdy. (Click on image to enlarge, then click on back arrow to return to this post.)
Manfrotto travel light stands 5002-M (top) and 5001 (bottom). (Made using Nikon D850 with ZEISS Milvus 50 mm macro lens. Lit by two Profoto B1x strobes firing into silver umbrellas with diffusers.)
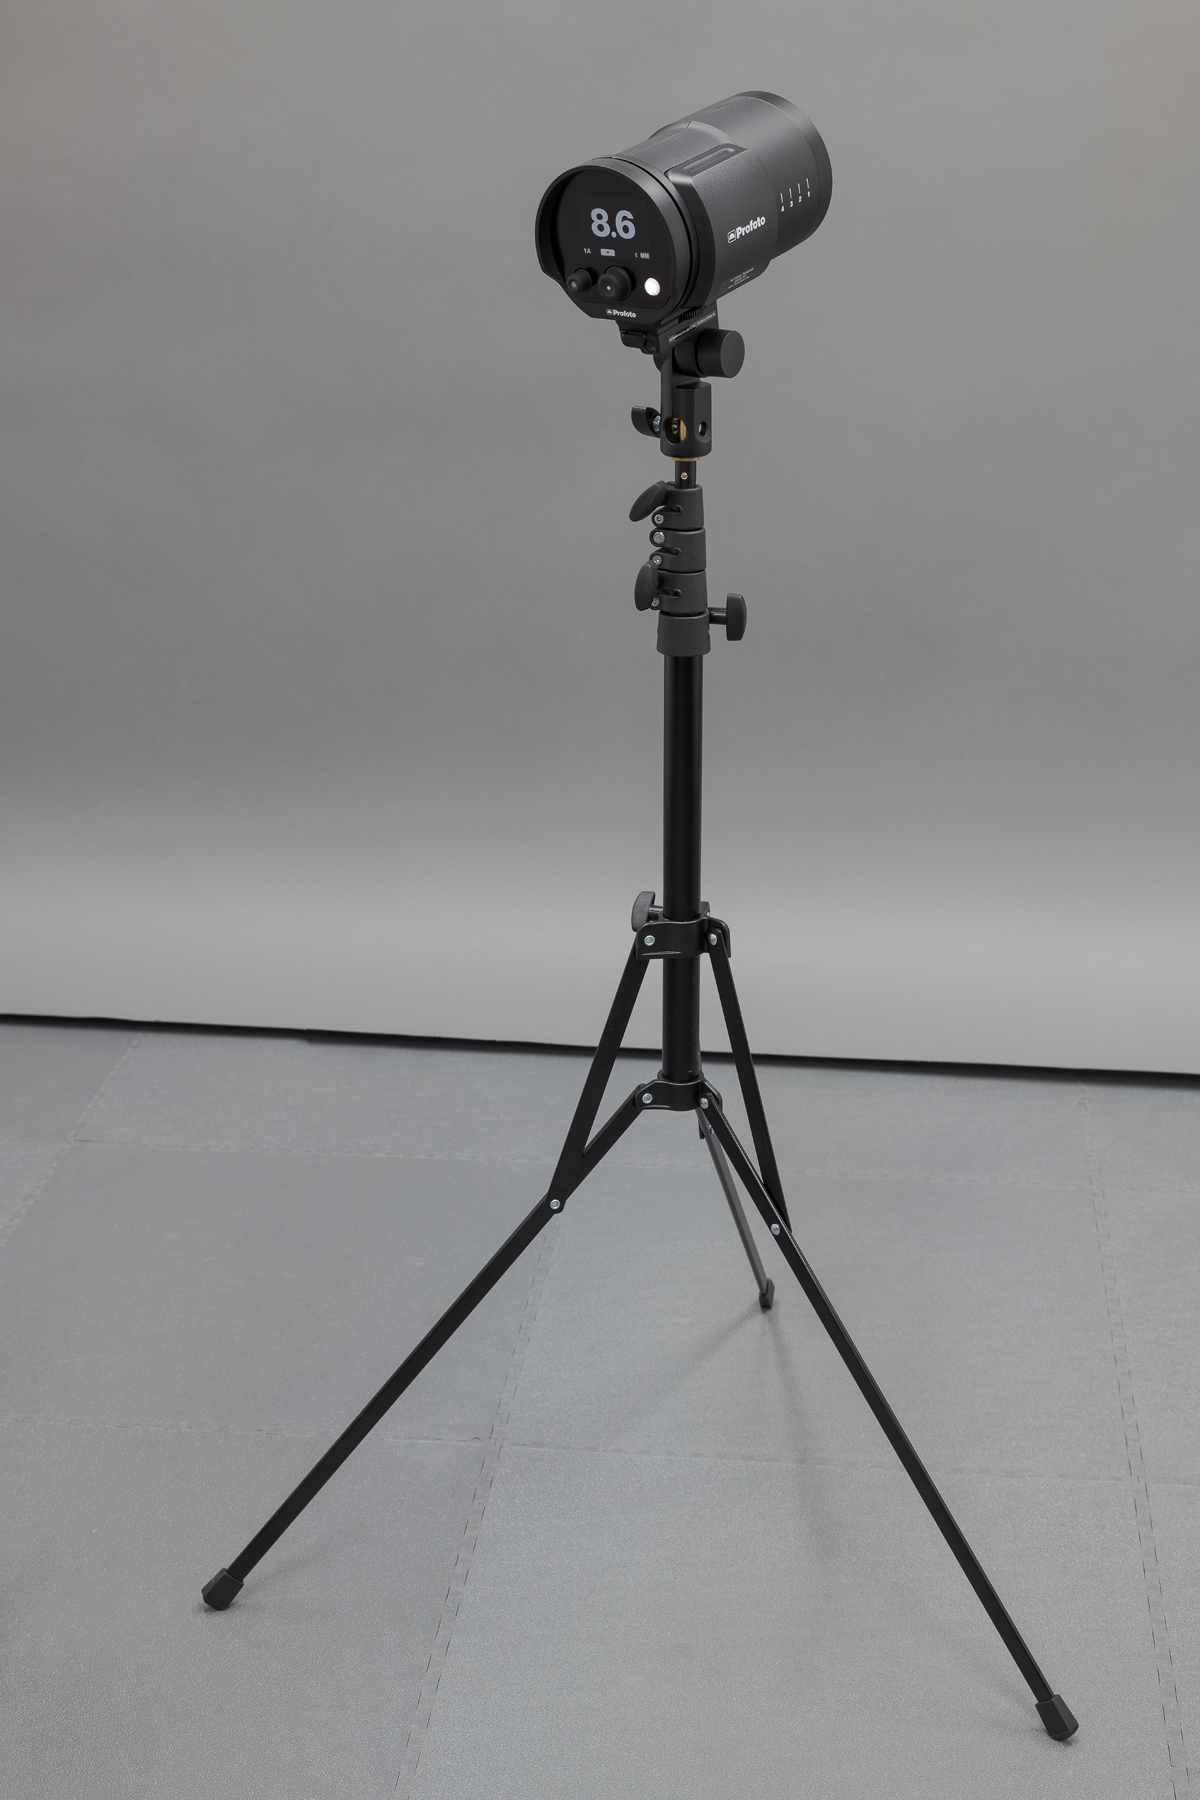
This final image shows a Profoto B10 mounted on a Manfrotto 5001, which is slightly smaller and slightly less sturdy (though still sufficient) than a 5002-M. (Click on image to enlarge, then click on back arrow to return to this post.)
Profoto B10 on Manfrotto 5001 travel light stand. (Made using Nikon D850 with ZEISS Milvus 50 mm macro lens. Lit with two Profoto B1x strobes firing into silver umbrellas.)
In the previous post, the two B10’s were fired through their infrared slave sensors when they sensed light from the on-camera Nikon flash. All three flashes and the camera’s exposure settings were all manually set.
Why use strobes when you can use speedlights? Power is the answer. Mid-to-high end speedlights typically have power outputs between 60 and 150 Watt-seconds (Ws), while the Profoto B10 and B1x are 250 and 500 Ws, respectively. This means you’d need two-to-eight speedlights to equal one Profoto strobe. For example, you’d need sixteen 60 Ws mid-range flashes to equal the power output of the two 500 Ws strobes I use for tire photos in my Studio Lab. Not only would those be unwieldy to set up, but think of how many AA batteries you’d need!
Why is flash power important? Every one stop increase in exposure requires doubling of the light power. For forensic or testing photographs, you want to minimize noise by using the lowest ISO you can, and you want a deep depth of field by using a smaller (higher number) aperture. Both a lower ISO and a smaller aperture result in less light reaching the sensor. Consequently, the flash has to be powerful enough to ensure a proper exposure without raising ISO or opening up your aperture.
Future posts will go deeper into exposure both with and without flash. We will be using this equipment throughout.
Most accident reconstructionists and product liability engineers have had to photograph a vehicle, vehicle component, or other product in a dark area such as a warehouse, storage facility, lab, or even an office. Conditions can be even worse for building or fire investigators, especially if the power is out. By definition, what is missing in any of these situations is light!
But despite the lack of light, you might only get this one chance to inspect the evidence. You’ve got to come back with well-exposed, well-lit professional photographs—photos that accurately portray what you saw, represent you well to your clients, and reflect the quality standards of your work, especially during depositions and trials.
Unless you are trying to capture a low light scene as it is (which is a completely different discussion), you have several options to make a photo in low light.
One is light painting by moving a flashlight over your subject during a long exposure. This is tedious and time-consuming, especially if you have to make more than one or two images. It is also hit-and-miss, even if you are experienced with it. Of course you need a sturdy tripod for every shot, since the exposures are long. These long exposures also risk generating noise. So light painting might be good in an emergency, and it’s sometimes necessary for illuminating vehicles at nighttime accident scenes.
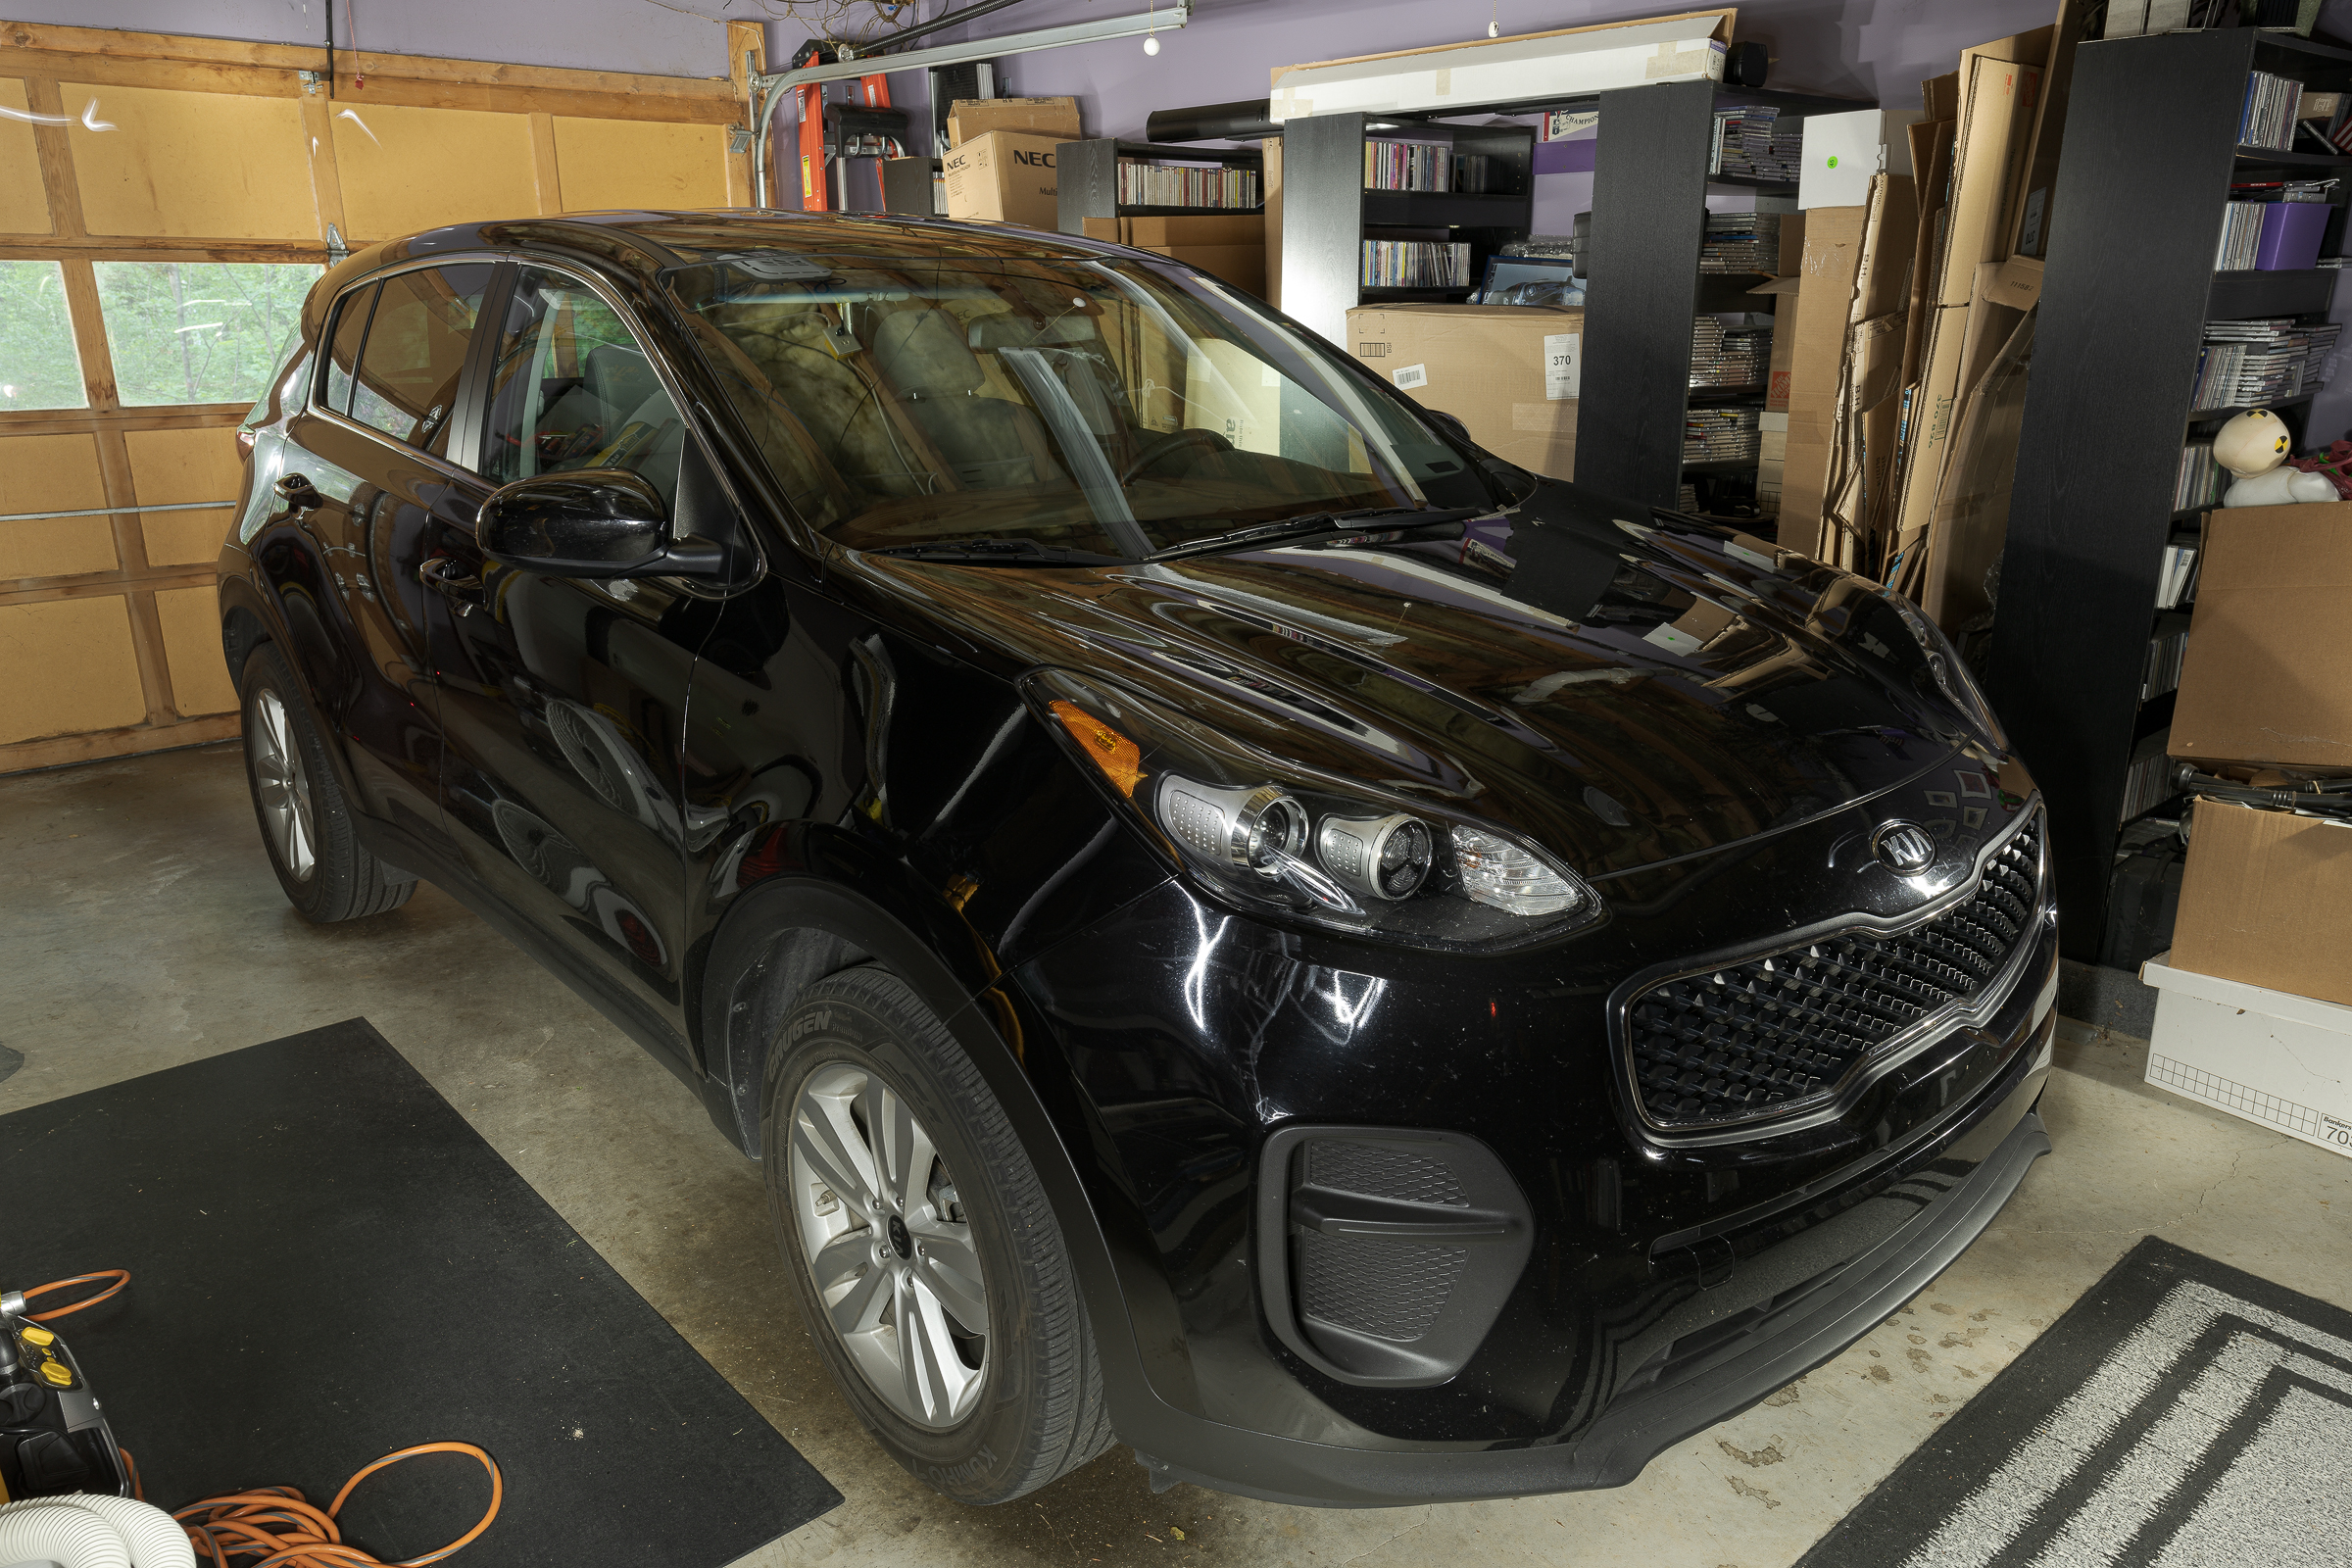
It can work, as shown below, but it’s not recommended for making inspection photographs. This photograph of a rental car was made at dusk with no lights on in the garage. The only light came from when I walked around the vehicle constantly moving a flashlight, painting both the car and the garage bay. Note how the long (74 second) exposure made the outdoors look brighter than it was. (Click on image to enlarge, then click back arrow to return to this post.)
Light painting at f/11 and ISO 64 with shutter speed of 74 seconds. (Made using Nikon D850 with ZEISS Milvus 25 mm f/1.4 lens on RRS TVP-45 tripod.)
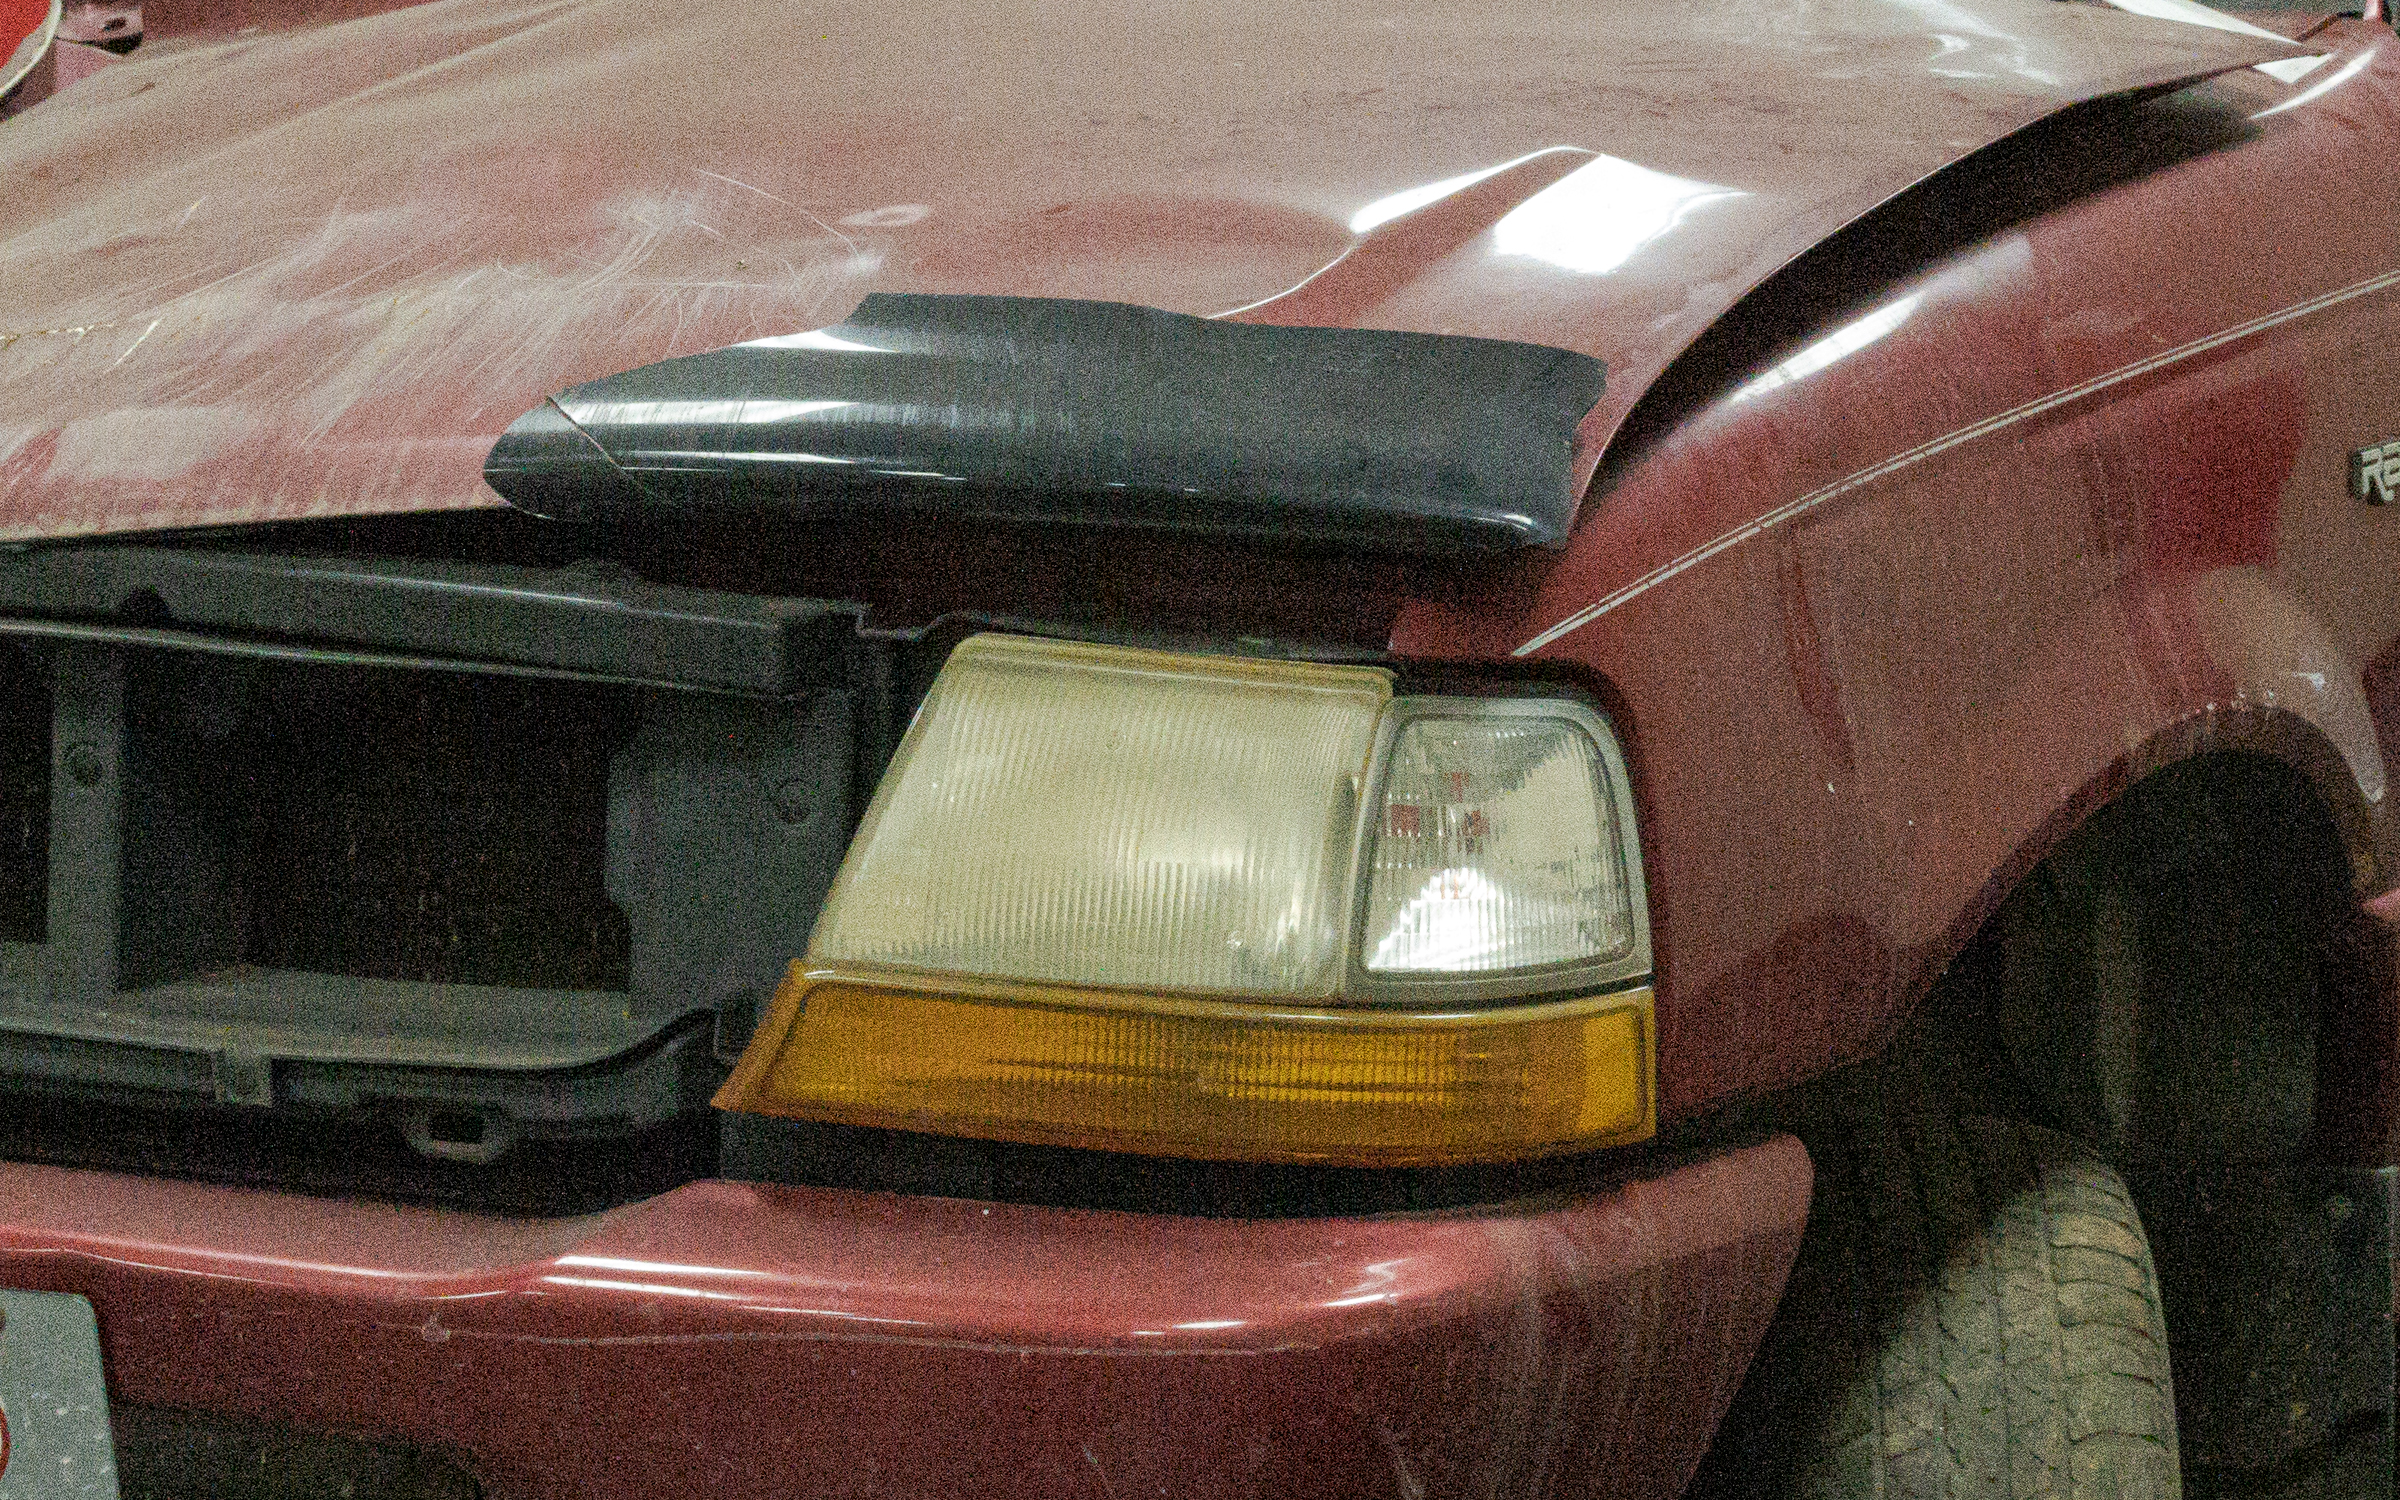
Another option is use high ISO sensitivities. On all digital cameras, the higher the ISO, the more noise and less dynamic range there is. With newer cameras, neither the increased noise nor the dynamic range loss are obtrusive until the middle or higher ISO values (say ISO 800 or even 1600). Here’s an example made at ISO 200,000 and cropped from the full frame. (Click on image to enlarge, then click back arrow to return to this post.)
Crop of an image made at f/16, 1/60 sec, ISO 200,000 showing noise. (Made using Nikon D850 with ZEISS Milvus 50 mm macro lens, no flash.)
As a third option, continuous light sources are better than nothing, but none are bright enough to avoid having to use a long shutter speed and/or to raise your ISO. Most fluorescent lights flicker and have an undesirable color cast. Halogen shop lights get hot and have a very warm color cast. Quality LED lights have good color control, but still aren’t bright enough. Even the larger LED panels made for photo studios don’t put out enough light, plus the brighter ones are big and unwieldy to transport and setup. Again, none of them put out enough light to allow a low ISO and a shorter shutter speed.
Flash is your best option, by far. But the tiny built-in flash on a point-and-shoot, the popup flash on a DSLR or mirrorless, or even a professional flash in your camera’s hot shoe won’t always be sufficient. You’ll need additional light.
There is a learning curve to using flash, since you can’t see the effect of the light until after you’ve made the photograph. But as long as you think about where and about how much light you need, it’s something you’ll pick up with a little practice.
Since I shoot Nikon, I always carry three Nikon Speedlights (flashes) with me. (You don’t need flashes made by your camera manufacturer, but those will always work with your camera, and are usually quite robust.) One flash goes in the camera’s hot shoe, and I put the other two where needed. I usually carry two small, lightweight, travel light stands with me so I can place the lights where they will do the most good, but I will often just prop them up on something nearby. (Within the next couple days, I will write a post about the gear I mention in this post.)
Since I do a lot of tire analysis, I often need even more light than the Speedlights can put out. Besides, Speedlights can take a long time to recharge their capacitors between shots.
Especially for tires, I use Profoto B10 battery-powered studio flashes on the road and battery-powered Profoto B1x studio flashes in my Studio Lab. Again, more on these in a post later this week.
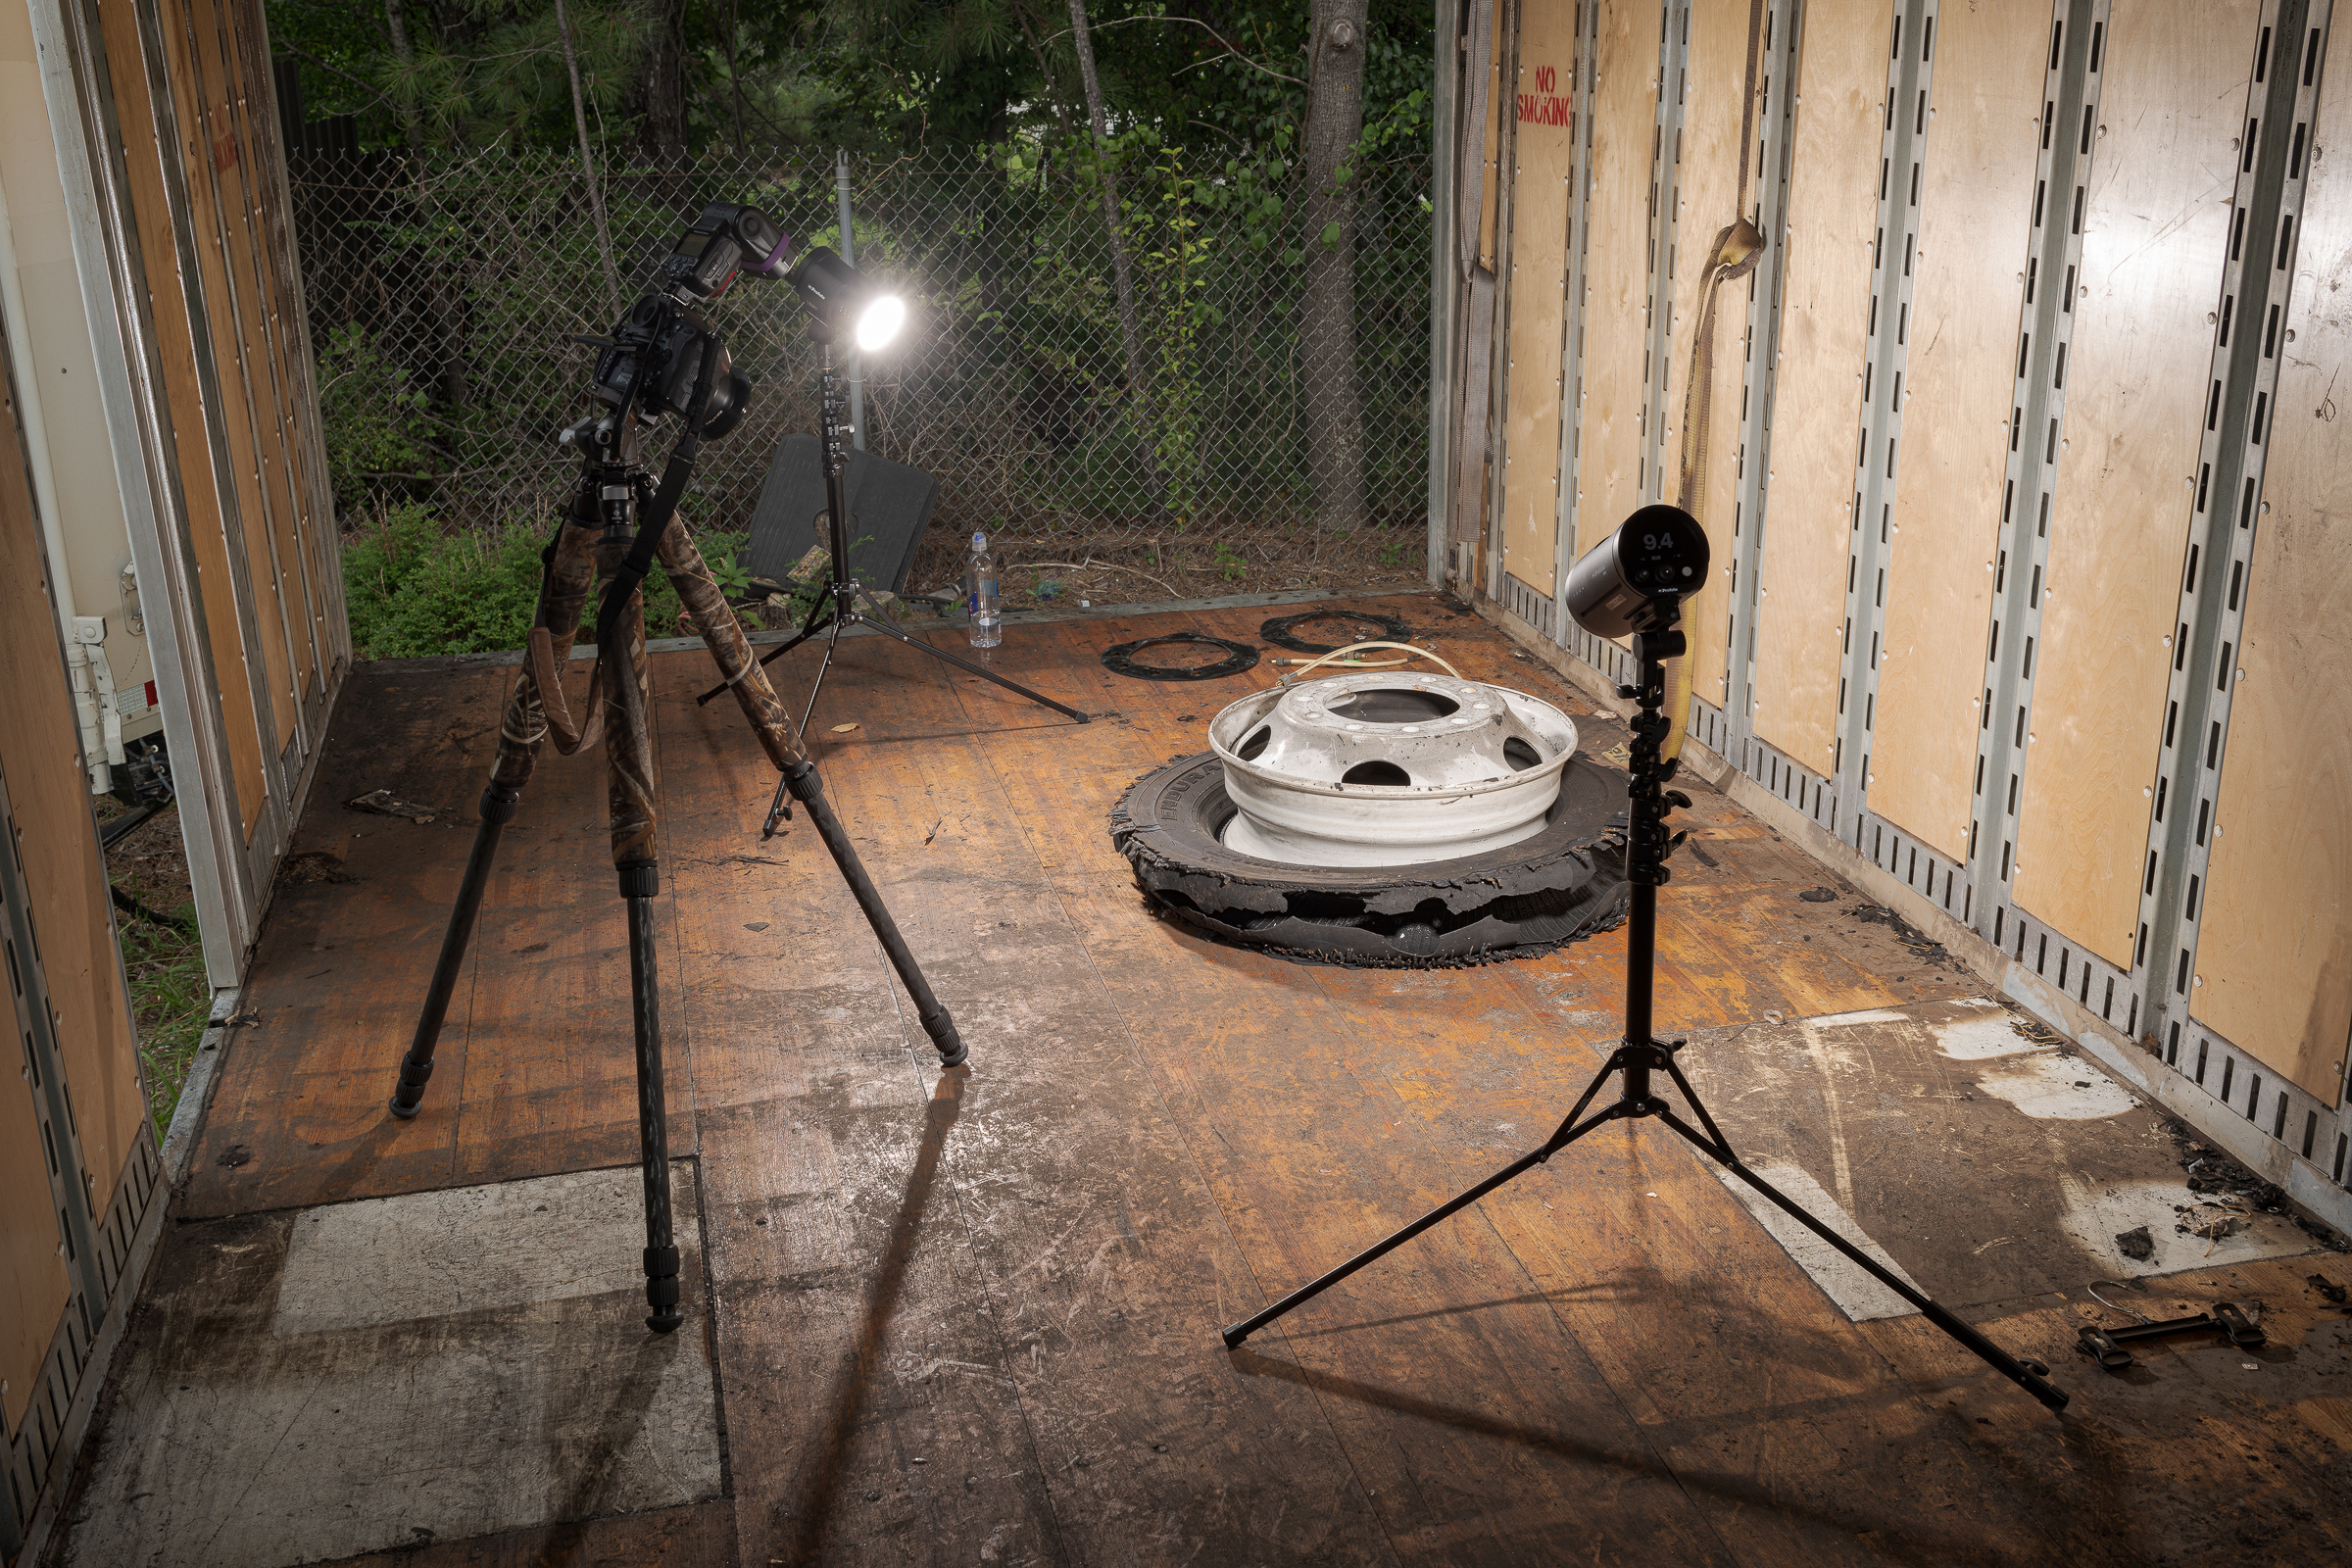
Recently, I had to inspect tires and wheels inside a semi-trailer. Even though my inspection was close to noon on a sunny day, and the trailer had a couple side doors I could open, I knew it would be pretty dark inside the trailer for photography. I set up my two Profoto B10 flashes on my travel light stands. They were fired by a Nikon SB-910 flash in my camera hot shoe. Exposure and flash powers were all set manually. (Click on image to enlarge, then click back arrow to return to this post.)
Tire and wheel inside semi-trailer. (Made using Nikon D850 with ZEISS Milvus 35 mm lens and on-camera Nikon SB-910 that also fired two Profoto B10s.)
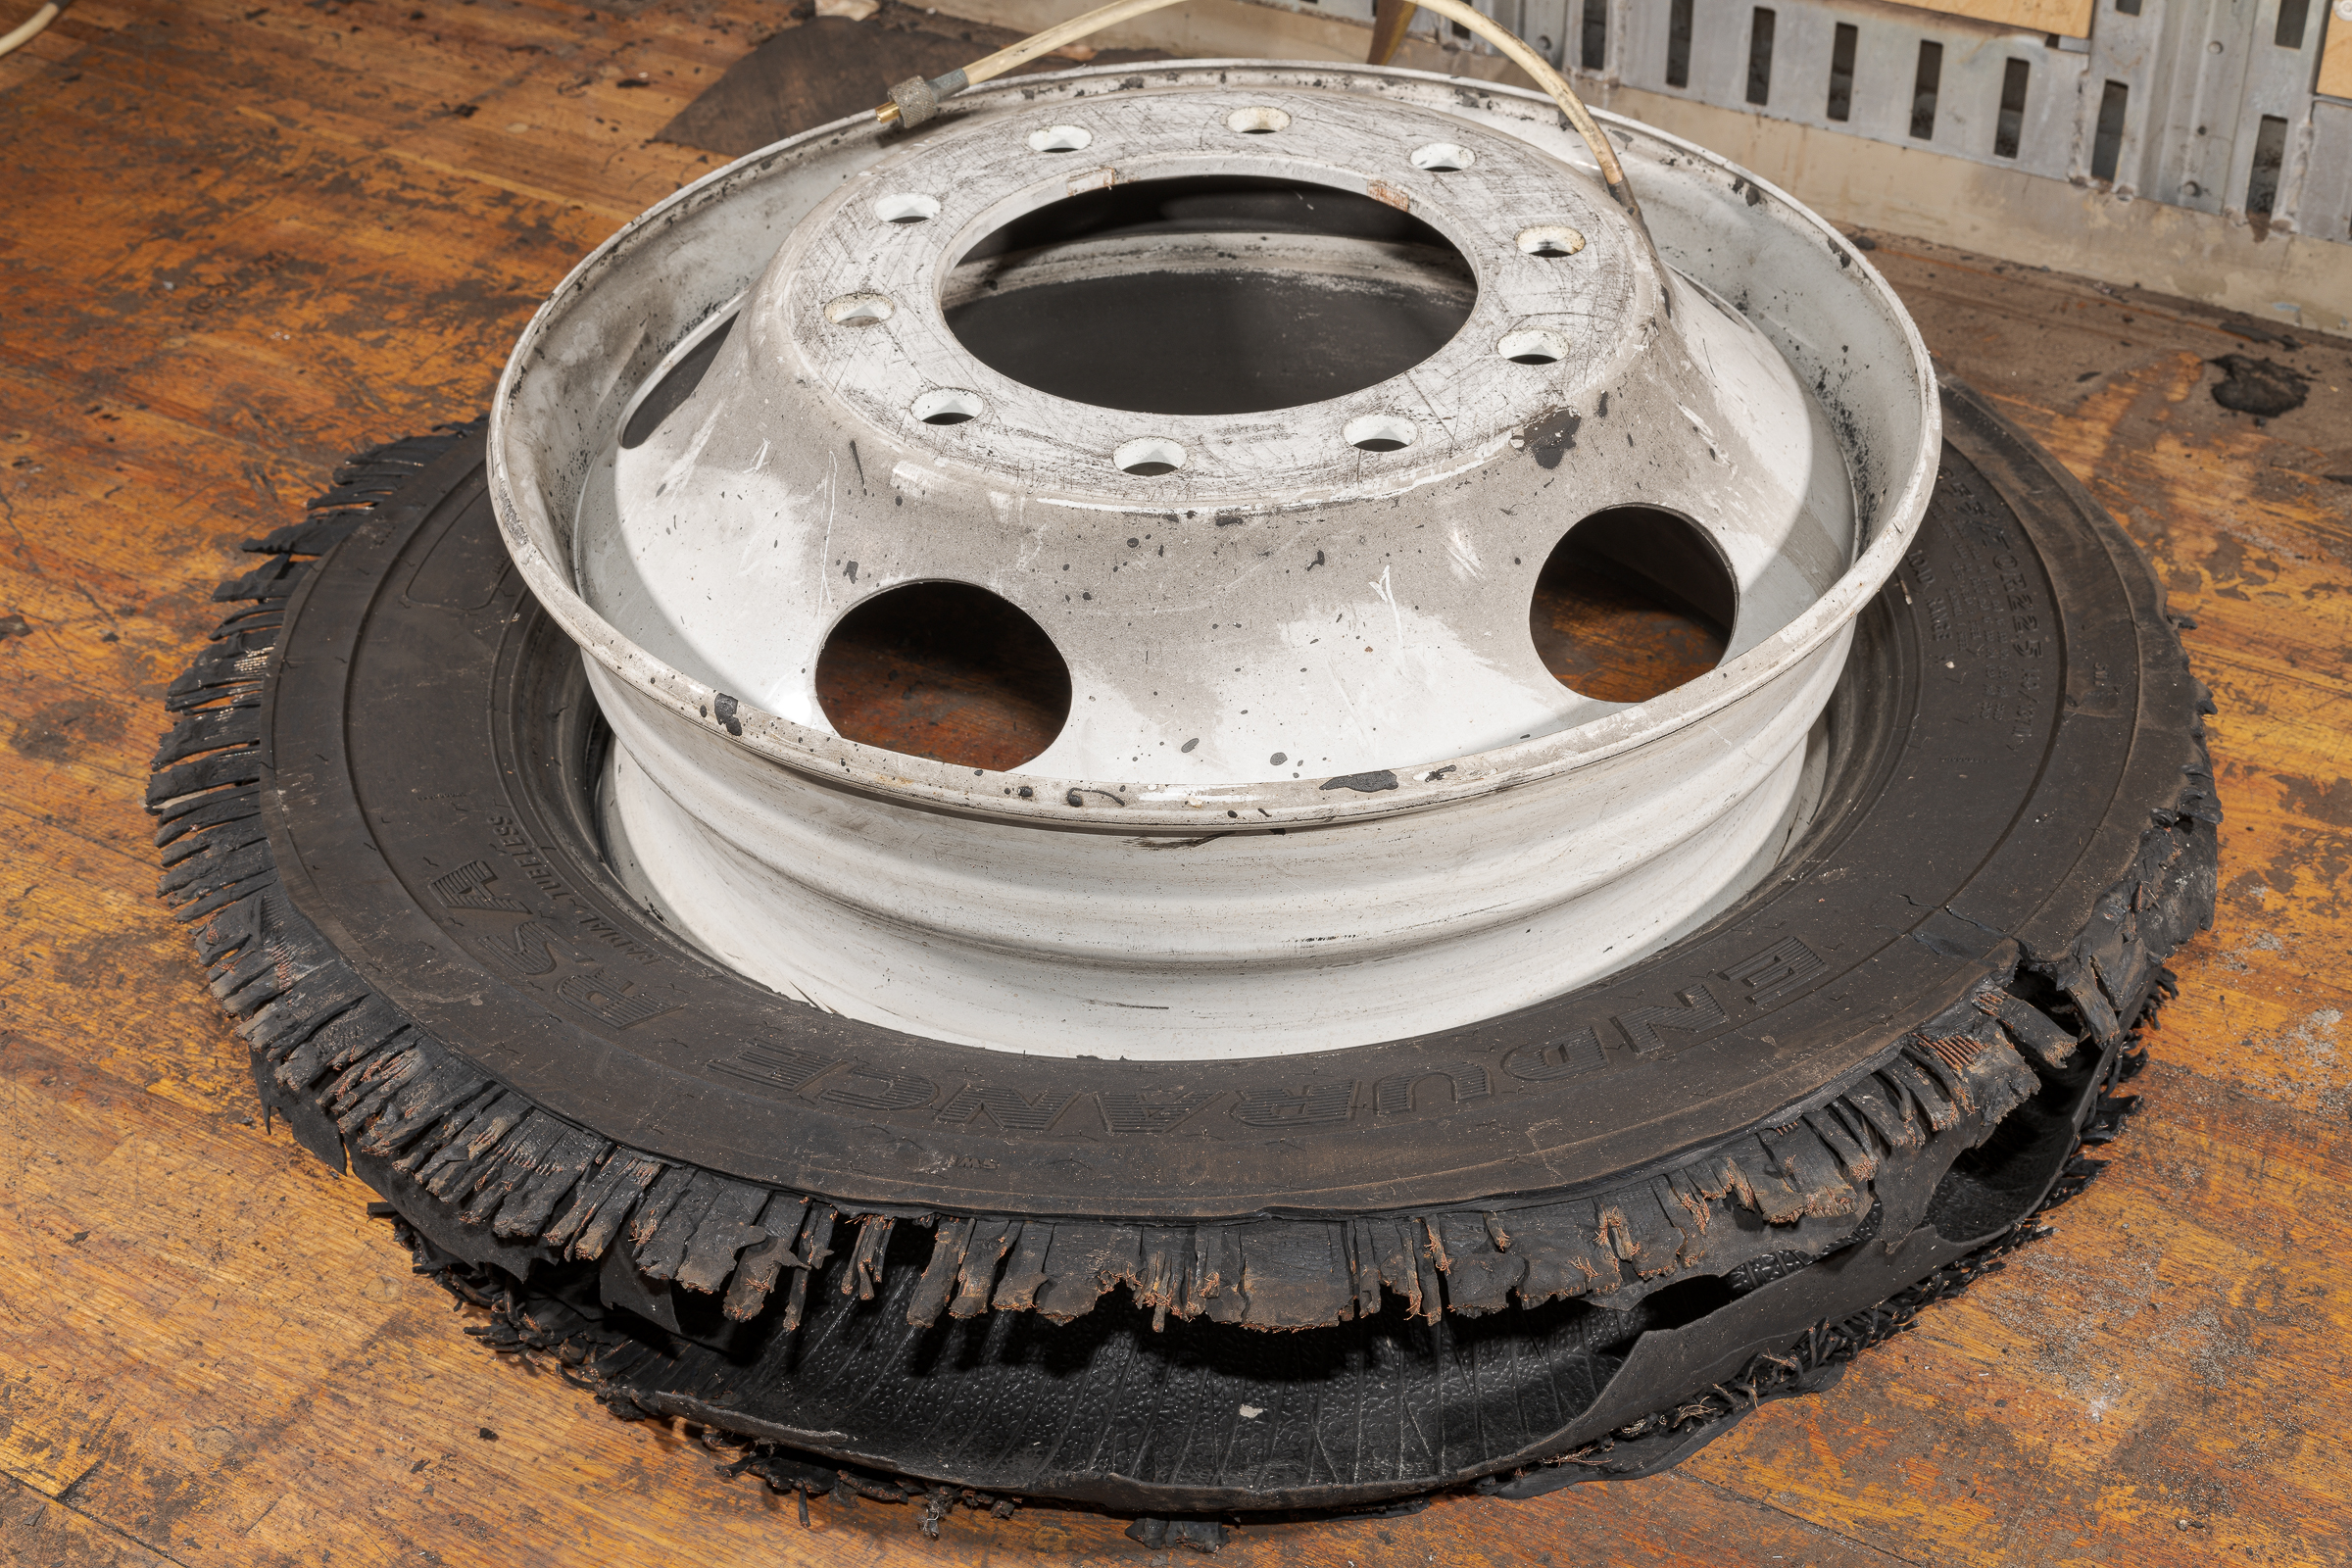
Here is a resulting image from that setup. (Click on image to enlarge, then click back arrow to return to this post.)
Tire and wheel inside semi-trailer. (Made using Nikon D850 with ZEISS Milvus 50 mm macro lens and on-camera Nikon SB-910 that also fired two Profoto B10s.)
A single flash on the camera—even Nikon’s most powerful Speedlight—could never have provided enough light to evenly illuminate this tire and wheel. The Speedlight and battery-powered strobes not only provided nice even lighting, but allowed me to shoot at ISO 64, which is the lowest on a Nikon D850. This minimized the noise and maximized the dynamic range to show the most detail possible.
Tire pressure monitoring systems (TPMS) are required on cars, pickups, and SUVs, and can be found on some heavy trucks. A TPMS simply warns the driver that the air pressure in a tire dropped to a certain pressure, or dropped a certain percent below the programmed pressure. TPMS does not replenish the air.
Onboard tire inflation systems, which are becoming common on air-braked trucks, semi-trailers, and buses, use the onboard air system to maintain the appropriate air pressure in each tire. Truck tire inflation systems only warn a driver if a tire loses air faster than the system can replenish it.
During routine maintenance, after a tire issue, or after an accident, you will often want to check all tire inflation pressures, even if there is a tire monitoring system or an onboard inflation system. You’ll need to ensure that either type of system was working properly. That requires checking each tire pressure individually.
With either system, how to you access the valve for each tire? Below are two examples.
First is a Stemco AirBat RF tire monitoring system on the rear tandems of a three-axle truck tractor. (Click on image to enlarge, then click on back arrow to return to this post.)
Stemco AirBat RF assembled. (Made using Nikon D850 with ZEISS Milvus 50 mm macro lens and Nikon SB-910 flash.)
There are two standard metal valve caps—one for each tire of the dual. Remove these caps and use a truck tire pressure gauge as you normally would. You can also add air through these valves if required. (Click on image to enlarge, then click on back arrow to return to this post.)
Stemco AirBat RF with valve caps off. (Made using Nikon D850 with ZEISS Milvus 50 mm macro lens and Nikon SB-910 flash.)
Make sure you know which valve goes to which tire. It’s easy to do; just trace the hose back to its associated wheel.
As an example of tire inflation systems, the Meritor Tire Inflation System by P.S.I. (MTIS) is a popular system on both new and retrofitted semi-trailers. (Click on image to enlarge, then click on back arrow to return to this post.)
MTIS by P.S.I. assembled. (Made using Nikon D850 with ZEISS Milvus 50 mm macro lens and Nikon SB-910 flash.)
With MTIS, twist the knurled fitting at either end of the through tee, then use your truck tire pressure gauge on the valve at the end of each hose. Again, make sure you trace which hose goes to which tire. (Click on image to enlarge, then click on back arrow to return to this post.)
MTIS by P.S.I. valve stem. (Made using Nikon D850 with ZEISS Milvus 50 mm macro lens and Nikon SB-910 flash.)
While these systems initially look intimidating, it is actually much easier to check tire inflation pressures with them than it is trying to get a tire gauge to fit on individual valve stems on the wheels.