Deprecated: Function WP_Dependencies->add_data() was called with an argument that is deprecated since version 6.9.0! IE conditional comments are ignored by all supported browsers. in /home/vadnaise/public_html/wp-includes/functions.php on line 6131
Deprecated: Function WP_Dependencies->add_data() was called with an argument that is deprecated since version 6.9.0! IE conditional comments are ignored by all supported browsers. in /home/vadnaise/public_html/wp-includes/functions.php on line 6131
If you use autofocus lenses, make sure the focus point is where you want it. I almost exclusively use ZEISS manual focus prime lenses, so I always have full control over where and what I focus on. (The only exception is when I use the Nikon 18-35 mm FX lens for pole photography. It’s a nice, small, light wide zoom lens with autofocus, which I can control using my CamRanger. This will be the subject of a future post.)
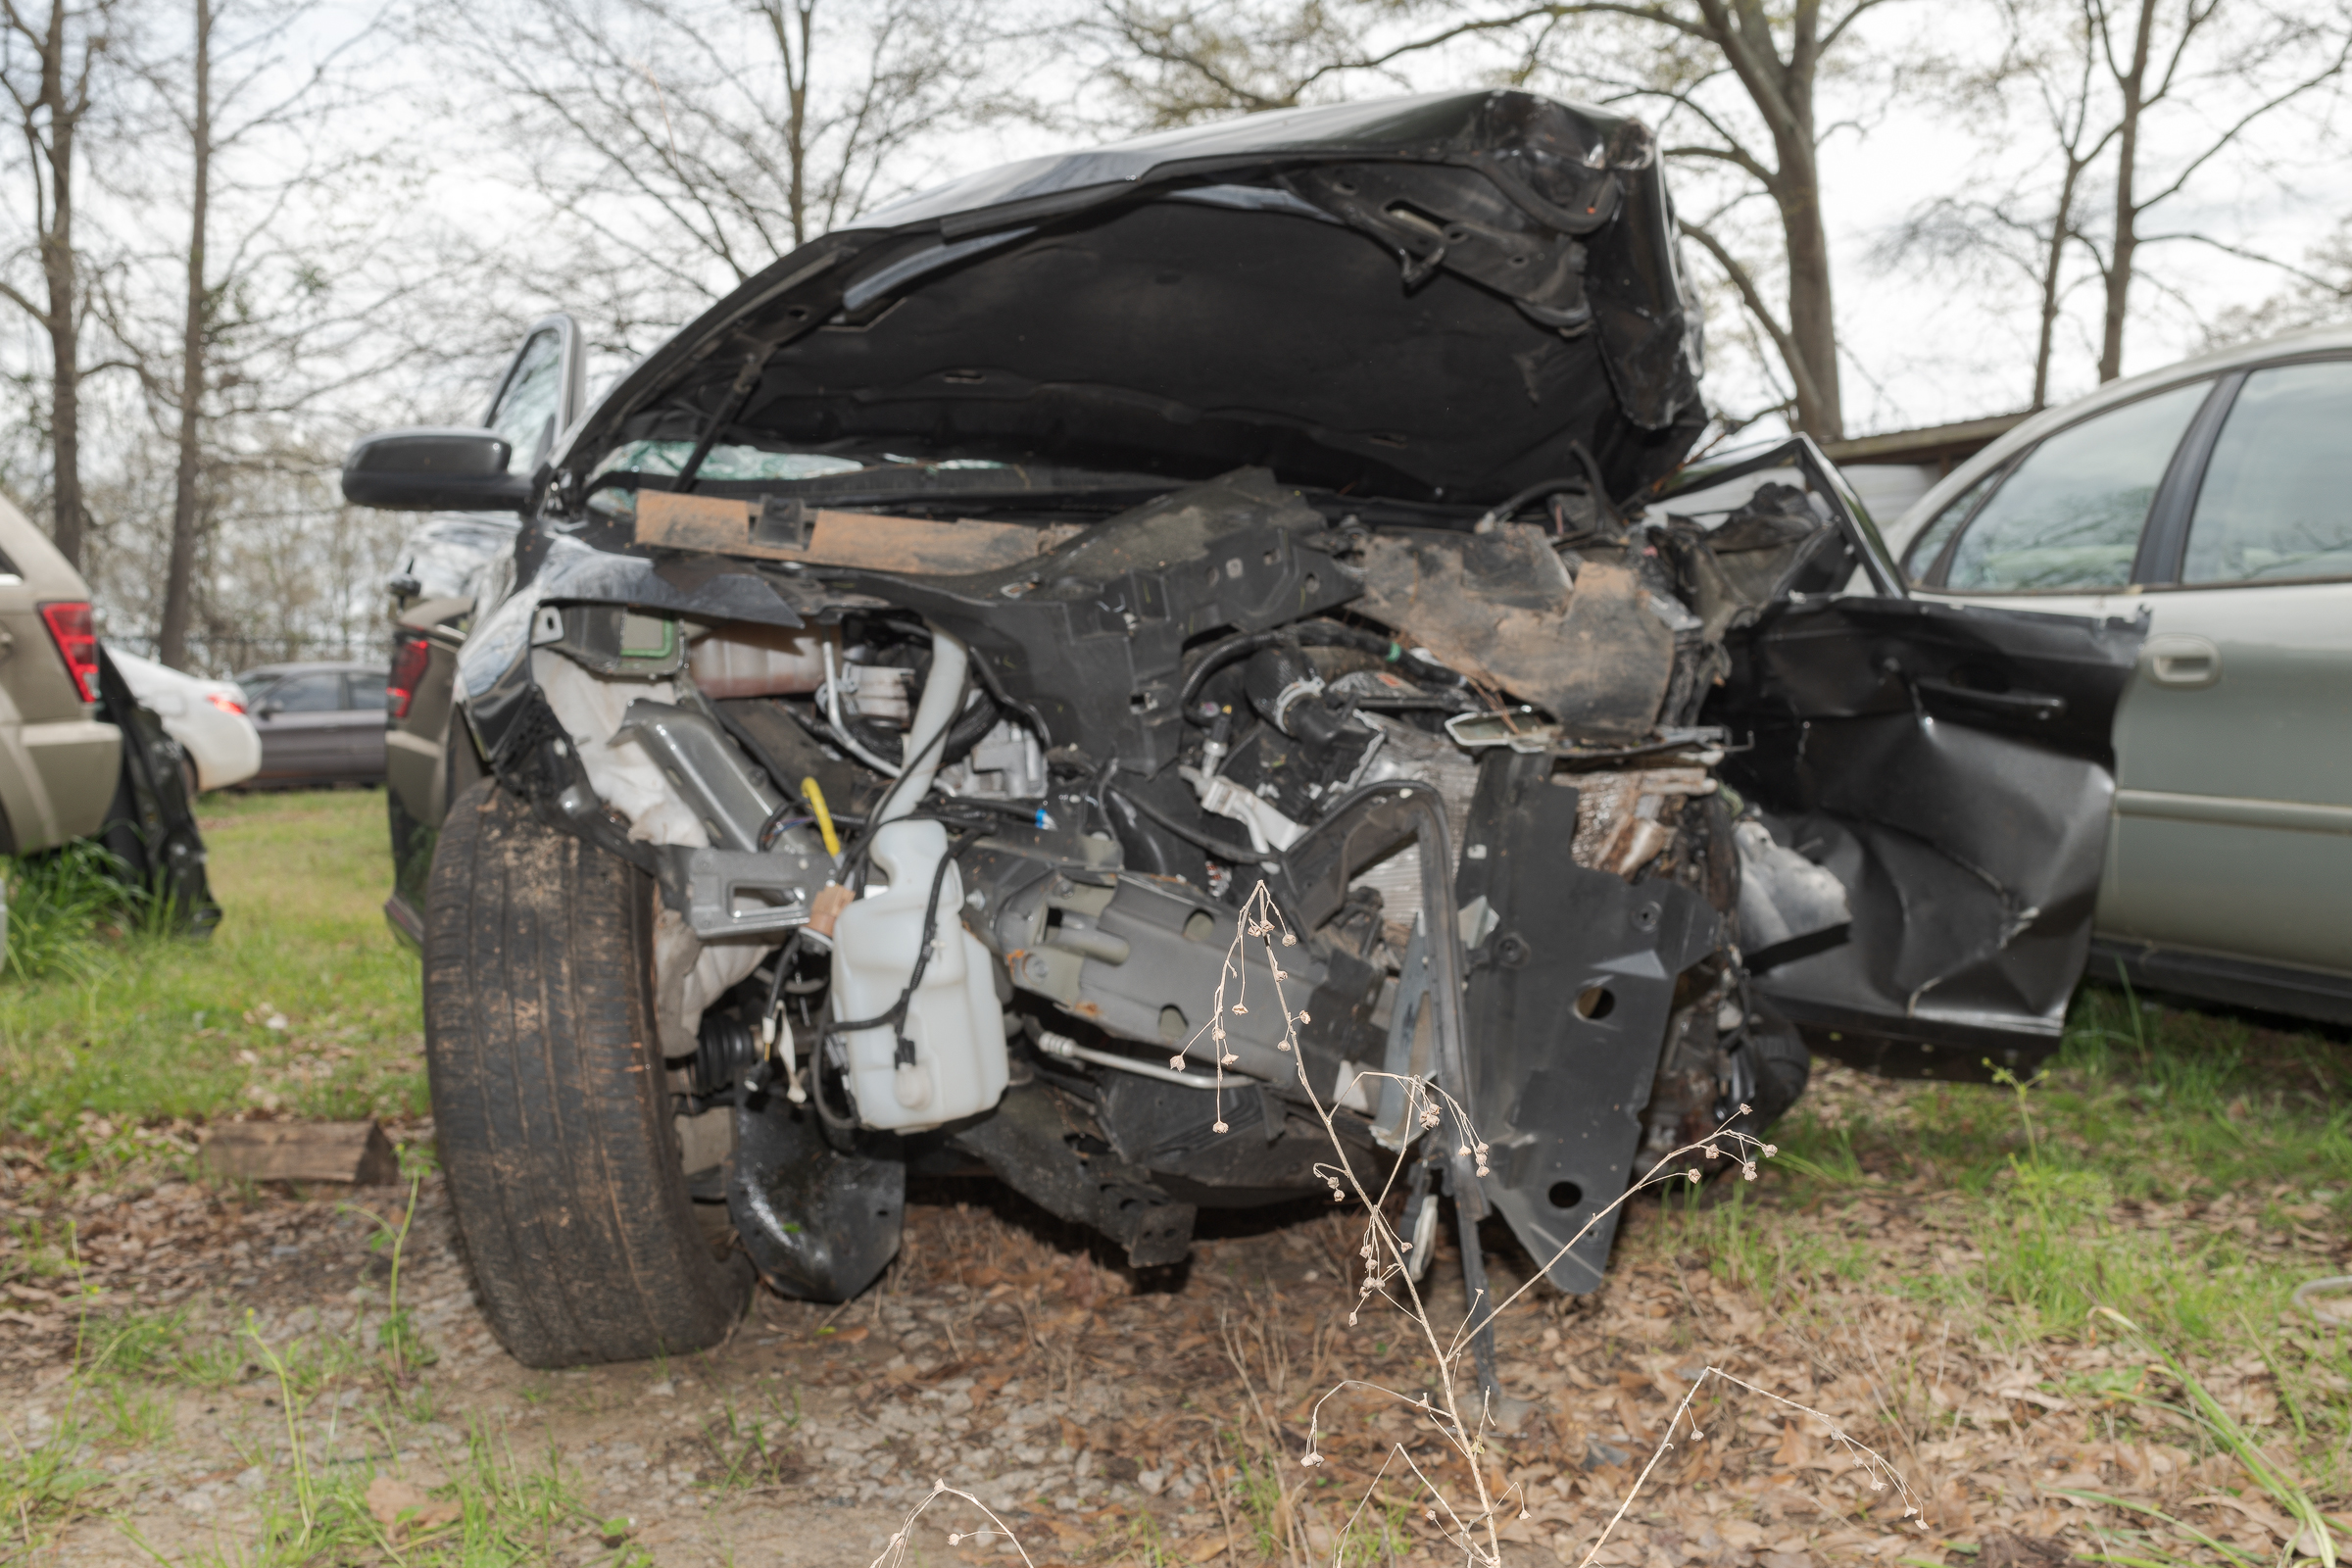
While I used my ZEISS 35 mm f/2 manual focus lens to purposely create these two photos, they illustrate an issue I’ve seen when I get photographs from either police or other experts. This car was inspected in a small, crowded area of a tow yard. To photograph the entire front end, I had to use a wide angle lens, and crouch down in bushes and weeds. In this first photo, the weeds are in sharp focus, but the car is blurry. (Click on the image to see a larger version, then click on back arrow to return to the post.)Focus on weeds in front of wrecked Taurus. (ZEISS 35 mm f/2 lens on Nikon D850.)This can easily happen if the autofocus point happens to pick up a weed or anything else between the lens and subject. Unfortunately, no amount of sharpening or other post-processing can restore detail to the car itself.
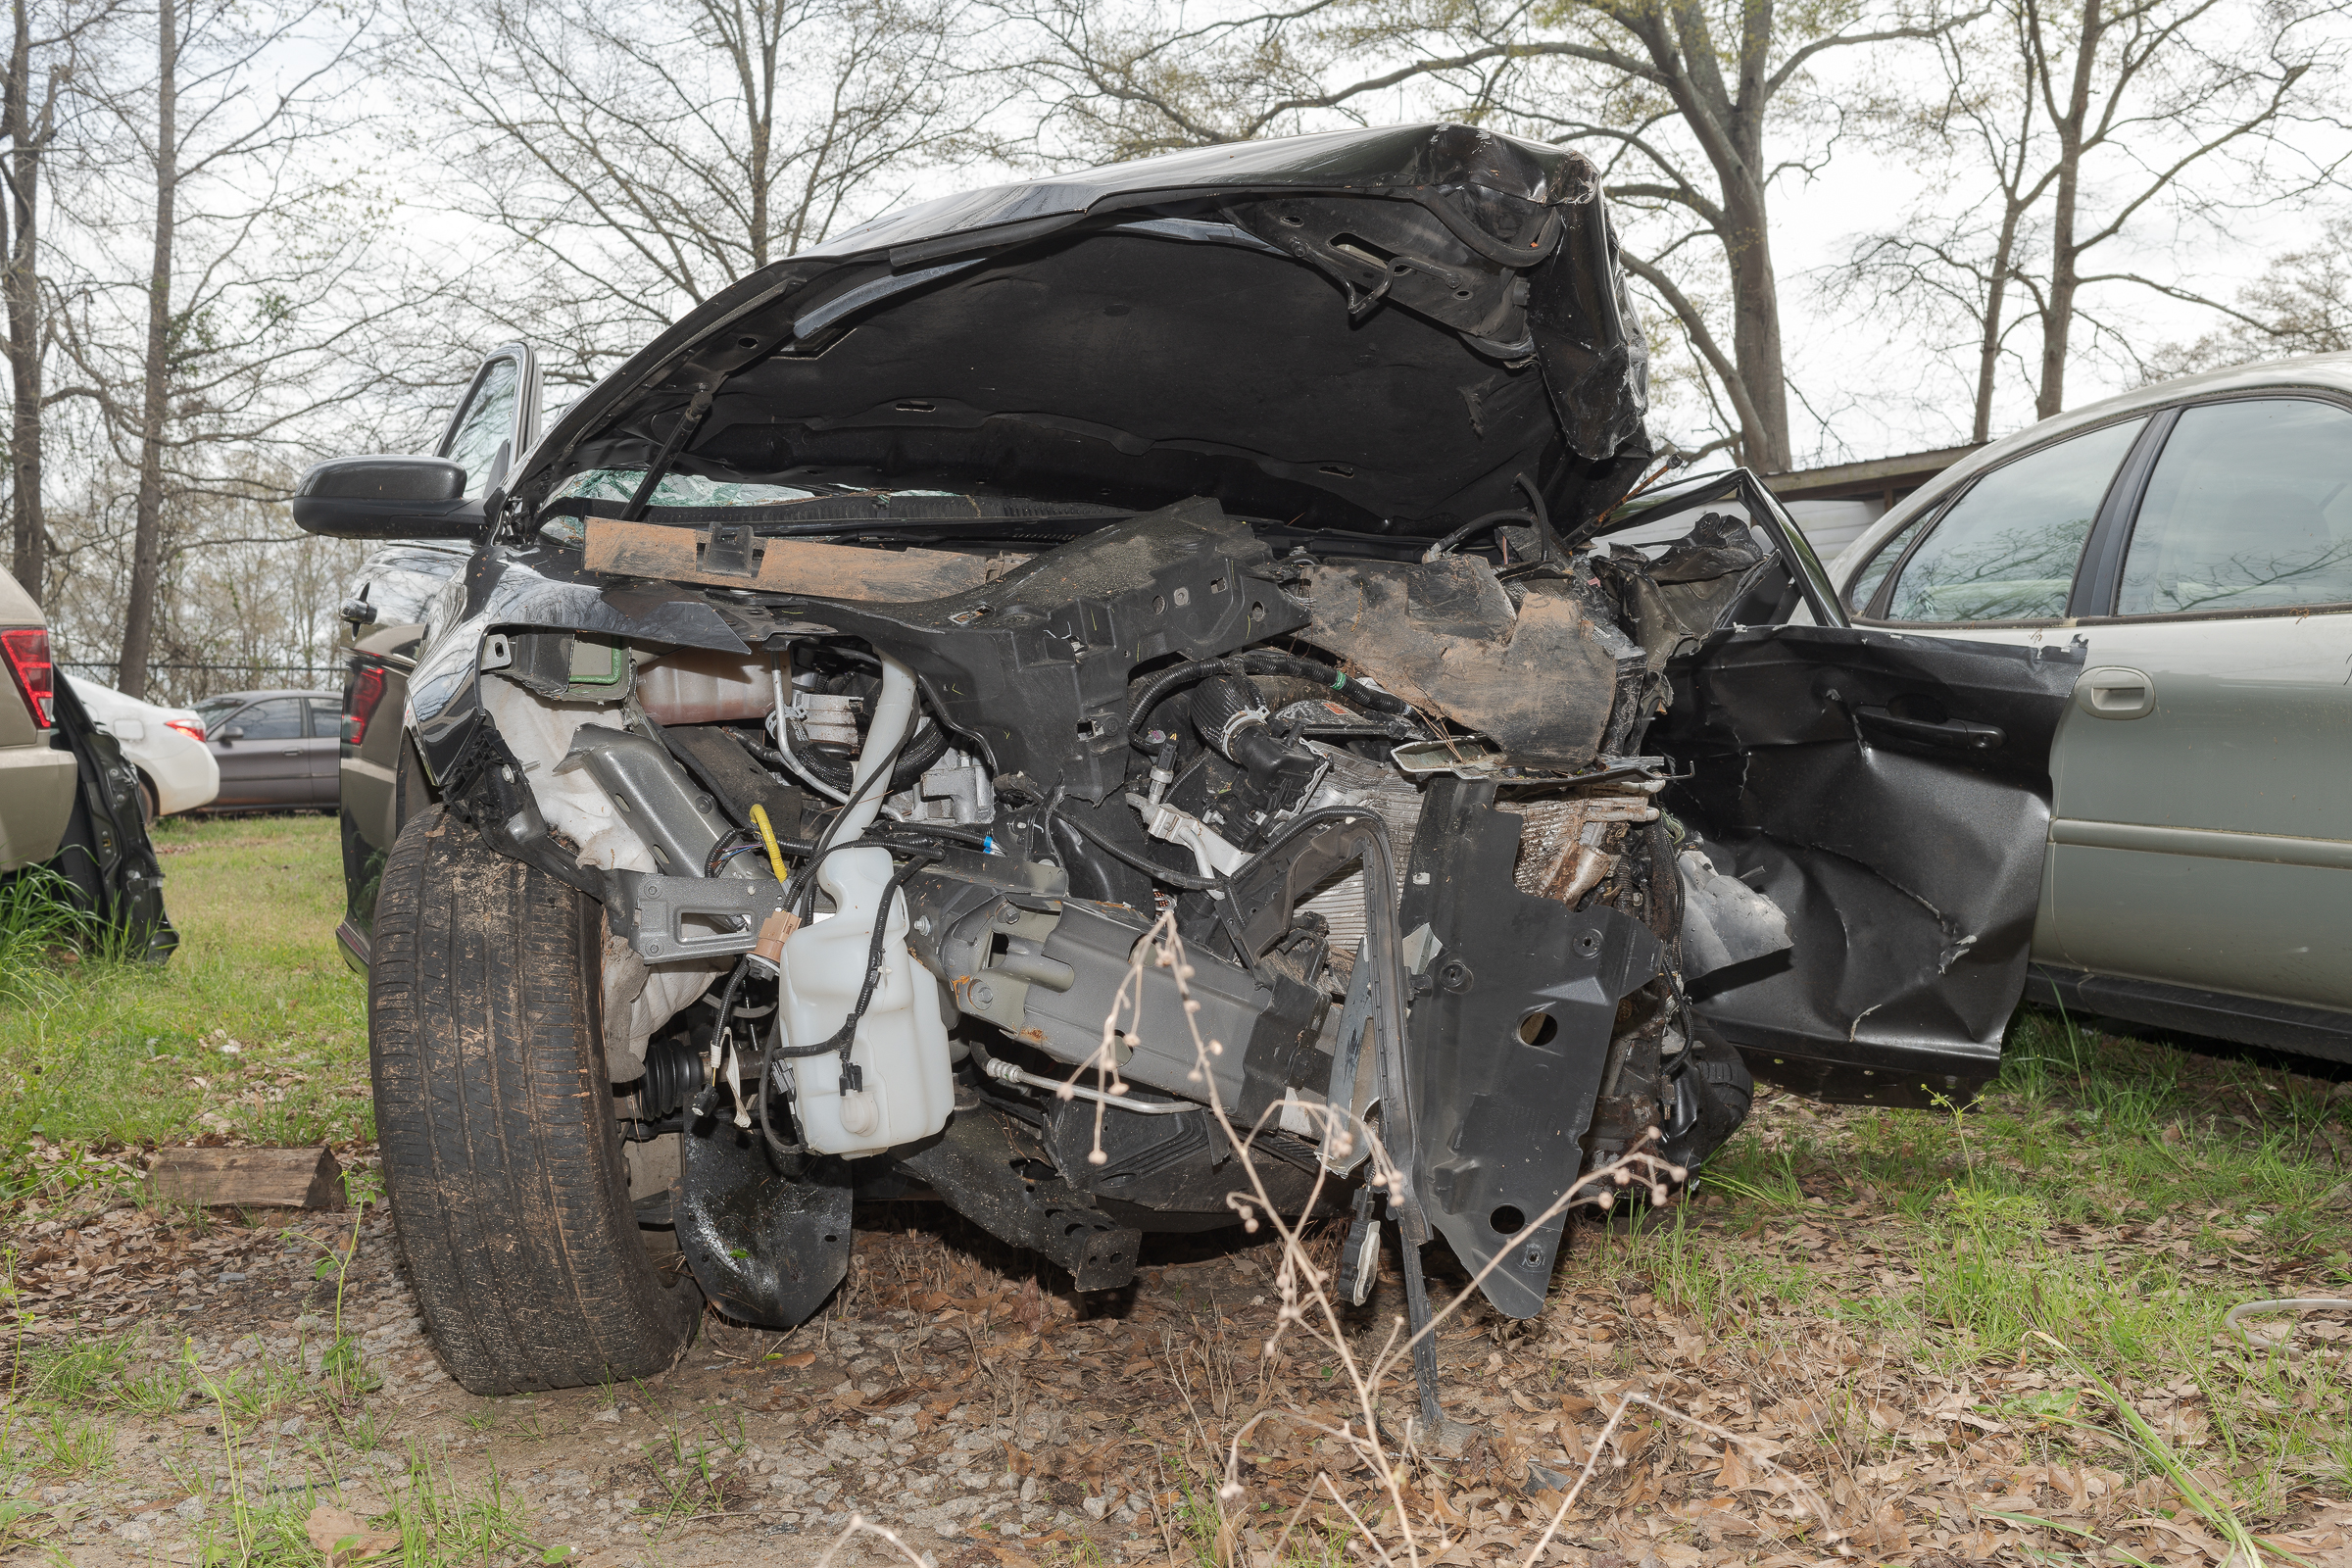
This second photo has the car in proper focus, with the weeds out of focus in between the lens and car.Focus on front of wrecked Taurus. (ZEISS 35 mm f/2 lens on Nikon D850.)While you’re in the field shooting, it can be difficult to tell if your subject is in focus by looking at your camera’s LCD, unless you zoom in to 100% and scroll around the image. If you have unimportant elements between your lens and your subject, it’s best to either manually focus, or make sure you move your autofocus point onto your subject.
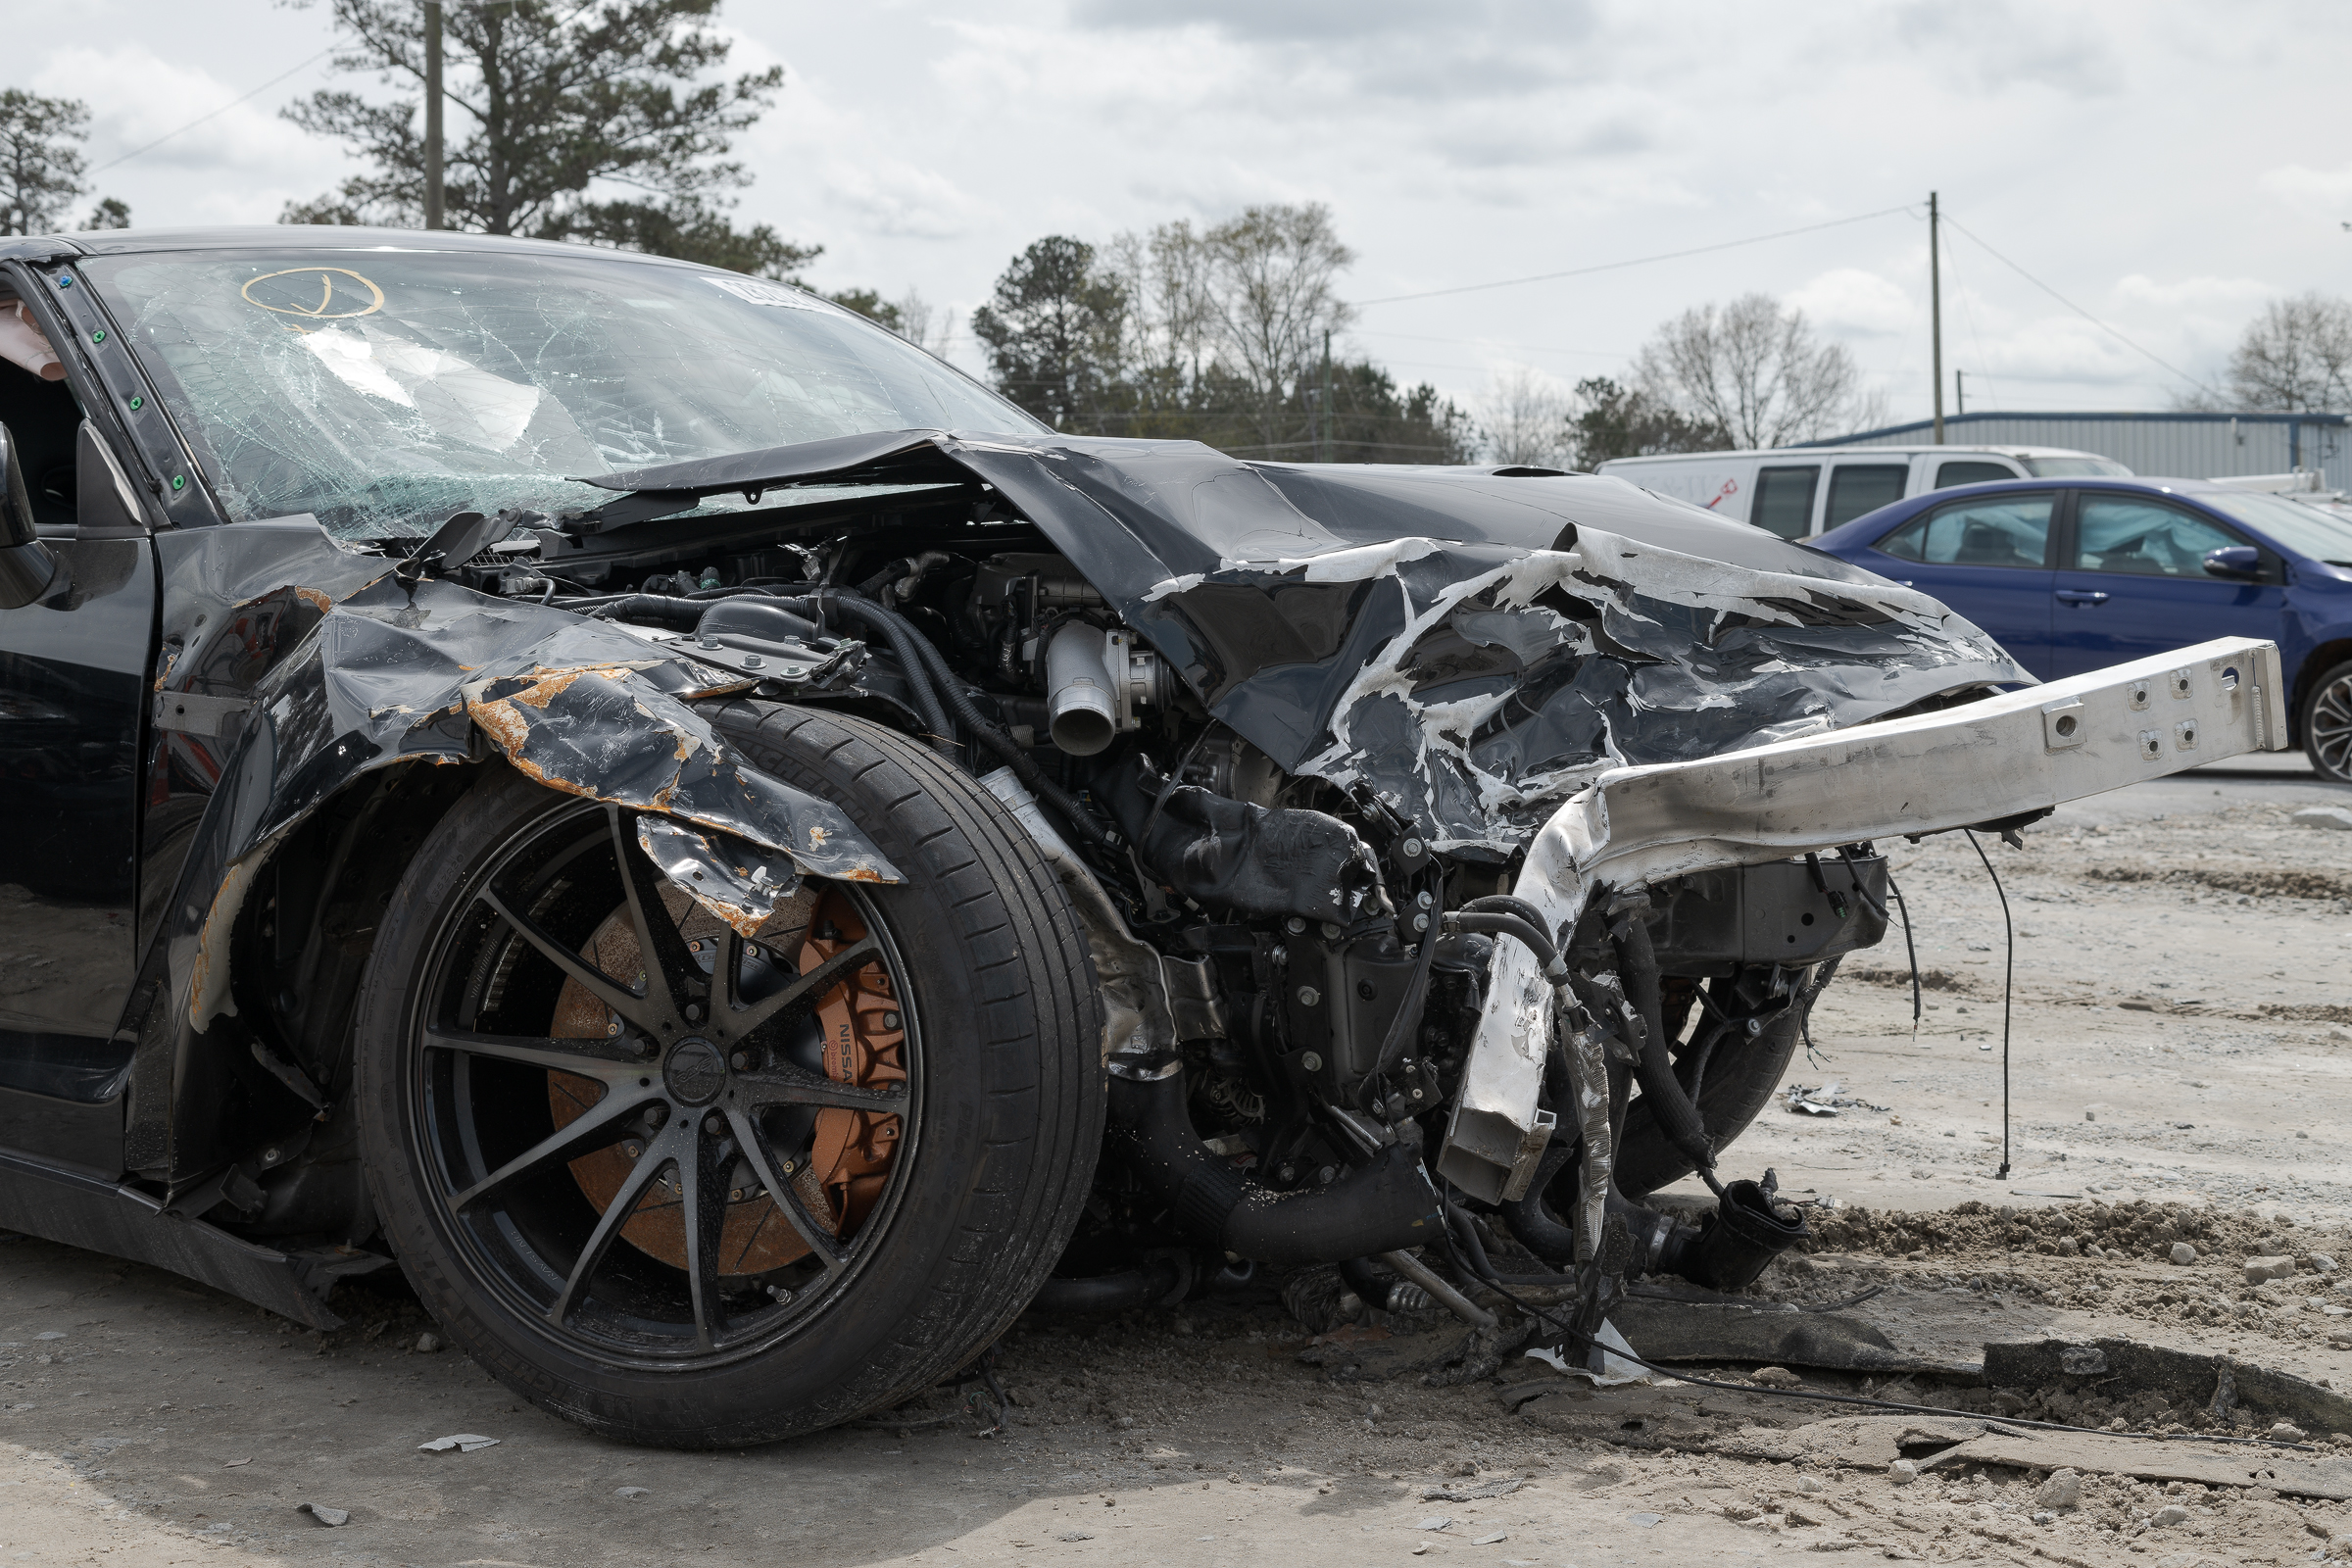
Fill flash helps bring out details in vehicle photos, especially under high-contrast lighting situations. As an example, the damage to the right front of this black car does not show up well when no flash is used. With the sun behind the car, the damaged area was in shadow. [Click on image to enlarge, then click back arrow to return.]
Front end damage with no flash used. (ZEISS Milvus 50 mm macro lens on Nikon D850. Exposure: f/11, 1/160 sec, ISO 100.)
Obviously, this car couldn’t have been driven to a more favorable spot, and it was not possible to have it moved. Besides, even if the car was moved to get better light on the right front, then the light wouldn’t have been good from other angles.
Like everything else photographically, the solution is to think about the light. Where is it? (Fairly high, and coming from the other side.) Where do you need it? (Good top light, but need light in the foreground, too.) How can you get light where you need it? (Use flash to fill in the shadows.) This is called “fill flash”. The term fill flash means that flash isn’t the only light source illuminating the subject, but light from the flash just fills in the shadows as desired.
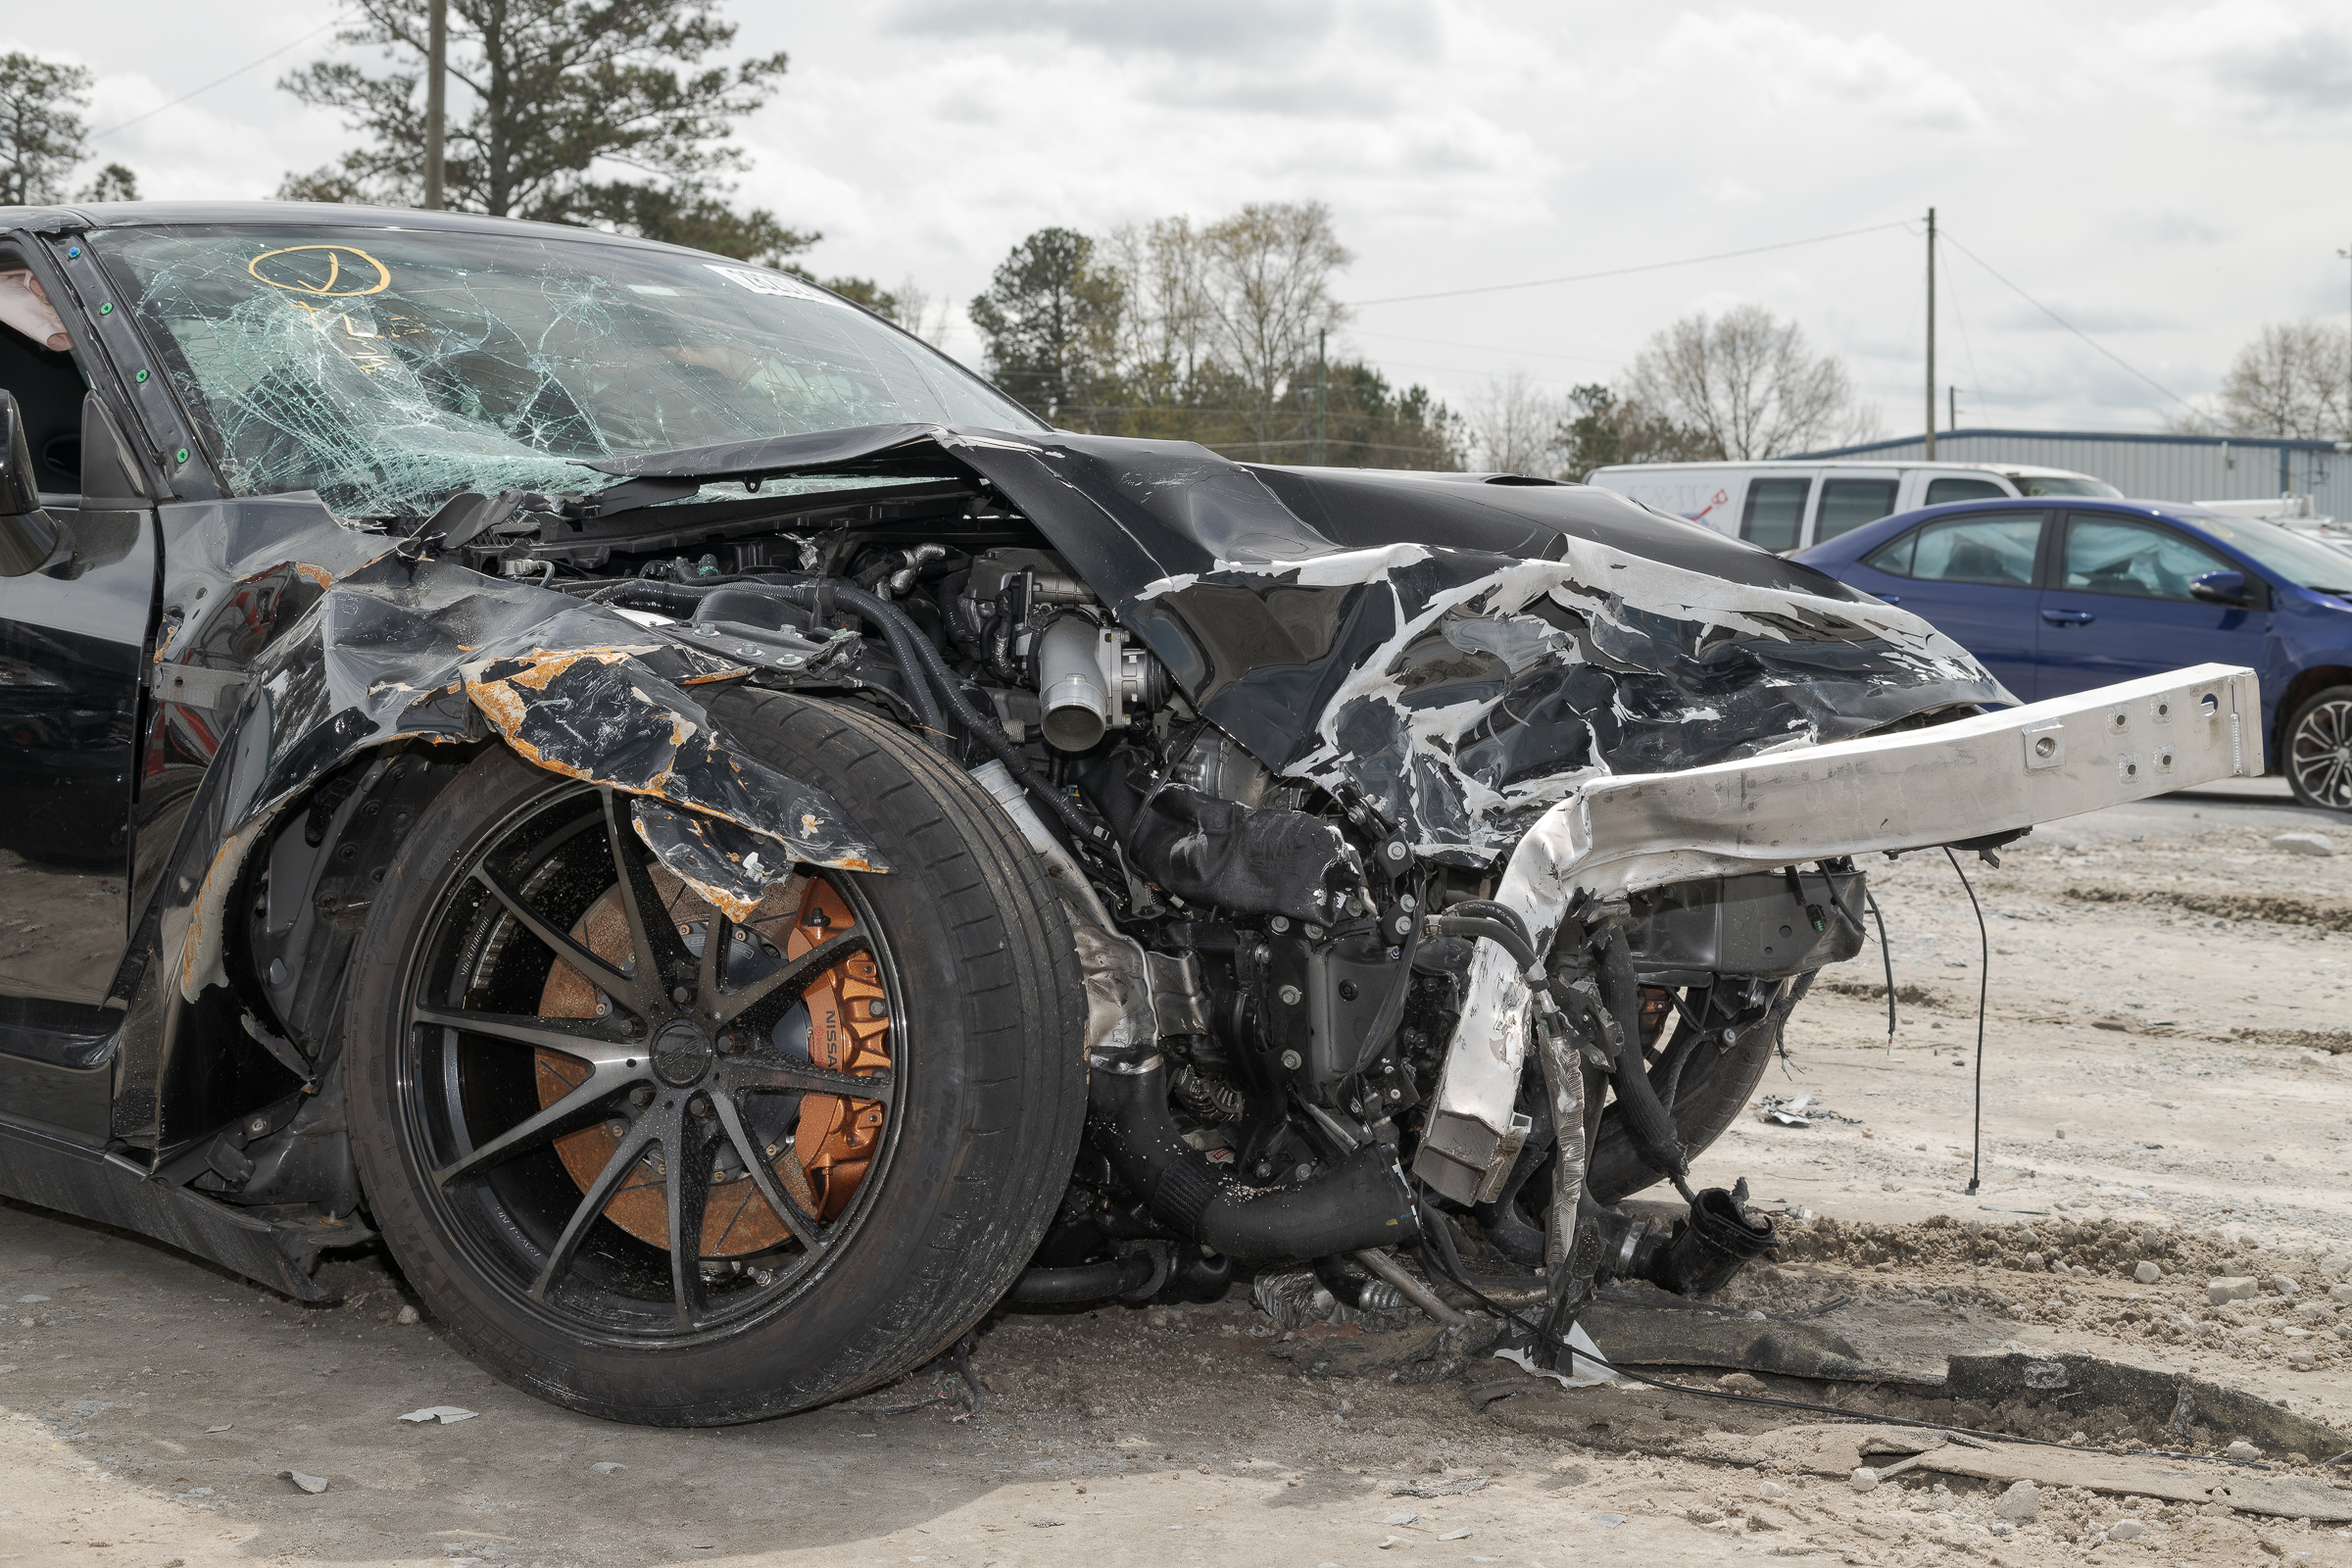
Here’s the same vehicle in the same location with the same light, but with an on-camera flash used to partially fill in the shadows. [Click on image to enlarge, then click back arrow to return.]
Front end damage with fill flash used. (ZEISS Milvus 50 mm macro lens on Nikon D850 with Nikon SB-910 flash. Exposure: f/11, 1/60 sec, ISO 100.)
You can see the light on the background stayed the same, but light from the fill flash now shows details in the shadows.
While at first flash may seem too complicated and unpredictable, learning to use it correctly is probably the best way to improve your vehicle, product liability, and testing photographs. Learning to use flash will be a big part of my SAE photography class: SAE Photography for Accident Reconstruction, Product Liability, and Testing.
You can make photographs—without using flash—regardless of the light that’s available. But not using flash has three major limitations:
-1- You can’t change the relative brightness between elements in the image. Any change in exposure will raise or lower the brightness of all elements equally. Flash lets you emphasize any element in relation to any other.
-2- You won’t always be able to properly expose for every important part of the photo. If you properly expose to show details in the shadows, brighter areas can be blown out with no details. If you expose for highlight details, shadows can be blocked up with no detail and with digital noise. Flash lets you add light in the shadows to balance the image.
-3- You can’t handhold the camera with long shutter speeds. The less ambient light there is, the more exposure you need. Exposures requiring longer shutter speeds require a tripod, or the photos will end up blurry. Flash can add enough light so you can get a shutter speed you can handhold.
Except for accident sites, I use flash for almost every shot I make. I always use flash with tires and wheels, and with almost every vehicle or vehicle component—indoors or out. The only exceptions are for certain reflections, for close-ups of certain marks, and occasionally for light bulbs.
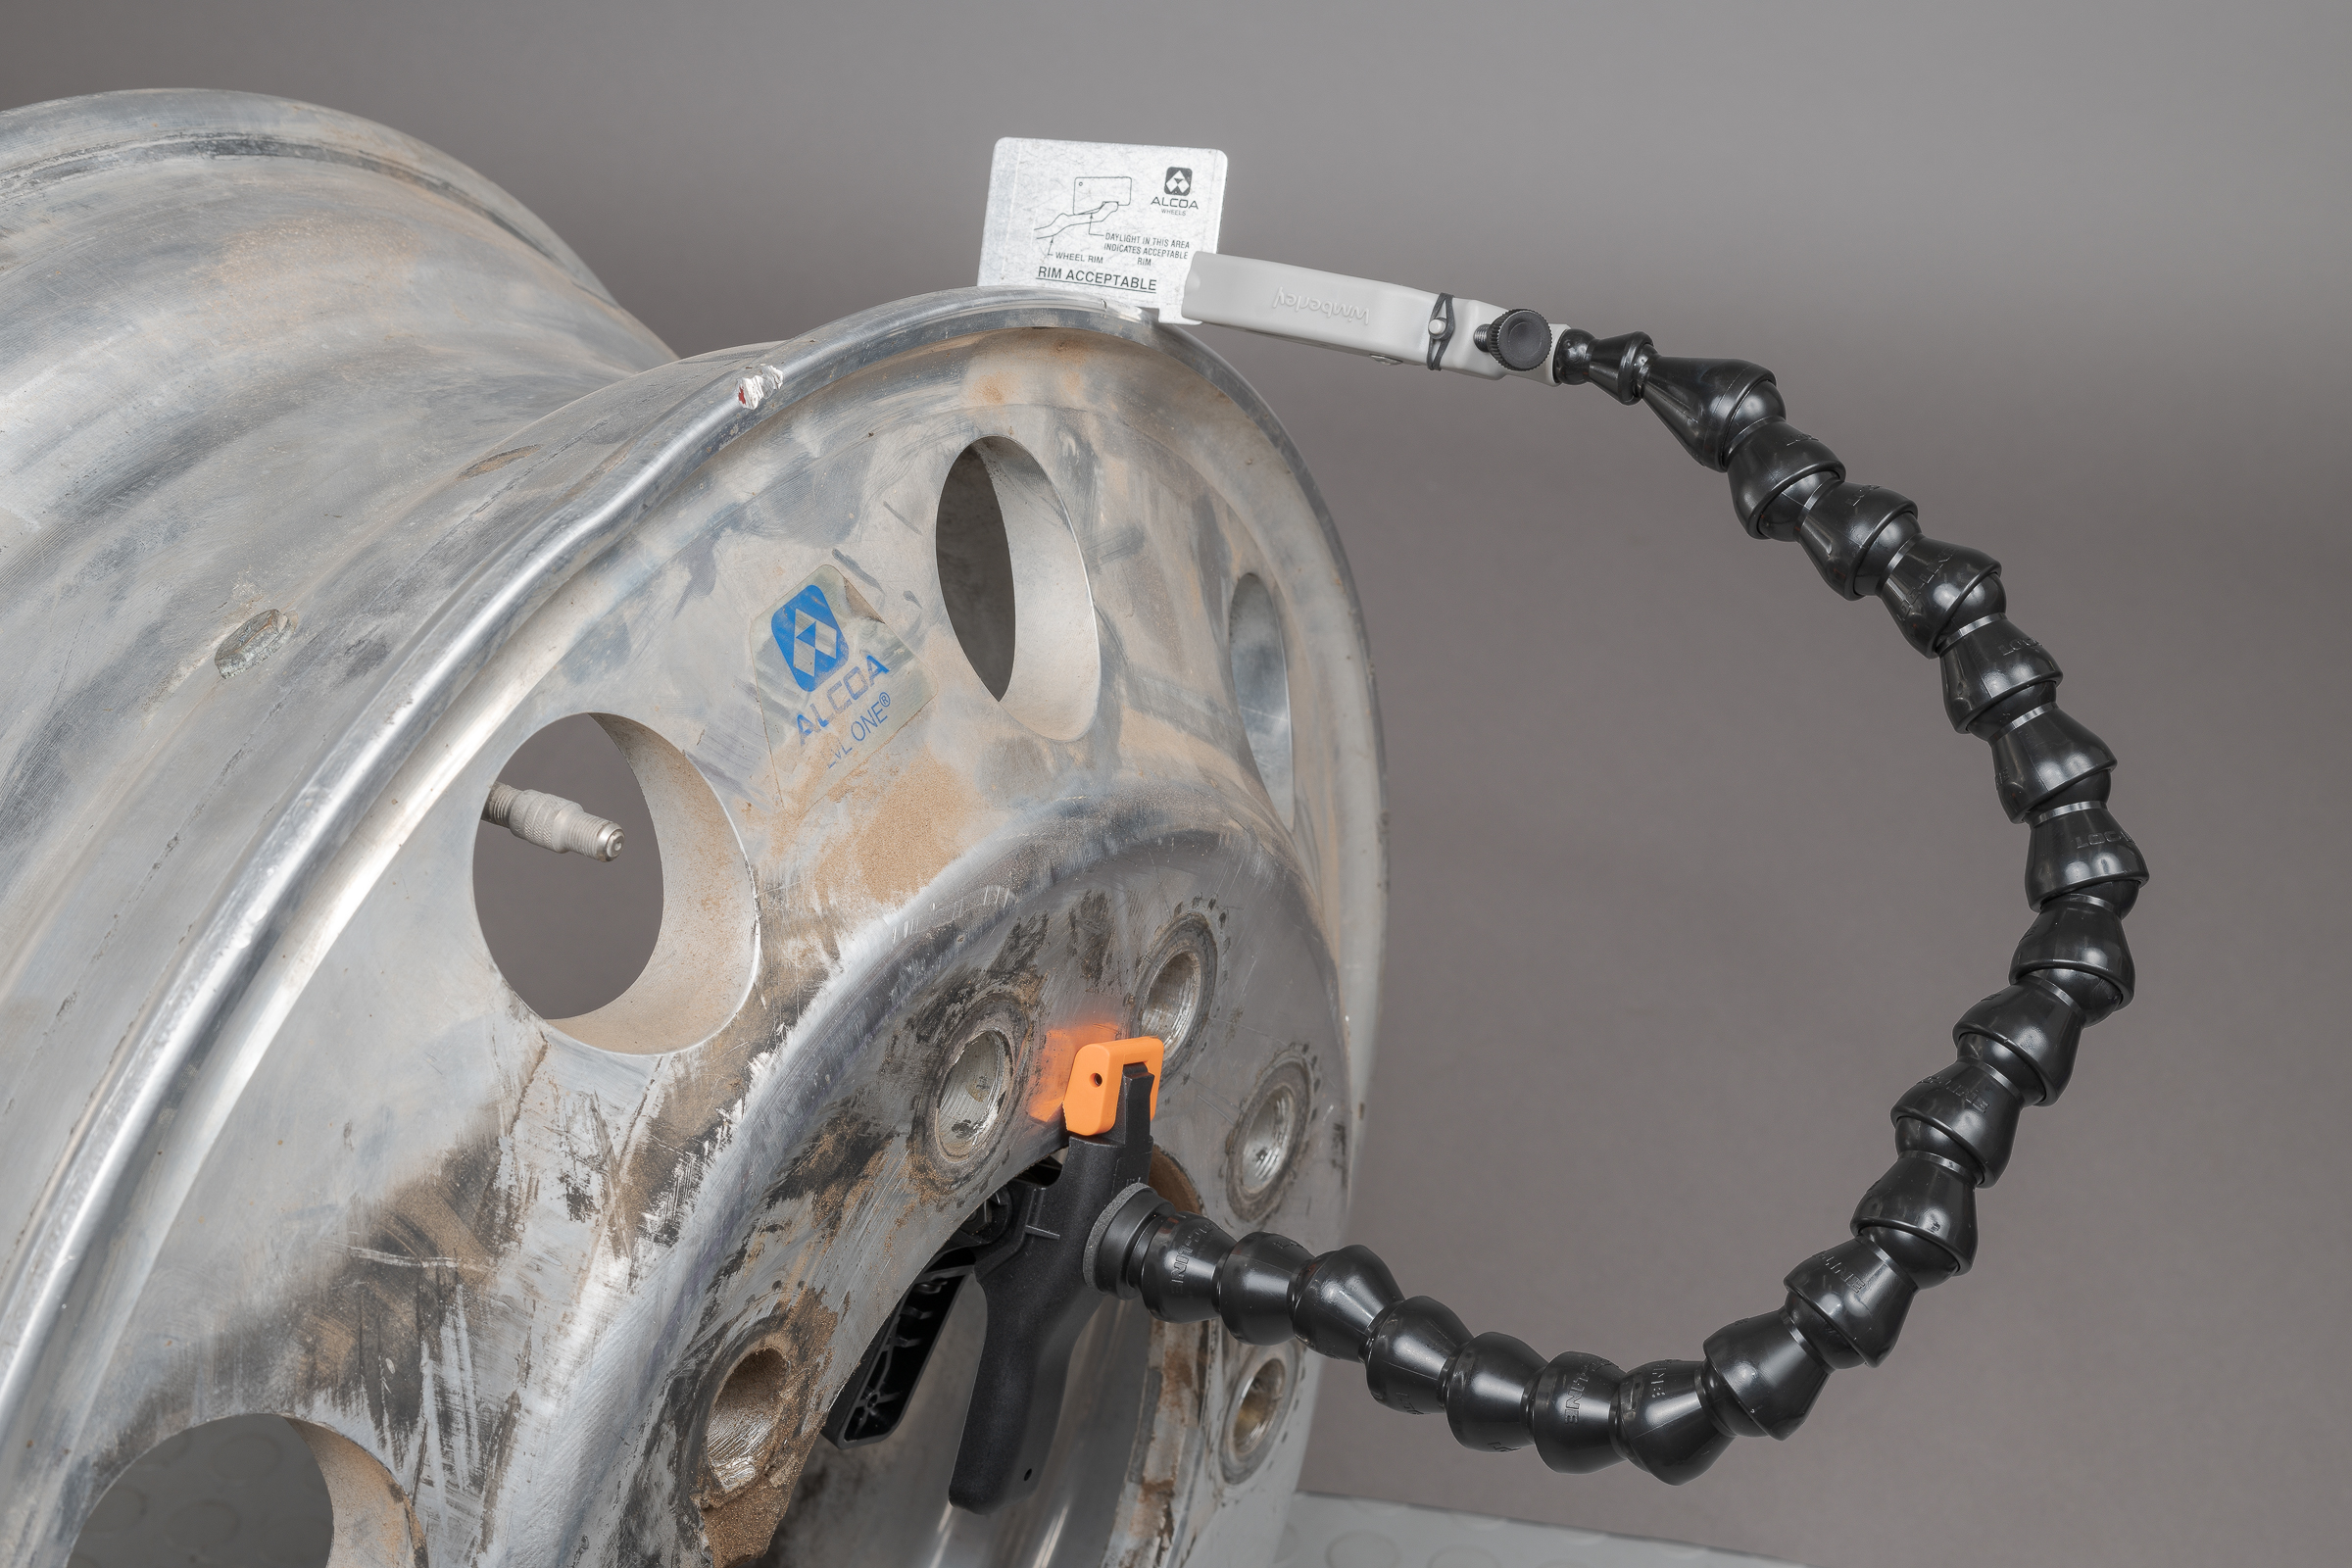
In my previous post, I described how to photograph a small wear gauge in place on a rim flange. All those photos were made in using flashes in my studio lab. Since I do many of my tire and wheel inspections there, I installed a bunch of bright LED shop lights overhead. They make the area really bright to the eye, but it’s still dark enough to require flash for most images. Here is a photo of the rim wear gauge setup using only the ambient LED shop lights. (Click on image to enlarge, then click on back arrow to return.)Using Wimberley The Plamp II to hold Alcoa Rim Wear Gauge in place for photography with no flash. (Made with ZEISS Milvus 50 mm macro lens on Nikon D850 with no flash.)Exposure settings for this image were f/16 for 1.0 second at ISO 64. A camera could not have been handheld for 1.0 second.
Now, from the previous post, here’s the setup shot using flash.Using Wimberley The Plamp II to hold Alcoa Rim Wear Gauge in place for photography, with flash. (Made with ZEISS Milvus 50 mm macro lens on Nikon D850 with flashes.)Exposure settings for this image were f/14 for 1/60 second at ISO 64. Adding flash to the subject required a faster shutter speed to keep it properly exposed. If necessary, the camera could have been handheld at 1/60 second.
While the differences in these photos are relatively subtle, there is more detail the photo with flash. You can see more detail in the lug bolt holes and more depth to the wheel itself in the image with flash. (Differences are harder to see in these compressed images on the web.) But more importantly for most circumstances, the shutter speed without flash was six stops less than with flash. (The total exposure was 5 2/3 stops different because the aperture was opened 1/3 stop in the flash image.) While both images were made using a studio stand (like a rolling tripod), the image without flash with its 1.0 second shutter speed certainly could not have been handheld. Higher shutter speeds also helps freeze the frame if there is any motion from loose parts or from wind.
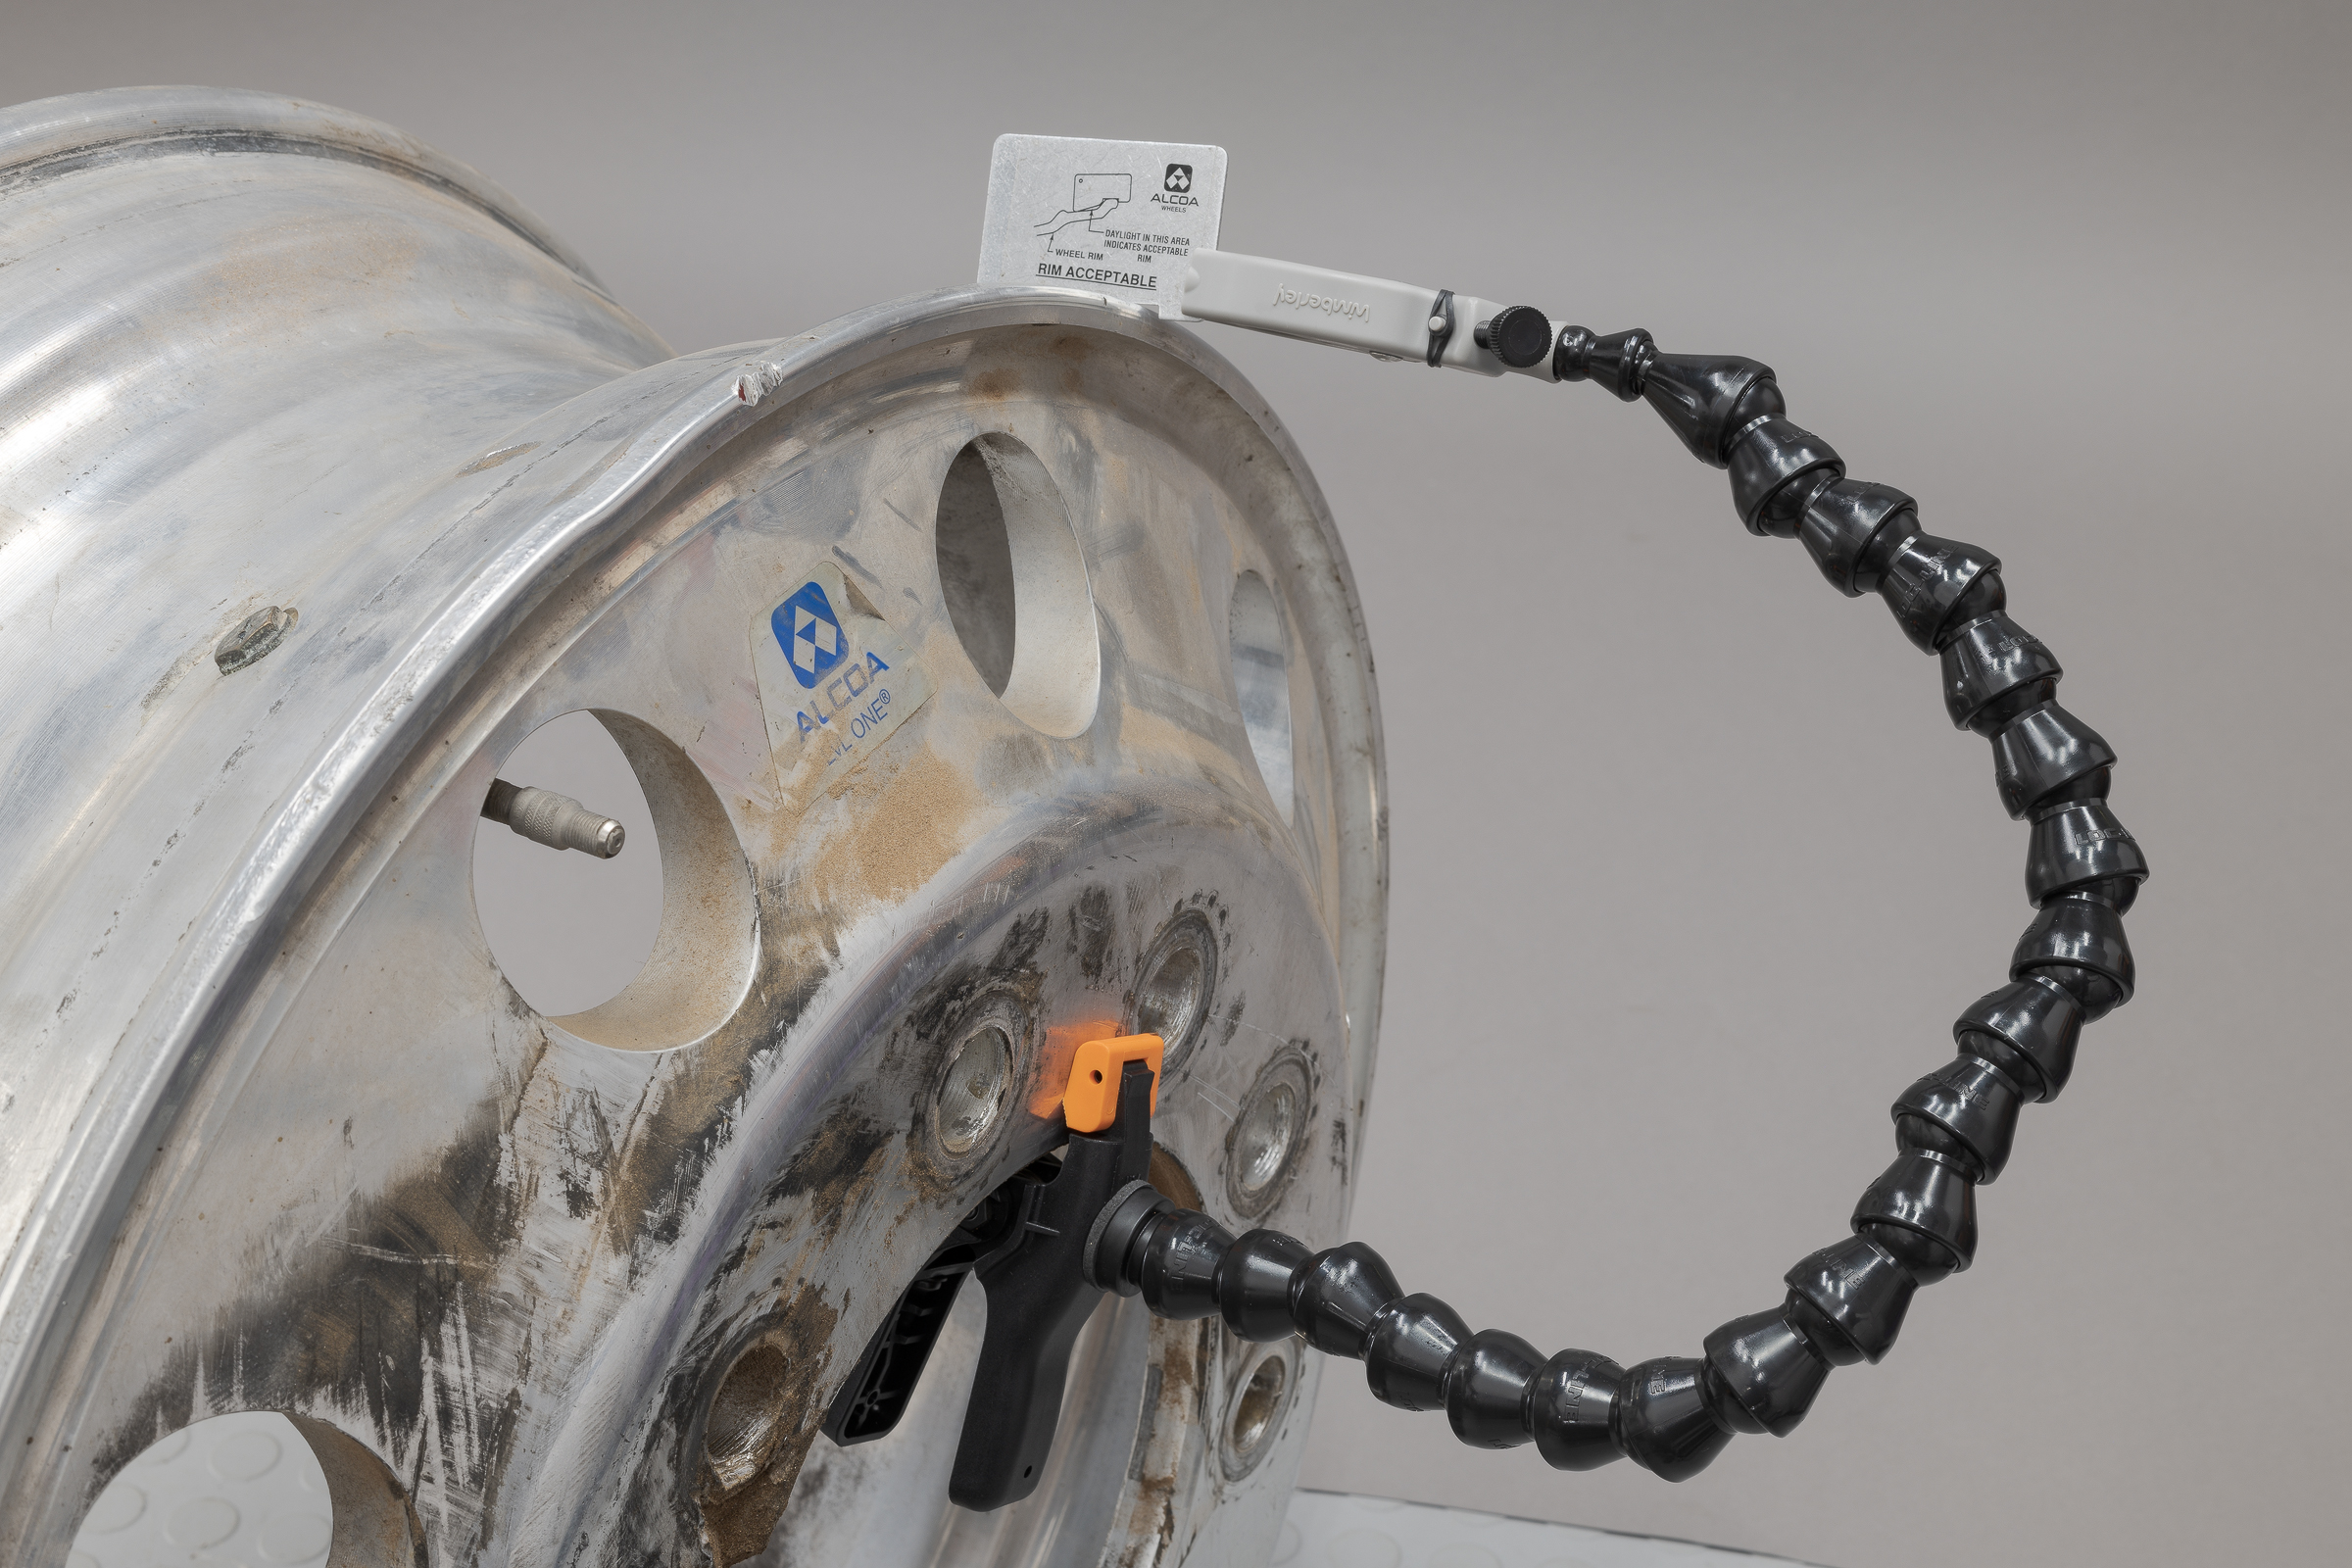
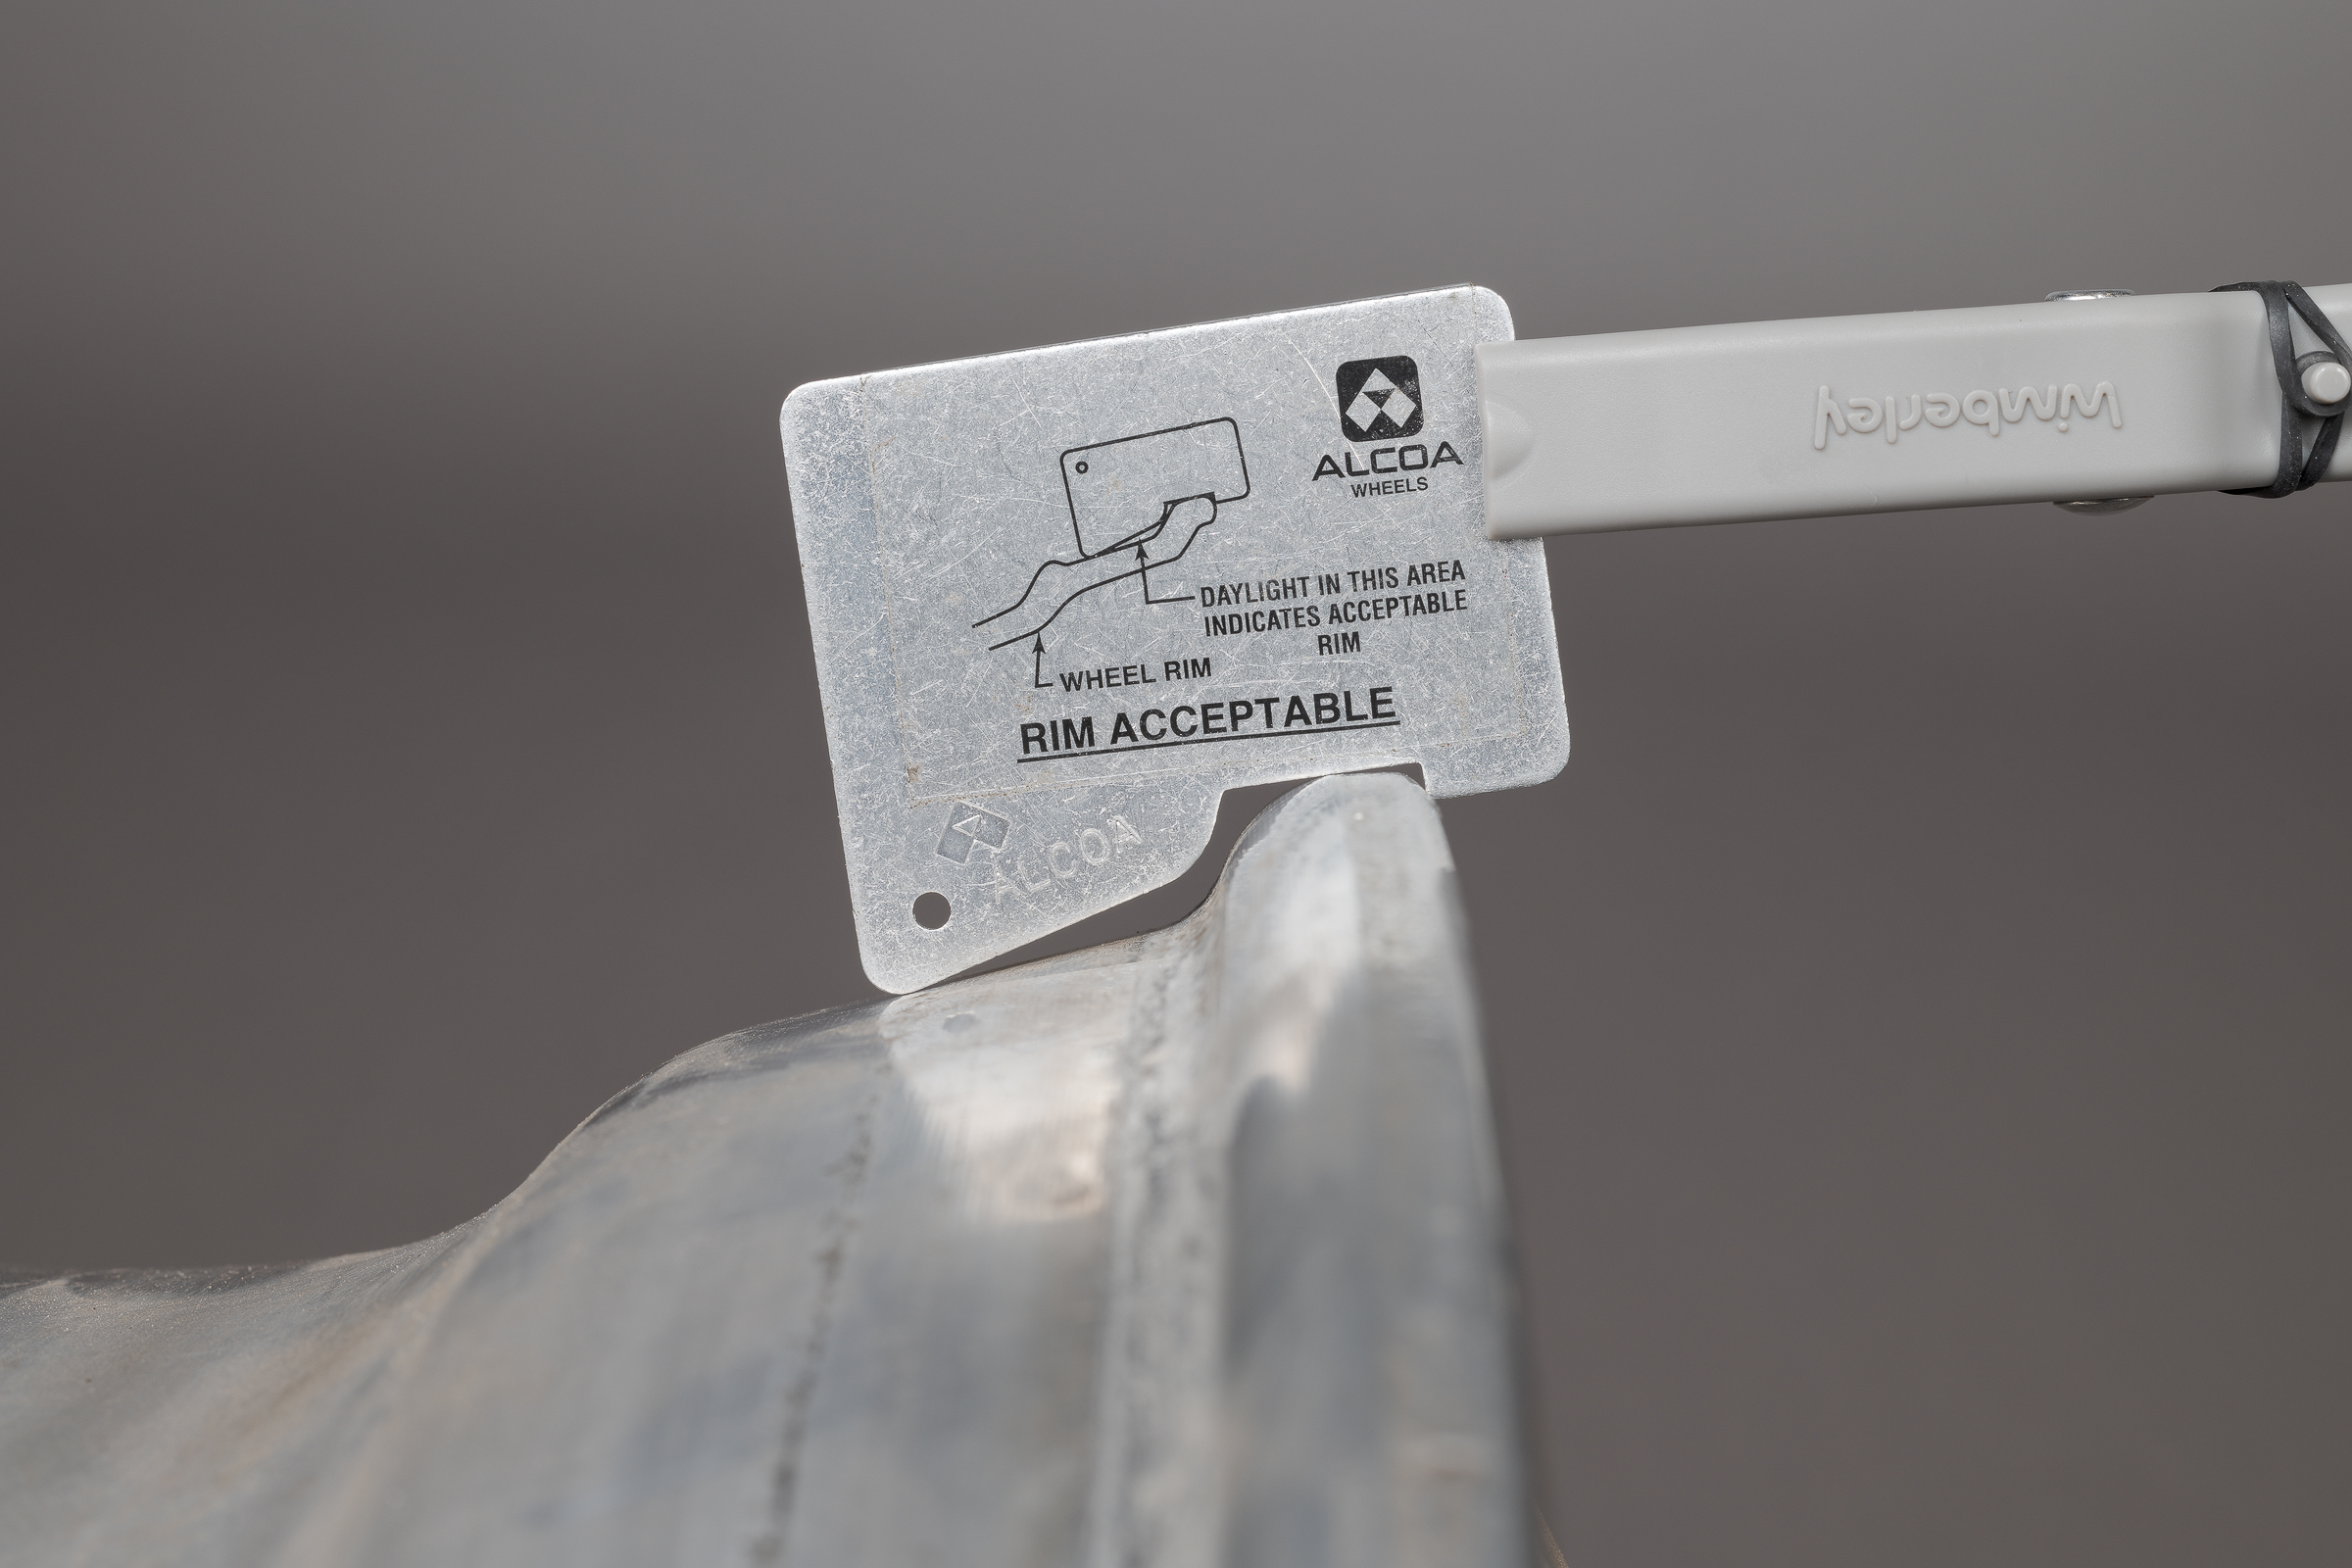
About half the truck wheels sold today are aluminum rather than steel. As with anything, there are trade-offs when comparing steel and aluminum wheels. Aluminum wheels weigh less but cost more than steel wheels. Aluminum wheels don’t rust, of course, but they can suffer from flange wear. Alcoa recommends checking for excessive flange wear using a simple go-no go gauge (Part No. 000700).Alcoa Rim Wear Gauge Go-No Go. (From 2015 Alcoa Wheel Service Manual.)Here’s a photograph of the gauge in use. (Click on image to enlarge, then click on back arrow to return.)Alcoa Rim Wear Gauge on rim flange. (Made with ZEISS Milvus 50 mm macro lens on Nikon D850 with flashes.)While the gauge is quite easy to use, it is more challenging to photograph. It can be tricky to hold the thin aluminum gauge in the proper position while also making a photograph. To make the photograph above, I used a Wimberley The Plamp II with one end clamped on the wheel center hole, and the other end clamped to the gauge.Using Wimberley The Plamp II to hold Alcoa Rim Wear Gauge in place for photography, with flash. (Made with ZEISS Milvus 50 mm macro lens on Nikon D850 with flashes.)The Plamp II is fantastic since it is flexible enough to get into any position, yet stiff enough to remain in place once released. Here’s a link on B&H: Wimberley The Plamp II from B&H. The Plamp II allowed me to quickly and steadily hold the Alcoa gauge perpendicular to the rim and properly up against the flange. It was easy to focus and shoot without any motion from trying to hold the gauge by hand. It also allowed me to get the flashes into position with no shadows from my arm across the photo.
If you need to photograph something like a gauge or ruler, it is worth taking the few minutes to secure it and light it properly. You can often just tape it in place, but that wouldn’t have worked to position this flange wear gauge.
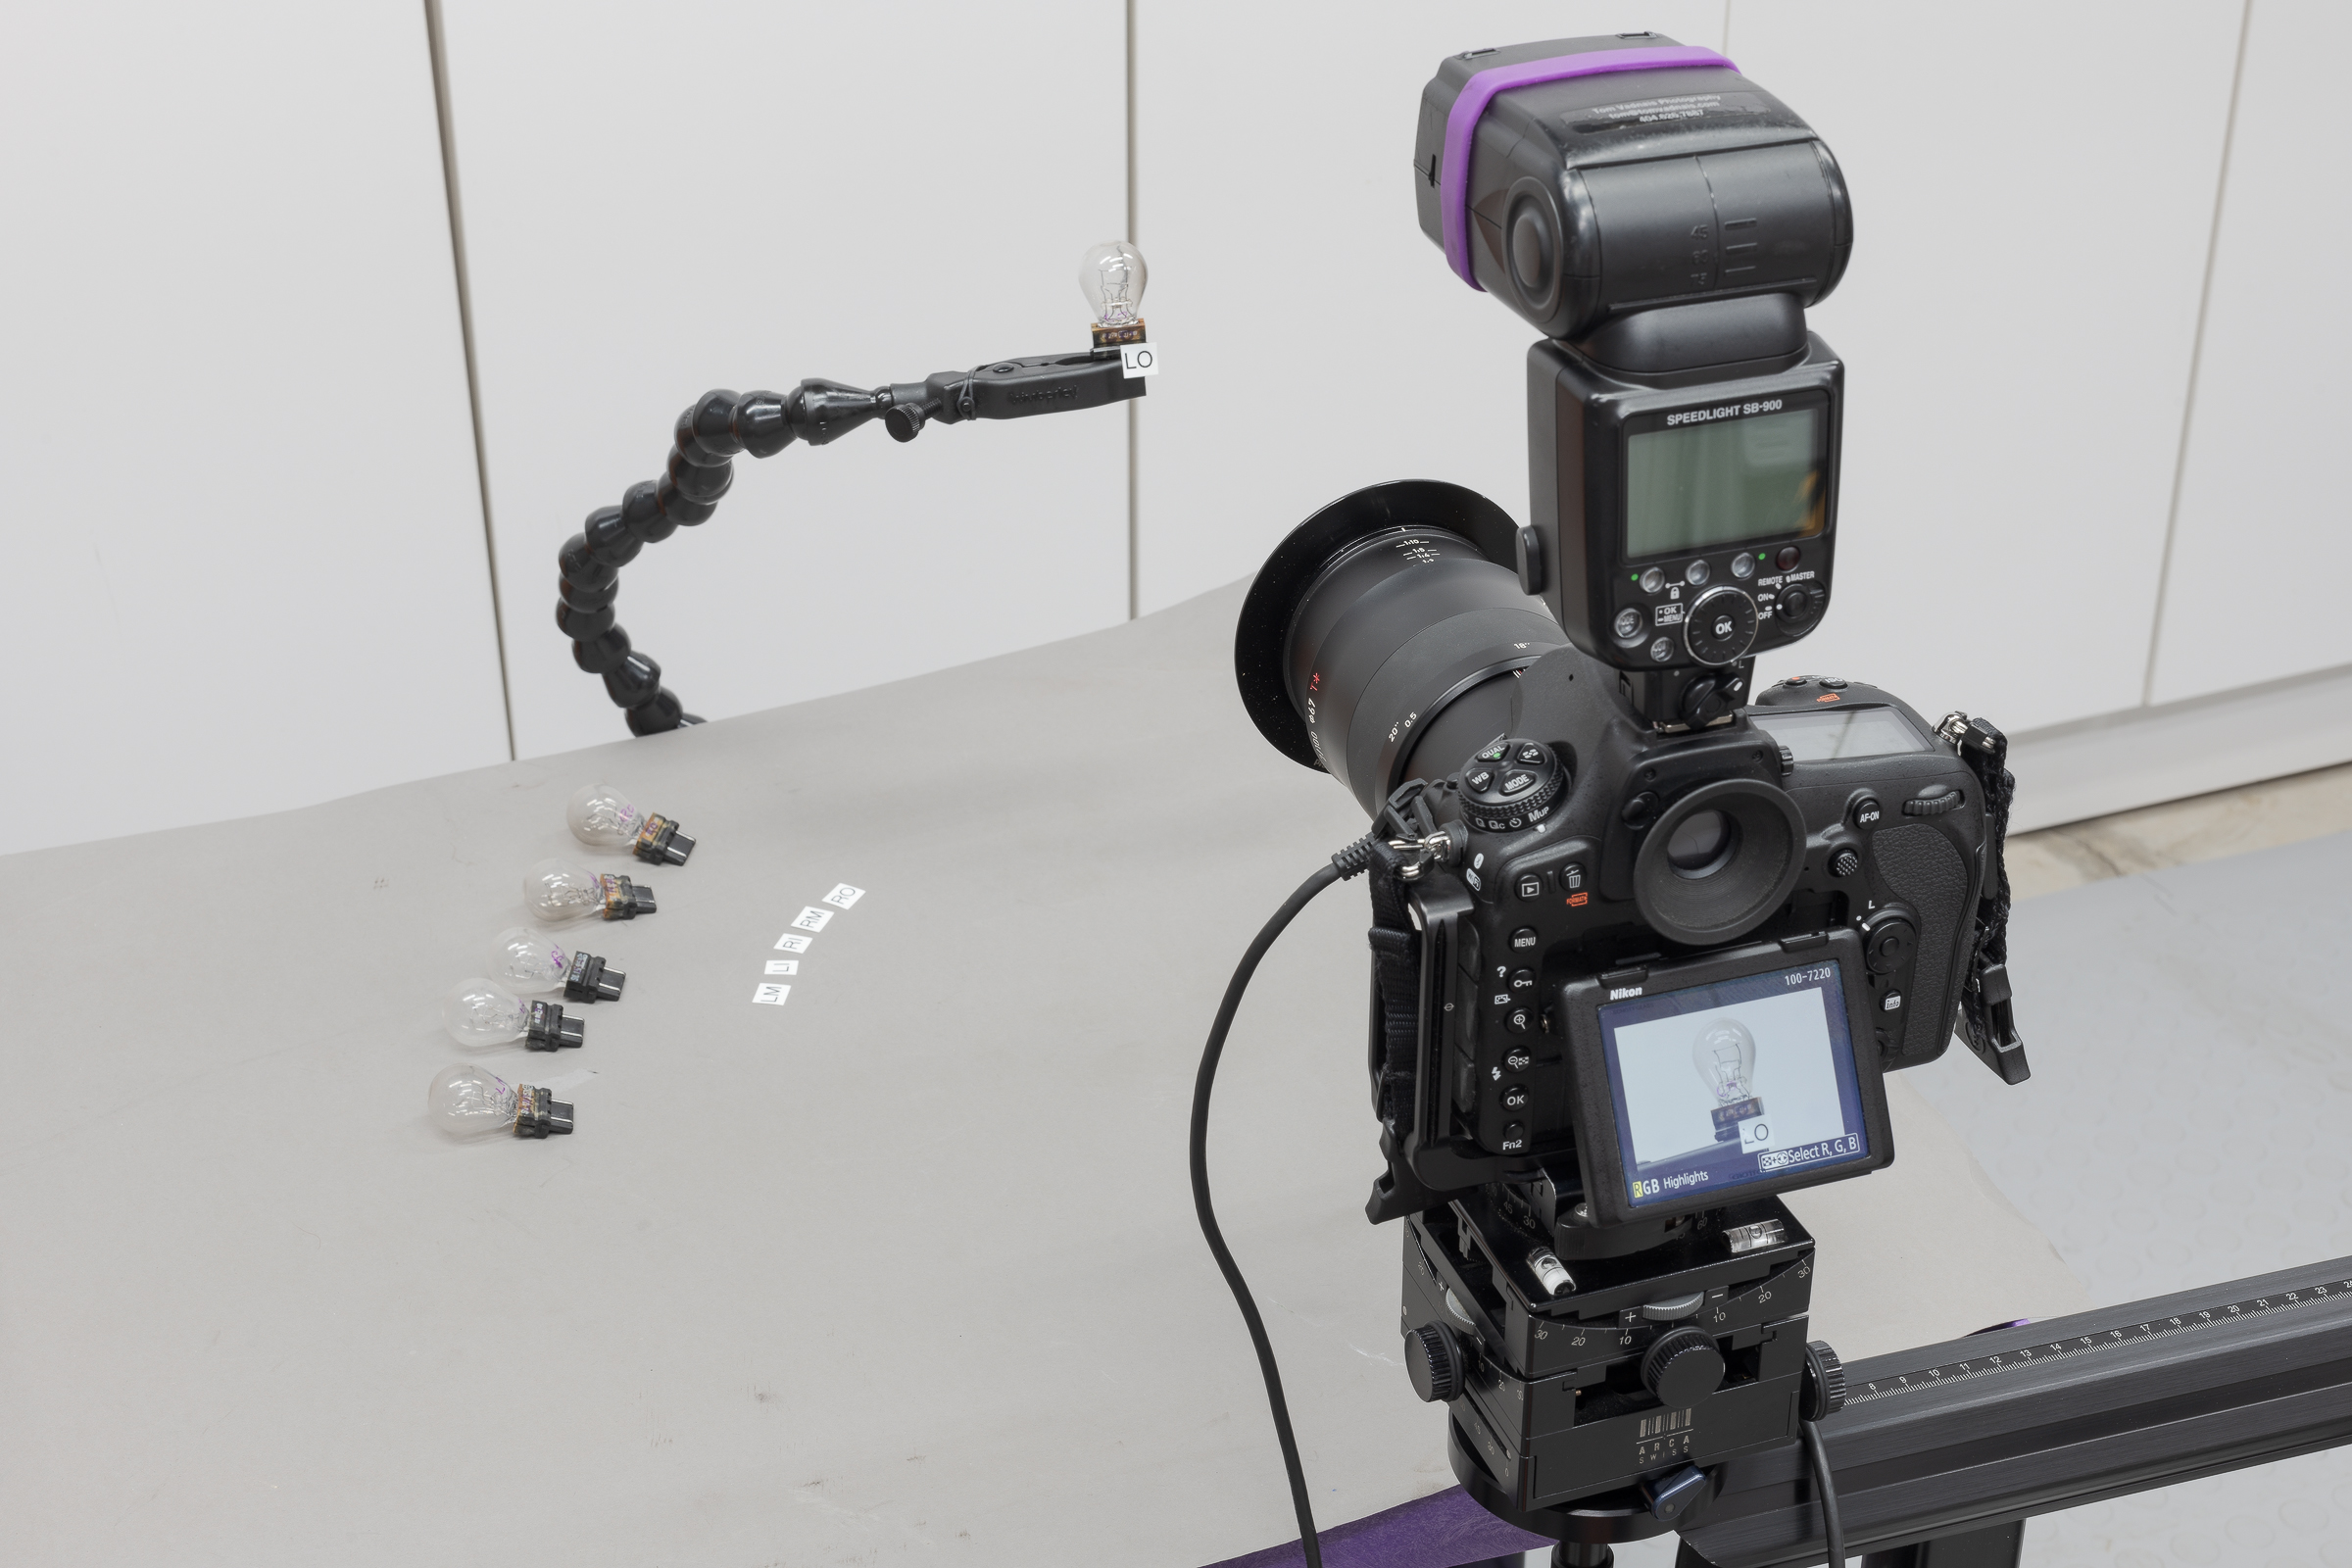
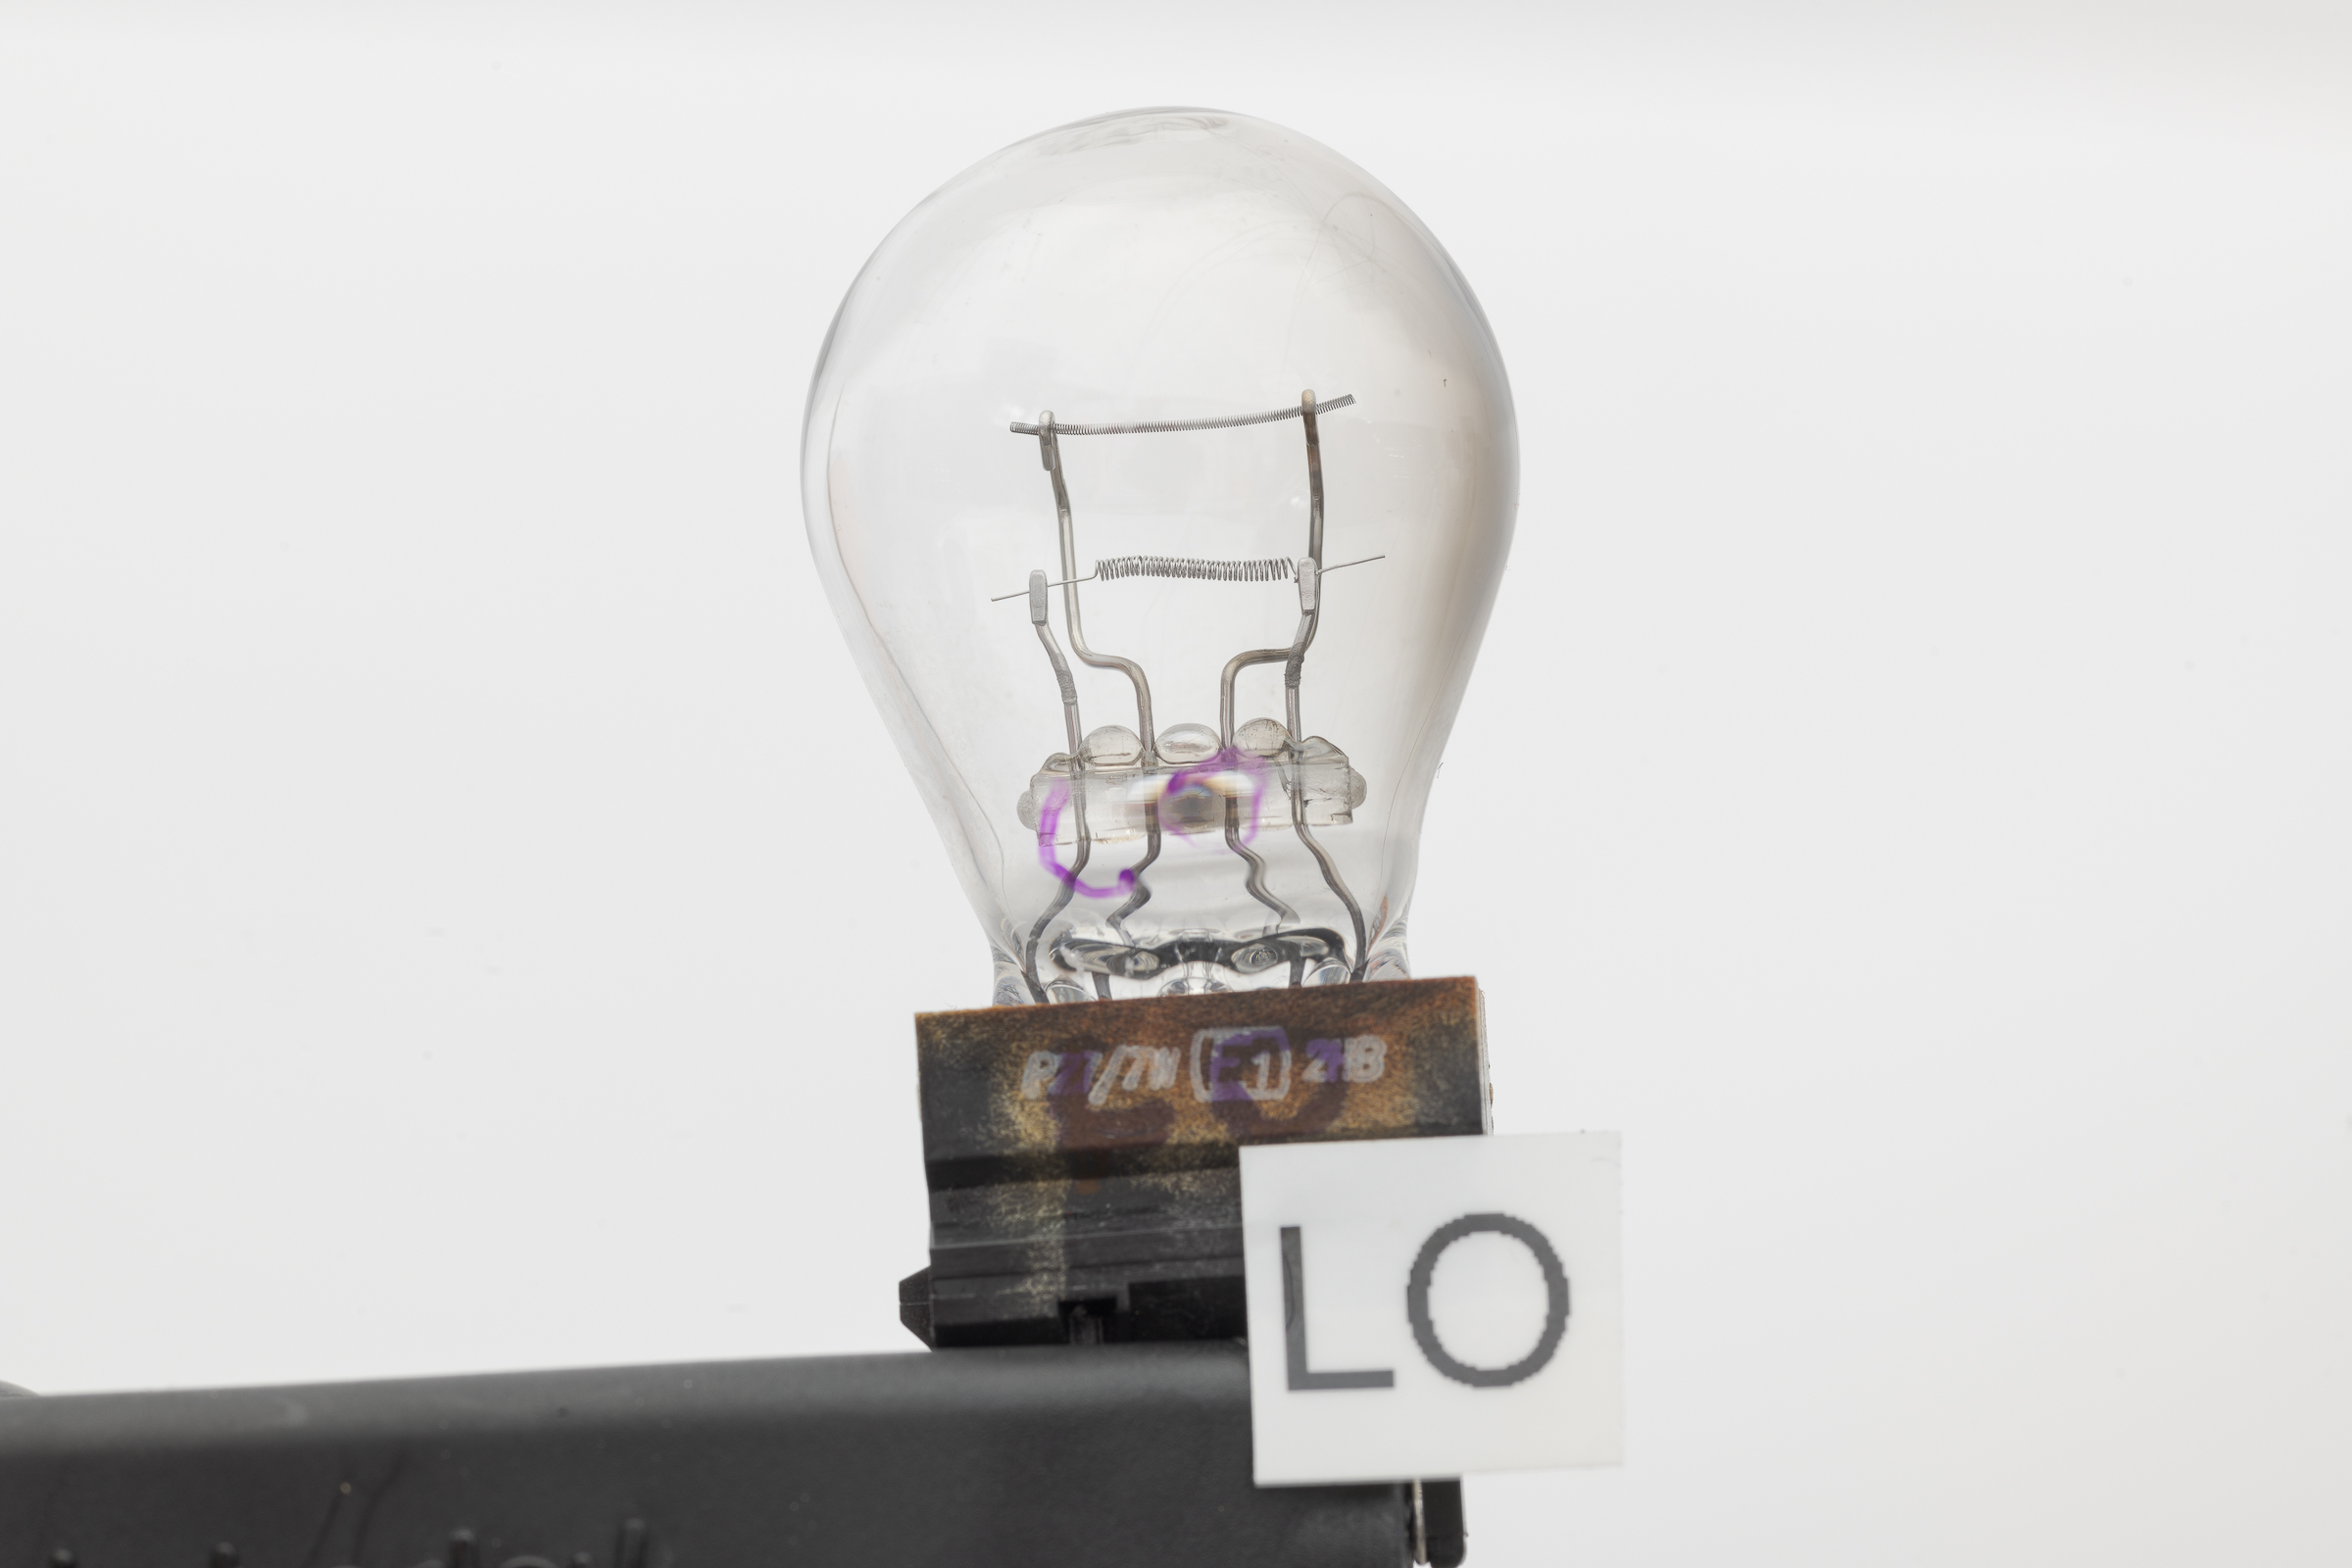
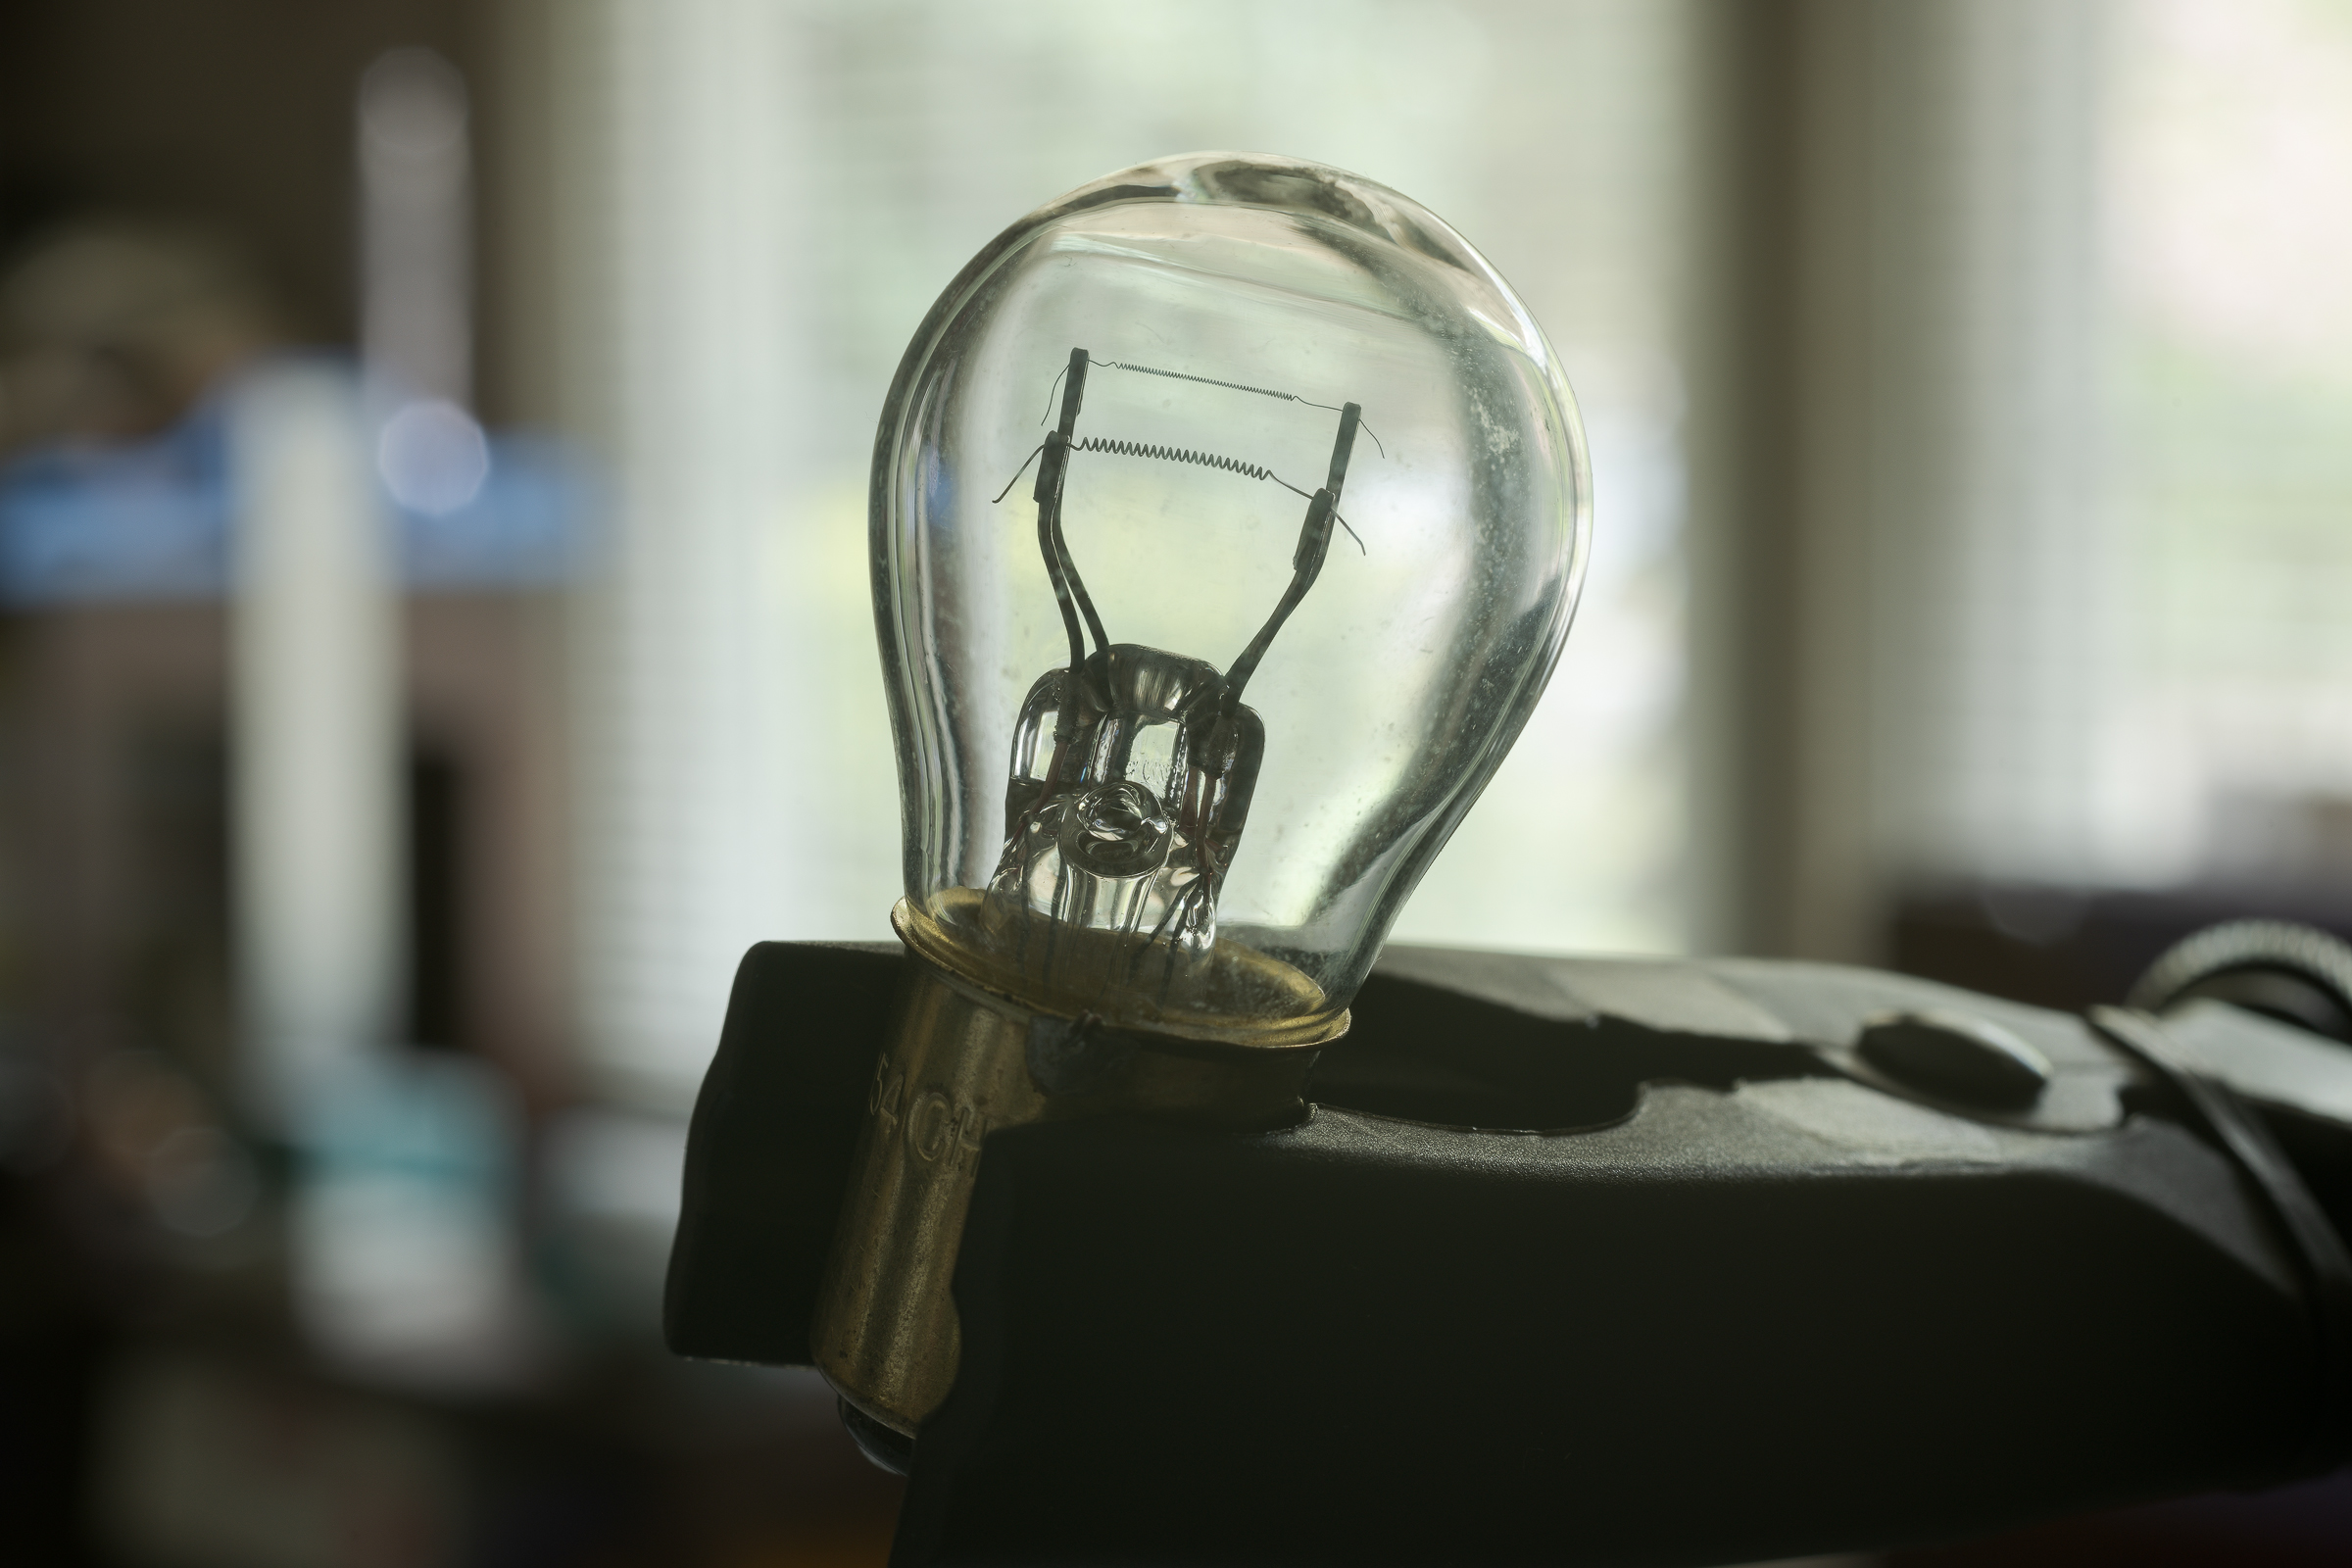
Glare on the glass globes can obscure the filaments when photographing light bulbs. This first photo shows the effects of overhead lights reflecting on the bulb. (LO refers to Left Outside taillight bulb.) (Click on image to enlarge, then click on back arrow to return.)Bulb reflecting overhead lights. (ZEISS Milvus 100mm Macro lens on Nikon D850.)Below is the setup that was used to create that photo.Setup for bulb with reflections on globe. (ZEISS Otus 55mm f/1.4 lens on Nikon D850.)The bulb was held in place with a Wimberley The Plamp II, and the camera was locked down on a studio camera stand. The white cabinet door was used as the background. Note that the flash was not used.
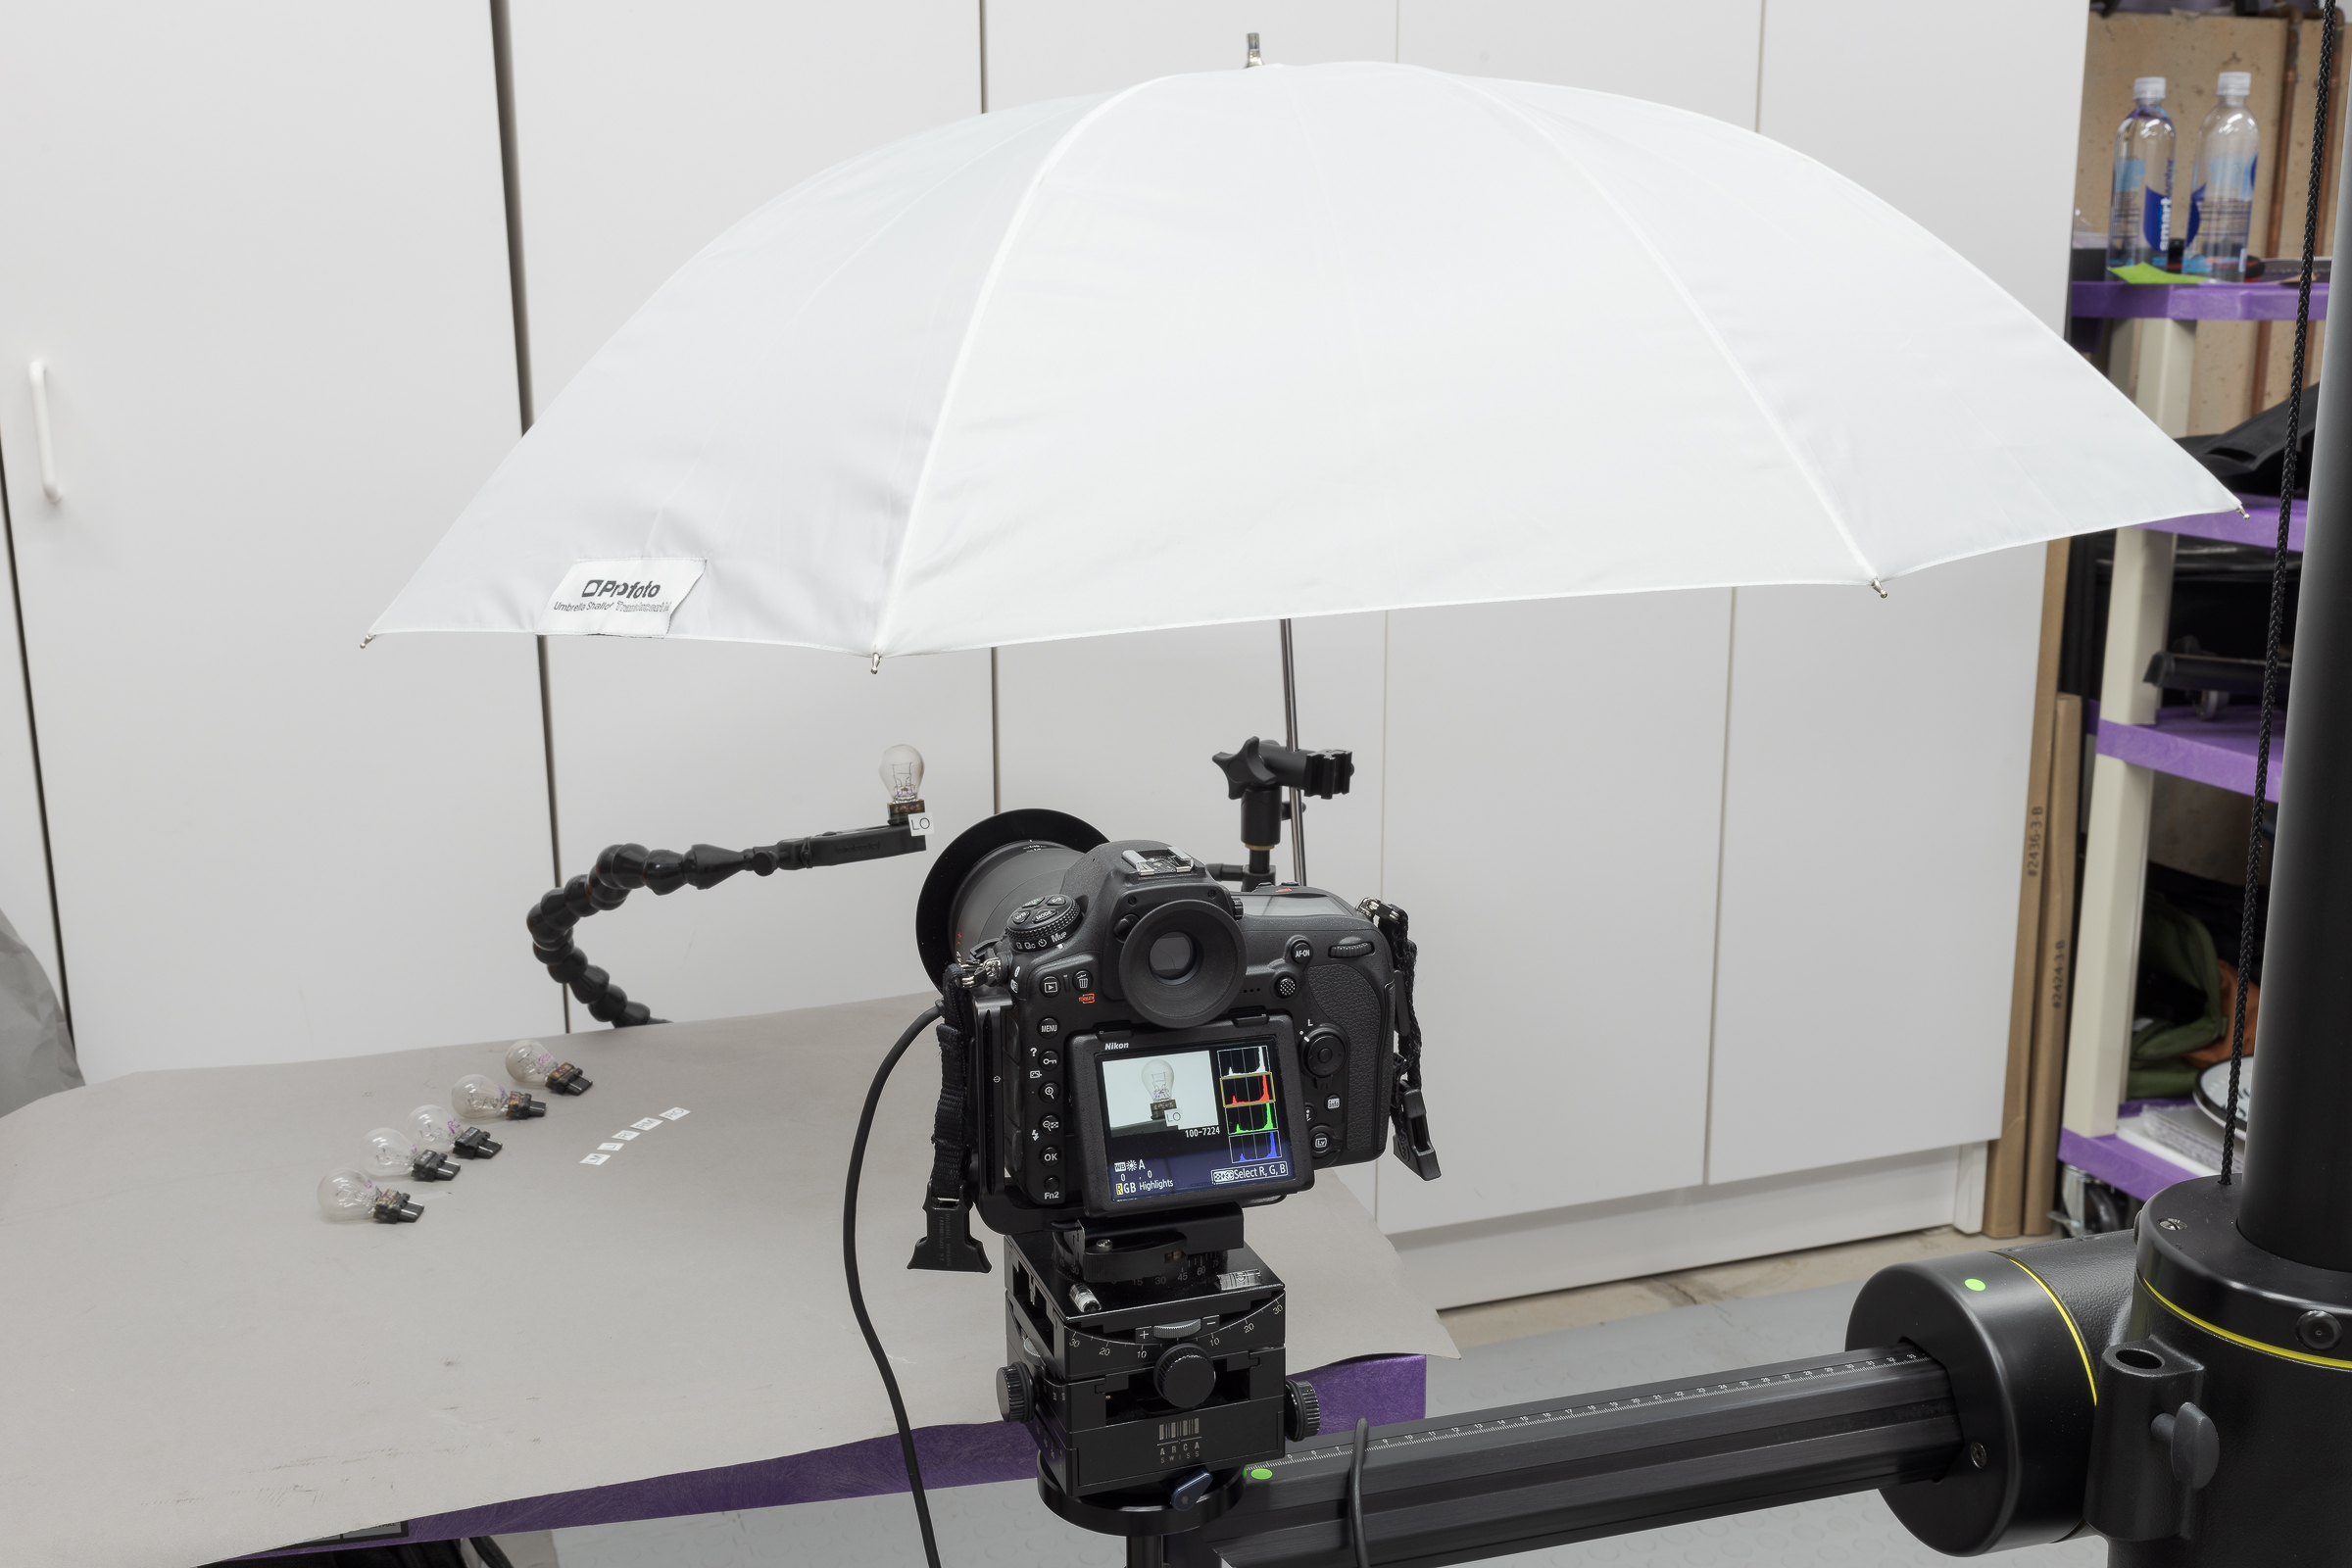
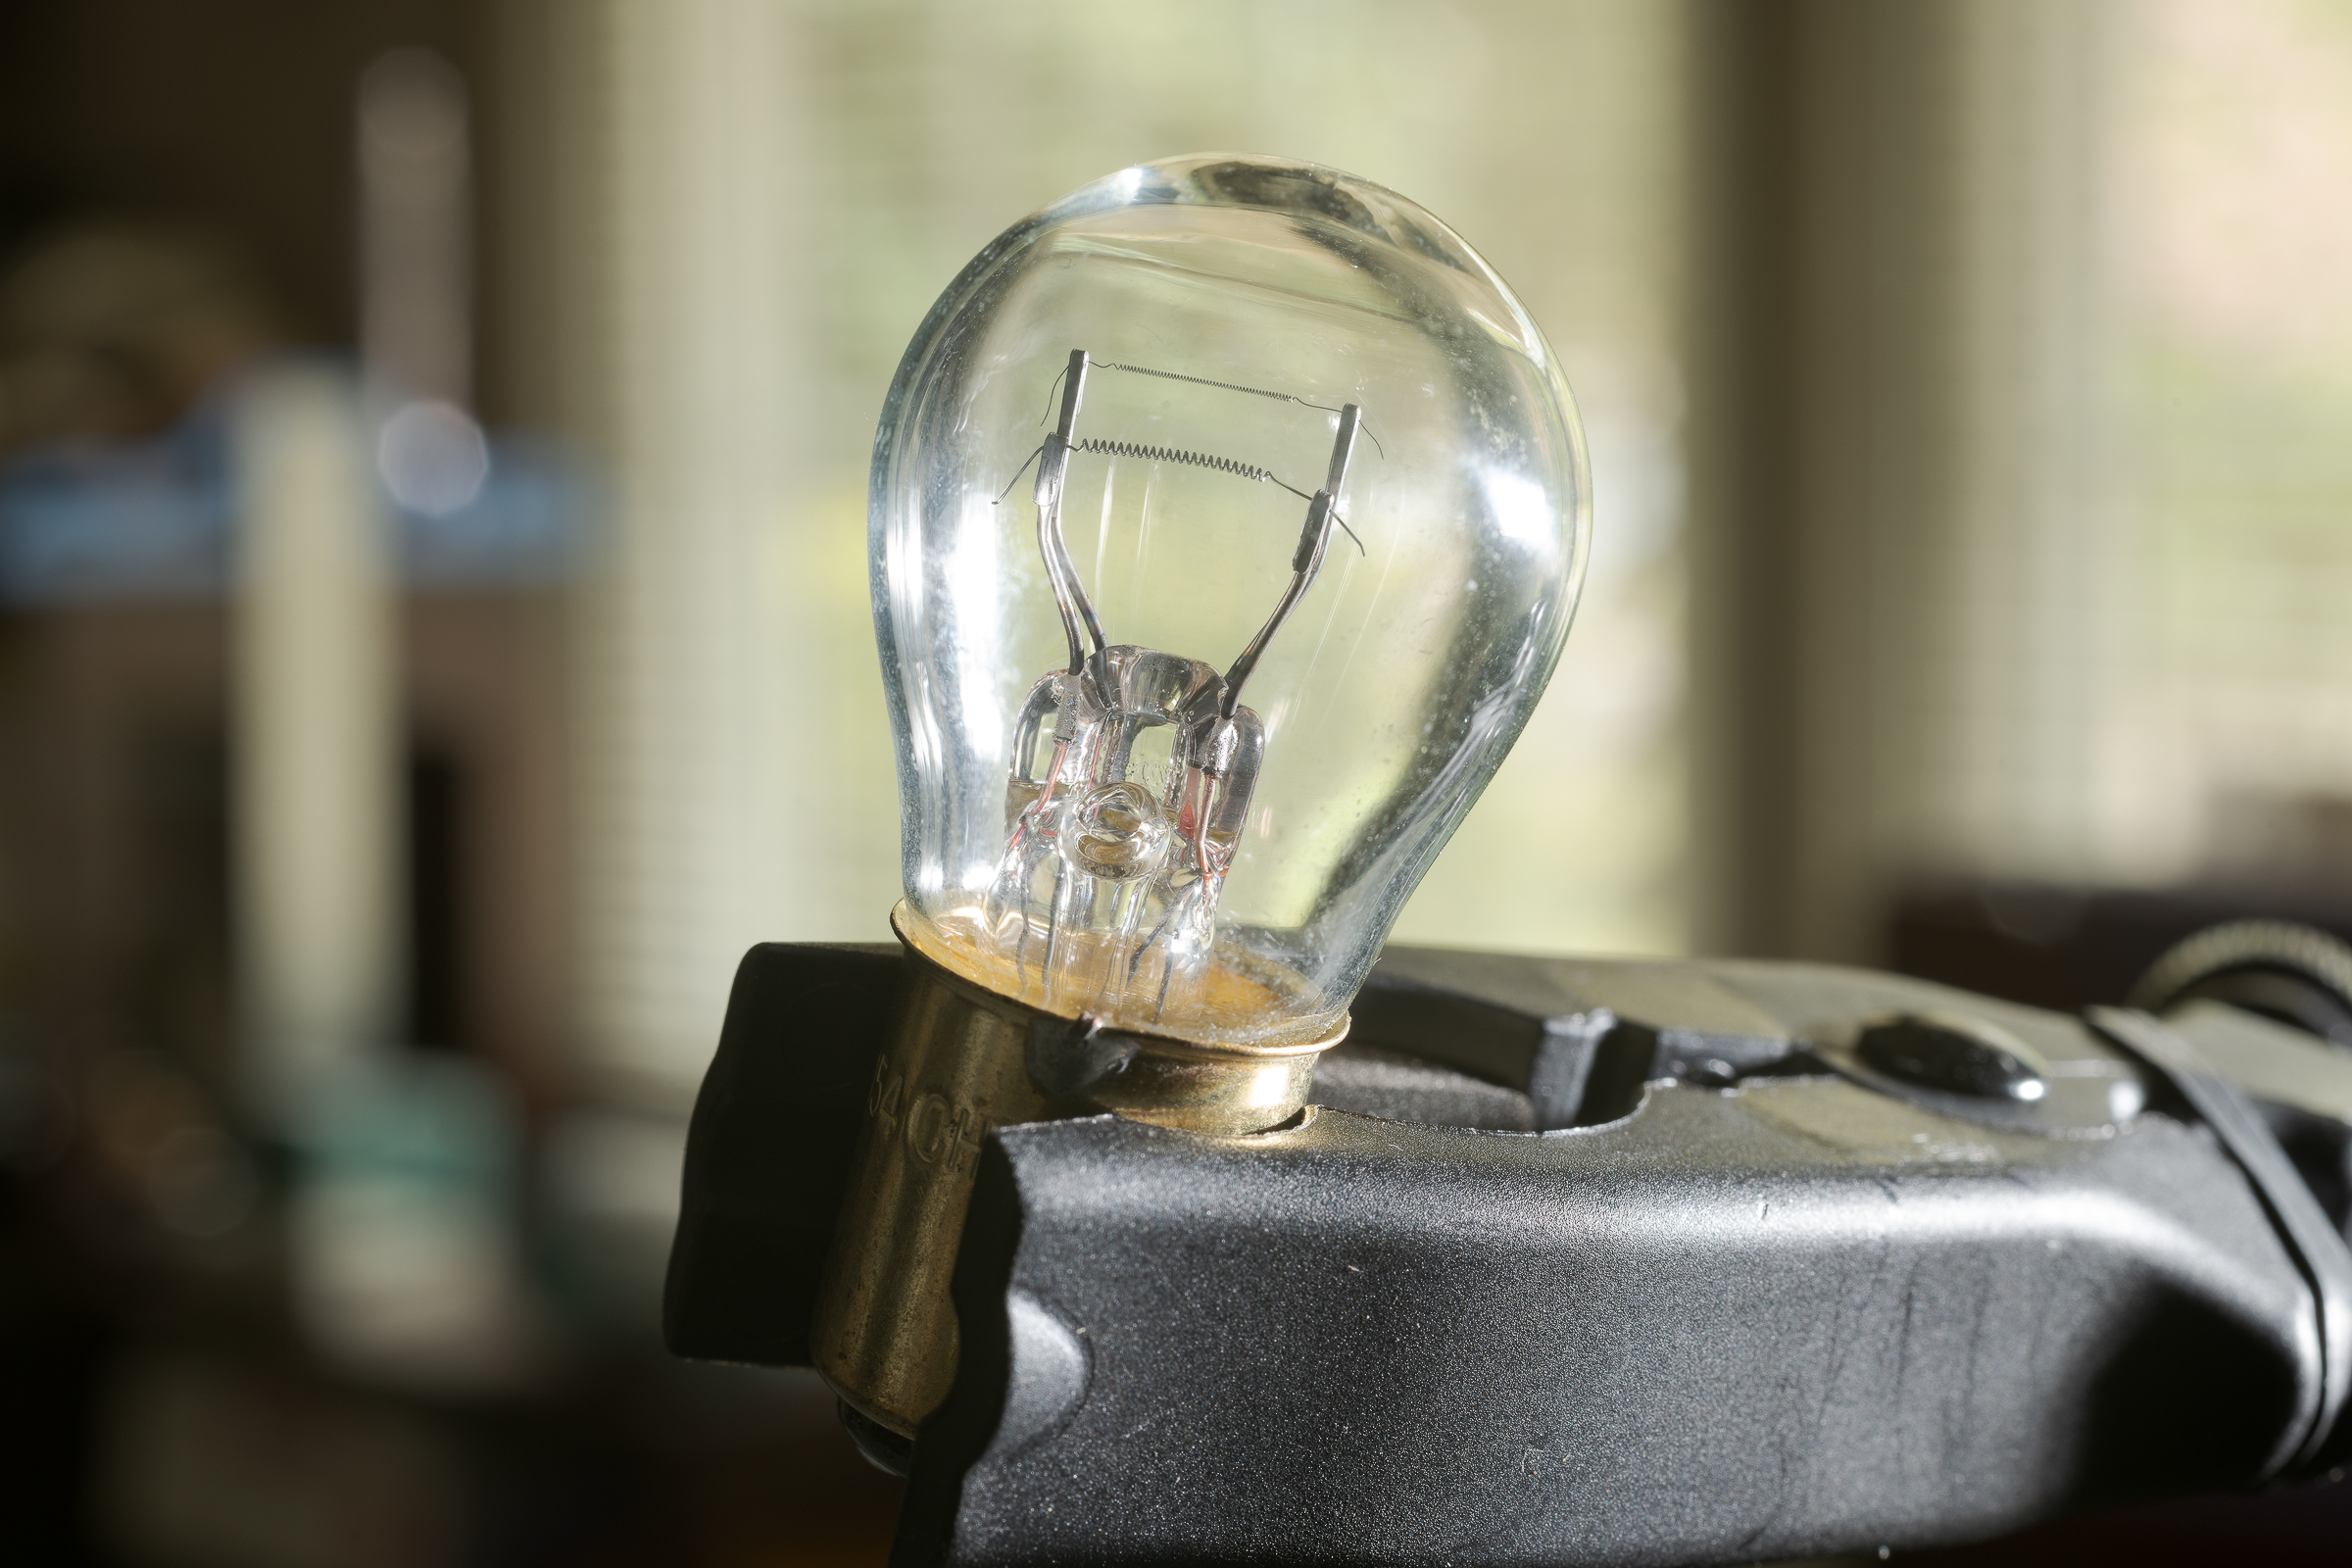
All the glare from the overhead lights was eliminated by placing a translucent umbrella on a small light stand above the bulb. That umbrella was lowered and moved around until all of the glare from the overhead lights was gone. Here’s what the setup looked like with that simple change.Setup for photographing bulb with no reflections on globe. (ZEISS Milvus 35mm f/1.4 lens on Nikon D850.)As you can see below, the resulting photograph had no glare, and clearly showed the filaments and the posts.Taillight bulb with no reflections on globe under translucent umbrella. (ZEISS Milvus 100mm Macro lens on Nikon D850.)Translucent umbrellas have the advantages of being inexpensive (well, except for this one by Profoto), lightweight, and compact. So this setup can be used anywhere outdoors or indoors, with a tripod replacing the studio stand. When using outdoors, typically you’ll just have one source of glare from the sun. Many times, you’ll be able to just prop the umbrella on the vehicle or ground without needing a light stand or some other holder. If it’s dark or shaded, you might need supplemental lighting (flash, LED, or other light sources). These can be fired through the translucent umbrella to prevent glare from them. That will be the subject of a future post.
Including a scale in a photograph is an excellent way to document dimensions. But it’s essential to properly position the camera to record an accurate measurement.
One of the most common mistakes made when photographing scales or rulers is making the photo from an angle. The camera lens must be perpendicular to the scale, both vertically and horizontally. A camera positioned too low or too high, and correspondingly tilted up or down, will result in parallax distortion. Worse is a horizontal offset that results in misleading measurements due to the angle of the camera to the scale markings.
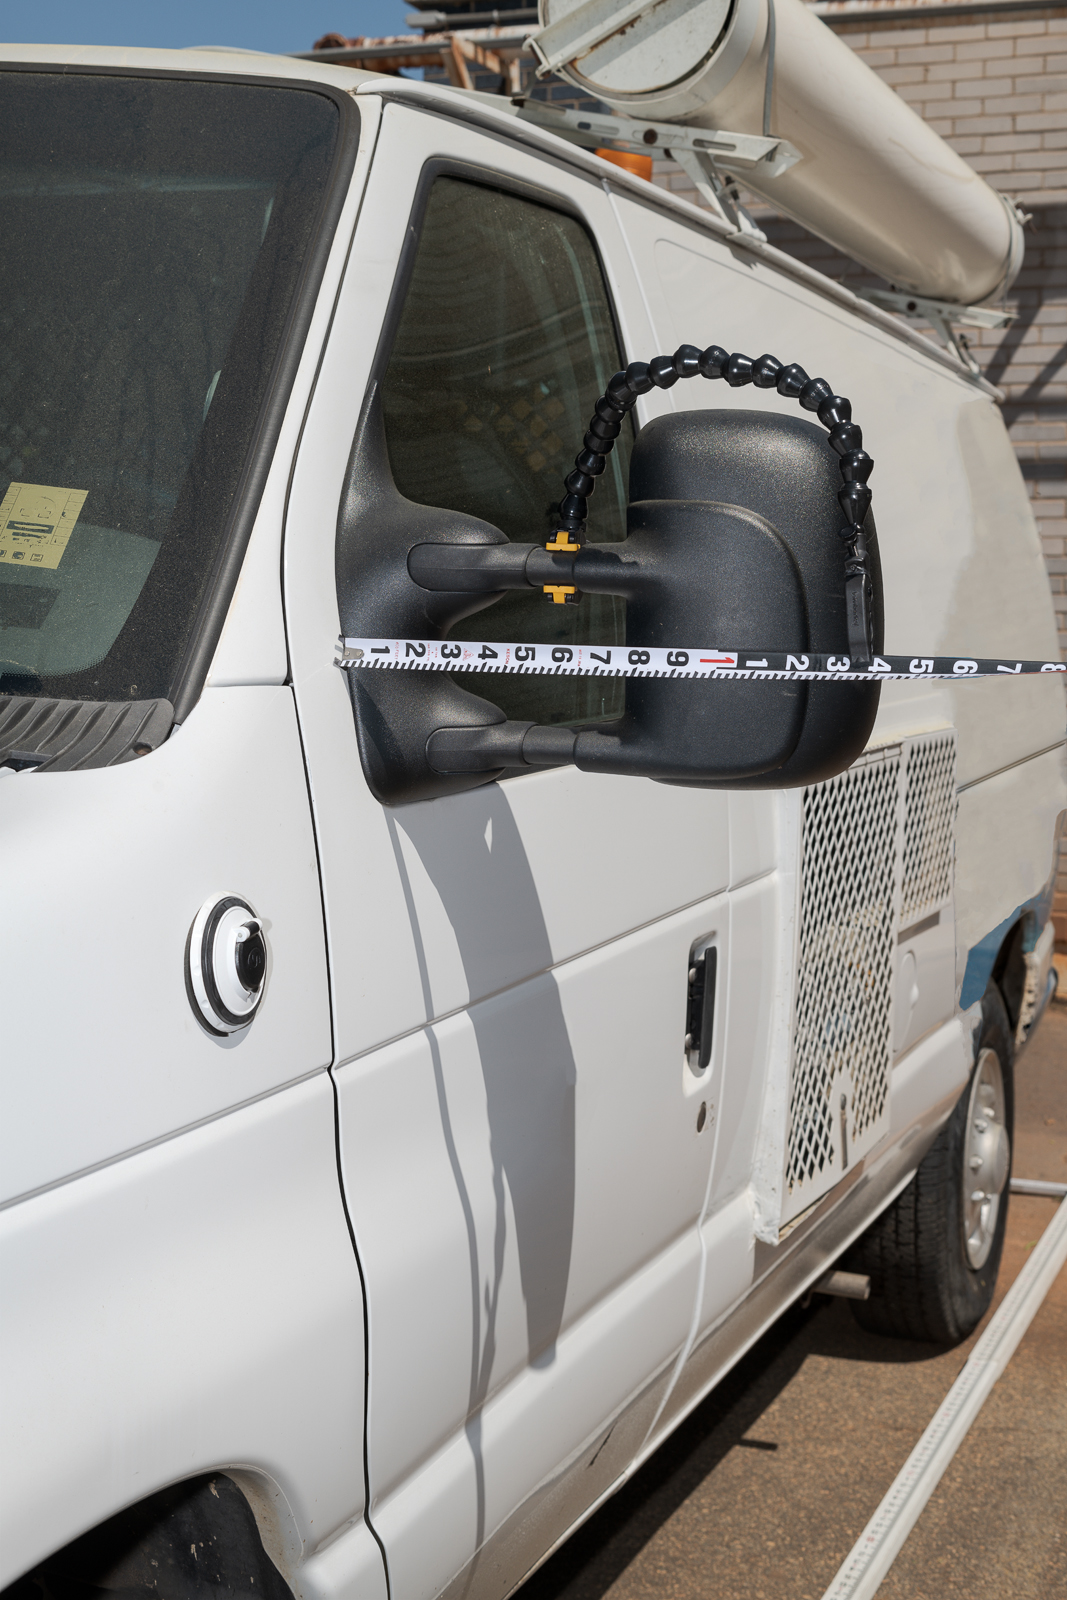
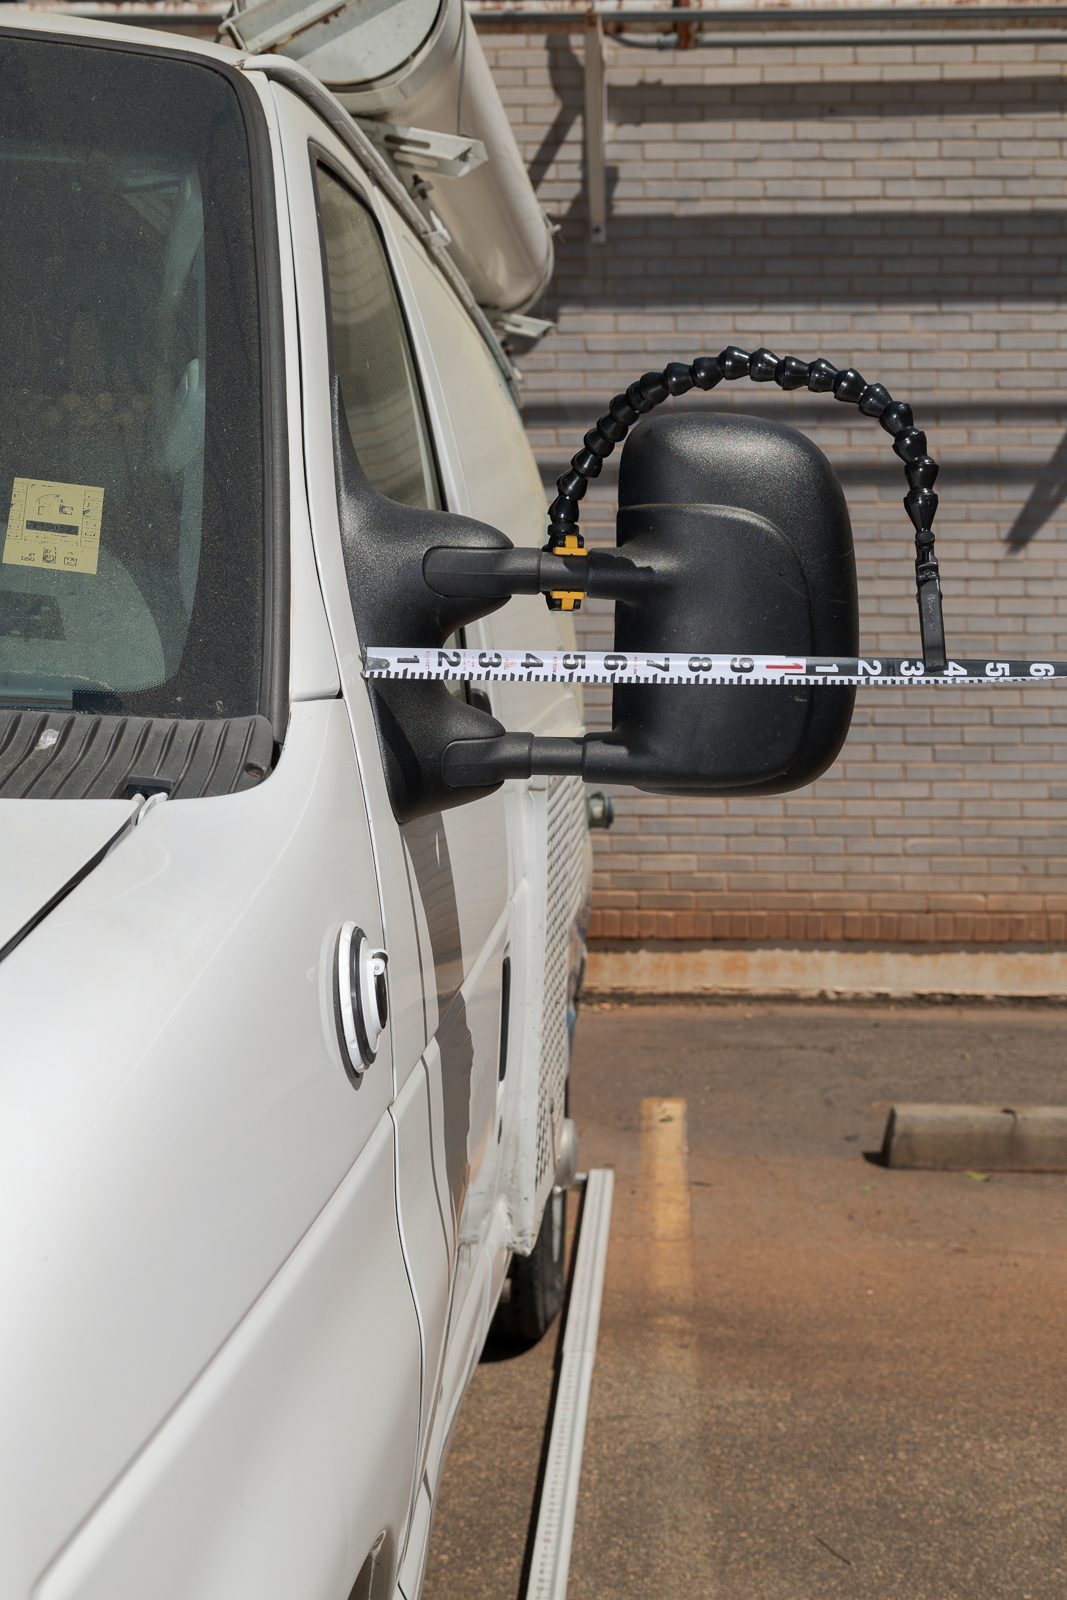
Take this example made to show how far a mirror protruded from the side of a van. The first photo was taken at the proper scale height, but was at an angle to the scale. Note how different the reading appears in the second image with the camera perpendicular to the scale. The latter accurately showed the measurement. (Click on image to enlarge, then click on back arrow to return.)Photographed at angle to scale. (Made with ZEISS 50mm f/2 macro lens on Nikon D850 with fill flash.)Photographed perpendicular to scale. (Made with ZEISS 50mm f/2 macro lens on Nikon D850 with fill flash.)Making an accurate photograph requires several steps:
-1- Make sure the pocket rod is parallel with the ground. Use something like a Wimberley Plamp clamped onto the upper mirror support arm to hold it at the proper height. Place the other end of the pocket rod firmly against the ground with enough pressure to hold the rod in proper position and angle.
-2- With the camera on a tripod, make sure the center of the lens is vertically level with the pocket rod.
-3- Move the tripod until the center of the lens is centered on pocket rod horizontally.
-4- Use a hot shoe bubble level or the in-camera level to make sure camera is level.
-5- Manually focus, or make sure your autofocus point is directly on the scale.
-6- Use a normal (50mm) or longer focal length to eliminate wide angle lens distortion. Macro lenses are ideal because of their flat field and edge-to-edge sharpness.
-7- Use fill flash to balance image, despite abundant sunshine.
Use scales, but take care to get the camera in position to show them accurately. Fortunately, you can check the results on your camera’s LCD (zoom the view if necessary) to make sure the dimension in the photograph matches the measurement you made. Fairly close isn’t accurate, and is misleading. A deceptive photo is worse than no photo at all.
When using flash, you can control how bright or dark the background by controlling your ambient exposure. A lot of people are afraid of flash, but it’s just another source of light. And it’s light you control.
As an example, while you’d never choose this busy background, let’s assume you need to shoot a light bulb indoors with a window in the background. Start with an ambient light shot like this. (Click on image to enlarge, then click on back arrow to return.)Bulb in ambient light with no flash. Exposure f/14, 2.0 sec, ISO 64. (Made with ZEISS 50mm macro on Nikon D850.)The scene out the window in the background is bright, but properly exposed. As a result, the bulb is almost in silhouette.
To bring out detail in the bulb, add a flash at 1/8 power in manual mode off camera to the right. Note this is the same exposure as the first image. The only change is the added fill flash.Bulb with flash at 1/8 power. Exposure f/14, 2.0 sec, ISO 64. (Made with ZEISS 50mm macro on Nikon D850 with Nikon SB-910.)This brings out details in the bulb, but the bright background remains distracting.
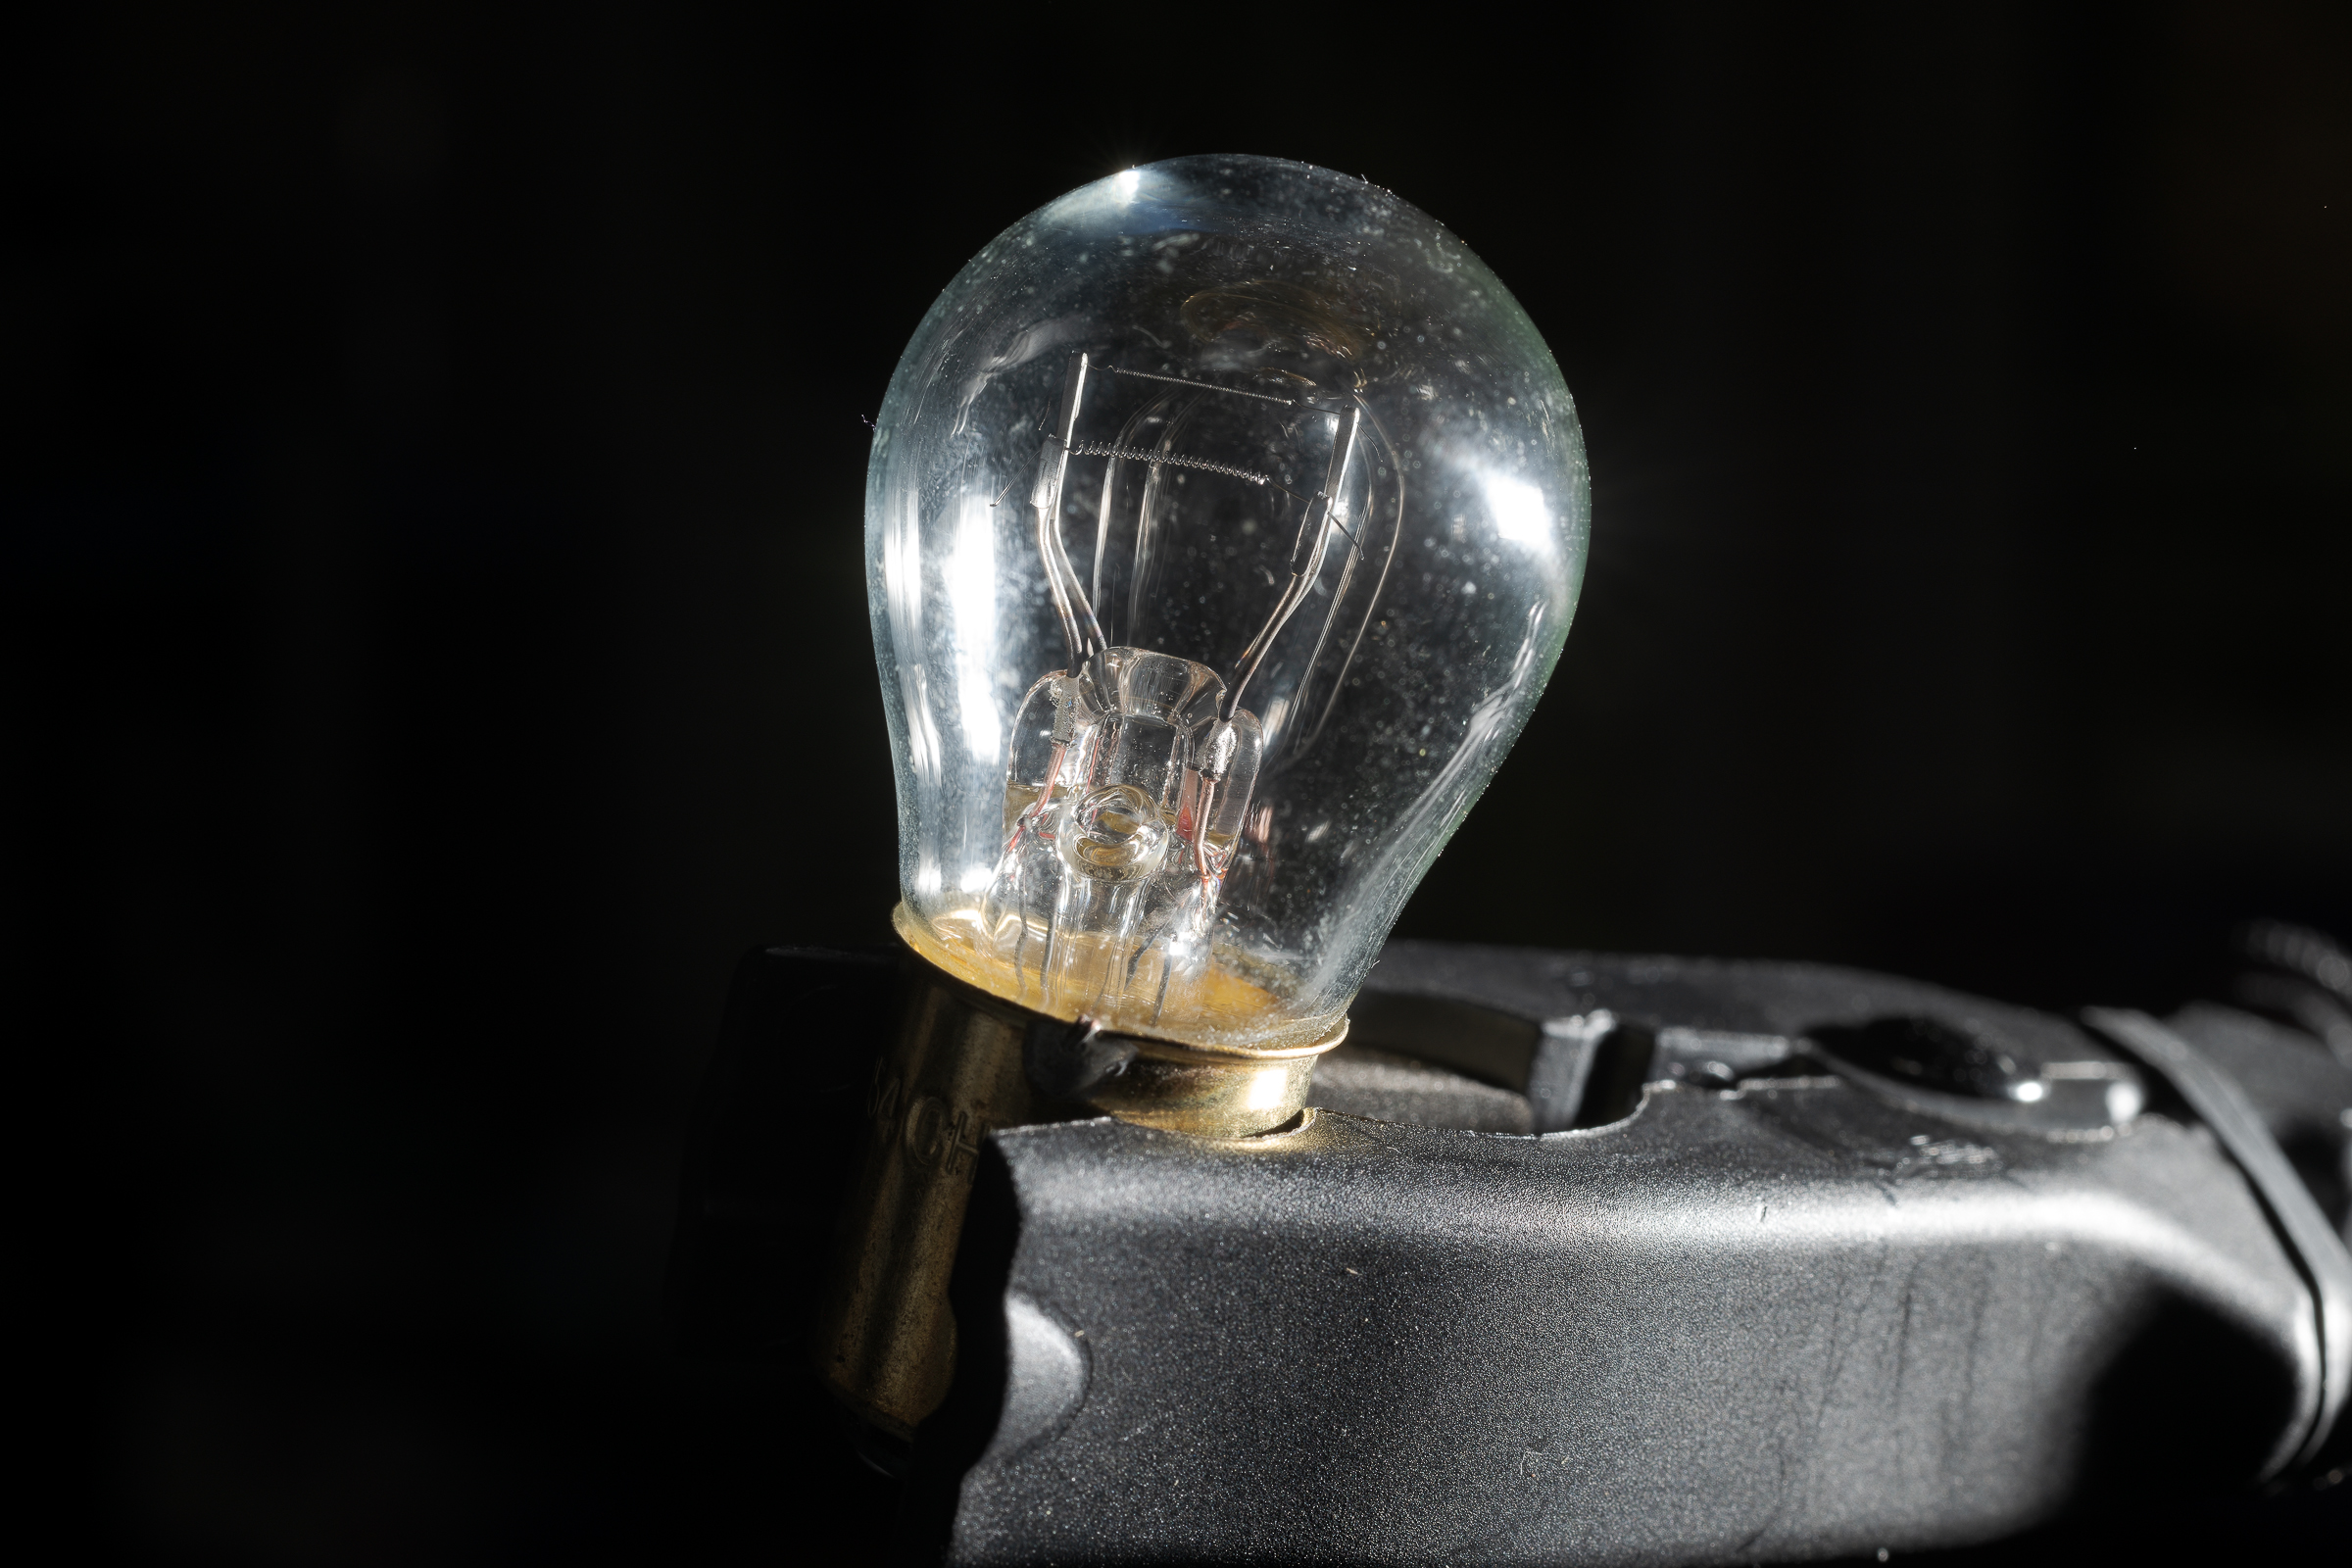
To darken the background, keep the flash setting (1/8 power), the ISO (64), and the aperture (f/14) constant. Then reduce the shutter speed to reduce ambient light. Here, the shutter speed was reduced from 2.0 seconds to 1/250 second.Bulb with flash at 1/8 power. Exposure f/14, 1/250 sec, ISO 64. (Made with ZEISS 50mm macro on Nikon D850 with SB-910.)Now, the ambient exposure is so low that most of the background light won’t register. Keeping a consistent amount of flash light on the bulb keeps the exposure constant on the bulb, but darkens the background almost to black.
Again, while you’d never choose such a background as this, this example shows that you can control the brightness of any background simply by using flash and changing shutter speed.
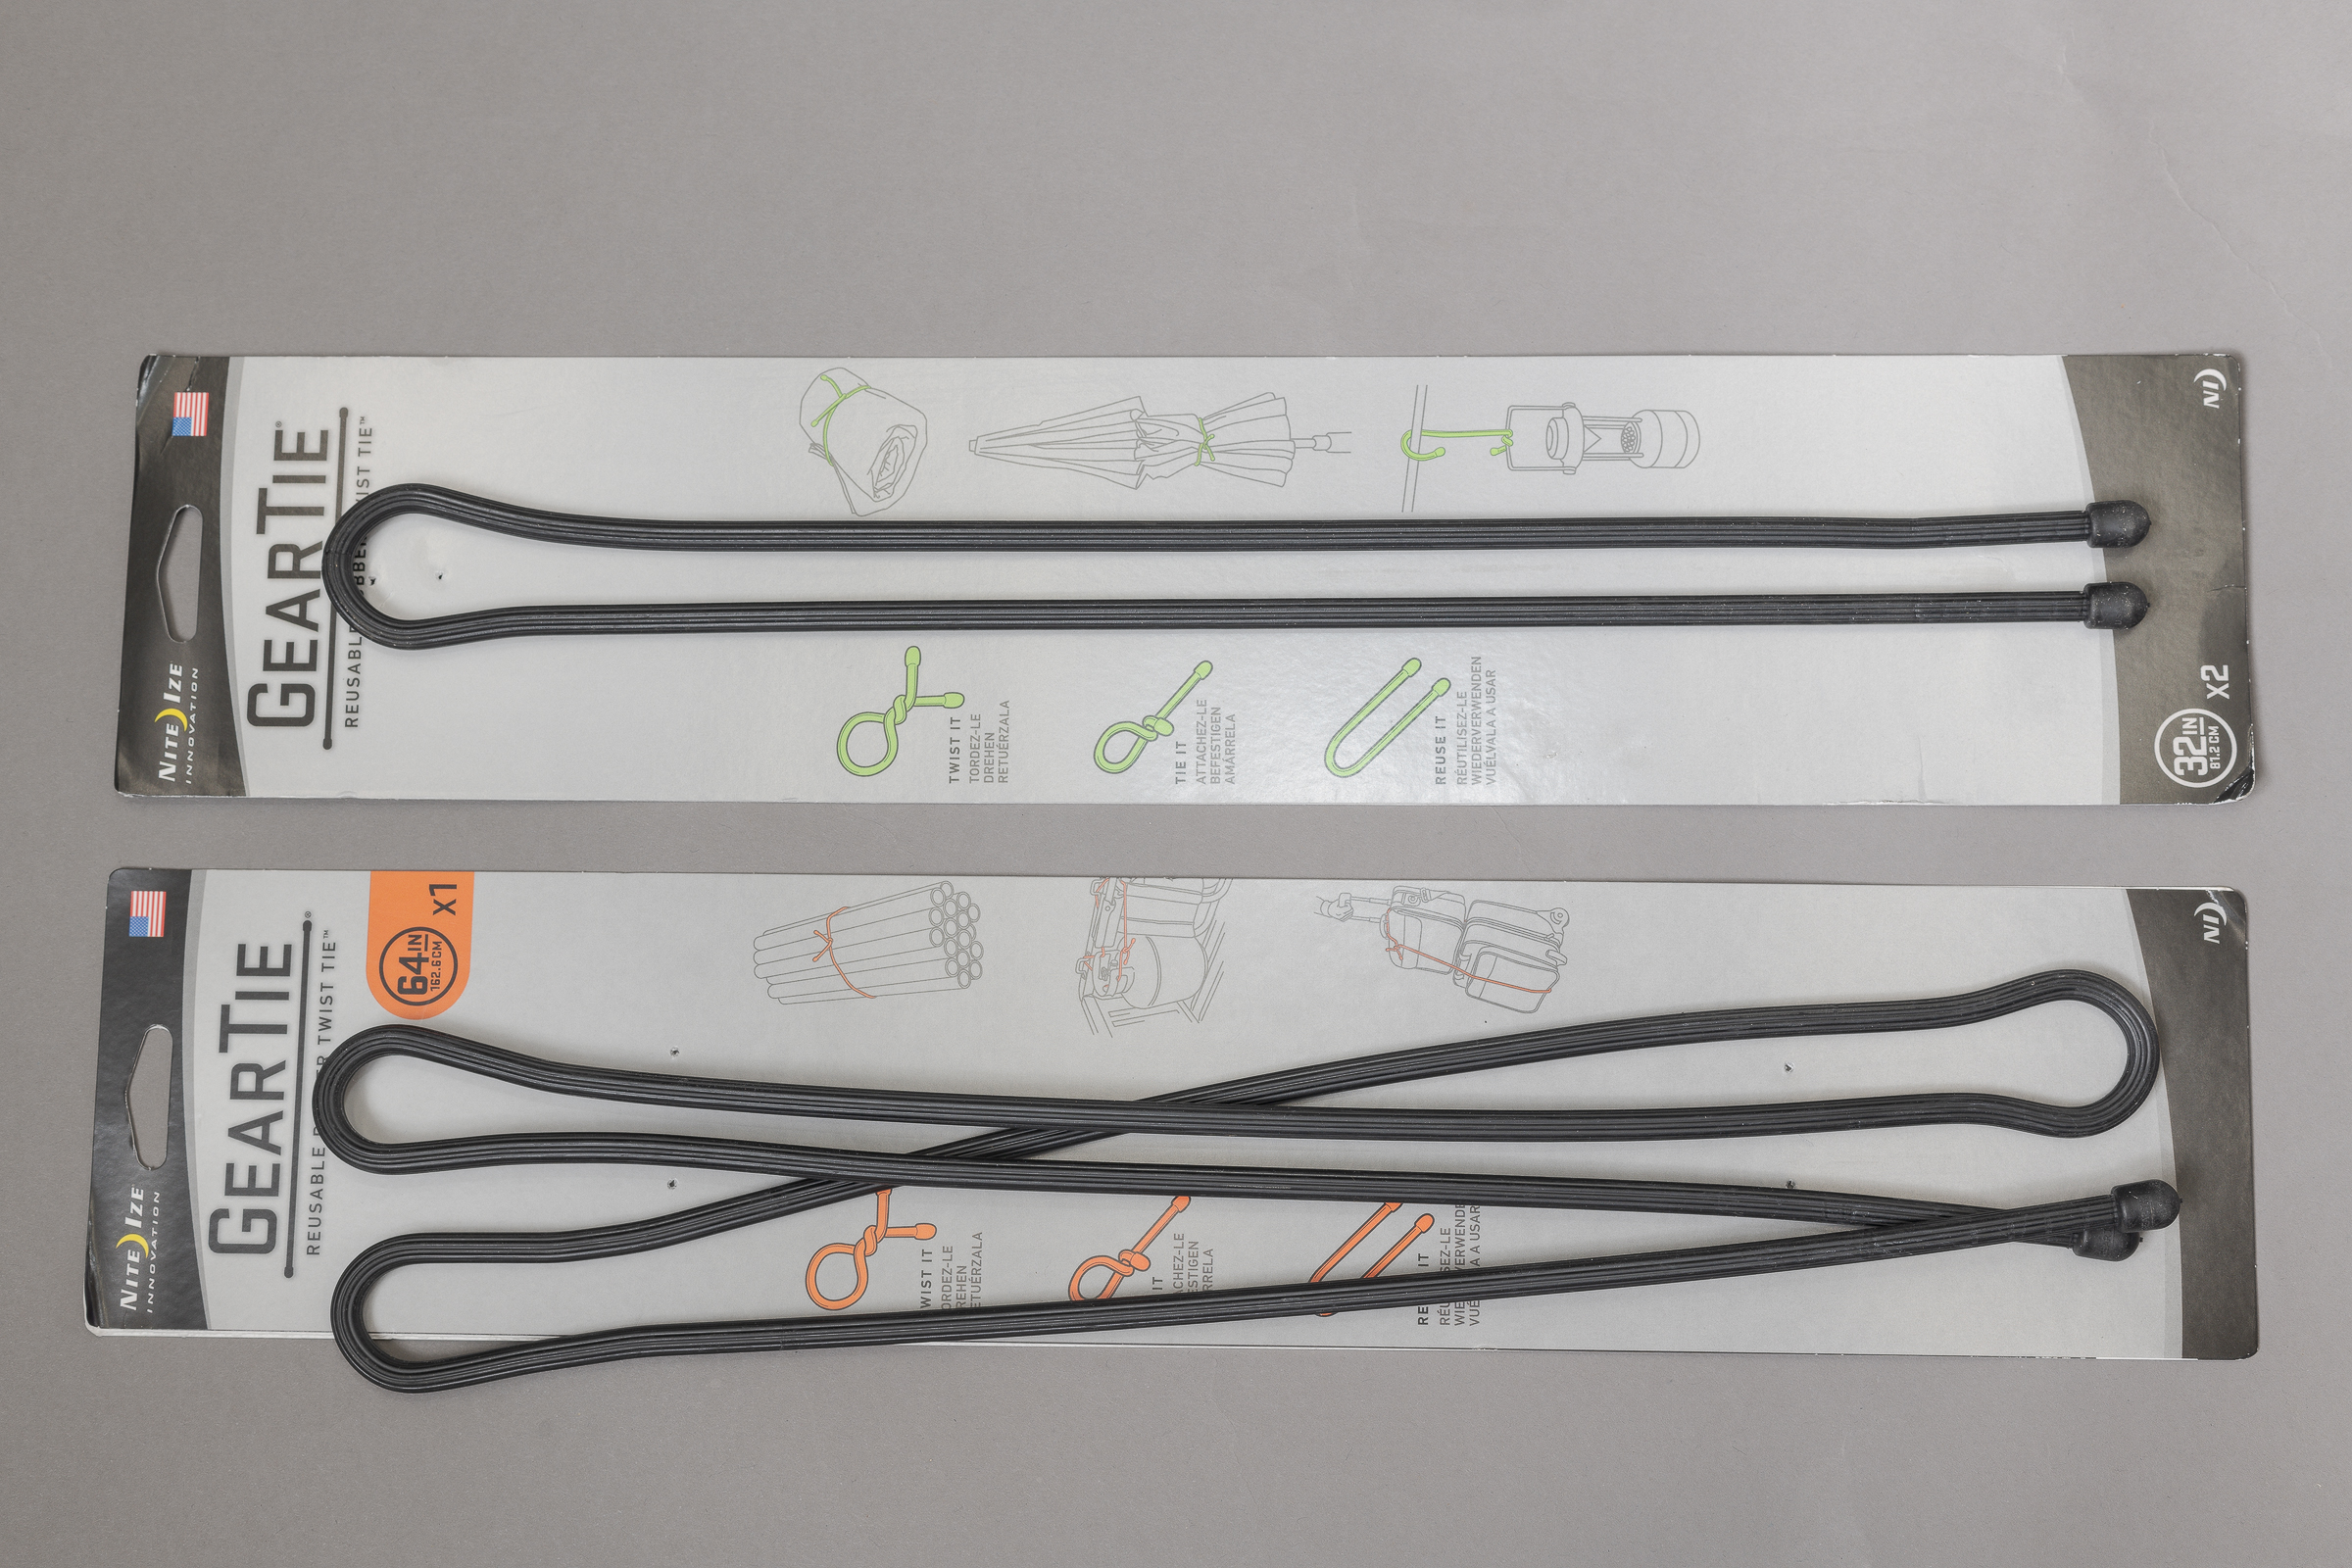
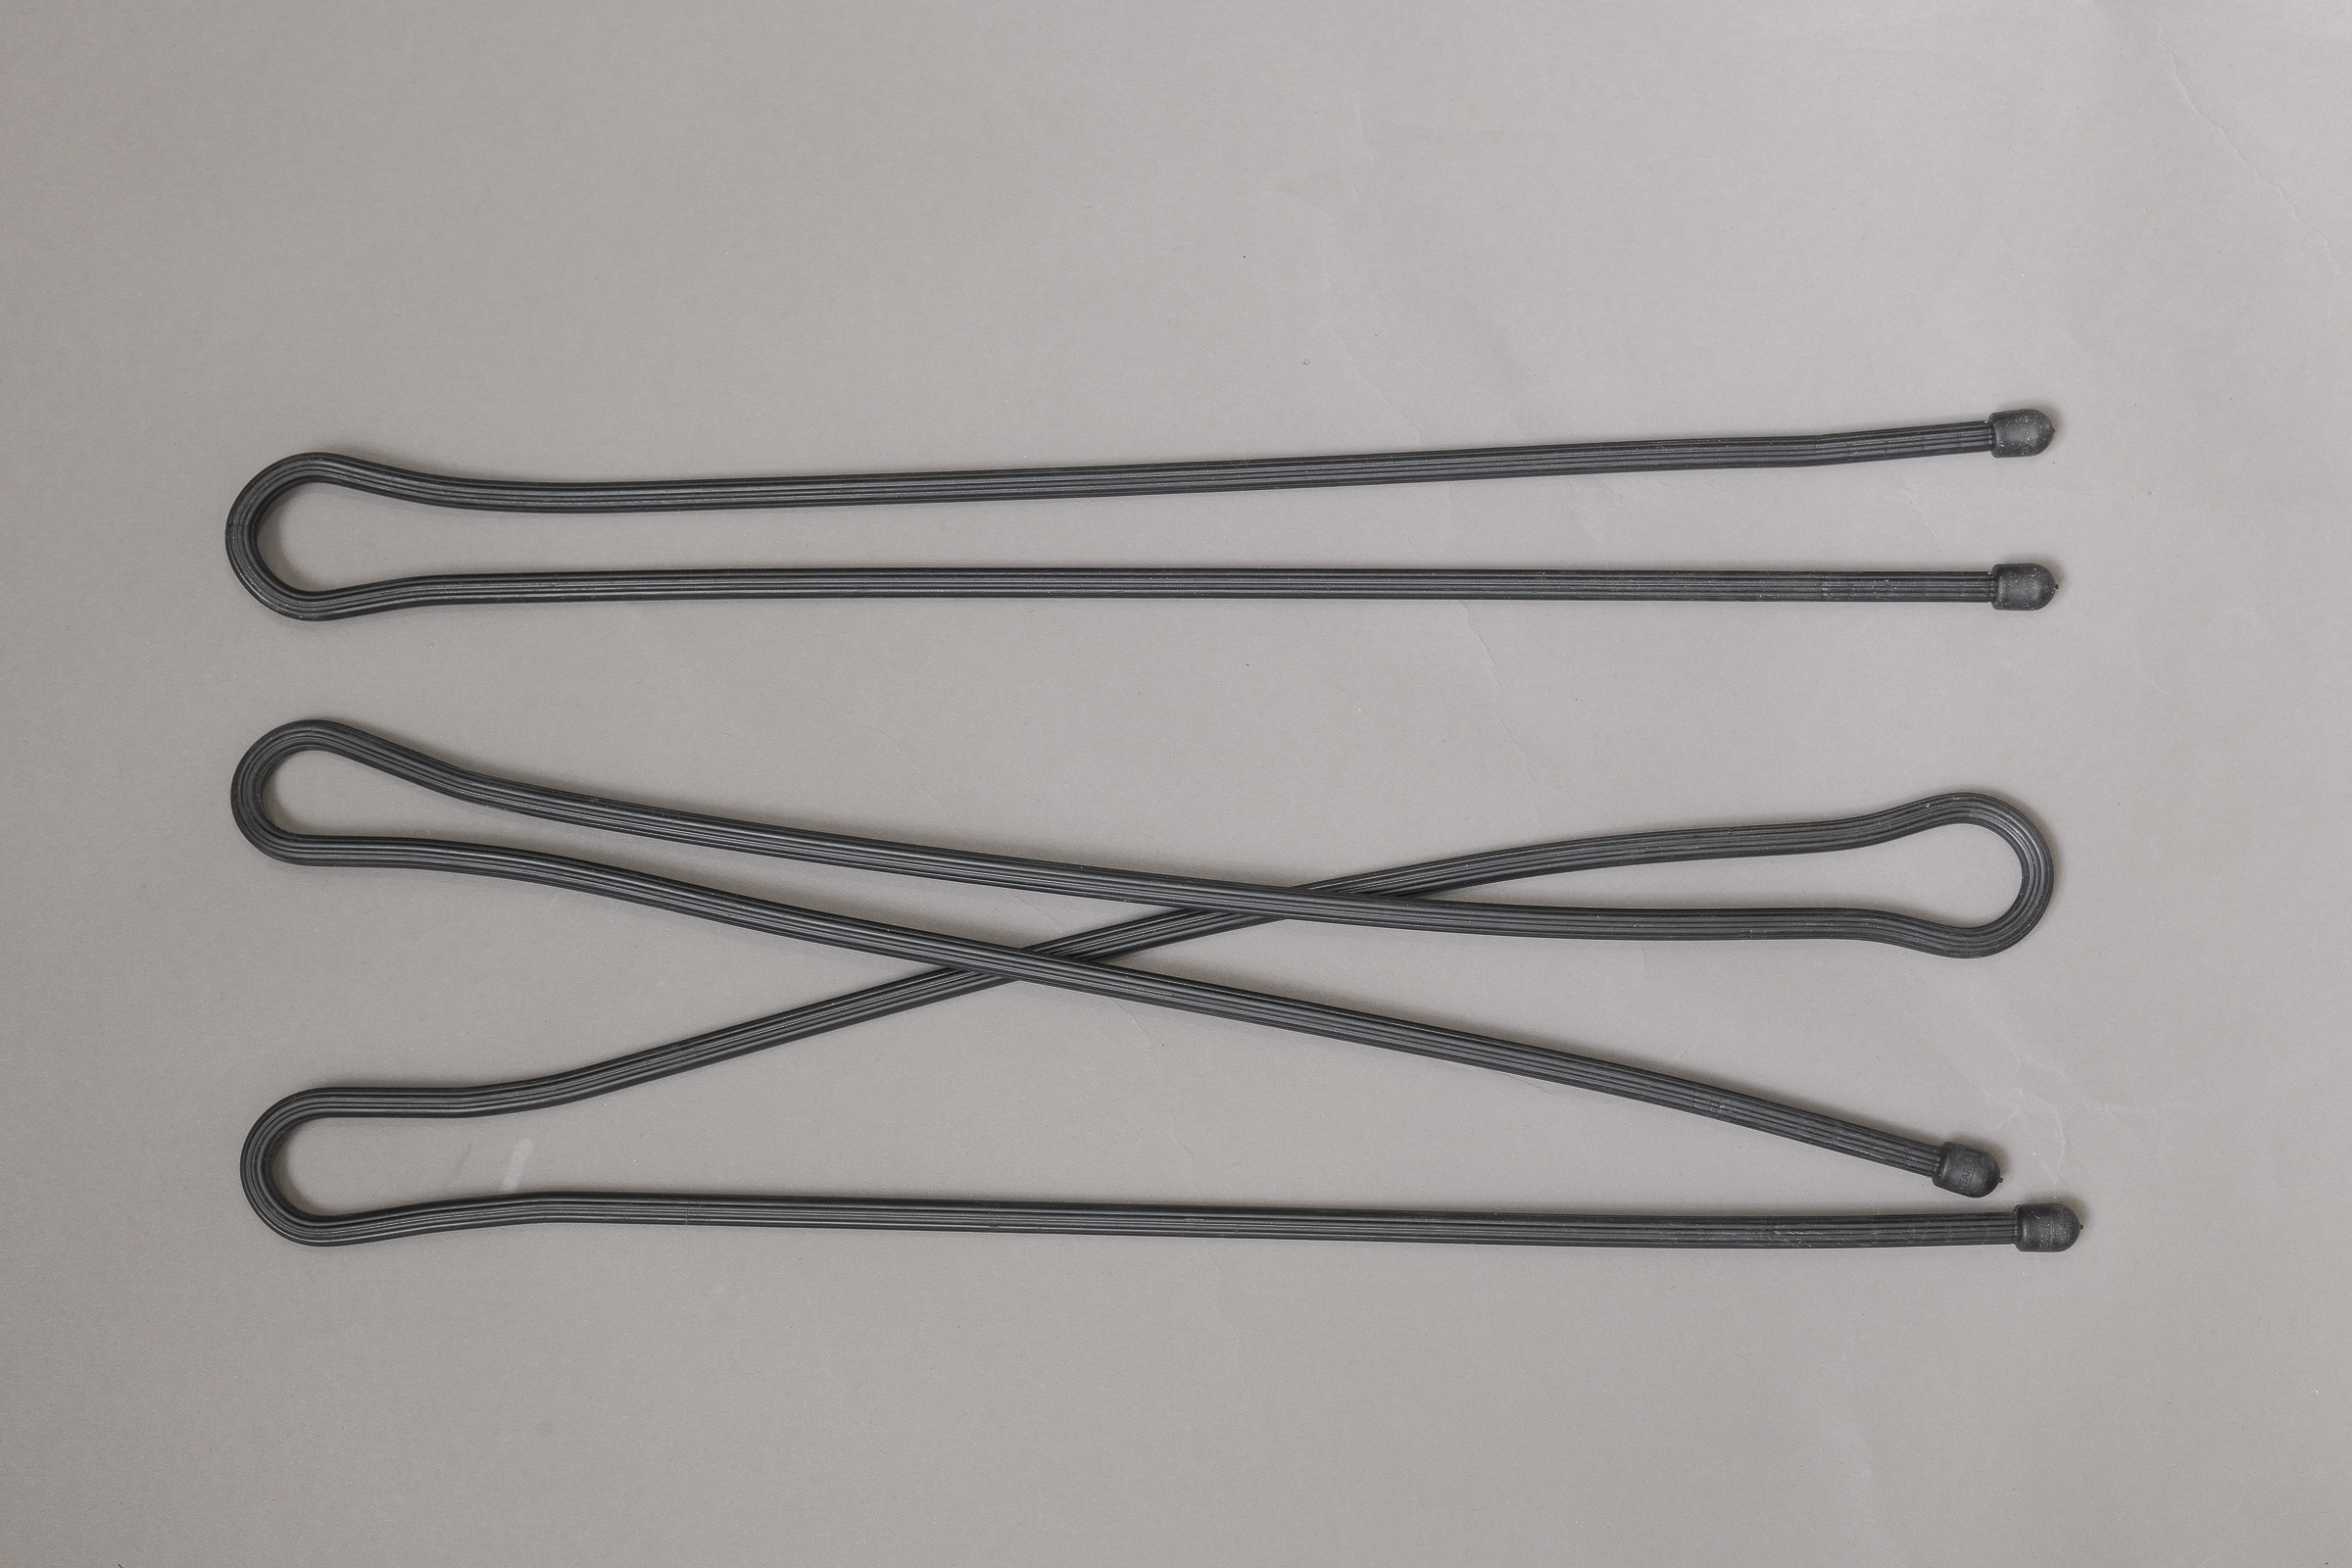
How do you hold loose items in place long enough to photograph them, especially when you’re by yourself? I encounter this with almost every tire failure and vehicle I analyze. I have tried every Velcro strap, bungee cord, string, wire, rope, and tape I can find. Each worked—a little. But I kept searching for a clean, simple, and reusable solution for years. I finally found it at The Home Depot! It’s a reusable rubber tie called Gear Tie by Nite Ize. You can get them at The Home Depot, Amazon, or directly from Nite Ize: Nite Ize Gear Ties (Click on image to enlarge, then click on back arrow to return.)Nite Ize Gear Tie Packaging. (ZEISS 50mm f/2 on Nikon D850.)Gear Ties are available from 3″ through 64″. I’ve found the 32″ and 64″ most useful for securing passenger/light truck and medium/heavy truck tire pieces, respectively.Nite Ize Gear Ties: 32″ Top; 64″ Bottom. (ZEISS 50mm f/2 on Nikon D850.)You can also use them to hold sprung doors, loose bumper covers, and loose pipes or wires in place while you photograph them. Conversely, Gear Ties are also handy for holding wires, trim, etc., out of your photographs.
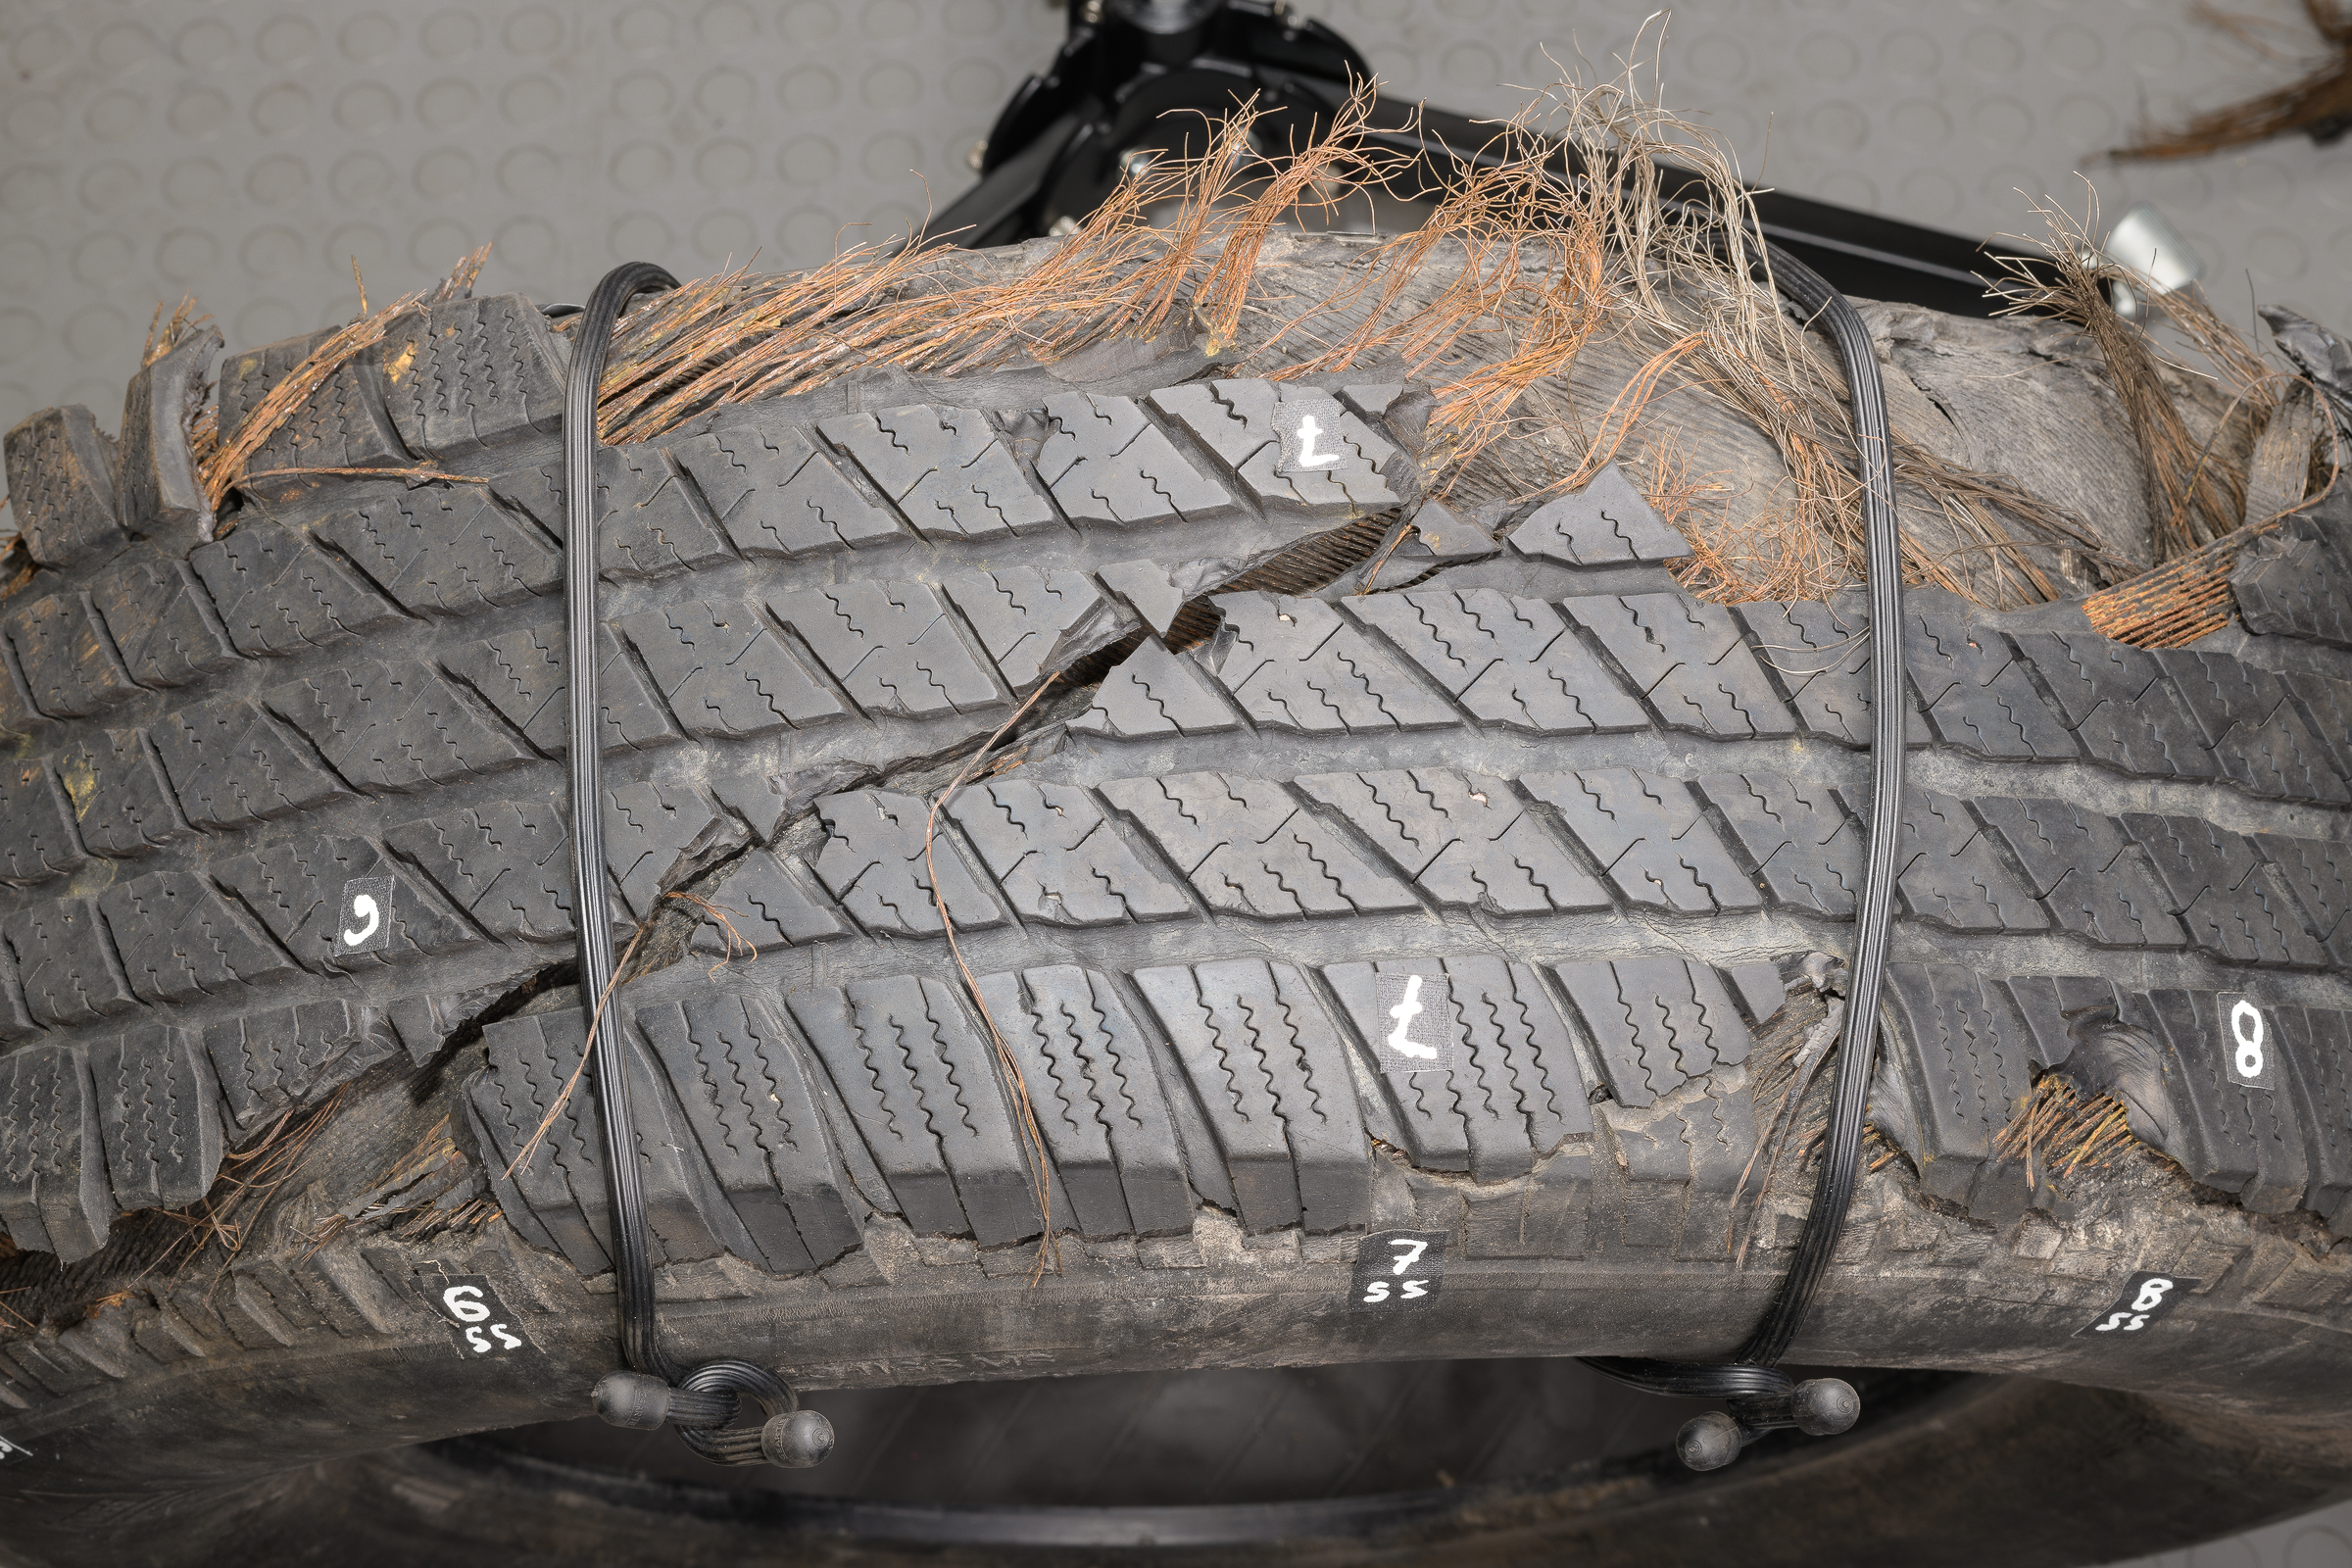
Here’s an example where two 32″ Gear Ties are holding two separated pieces from a passenger tire in place so I can photograph them.Using 32-inch Gear Ties on Tire Pieces .(ZEISS 50mm f/2 on Nikon D850.)I carry sizes from 12″ through 64″ with me. You won’t find more useful “third hands”. Highly recommended.
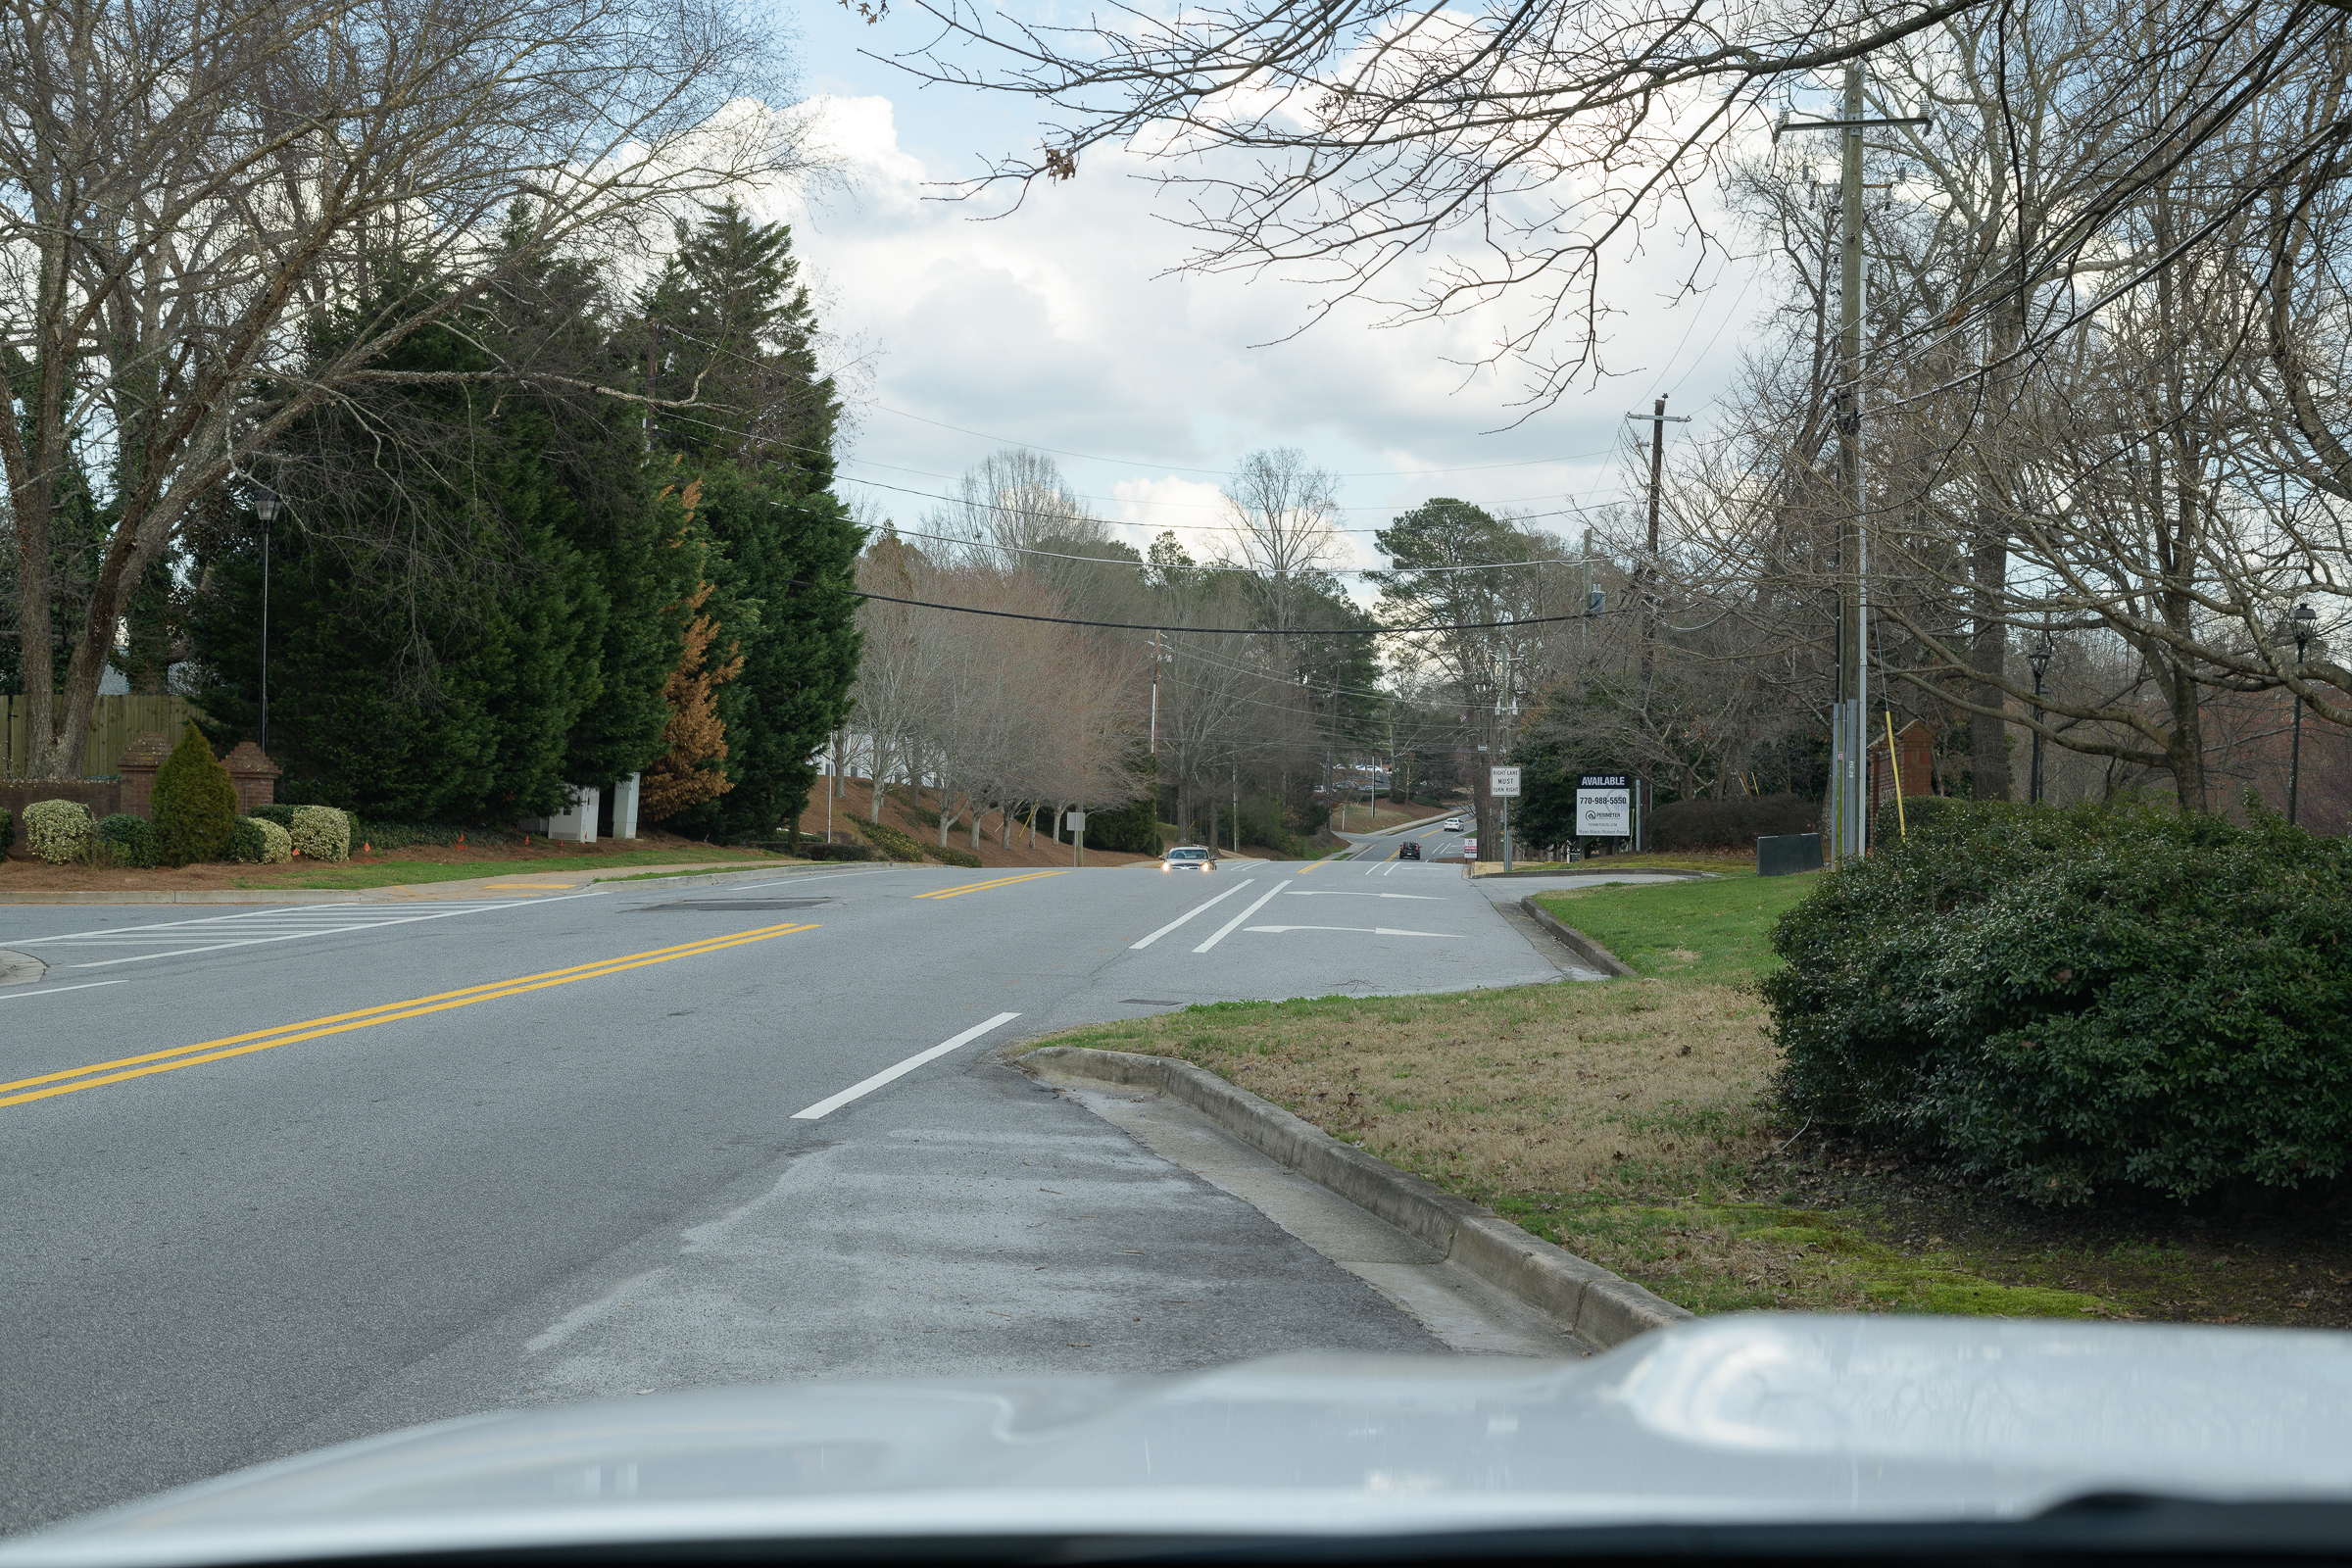
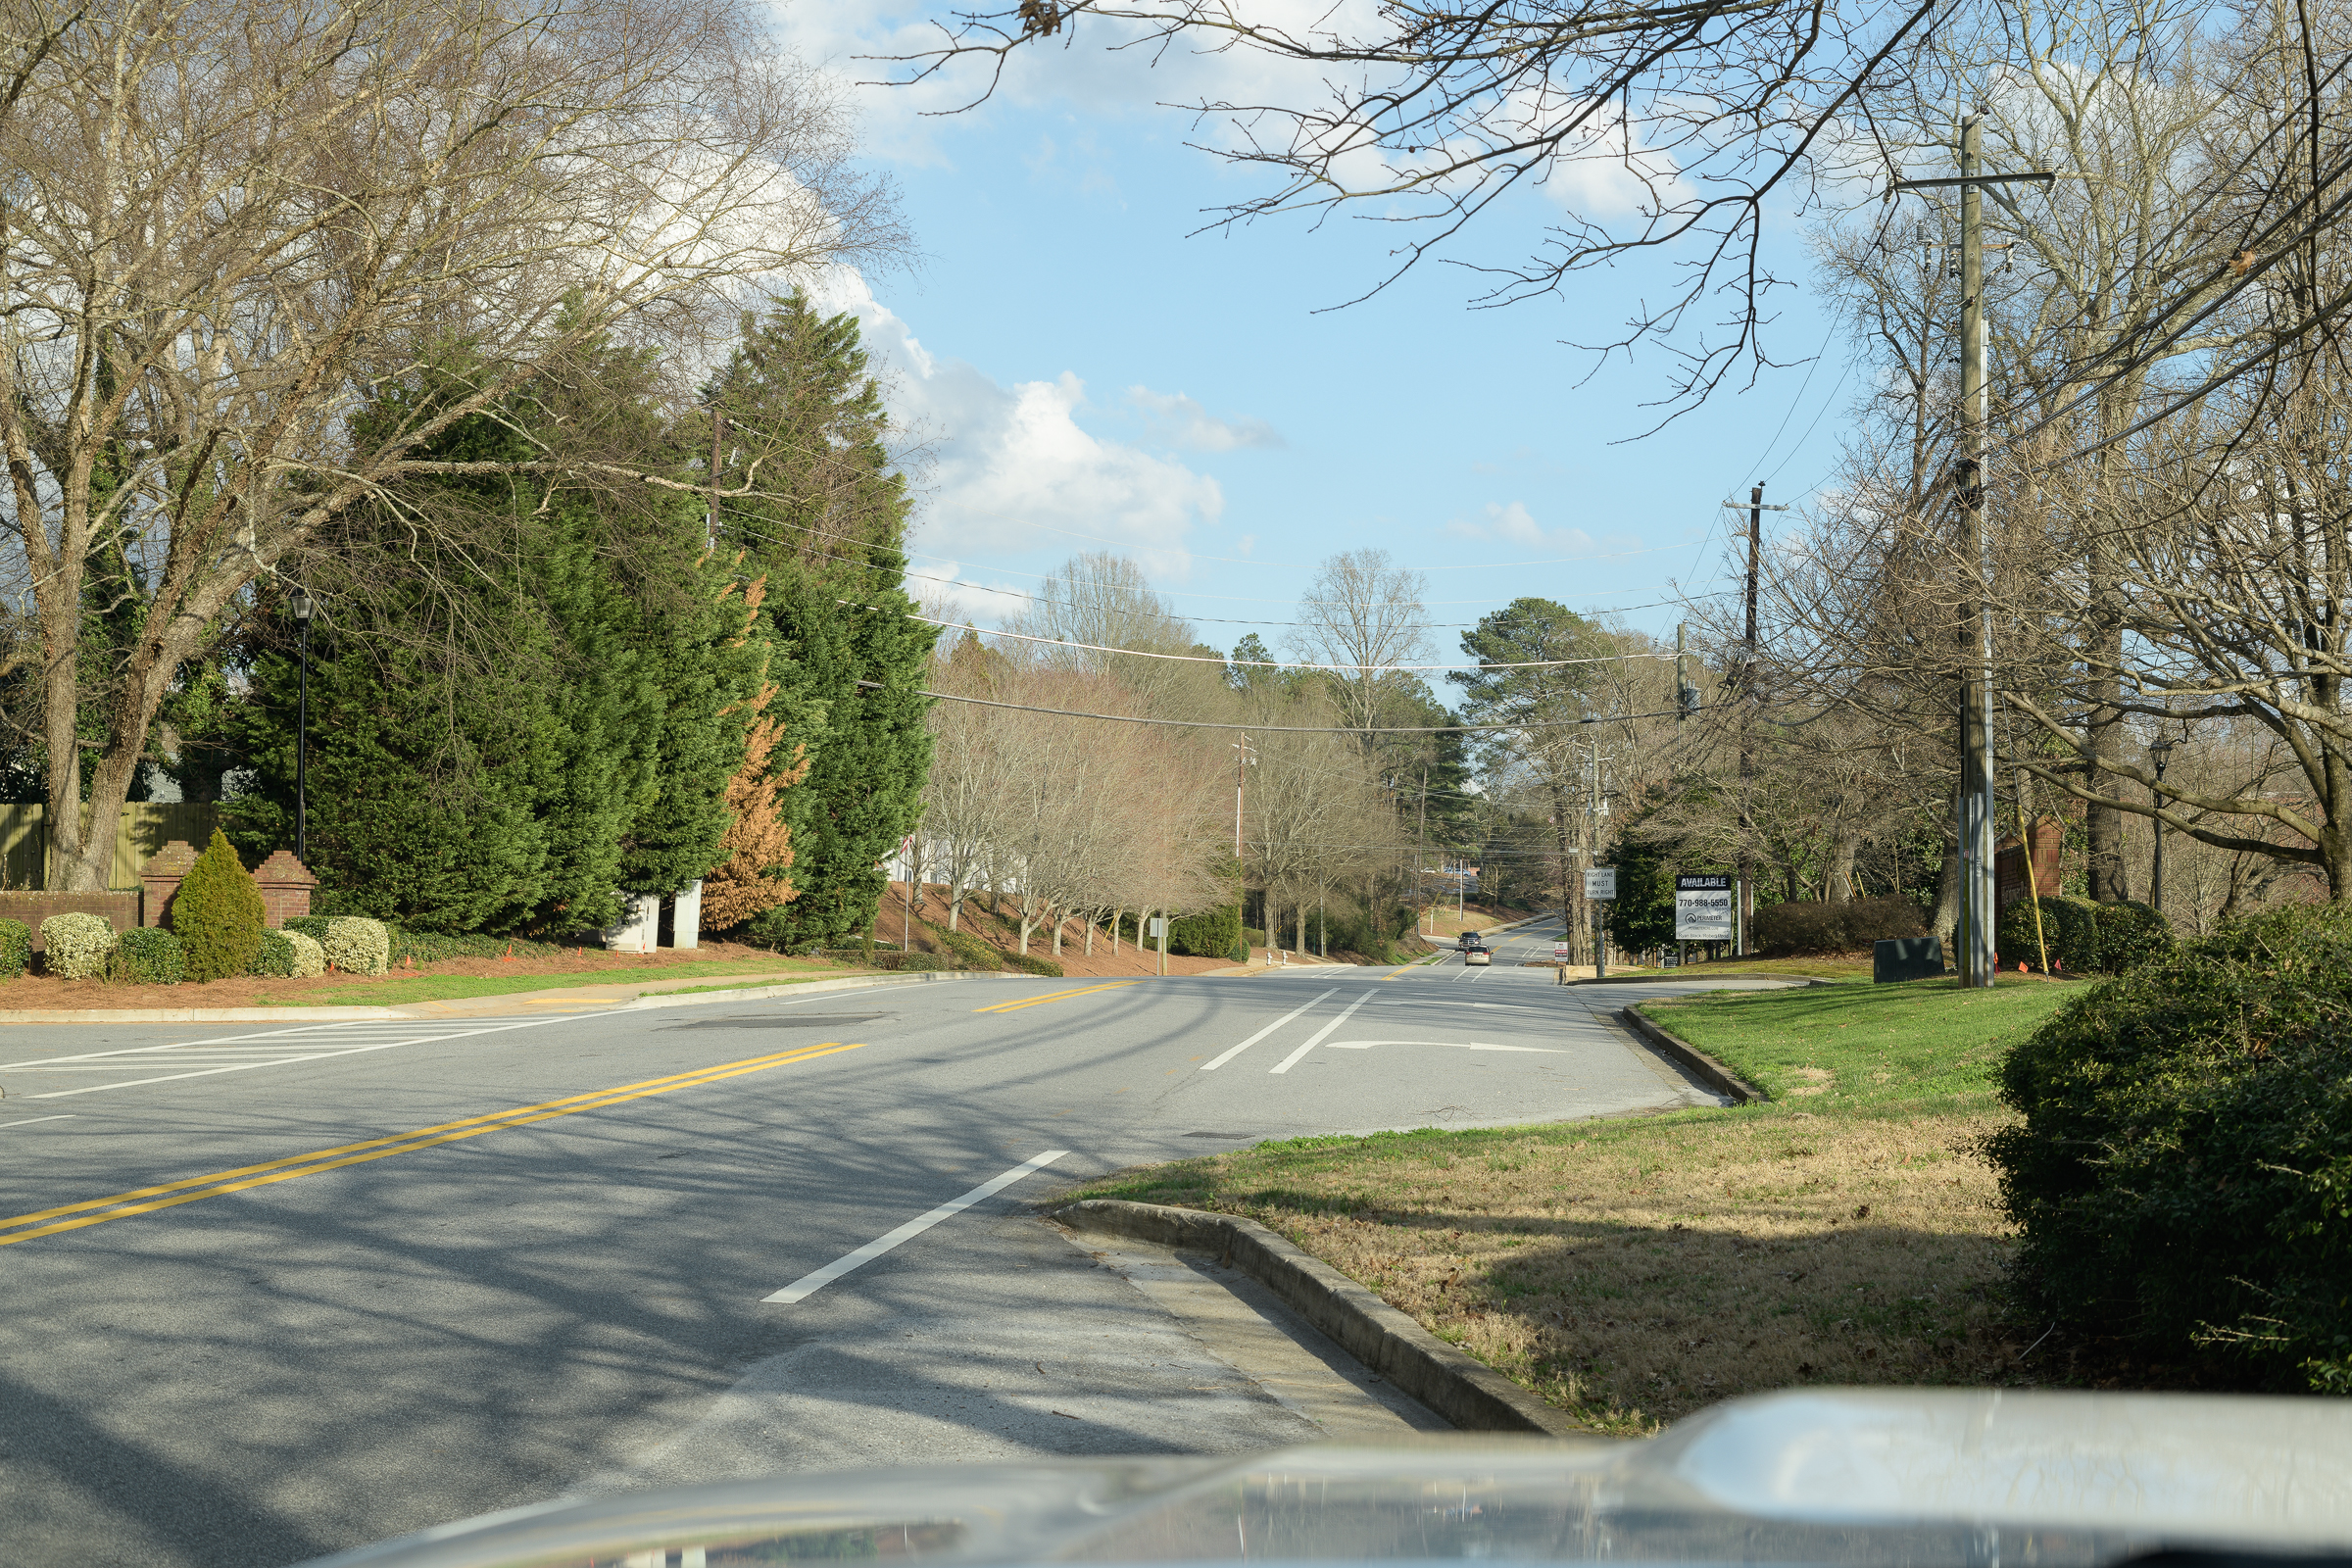
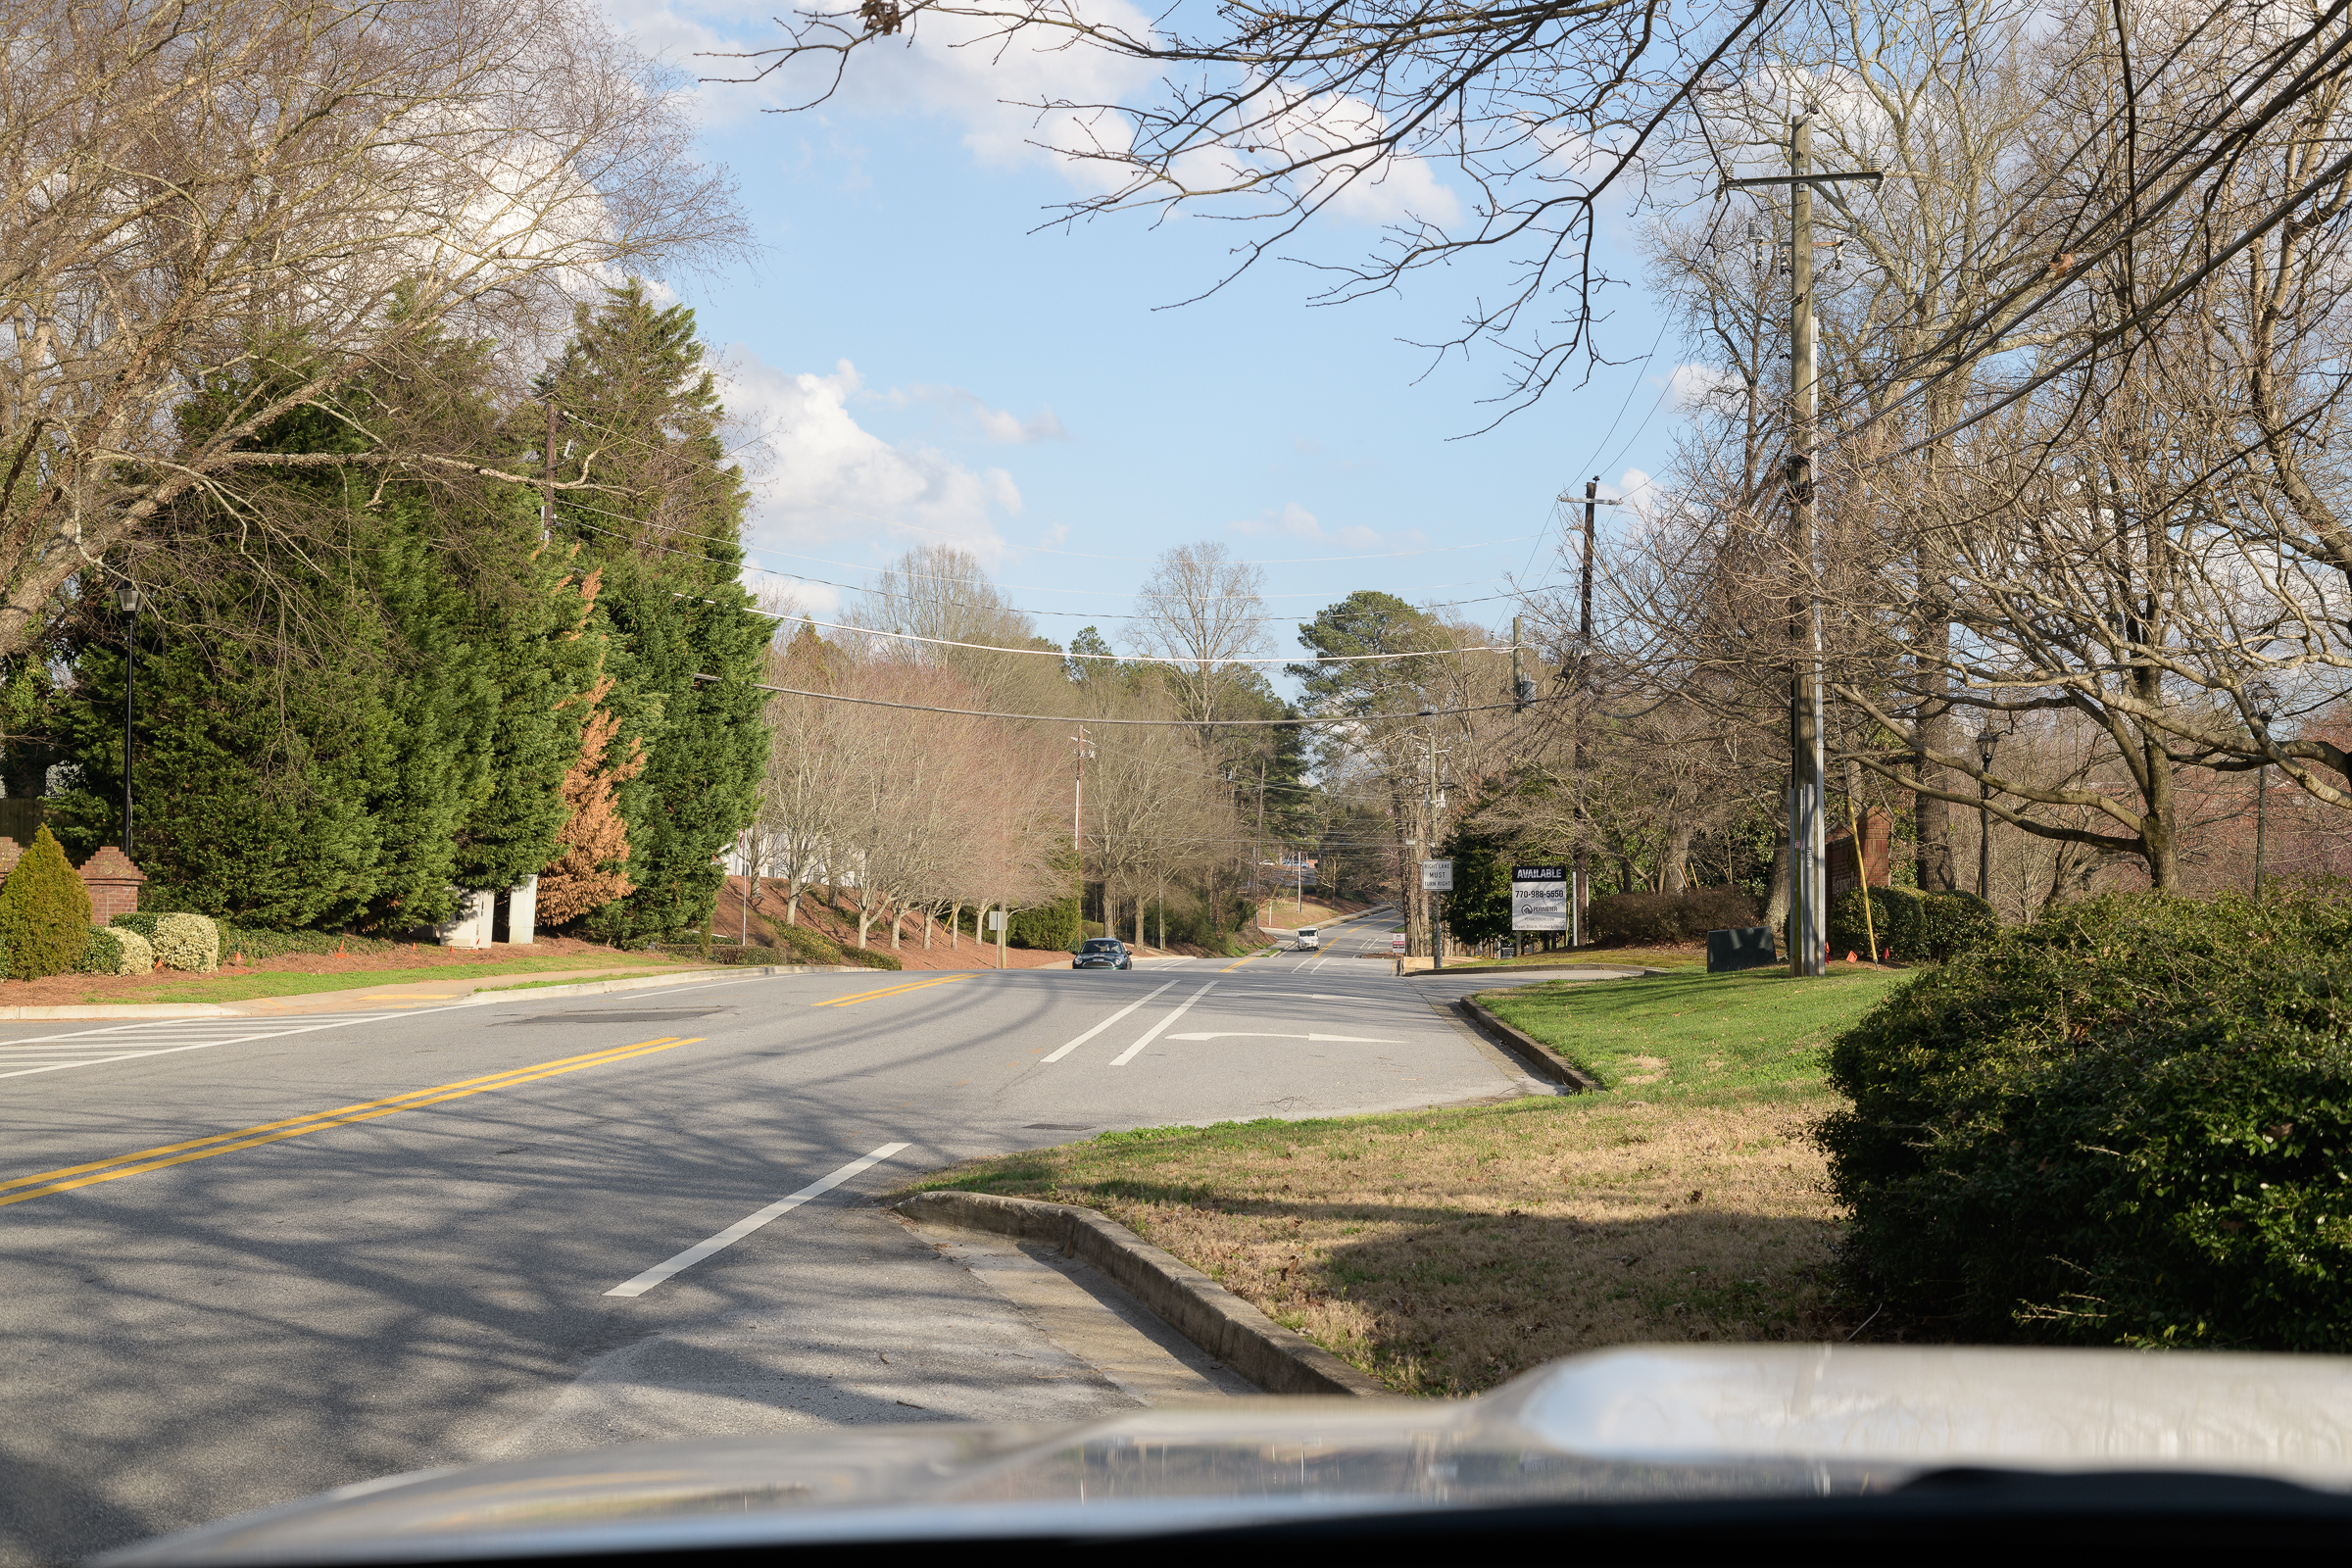
Photographing through a windshield for a driver’s eye view or for an accident site drive-through usually results in an unwanted color cast in the resulting images, regardless of your white balance (WB) setting. It can be most noticeable in Auto WB. This is due to the tint of the windshield. (Click on the images to enlarge, then click on the back arrow to return to the post.)Auto Sun White Balance with Overcast Skies (ZEISS 50mm f/2 Macro with polarizer on Nikon D850.)If you shoot raw files, you can correct this in your raw processor if there is a neutral-colored item in the scene. But if you’re shooting in JPEG, or if you’re taking a series of images while driving through a scene, you’ll want to get it right in the camera. WB can be difficult to adjust later, especially if there is no neutral tone in your image.
Setting a custom white balance, called Preset white balance on Nikon, varies from camera to camera, but is usually pretty straightforward. On Nikon, you enter the Preset white balance menu, point your camera toward a white or neutral source, and push the WB button. A custom WB is now set until you change it. With Canon, there is an extra step. After entering the custom white balance menu, you take and save a photograph of your neutral source. You then tell the camera to use that photograph for your WB for subsequent images.
If you’re shooting through any glass, your white or neutral source needs to be on the other side of the glass from your camera, and generally in the same light as the scene you’re about to photograph. This can be tricky when you’re by yourself or alongside a busy road.
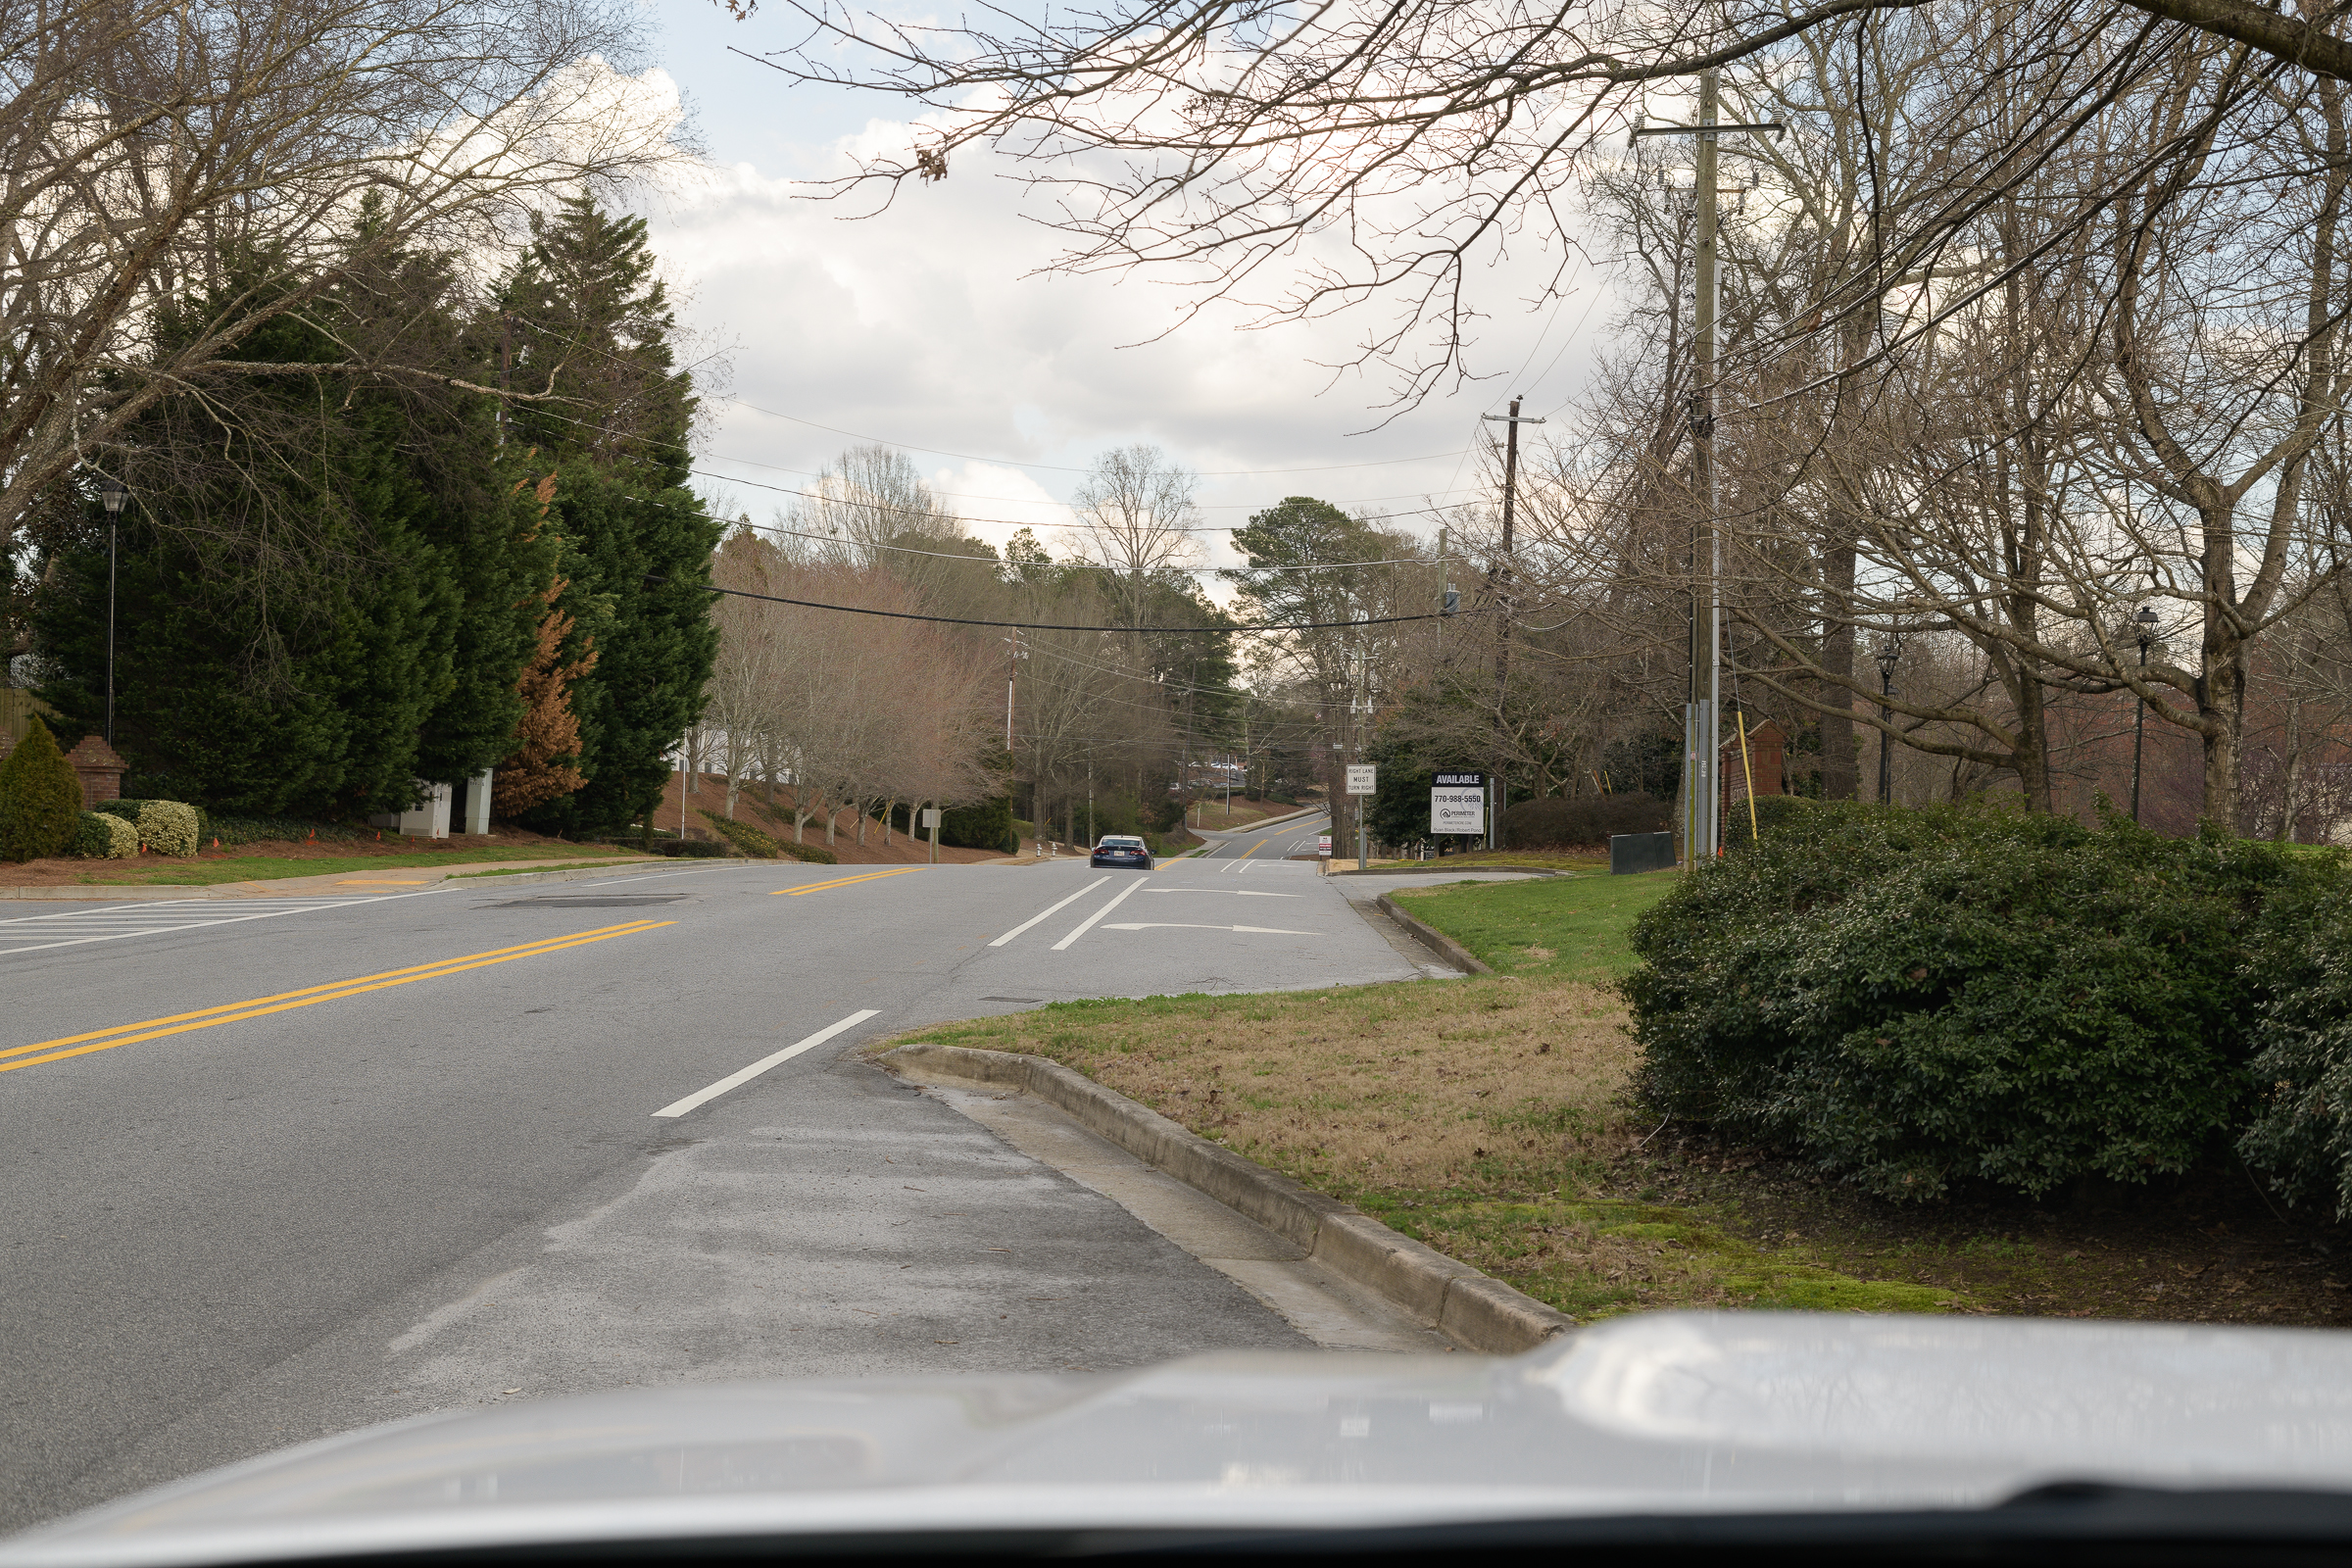
Both my trucks are white, so I point my Nikon toward their hoods (as long as they’re roughly in the same light as the scene I’m shooting), and press the WB button in PRE mode to save the new preset. Now I have correct colors for my scene. I can then drive down the road, and all the images I capture will have a consistent, correct white balance.Preset WB Off White Hood with Overcast Skies (ZEISS 50mm f/2 Macro with polarizer on Nikon D850.)What if you’re vehicle isn’t white? In a case like the scene shown here, you can set your custom white balance using the road (or a nearby sidewalk), as long as you can fill a good part of the frame with it. You might have to use a telephoto lens or zoom to isolate sections of your neutral source, but that will still give you a good custom WB.
Four more tips:
-1- DON’T DO THIS WHILE YOU’RE DRIVING!!! Like shown in these photos, set your custom WB from the shoulder of the road or even from a nearby parking lot.
-2- If you are using a polarizer, make sure you put the polarizer on and rotate it to get the effect you want before you set your custom WB.
-3- Don’t set your custom WB while you’re standing outside of a vehicle, then get in and start shooting through the windshield. The WB won’t be correct, and you’ll be back to your original problem.
-4- Don’t forget to change your WB after you’re done shooting through your windshield, or your subsequent images will have an undesirable color cast.
Here are examples in full sun:Auto Sun WB in Full Sun (ZEISS 50mm f/2 Macro with polarizer on Nikon D850.)Preset WB in Full Sun (ZEISS 50mm f/2 Macro with polarizer on Nikon D850.)Like everything in photography (and in life, for that matter), it may take a little practice before this becomes second nature. Make sure you practice setting your custom WB through your own vehicle’s windshield before trying it for the first time at an accident site.
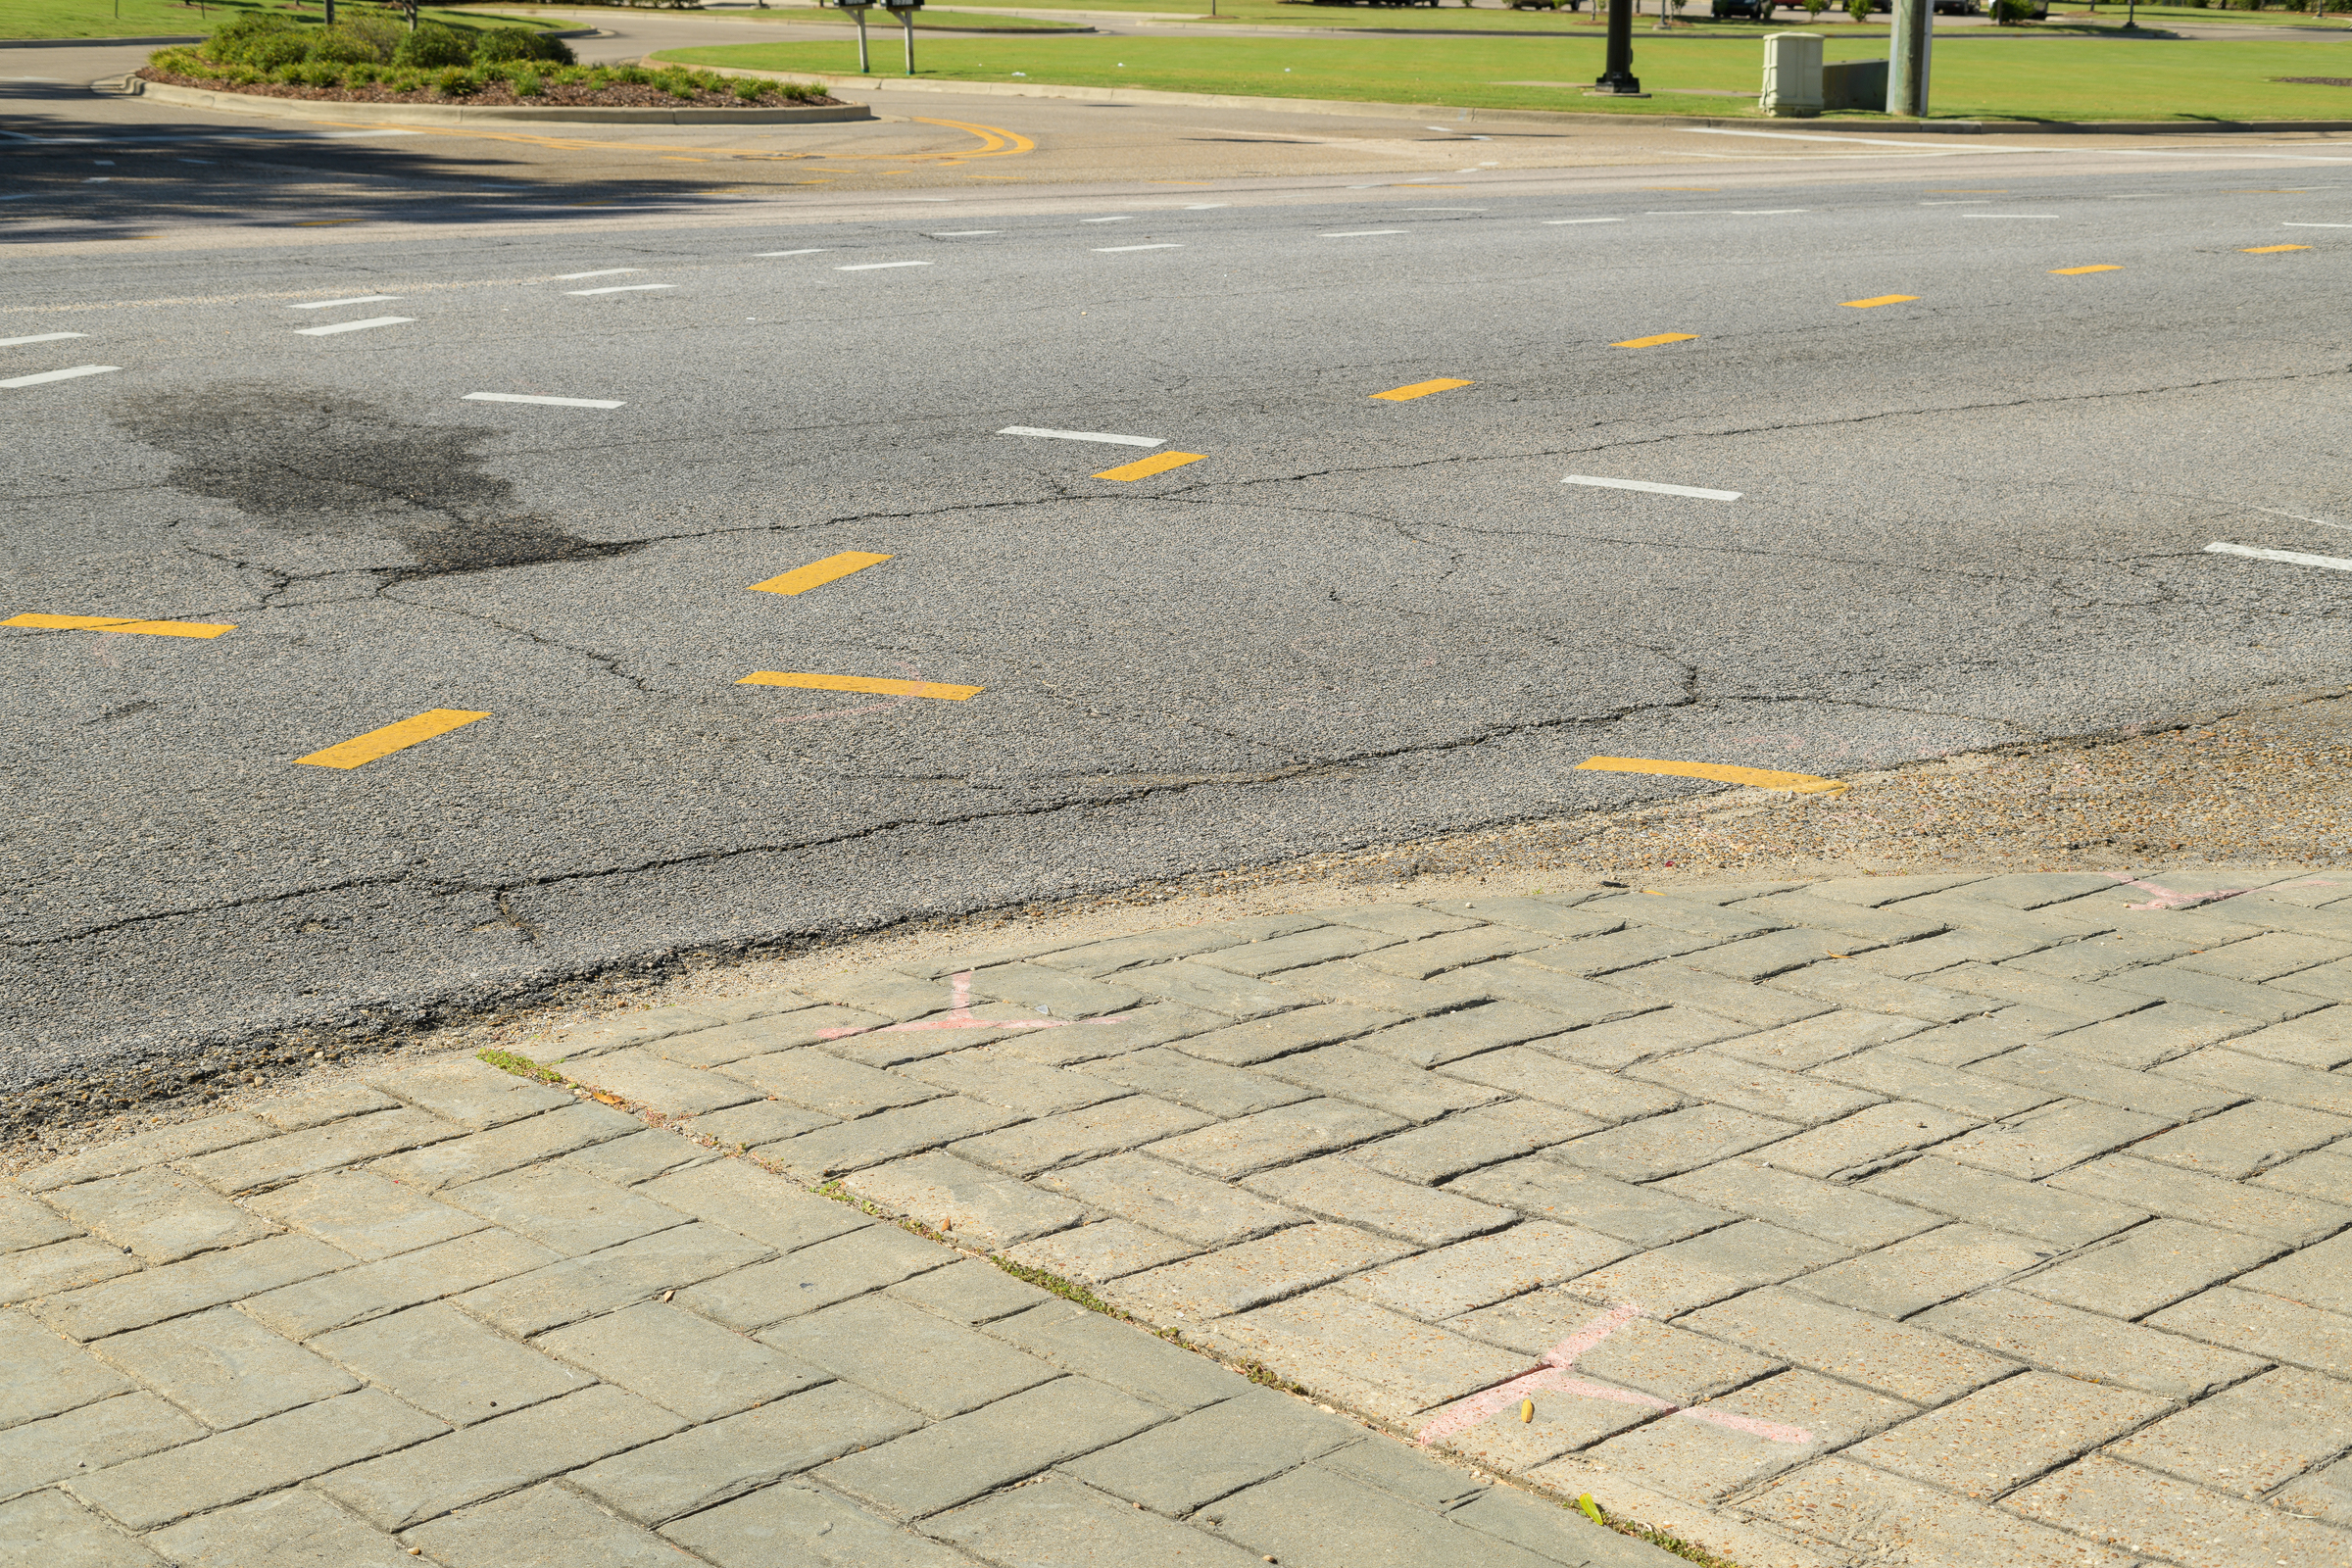
At times, when you get to an accident site, the paint marks made by investigating officers have faded such that they don’t readily show up in photographs. [Click on image to enlarge, then click back arrow to return.]
Police Paint Marks as Found. (ZEISS Milvus 50mm macro on Nikon D850.)
While these can still be documented and measured, it would be helpful to show them more distinctly in your photographs.
You can easily enhance paint marks in Photoshop using a mask on a Hue Saturation layer:
-1- Make a loose selection around the marks with the lasso tool.
-2- Feather the selection.
-3- Select the paint color using the Targeted Adjustment Tool.
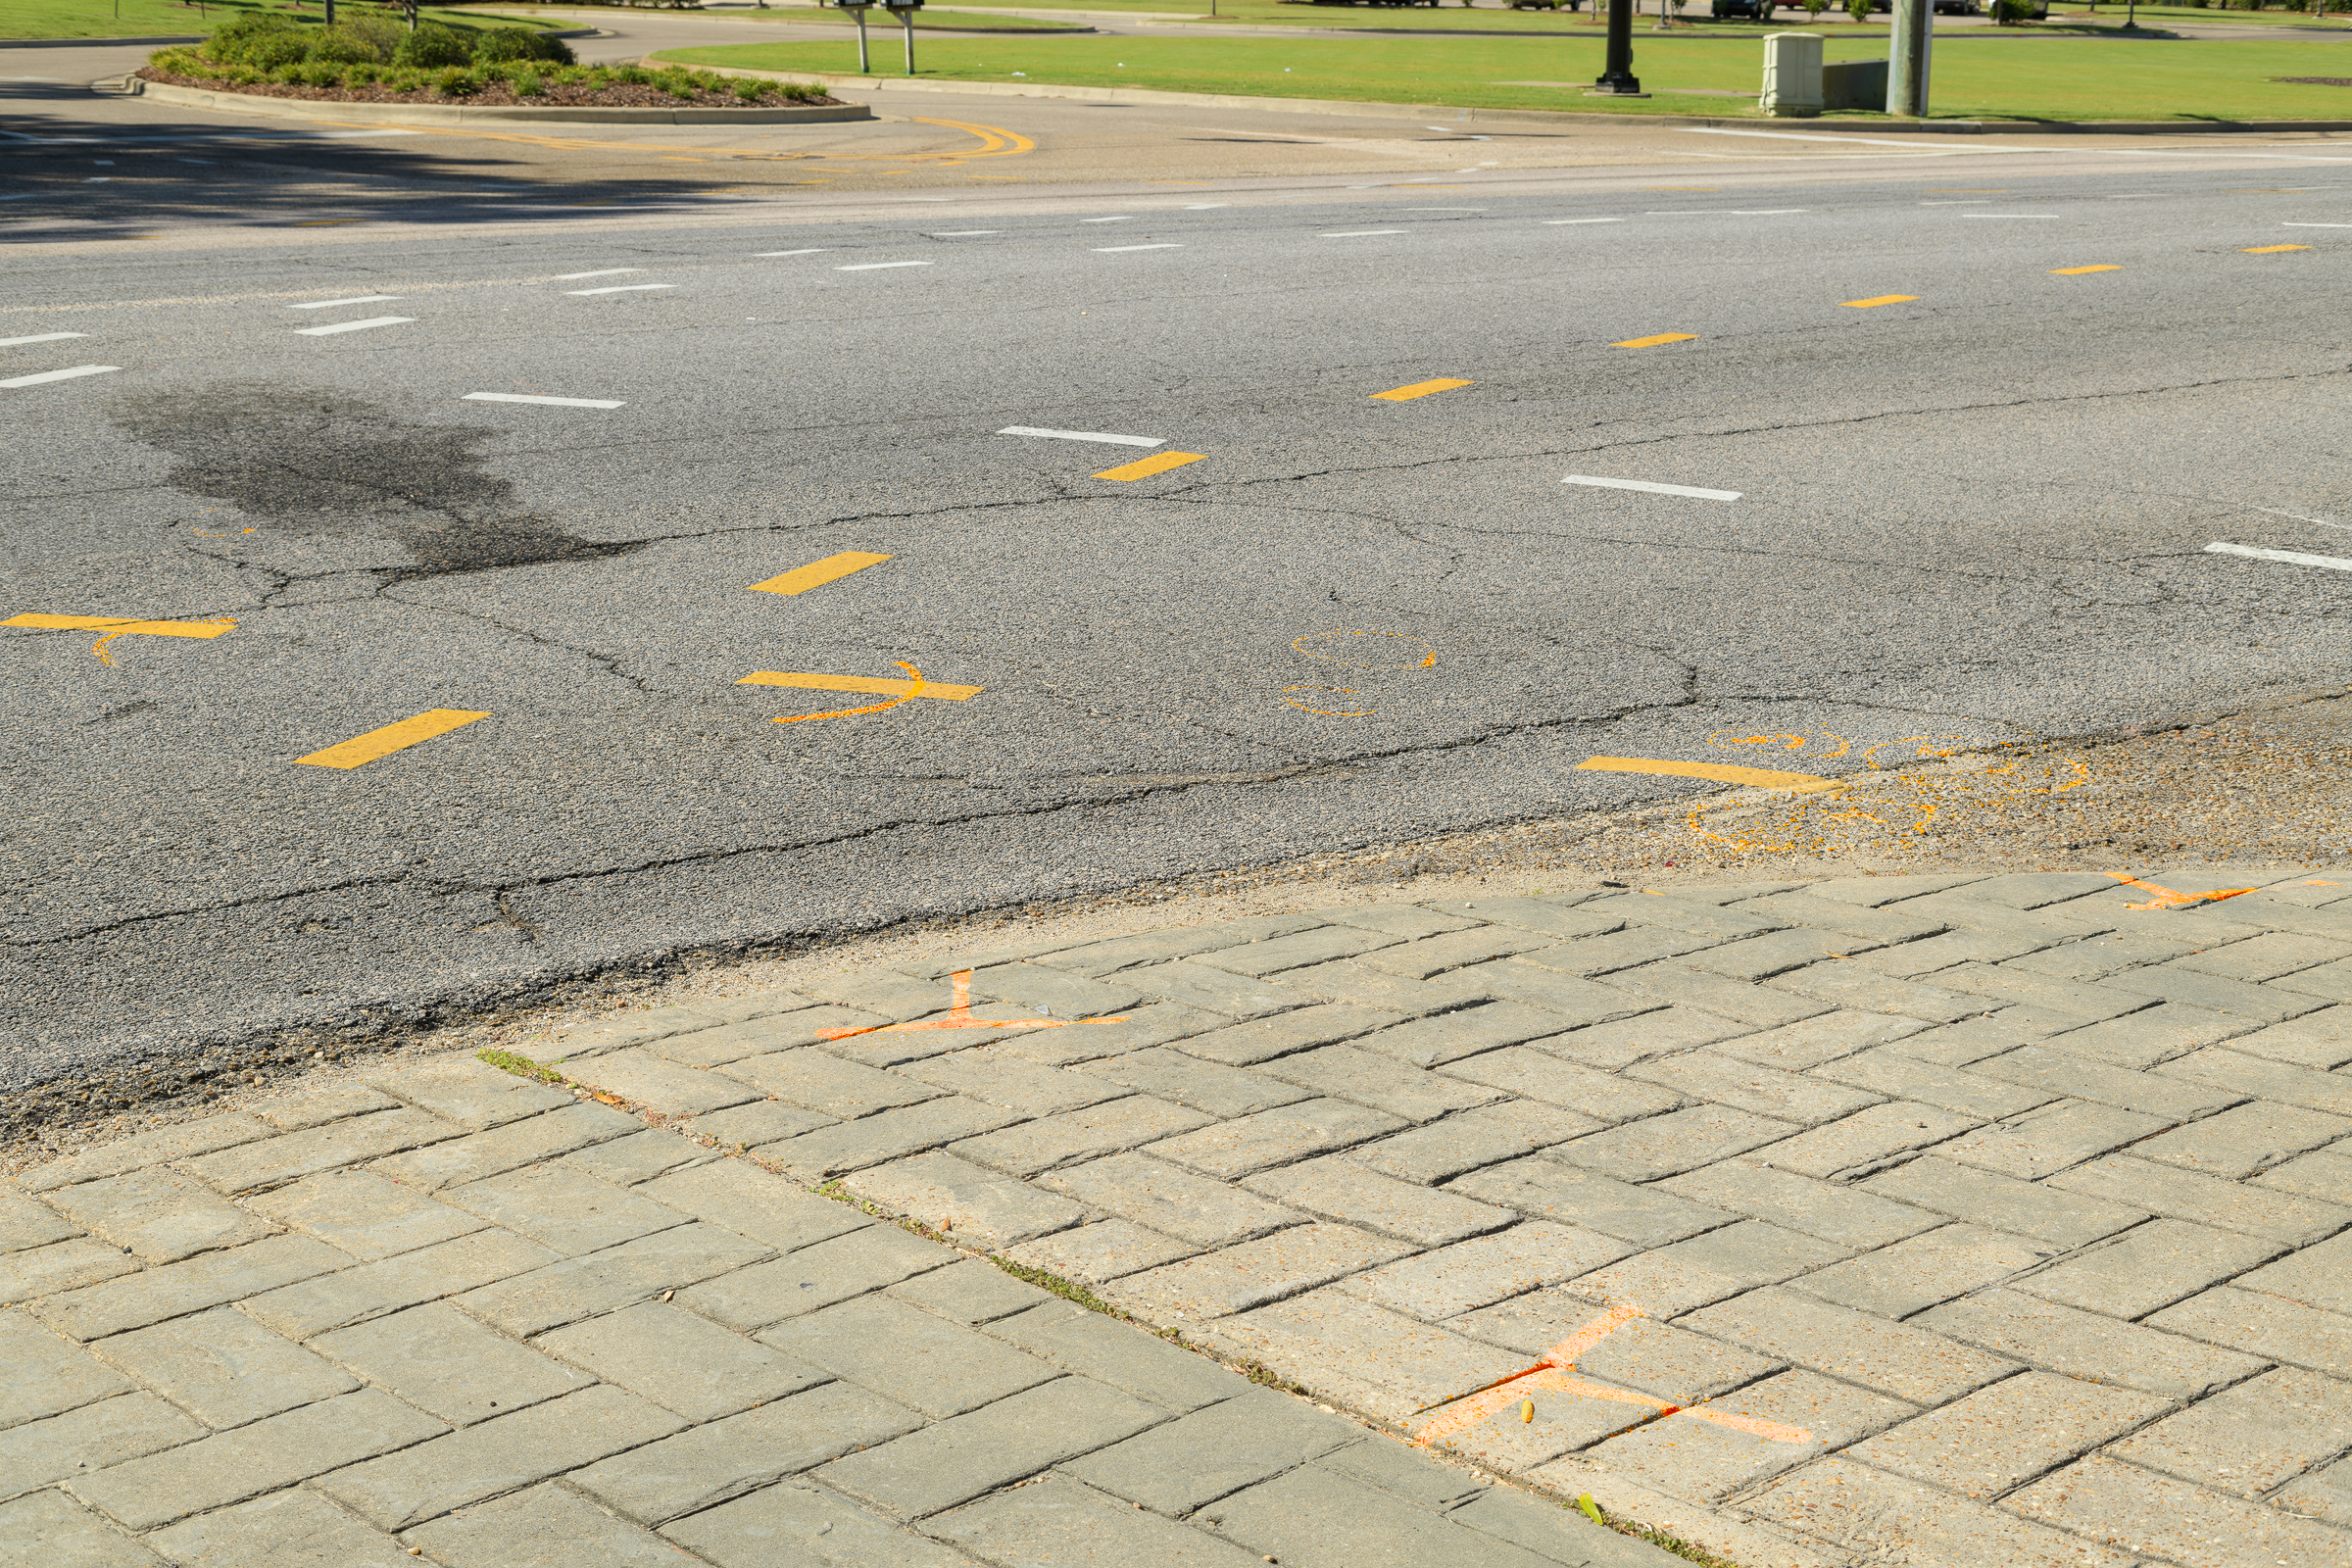
-4- Increase saturation until the paint marks are distinct. In this case, I increased the saturation of the red channel to 100%. [Click on image to enlarge, then click back arrow to return.]
Police Paint Marks – Enhanced. (ZEISS Milvus 50mm macro on Nikon D850.)
To ensure I didn’t enhance the yellow lane stripes, I added them to the mask by simply painting out areas I didn’t want enhanced using a feathered black brush.
I only shoot raw images, so I can’t save over my original image. When making adjustments with layers, like these localized saturation enhancements, I save the image with all its layers and masks as a native Photoshop PSD file. That way, I always have the original image I made, and can document that I have only enhanced, and not altered, the photograph.