Many lenses have an odd number of aperture blades, but several have an even number. For most photography, there is little to no noticeable effect.
There is, however, a noticeable difference if you have a “sun star” in your image. A “sun star” is the name given to noticeable rays—day or night—emanating from the sun or from an artificial light source. A sun star is created when the lens is stopped down. The more the lens is stopped down, the larger the rays of the sun star.
An even number of aperture blades results in the same number of sun star rays. As the image below shows, a lens with ten blades (the TTArtisan 50 mm f/2 lens), stopped down to f/16, resulted in ten pronounced rays from a street light at night. [Click on image to enlarge, then click back arrow to return to this post.]
Made with Nikon Z 8 with TTArtisan 50 mm lens at f/16, 3.0 sec, ISO 64.
An odd number of blades results in twice the number of rays. Using the same camera as above, but switching to a lens with nine aperture blades (the Nikkor Z 50 mm f/1.2 S lens), also stopped down to f/16, resulted in eighteen sun star rays. [Click on image to enlarge, then click back arrow to return to this post.]
Made with Nikon Z 8 with Nikkor Z 50 mm f/1.2 S lens at f/16, 2.5 sec, ISO 64.
Takeaways:
-1- Day or night, “sun stars” are often created from small, bright light sources in a photograph when lenses are stopped down.
-2- An even number of lens aperture blades creates the same number of sun star rays. An odd number of blades results in double the number of rays.
-3- An even number of blades creates more pronounced rays than does an odd number of blades.
-4- Sun stars are usually undesirable in forensic photographs. A future post will describe how to control the prominence of those rays. But if you must stop down for depth of field, an odd number of lens aperture blades will create more rays, but they will be less obtrusive.
The closer you get to your subject, the less depth of field (DOF) you have. As you can imagine, when you photograph close-up or macro or micro subjects, you get progressively even less DOF.
In close-up—or closer—shots, even stopping down to your smallest aperture won’t give you enough DOF to make much of a difference. Besides, if you fully stop down your aperture, any small gain in DOF will likely be negated by diffraction, which softens the entire image.
Focus stacking blends multiple images with increasingly further focus points into a single image. This allows you to create an image with the specific DOF you want for your subject . You might not need everything in the foreground or background sharp, but you control what is or isn’t in focus by how many images (called slices) you use.
For this example, I wanted the entire broken lug stud in focus, but wasn’t concerned about the hub surrounding it. As shown below, even stopping down to f/16 didn’t give sufficient DOF to show the entire fracture surface. [Click on image to enlarge, then click on back arrow to return to this post.]
Single image at f/16 made with Nikon Z 8 with Nikon Z 50 mm MC macro lens. One Profoto B1x studio strobe on either side with Godox T365N II flash mid-left. f/16, 1/200 sec, ISO 64.
Notice how the focus quickly falls off toward the farther end of the broken lug stud fracture surface. Both the foreground and background of the hub are out of focus, but that’s okay since they’re not the subject of the photograph.
To get the entire lug stud to be in focus, I made nine separate photographs of the fracture surface with each one focused slightly further from the camera. [Click on image to enlarge, then click on back arrow to return to this post.]
Each individual image from closest focus upper left to farthest focus lower right, each made with Nikon Z 8 with Nikon Z 50 mm MC macro lens. One Profoto B1x studio strobe on either side with Godox T365N II flash mid-left. Each component image f/16, 1/200 sec, ISO 64.
In Photoshop, I brought all of the raw frames (slices) into a single image as separate layers. I aligned the layers, then stacked them using Auto-Blend Layers. As shown below, using layer masks, this function blocked the out of focus areas on each slice. Only the sharpest parts of each layer, or slice, remained. [Click on image to enlarge, then click on back arrow to return to this post.]
Screenshot of Photoshop layers with their focus stacking masks.
I cropped the image back to its original size and saved it with all its layers as a PSB Photoshop Big) file. With ten 45 megapixel layers, the file was over 2 GB, which is larger than can be saved as a PSD (Photoshop Document) file. I then flattened the image, resized it, output sharpened it, and saved it as JPEG. Note: I still always keep the PSB file with the layers and layer masks to be able to show what I did, if asked.
Below is the result of the focus stack blending of the nine layers shown above. [Click on image to enlarge, then click on back arrow to return to this post.]
Focus stacked in Photoshop from nine images, each made with Nikon Z 8 with Nikon Z 50 mm MC macro lens. One Profoto B1x studio strobe on either side with Godox T365N II flash mid-left. Each component image f/16, 1/200 sec, ISO 64.
Note how the entire face of the fracture surface is now in focus. Note: I used to also use Zerene Stacker and Helicon Focus for focus stacking—and both are excellent—but now I almost exclusively use Photoshop.
Takeaways:
-1- The closer your camera is to your subject, the less depth of field (DOF) you will have.
-2- Most forensic images require the entire subject to be in focus to show all its details.
-3- Even stopping your lens down to its minimum aperture won’t give you sufficient DOF, plus you risk losing detail from diffraction.
-4- Focus stacking requires a series of photographs (slices) be made with the focus increasingly distant from the camera. These slices are blended into a single image where only the sharpest elements of each slice will be kept by the software.
-5- Only combining images through focus stacking allows you to get sufficient DOF for many close-up, macro, and micro images.
-6- The closer the subject, the more slices (individual images) you need. For some micro images, more than 1,000 slices need to be blended through focus stacking.
-7- Focus stacking can also be used for large subjects including landscapes, buildings, accident scenes, and vehicles. Those larger subjects require fewer slices—often only two or three.
One kind of forensic night photography requires you to accurately capture the appearance of a scene as closely as possible under lighting conditions similar to what they were at the time of an incident. Of course that results in an overall image that appears dark since, after all, it is a night scene.
Using fully automatic exposure modes will result in the scene being significantly (and obviously) overexposed. This is because the camera is trying to record the scene as a mid-tone (frequently referred to as “middle gray” even when the subject isn’t gray). This automatic brightening of night scenes usually results in noisy, overexposed images that don’t resemble the actual scene at all.
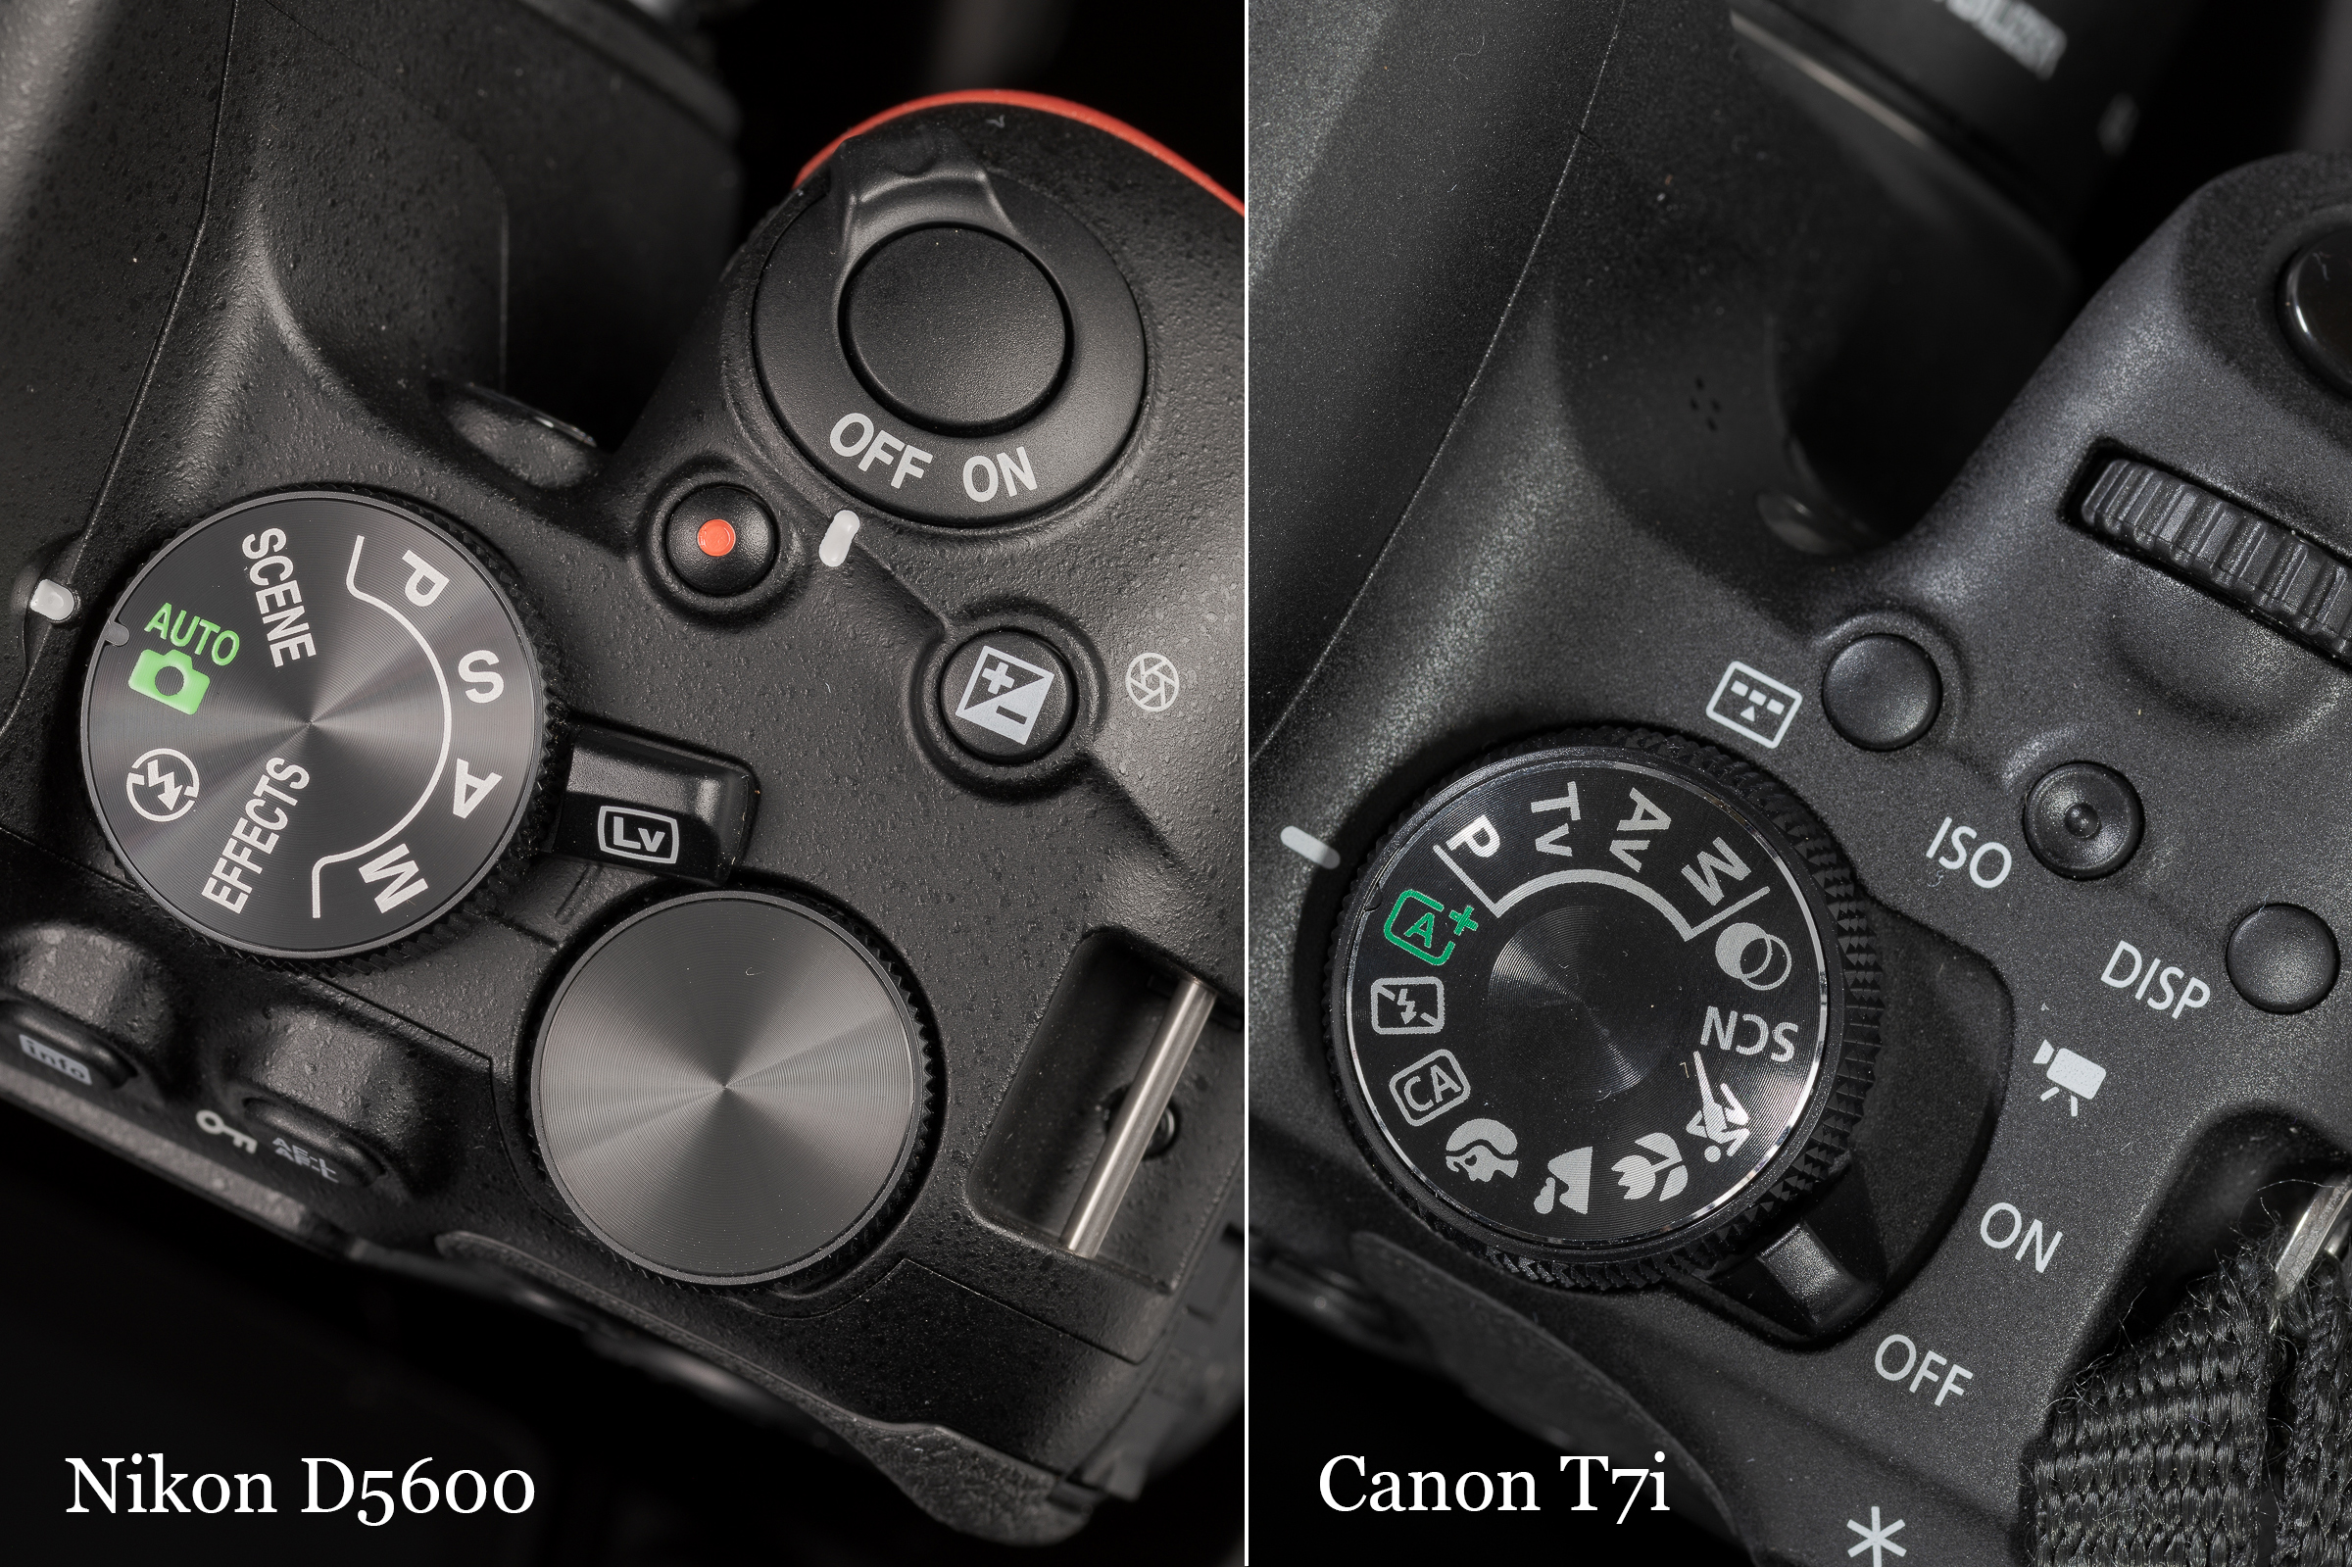
Almost all consumer and prosumer cameras have a fully automatic exposure mode denoted by a green camera icon with or without the word “Auto”. The image below shows the full Auto mode icon on a Nikon D5600 and Canon T7i. (Professional cameras like my Nikon Z 8’s often do not have this mode.) [Click on the image to enlarge. Then click on back arrow to return to this post.]
Made with Nikon D850 and ZEISS Milvus 100 mm macro lens.
In Auto mode, the camera sets the aperture, shutter speed, and ISO, and you cannot change or override any of them! Because the photographer cannot affect exposure in any way in full Auto mode, when teaching I refer to it as the “Green Mode of Shame” to drive home the point that you as the photographer are left without any ability to control your exposure (or a number of other important settings). While this mode might work for ideal lighting during the day, it just doesn’t—and can’t—work for ambient light night photographs. (Note: Semi-automatic exposure modes Program, Aperture Priority, and Shutter Priority will be addressed in a future post.)
I made the following two images in a lighted parking lot that had a white, a black, and a silver vehicle in the scene. (Note: both images were captured in the camera’s raw NEF format.)
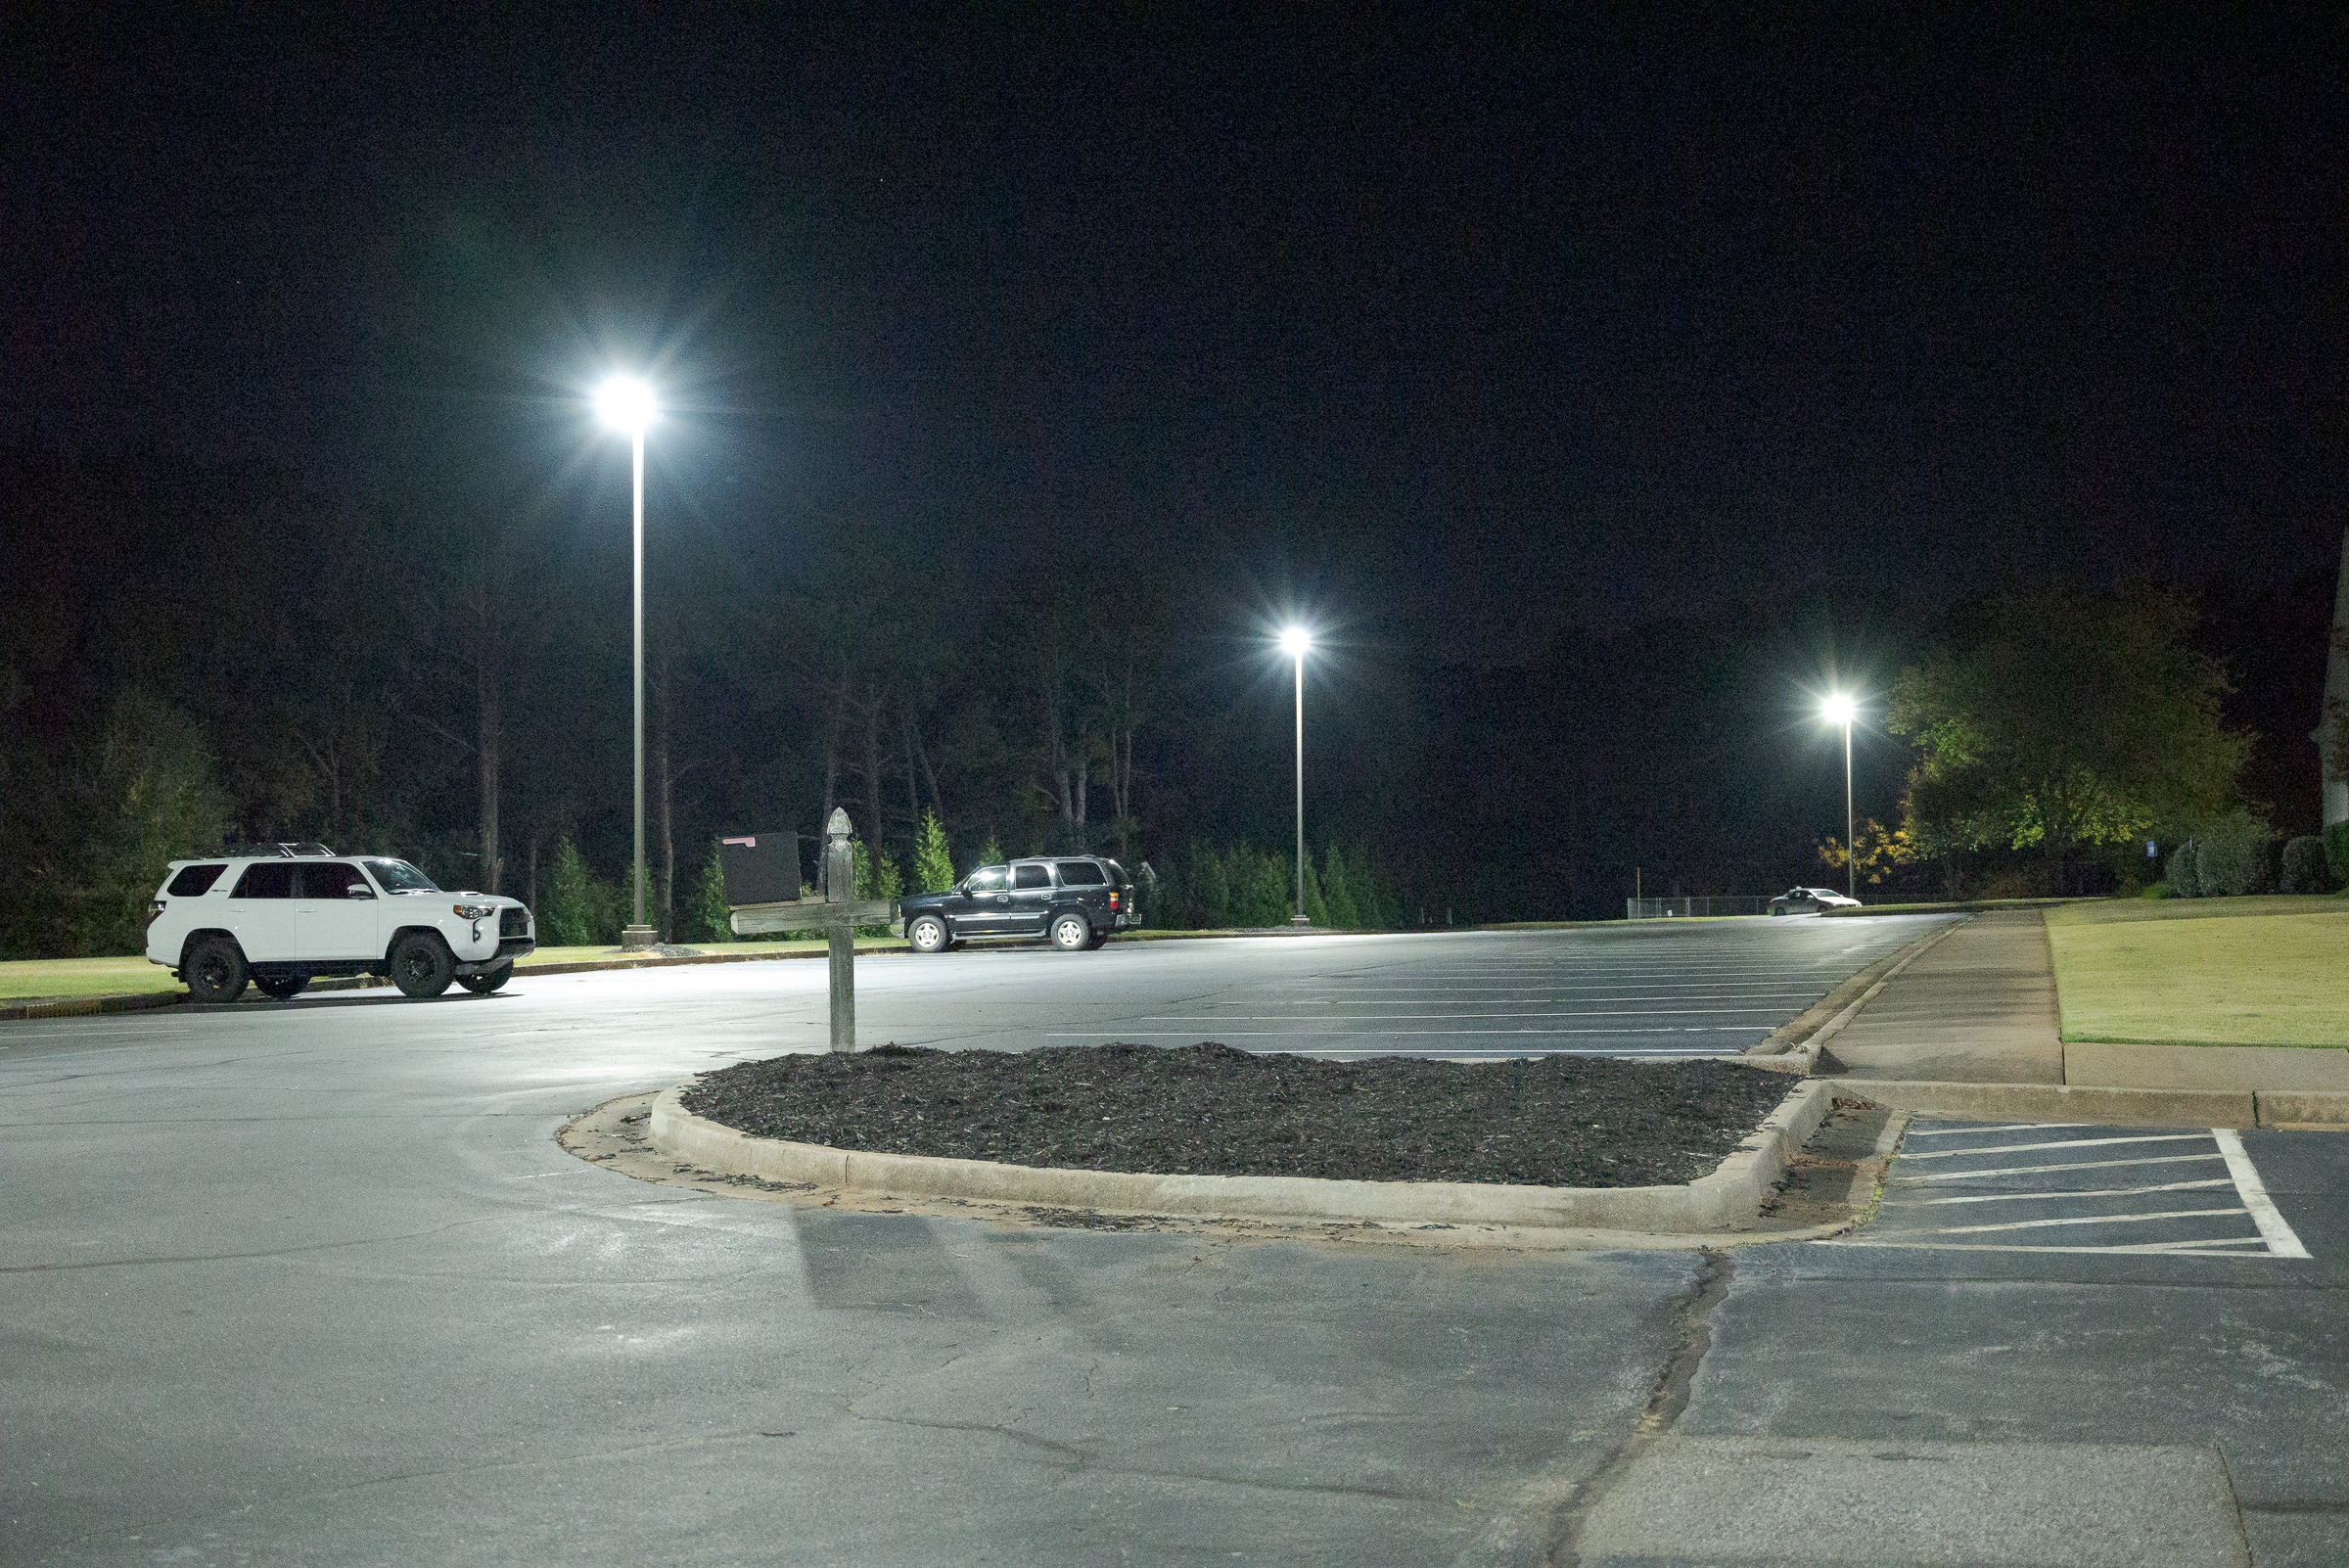
For this first image, I used a Nikon Z 5 in Auto mode (its Green Mode of Shame). As discussed above, the camera tried to create a mid-tone image, and I couldn’t do anything about it. [Click on the image to enlarge. Then click on back arrow to return to this post.]
Auto exposure mode with Auto ISO. Made with Nikon Z 5 with Nikkor Z 24-70 mm f/4 lens at 49 mm in raw mode. f/4, 1/50 sec, ISO 25,600.
Note the camera chose a wide open aperture to let in as much light as possible (f4 on that lens), and an ISO of 25,600(!), while setting the shutter speed to 1/50 of a second. (A shutter speed of 1/50 of a second is considered handholdable with a near 50 mm focal length. The thinking is that if someone is going to use a camera in Auto mode, the camera will most likely be handheld. Consequently, the camera will open the aperture and boost the ISO to keep the shutter speed handholdable. But as usual, I had this camera on a tripod, like I almost always do in any light. )
Even though the original image is quite noisy (the great reduction in size and the JPEG compression of this posted image reduced the appearance of noise from the original raw), that’s not the biggest issue with it. The real problem is the scene was nowhere near this bright; it didn’t look anything like this at the time I made this image.
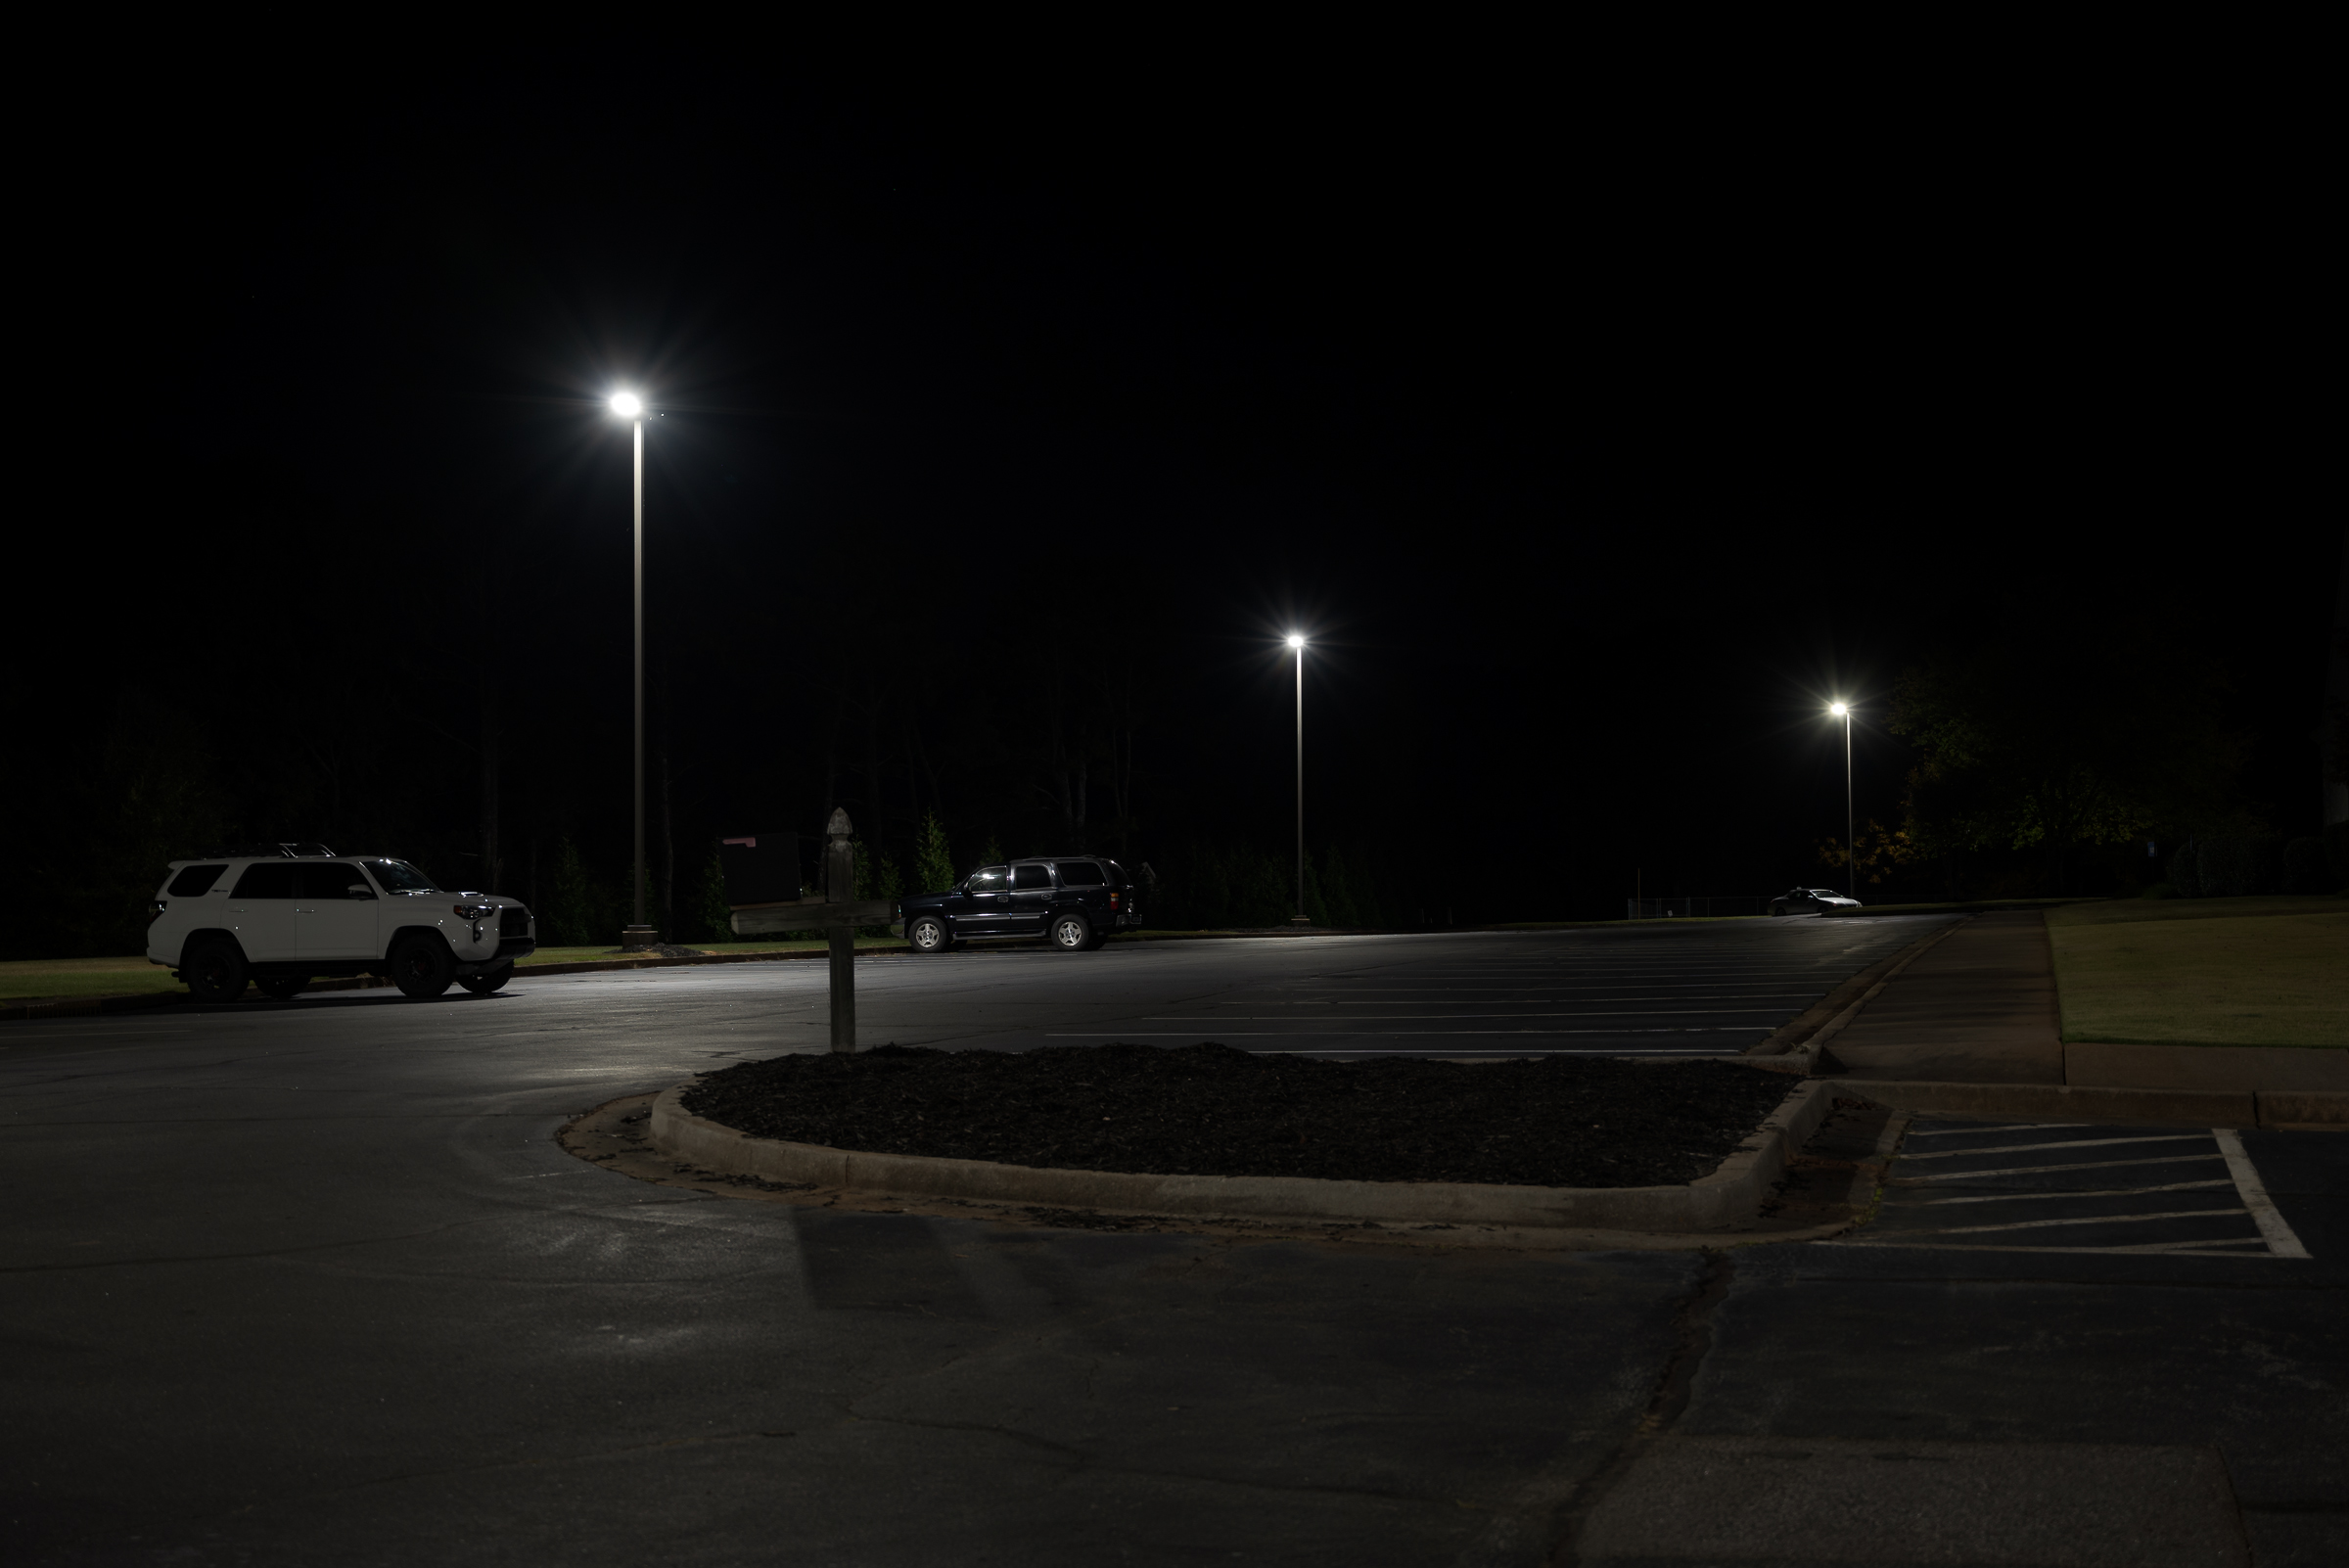
For the image below, I switched to manual exposure mode (the only exposure mode I ever use). I kept the aperture at f/4, but then set the ISO to the camera’s minimum of 100 to minimize the image noise. Because the camera was on a tripod, I wasn’t too concerned about shutter speed as long as it stayed within reason. [Click on the image to enlarge. Then click on back arrow to return to this post.]
Manual exposure mode with ISO set at 100. Made with Nikon Z 5 with Nikkor Z 24-70 mm f/4 lens at 49 mm in raw mode. f/4, 1/3 sec, ISO 100.
With the aperture and ISO set, I adjusted the shutter speed until the image on the back of the LCD looked like what I was seeing with my naked eye. As it turns out, the Auto image was four stops lighter than this more accurate one.
Note 1: By default, I have the camera’s Picture Control set to Neutral with reduced contrast and saturation so the LCD closely matches my computer monitor.
Note 2: For an actual night photograph case, I start by tethering my camera to a laptop that is calibrated to match my desktop monitor. There’s much more to the actual process than I did for this demo, but it’s close enough to illustrate the point that you need to take manual control of the camera.
While this second image is close to showing the scene as I saw it, to view it properly, you would need to view it with a black surround in a darkened room with your monitor brightness set to 140 cd/m² to match what I see. Regardless of these technicalities, comparing the two images—in whatever light you’re in or computer you’re on—it is obvious that the upper Auto exposure image doesn’t look anything like the more accurate lower manual exposure mode image.
In a number of cases where I’ve done both the night photography and explained why photographs submitted by other experts or photographers were improper and misleading, all of those inaccurate photographs have been stricken and disallowed by the judge.
While it’s a little bit off-topic, being able to explain how and why photographs were made and why they accurately represent what they purport to show—and why other ones don’t—is critical in almost all ambient light night photography cases.
Takeaways:
-1- Fully automatic exposure modes (like Auto) are not designed to—and cannot—accurately capture ambient light night images.
-2- You need to shoot night photographs using manual exposure mode with a low ISO to minimize noise, with the appropriate aperture for the depth of field you need, and with the shutter speed set to match what the scene looks like to the naked eye. There’s much more to the whole process, but that’s the essence of it.
-3- While the lower photo looks much closer to what the parking lot looked like when I made the photographs, it was not made with the procedure I use for case work. It is close enough to make a quick demo comparison against a demonstrably incorrect Auto method that yielded a demonstrably incorrect image.
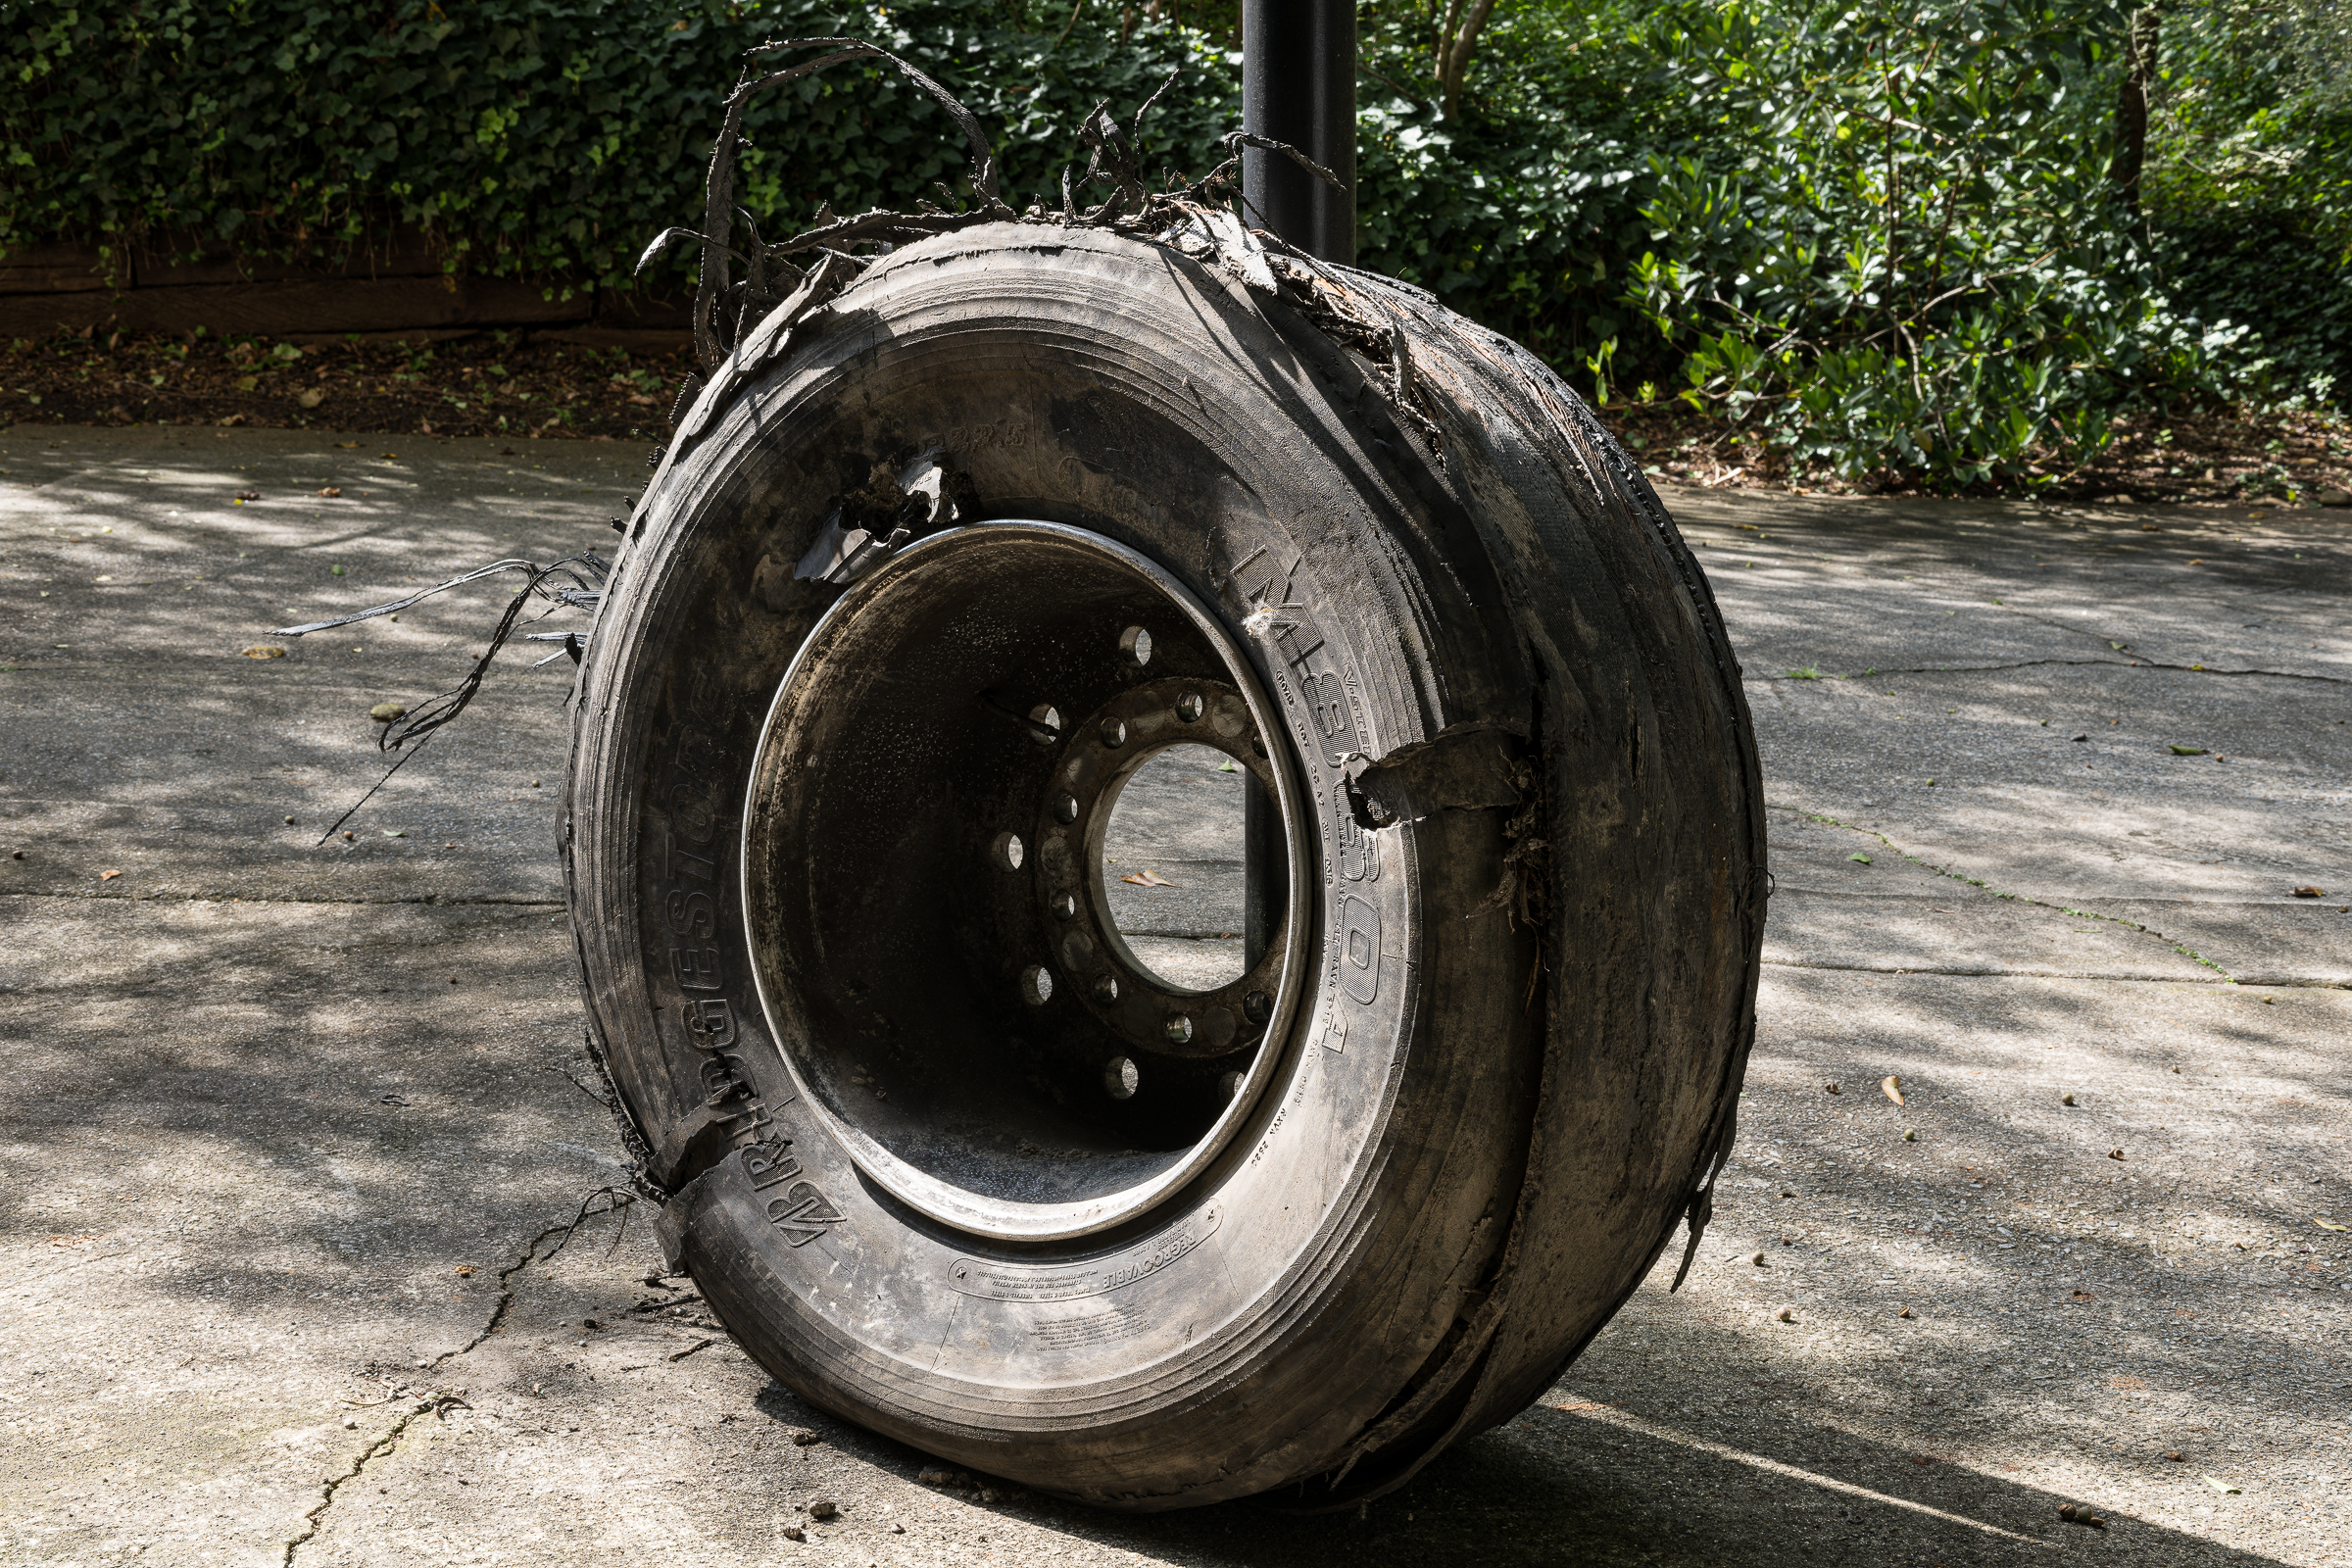
This tire was photographed in the afternoon on a sunny day. [Click on the image to enlarge. Then click on back arrow to return to this post.]
Mounted tire on wheel outdoors with no flash. (Made with Nikon Z 8 and ZEISS Milvus 50 mm macro on Nikon FTZ II adapter at f/16, 1/10 sec, ISO 64.)
Despite being properly exposed, there are almost no details in the shadows of the tire sidewall or the wheel. Brightening the exposure would have shifted the brightest parts of both the wheel and tire into blown out highlights and all detail there would have been permanently lost. While not essential to the tire or wheel, the brighter spots on the concrete driveway would also have blown out. This would result in a less professional looking image.
Fortunately, the overall exposure itself can remain, and flashes can be used to bring out details in the shadows. [Click on the image to enlarge. Then click on back arrow to return to this post.]
Mounted tire on wheel outdoors with both on-camera flash and second flash at lower right. (Made with Nikon Z 8 and ZEISS Milvus 50 mm macro on Nikon FTZ II adapter. Godox TT685N II in camera hot shoe and Godox AD200 Pro at lower right at f/16, 1/10 sec, ISO 64.)
While keeping the identical exposure, a Godox TT685N II speedlight was slid into the camera’s hot shoe and aimed towards the shadows inside the wheel and on the left side of the tire sidewall. A second Godox flash—an AD200 Pro—was handheld at the lower right, and angled upwards toward the right side where the tread used to be.
These two flashes balanced the natural light and added much-needed detail in the shadows. The result was both a professional appearing image and one where details were not blocked up in dark shadows or blown out in the highlights.
Of course, like almost every photograph I make, both of these images were made with the camera on a tripod. I used a five-second self-timer so I could move over and get the handheld flash at the lower right into position.
Takeaways:
-1- On bright sunny days, there is often too much contrast to capture detail in both the highlights and the shadows.
-2- Increasing the exposure will lighten the shadows, but will cause the highlights to blow out and permanently lose all data and detail there.
-3- Adding one or more flashes to fill in shadows where needed results in more detail in the shadows without losing detail in the highlights.
-4- You may have to make a couple different images with the flashes to get the proper amount of light and the proper angle of light for what you want. When I make more than one image, I only keep the one that shows the details I intended. If you feel you must keep all the images you make, no problem. Only use the best one in reports or as an exhibit.
-5- More good news! The more often you practice with one or more flashes, the more quickly and intuitively you will be able to get both the amount and direction of light that you want.
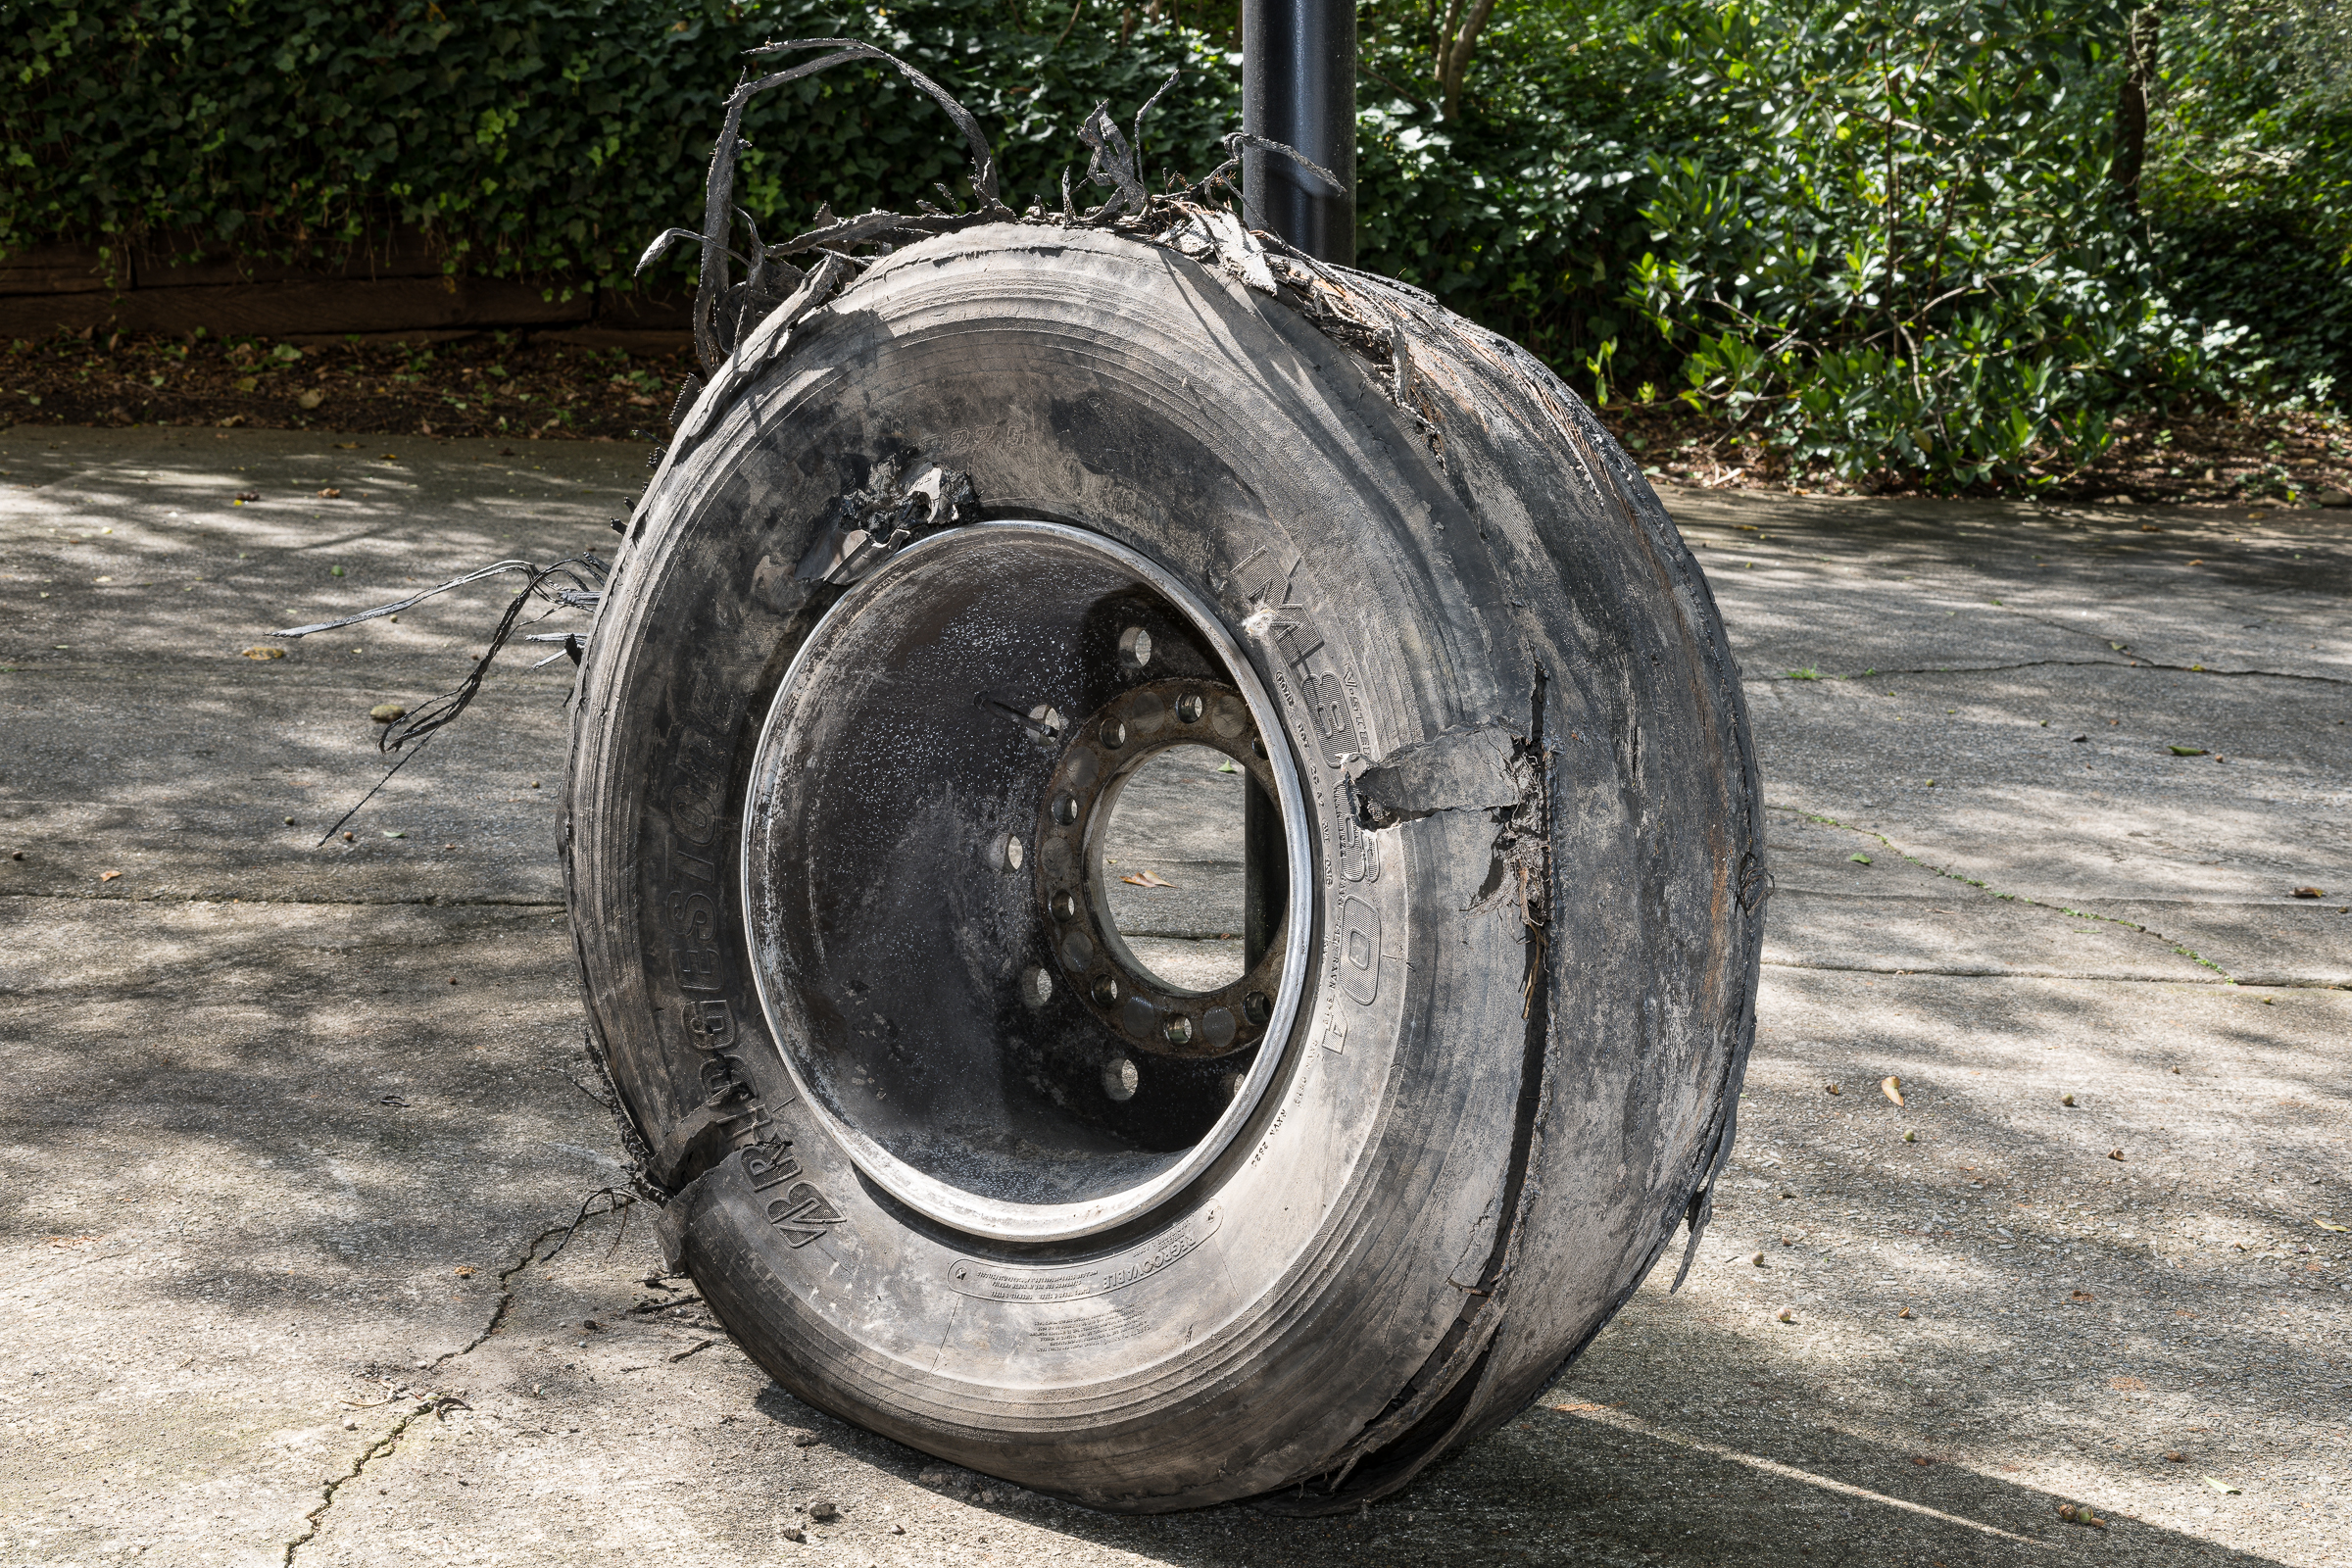
I needed to document the bolt holes on a wheel that came off the front of a pickup to show whether or not the wheel had been loose on its studs.
After making overall photos of the wheel and tire assembly, I made close-ups of the mounting surface and bolt holes from the back of the wheel. But on the outside of the wheel, the bolt holes were too deeply recessed to use a standard macro lens.
It was important to photograph the lug nut mating surface at the bottom of each recess, but it was nearly impossible both to get light down each recess and to fill the image frame with each hole. I wanted to get sharp, detailed, full frame images of the mating surface—not images cropped from a larger view.
The solution was the unique Laowa Probe lens. (I have previously discussed another unique Laowa super macro lens. I’ve found Laowa lenses to be well made and optically excellent.)
As the photo below shows, the Probe is a 16-inch long tube with a small diameter 24 mm lens surrounded by tiny LED lights at its end. You use a small USB power brick to power those LED lights. Laowa supplies a USB cable with a built-in dimmer switch, but you must supply the power brick. [Click on photo to enlarge, then click on back arrow to return to this post.]
Nikon D850 with Laowa 24mm f/14 2X Macro Probe macro lens made with Nikon Z 7II with Nikon Z 24-70 mm f/2.8 lens and two Profoto B1x studio flashes. f/16, 1/200 sec, ISO 200.
Laowa offers the Probe with several different mounts for many popular DSLR and mirrorless cameras. I used the Nikon F-mount version of the Probe lens on my Nikon D850. Note that all versions of the Probe require manual focusing and exposure; there are no electronic connections between the Probe and any camera.
Fortunately, the lens barrel fit perfectly into the recessed bolt hole, allowing me to get a full frame image of the mounting surface at the bottom. All I had to do was to adjust the intensity of the LEDs, adjust the exposure, and click the shutter. [Click on photo to enlarge, then click on back arrow to return to this post.]
Nikon D850 with Laowa 24mm f/14 2X Macro Probe macro lens made with Nikon Z 7II with Nikon Z 24-70 mm f/2.8 lens and two Profoto B1x studio flashes. f/16, 1/200 sec, ISO 200.
To steady the lens, manually focus, and keep the lens perpendicular to the bottom of the recess, I had the camera mounted on my rolling studio camera stand, which acted like an easily-adjusted tripod on wheels.
As you’ll see, the next two images made with the Probe lens required 0.5 and 0.3 second exposure times, respectively. That range of shutter speeds required that the camera be secured on a tripod to eliminate camera shake. Raising ISO to get handholdable shutter speeds would introduce noise, reduce detail, and reduce dynamic range. That would defeat the whole purpose of using the Probe to get sharp, detailed full frame images.
The first image I made for each paired hole (the wheel was drilled for two bolt patterns) was to show the bolt hole pair, while concentrating on the appropriate bolt hole. [Click on photo to enlarge, then click on back arrow to return to this post.]
Nikon D850 with Laowa 24mm f/14 2X Macro Probe. f/unrecorded, 0.5 sec, ISO 64.
I then slid the end of the Probe deeper into the recess to fill the frame with details of the mounting surface. [Click on photo to enlarge, then click on back arrow to return to this post.]
Nikon D850 with Laowa 24mm f/14 2X Macro Probe. f/unrecorded, 0.3 sec, ISO 64.
I know of no other way to have attained this image without significant cropping and the inherent loss of detail and resolution.
Although it’s not a lens I use all that often, I’ve found the Probe unmatched for photographing inaccessible labels, fasteners, or other components, too. The built-in LED lights around the lens make it a really useful tool.
-1- The Laowa Probe (along with the more recent Peri-Probe) lens is a unique, specialized macro lens that can allow you to photograph areas that are otherwise inaccessible.
-2- The Laowa Probe lens allows you to capture all the resolution and detail of full frame images that would be lost with a significant crop.
-3- If you are stymied about how to photograph a challenging subject, you might be able to find a commercially available specialized solution.
-4- While it is preferable to have specialized lenses at your disposal, you can always rent lenses (or other photography gear) for infrequently encountered situations. Of course, you might find yourself using even seemingly specialized lenses more often if you own them and have them readily available.
Often, evidence is stored in plastic bags or containers with shiny surfaces that result in reflective glare when photographed. This glare can obscure both the content and any markings on the bag or container.
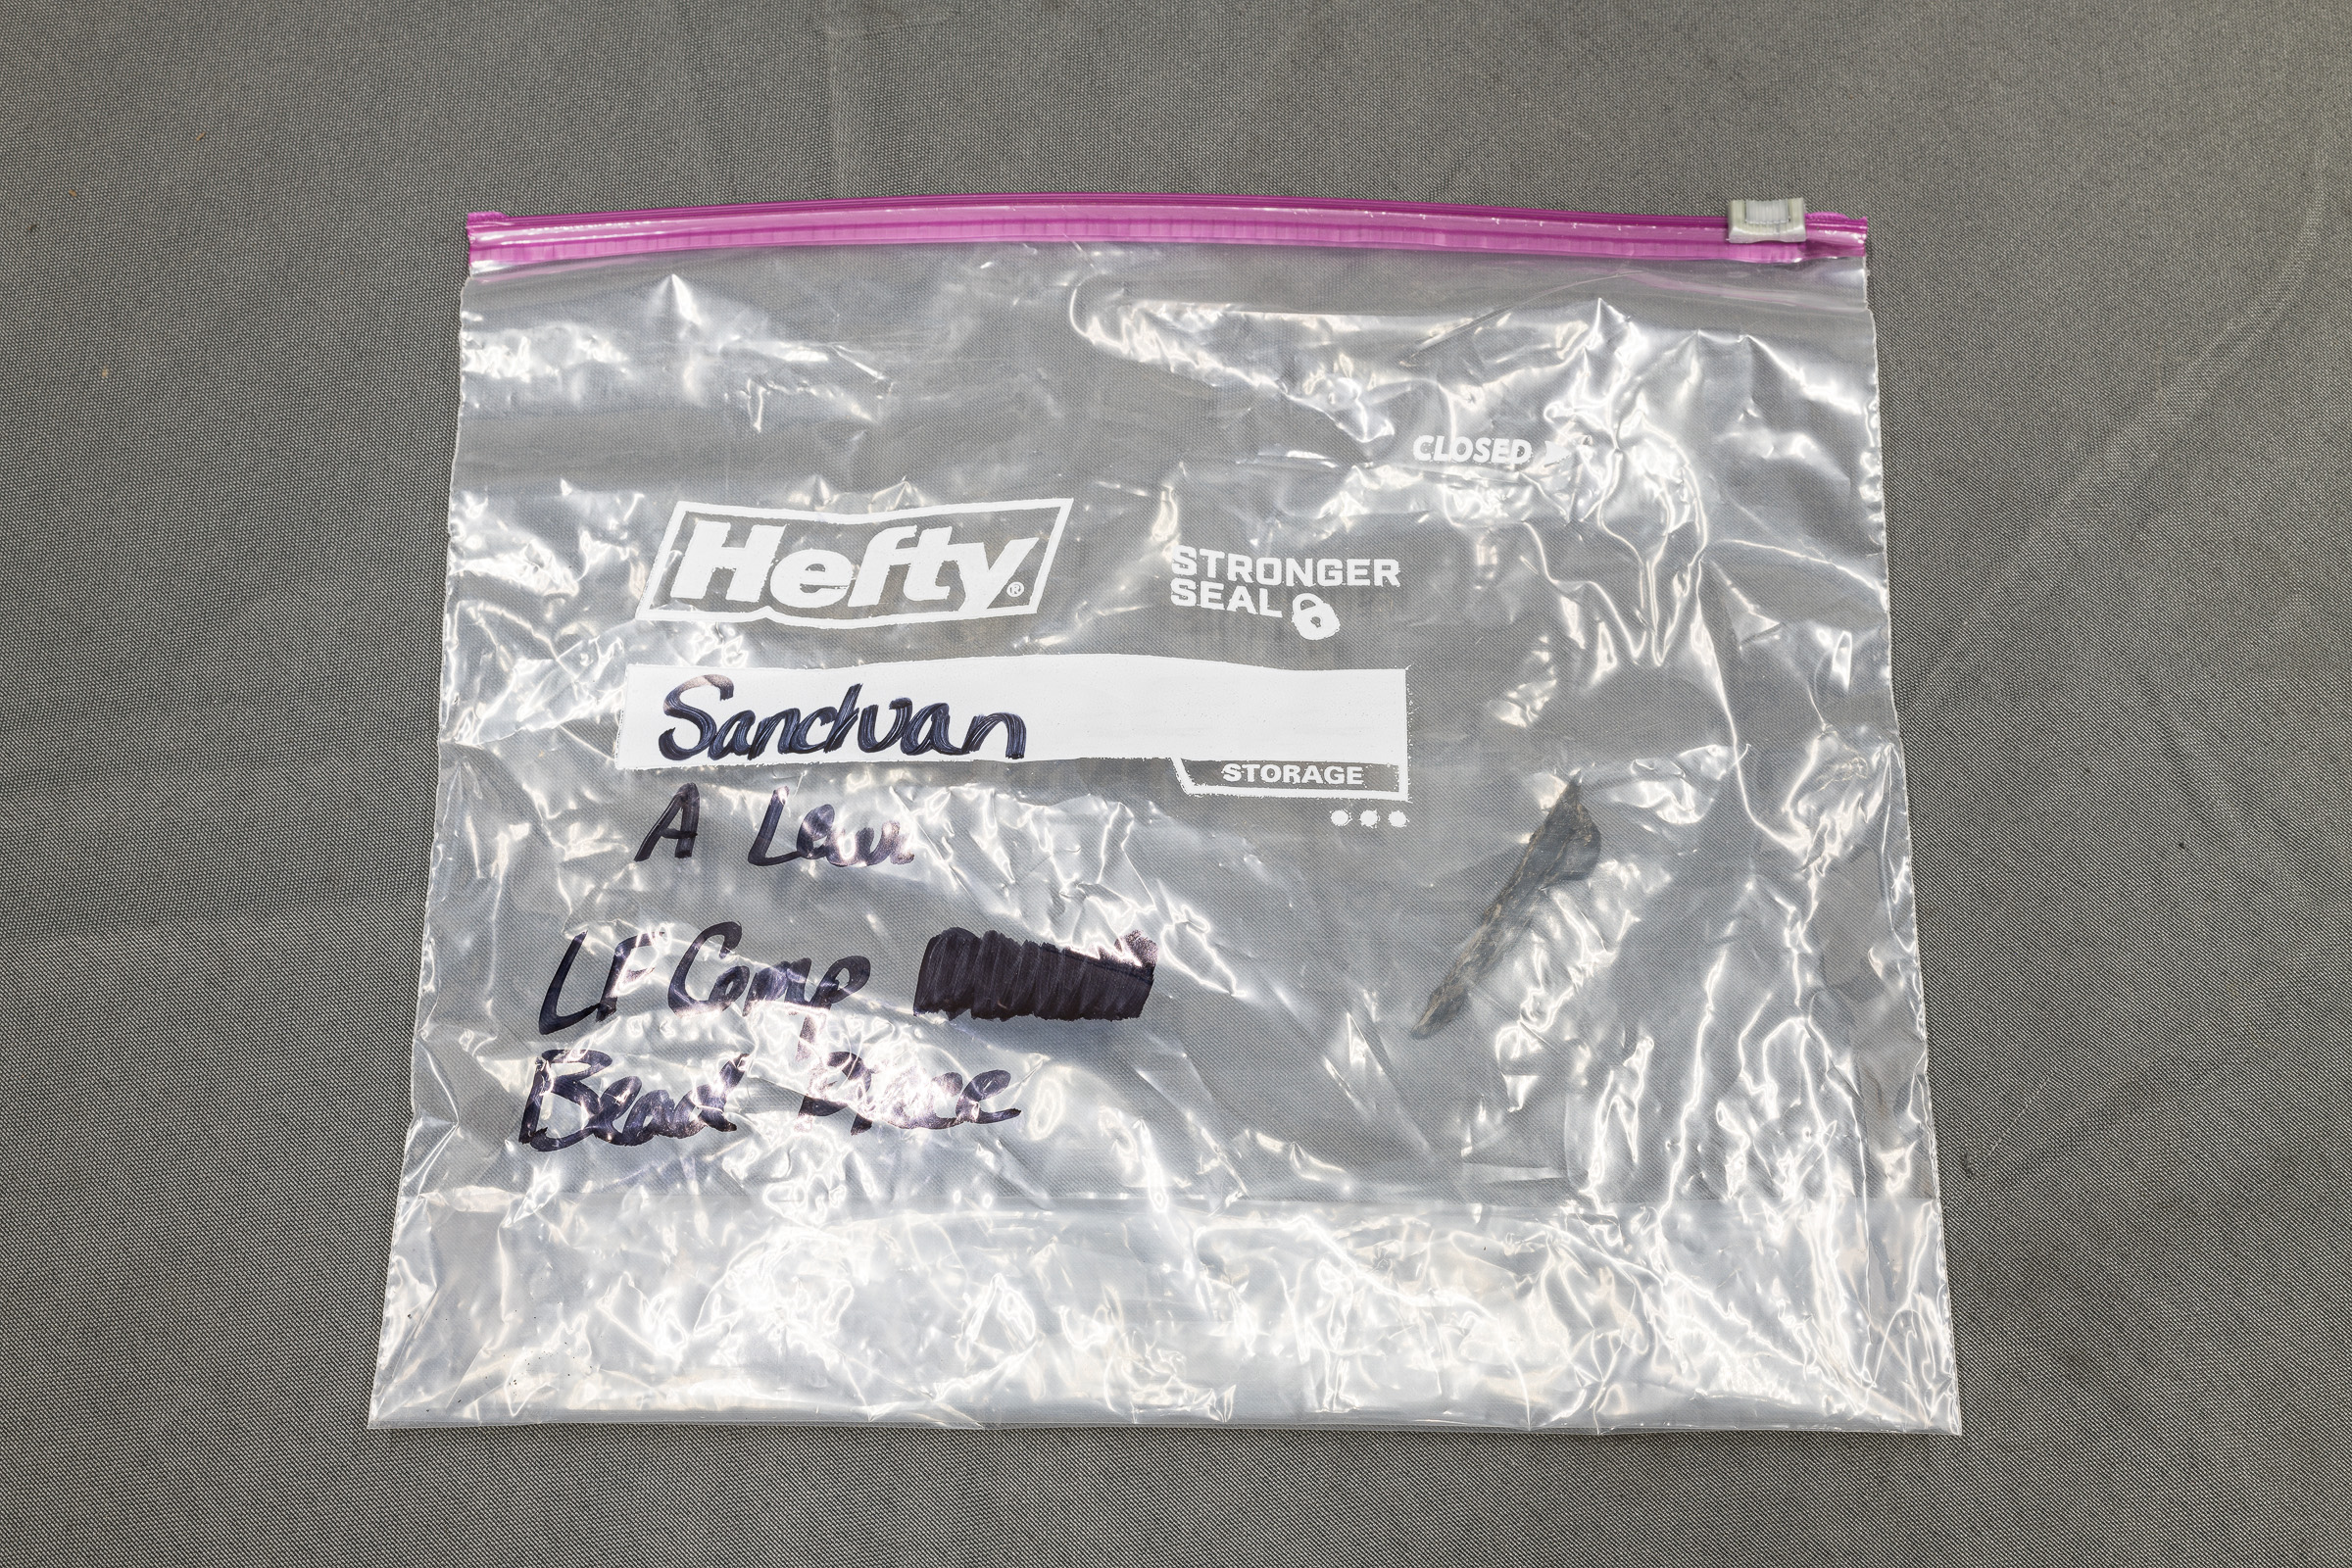
As an example, a small piece of the bead toe from a tire was placed in a plastic bag, which was labeled with a black magic marker. (The writing on the bags in the images below has been intentionally altered to preserve anonymity.)
This first image was made in my Studio Lab using just the overhead LED lights. [Click on image to enlarge, then click on left arrow to return to this post.]
Plastic Evidence Bag without Flashes (Made with ZEISS Milvus 50 mm f/2 Macro lens on Nikon D850 at f/16, 1 sec, ISO 64.)
Even though the image is properly exposed, the overhead LED lights resulted in so much glare that it is difficult to make out the tiny tire piece inside or the writing on the outside of the bag.
To show both the contents and the writing, I kept the overhead LED lights on, but added a Profoto B1x studio flash on the right and on the left side of the bag. (Note: any remote flashes or speedlights can be used for the same effect.) [Click on image to enlarge, then click on left arrow to return to this post.]
Plastic Evidence Bag with Flashes (Made with ZEISS Milvus 50 mm f/2 Macro lens on Nikon D850 at f/16, 1/200 sec, ISO 64. One Profoto B1x strobe to each side triggered by a Godox TT685N II flash in the camera’s hot shoe.)
Wait, how did adding even more light eliminate the glare? Two things combined to make that work.
First, the added light from the flashes allowed me to significantly reduce the overall exposure. In this case, for both images I kept the aperture at f/16 for depth of field, and the ISO at 64 for lowest noise/highest dynamic range.
In the original image using the overhead LED lights only, the shutter speed was 1 second. When I added the flashes, I reduced the shutter speed down to 1/200 second. This faster shutter speed prevented the overhead LED lights—and their reflections—from recording at all. If I turned off the flashes, the image would have been black, even though the overhead LED lights were on.
Second, the light that reflected from each flash bounced away from its respective flash, and not into the camera lens. Hence, their reflections were not recorded by the camera.
Takeaways:
-1- To reduce or eliminate glare from overhead lights, reduce the exposure enough to cause the image to go black, or nearly so.
-2- Add one or more flashes positioned (usually to the sides) such that any reflections bounce away from the lens, not into it.
-3- Adjust the power of the flash(es) to properly light the subject at the new exposure.
-4- Note: With curved or irregularly shaped objects (like plastic bags), some localized reflections may remain. These may or may not be moved or eliminated by changing the positions of the camera or the flash(es).
When your subject has multiple similar features, you’ll need to mark each of them to distinguish among them in your photographs. These markings must be repeated on the other side of your subject, too, if applicable.
Since you are dealing with evidence, you should never make permanent marks unless agreed to by all parties involved beforehand. Instead, it’s best to use removable stickers or labels.
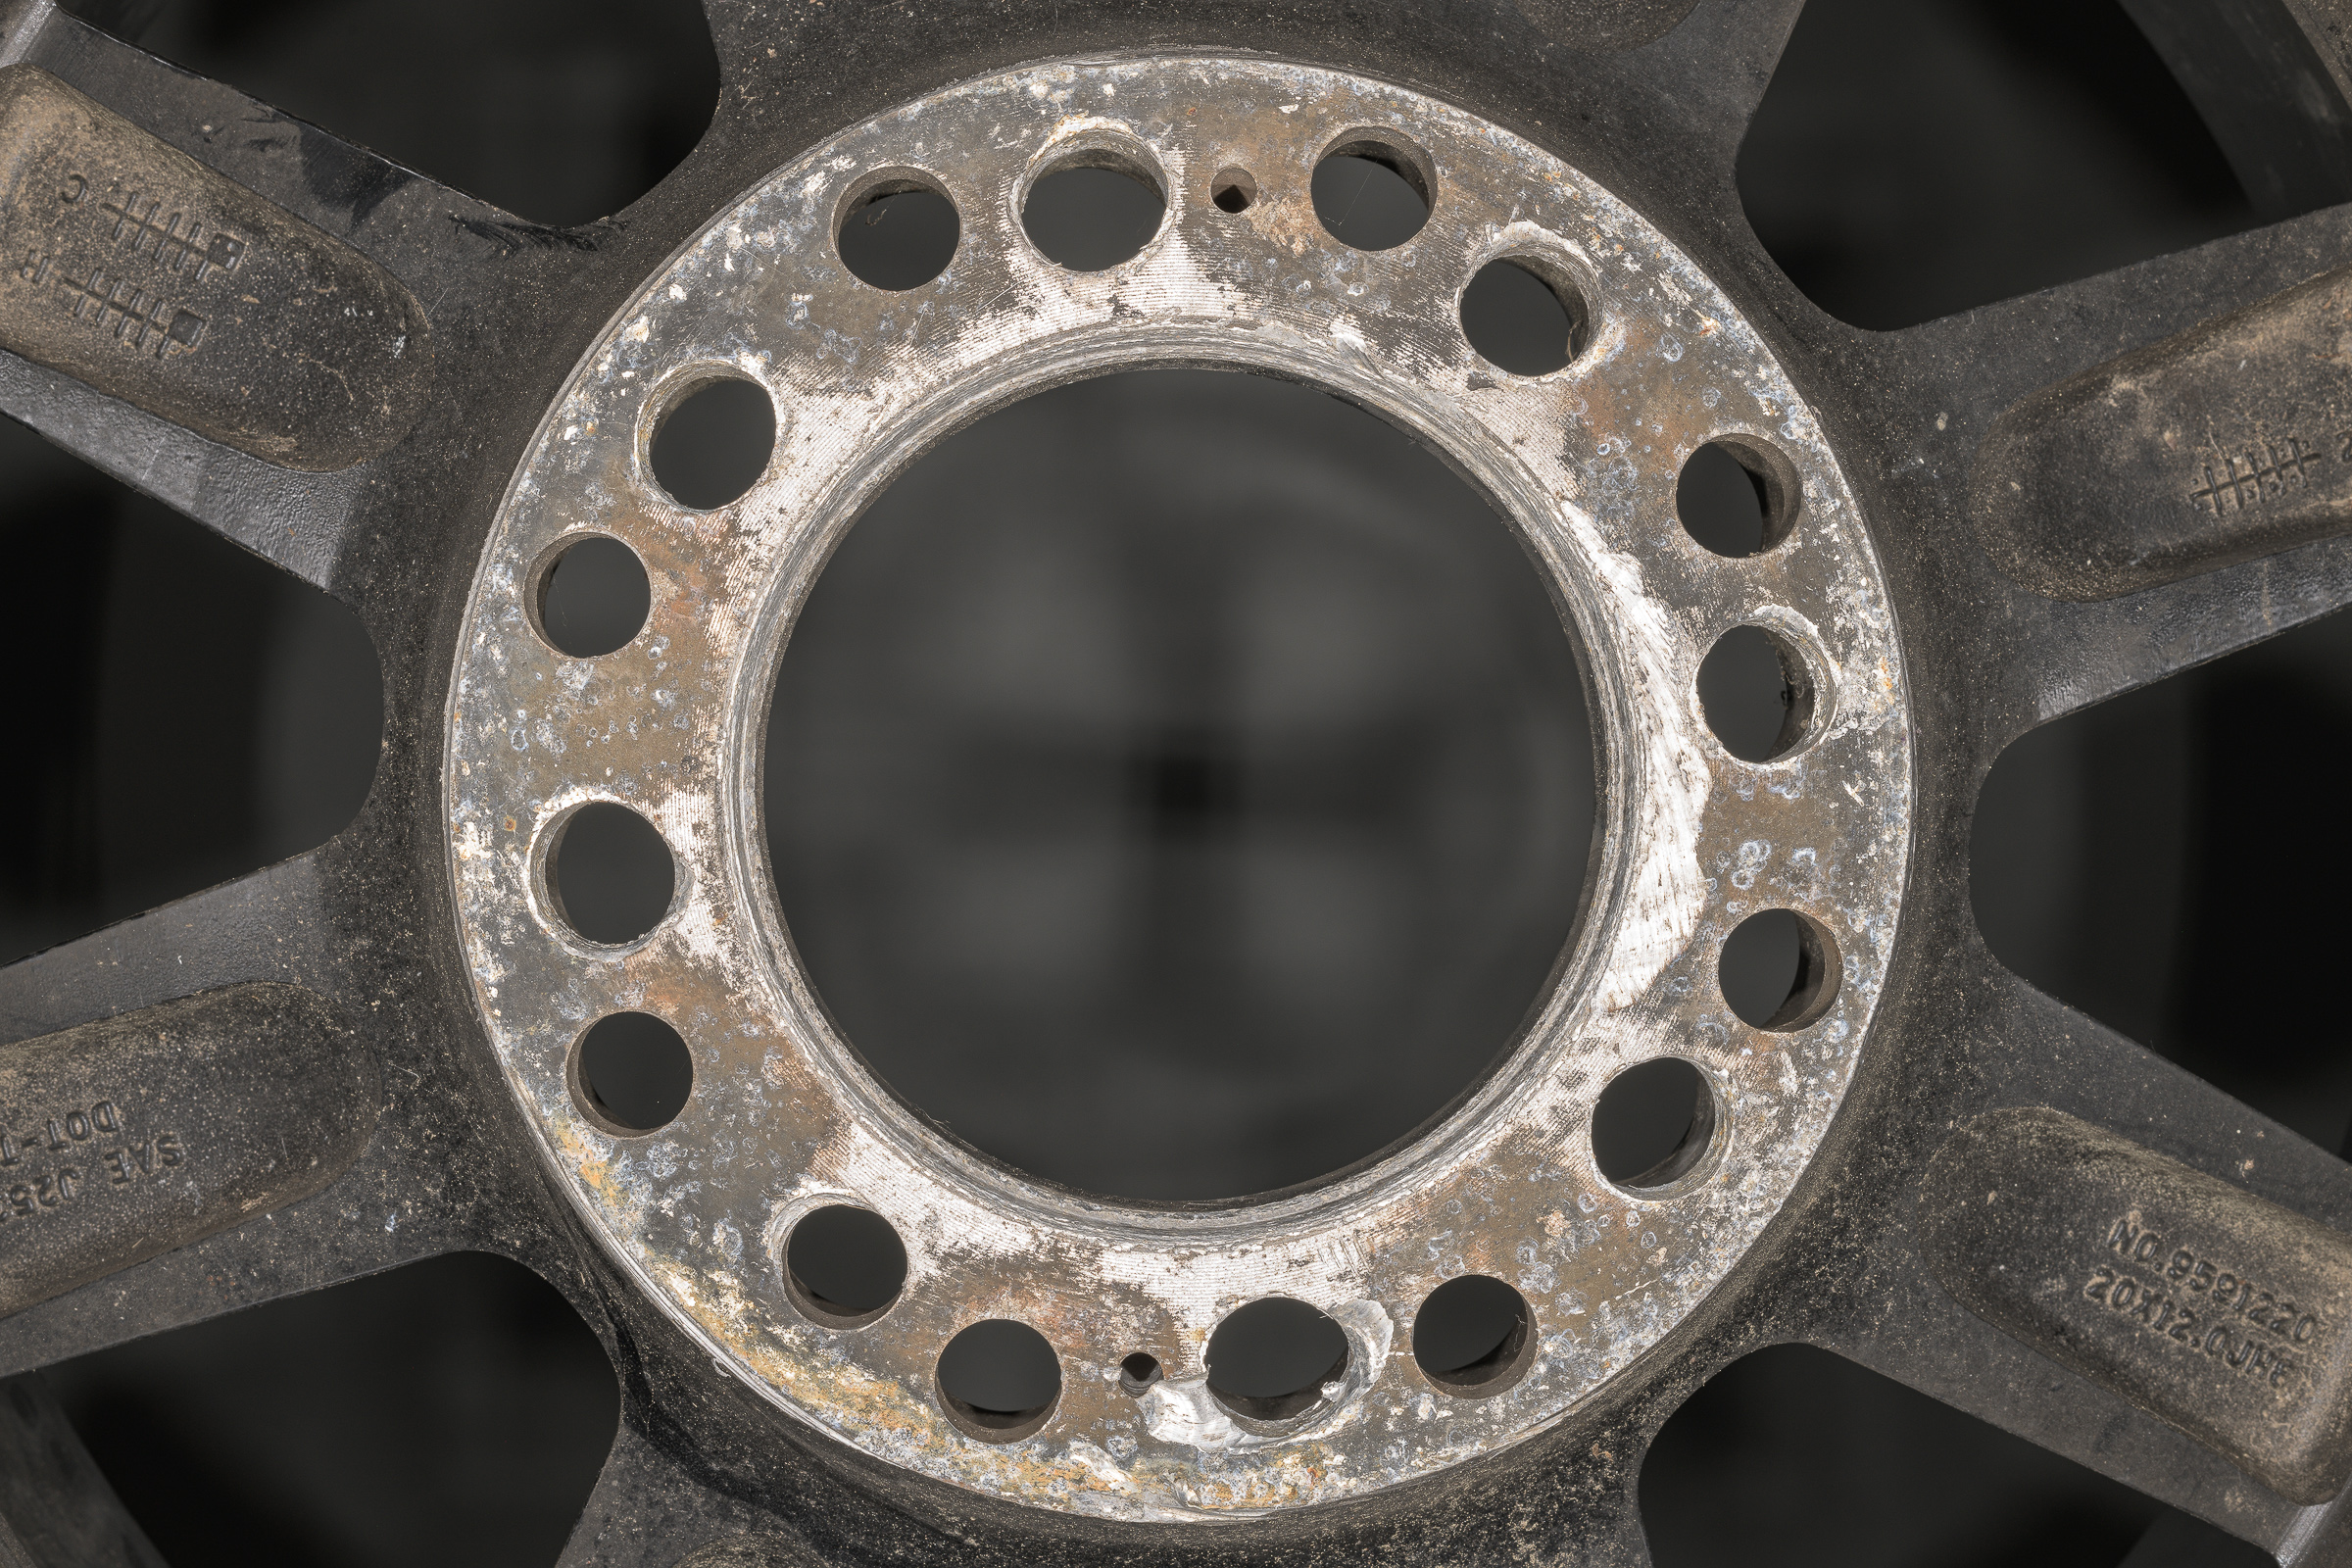
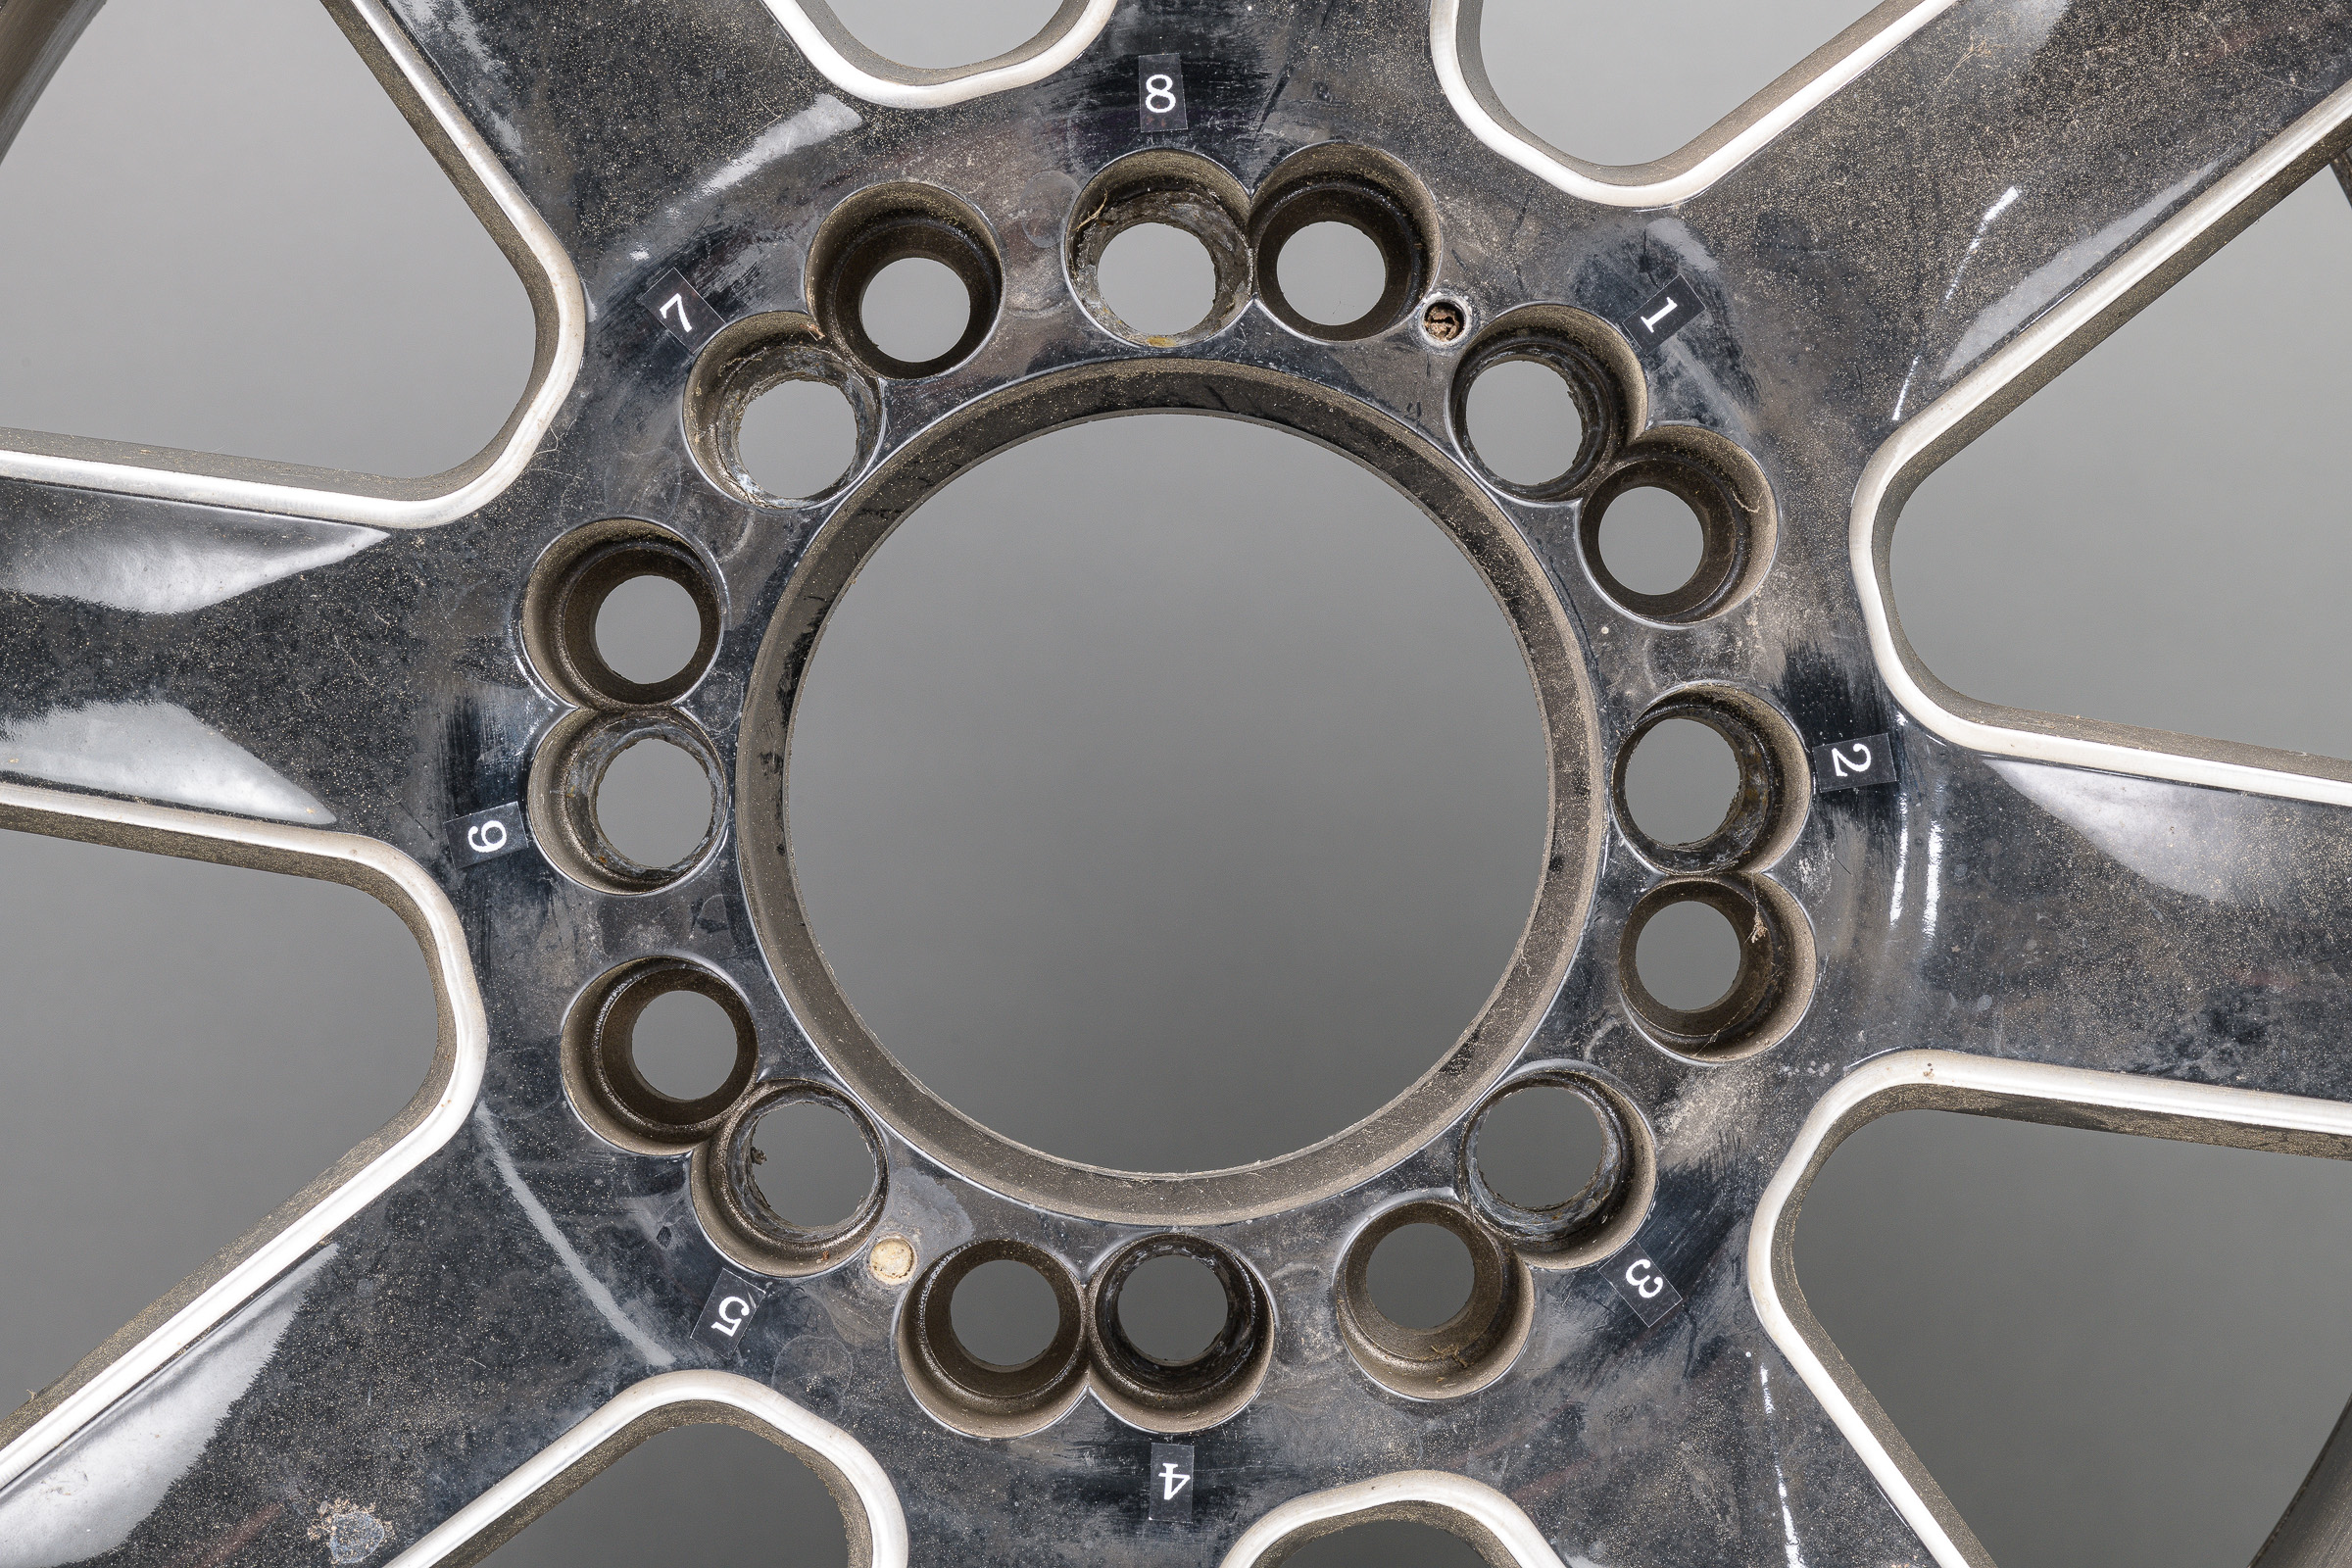
Before applying any labels, photograph the subject as you received it. This will ensure no part of the evidence is masked. As an example, here is a photograph of the mounting surface of an eight-bolt wheel with sixteen holes so it can be used with more than one bolt circle. (Click on image to enlarge, then click on the back arrow to return to this post.)
Nikon D850 with ZEISS Milvus 50 mm macro lens and Nikon R1C1 macro flashes. f/16, 1/200 sec, ISO 64.
Using a Brother P-touch labeler, I made one long label with two strings of numbers from 1 through 8, then cut between each number to create small labels of each individual number. The goal was to make the labels as small—yet as legible—as possible so they would mask the least amount of the evidence.
Choose a font with legible numbers, and set the font style to bold. Depending on the color of evidence, I usually use either white on black or black on white labels. On rare occasions, I have used black on clear labels. It’s advantageous to have all three label tapes available.
A label maker creates labels that are more legible and more professional looking than writing numbers by hand on torn pieces of tape.
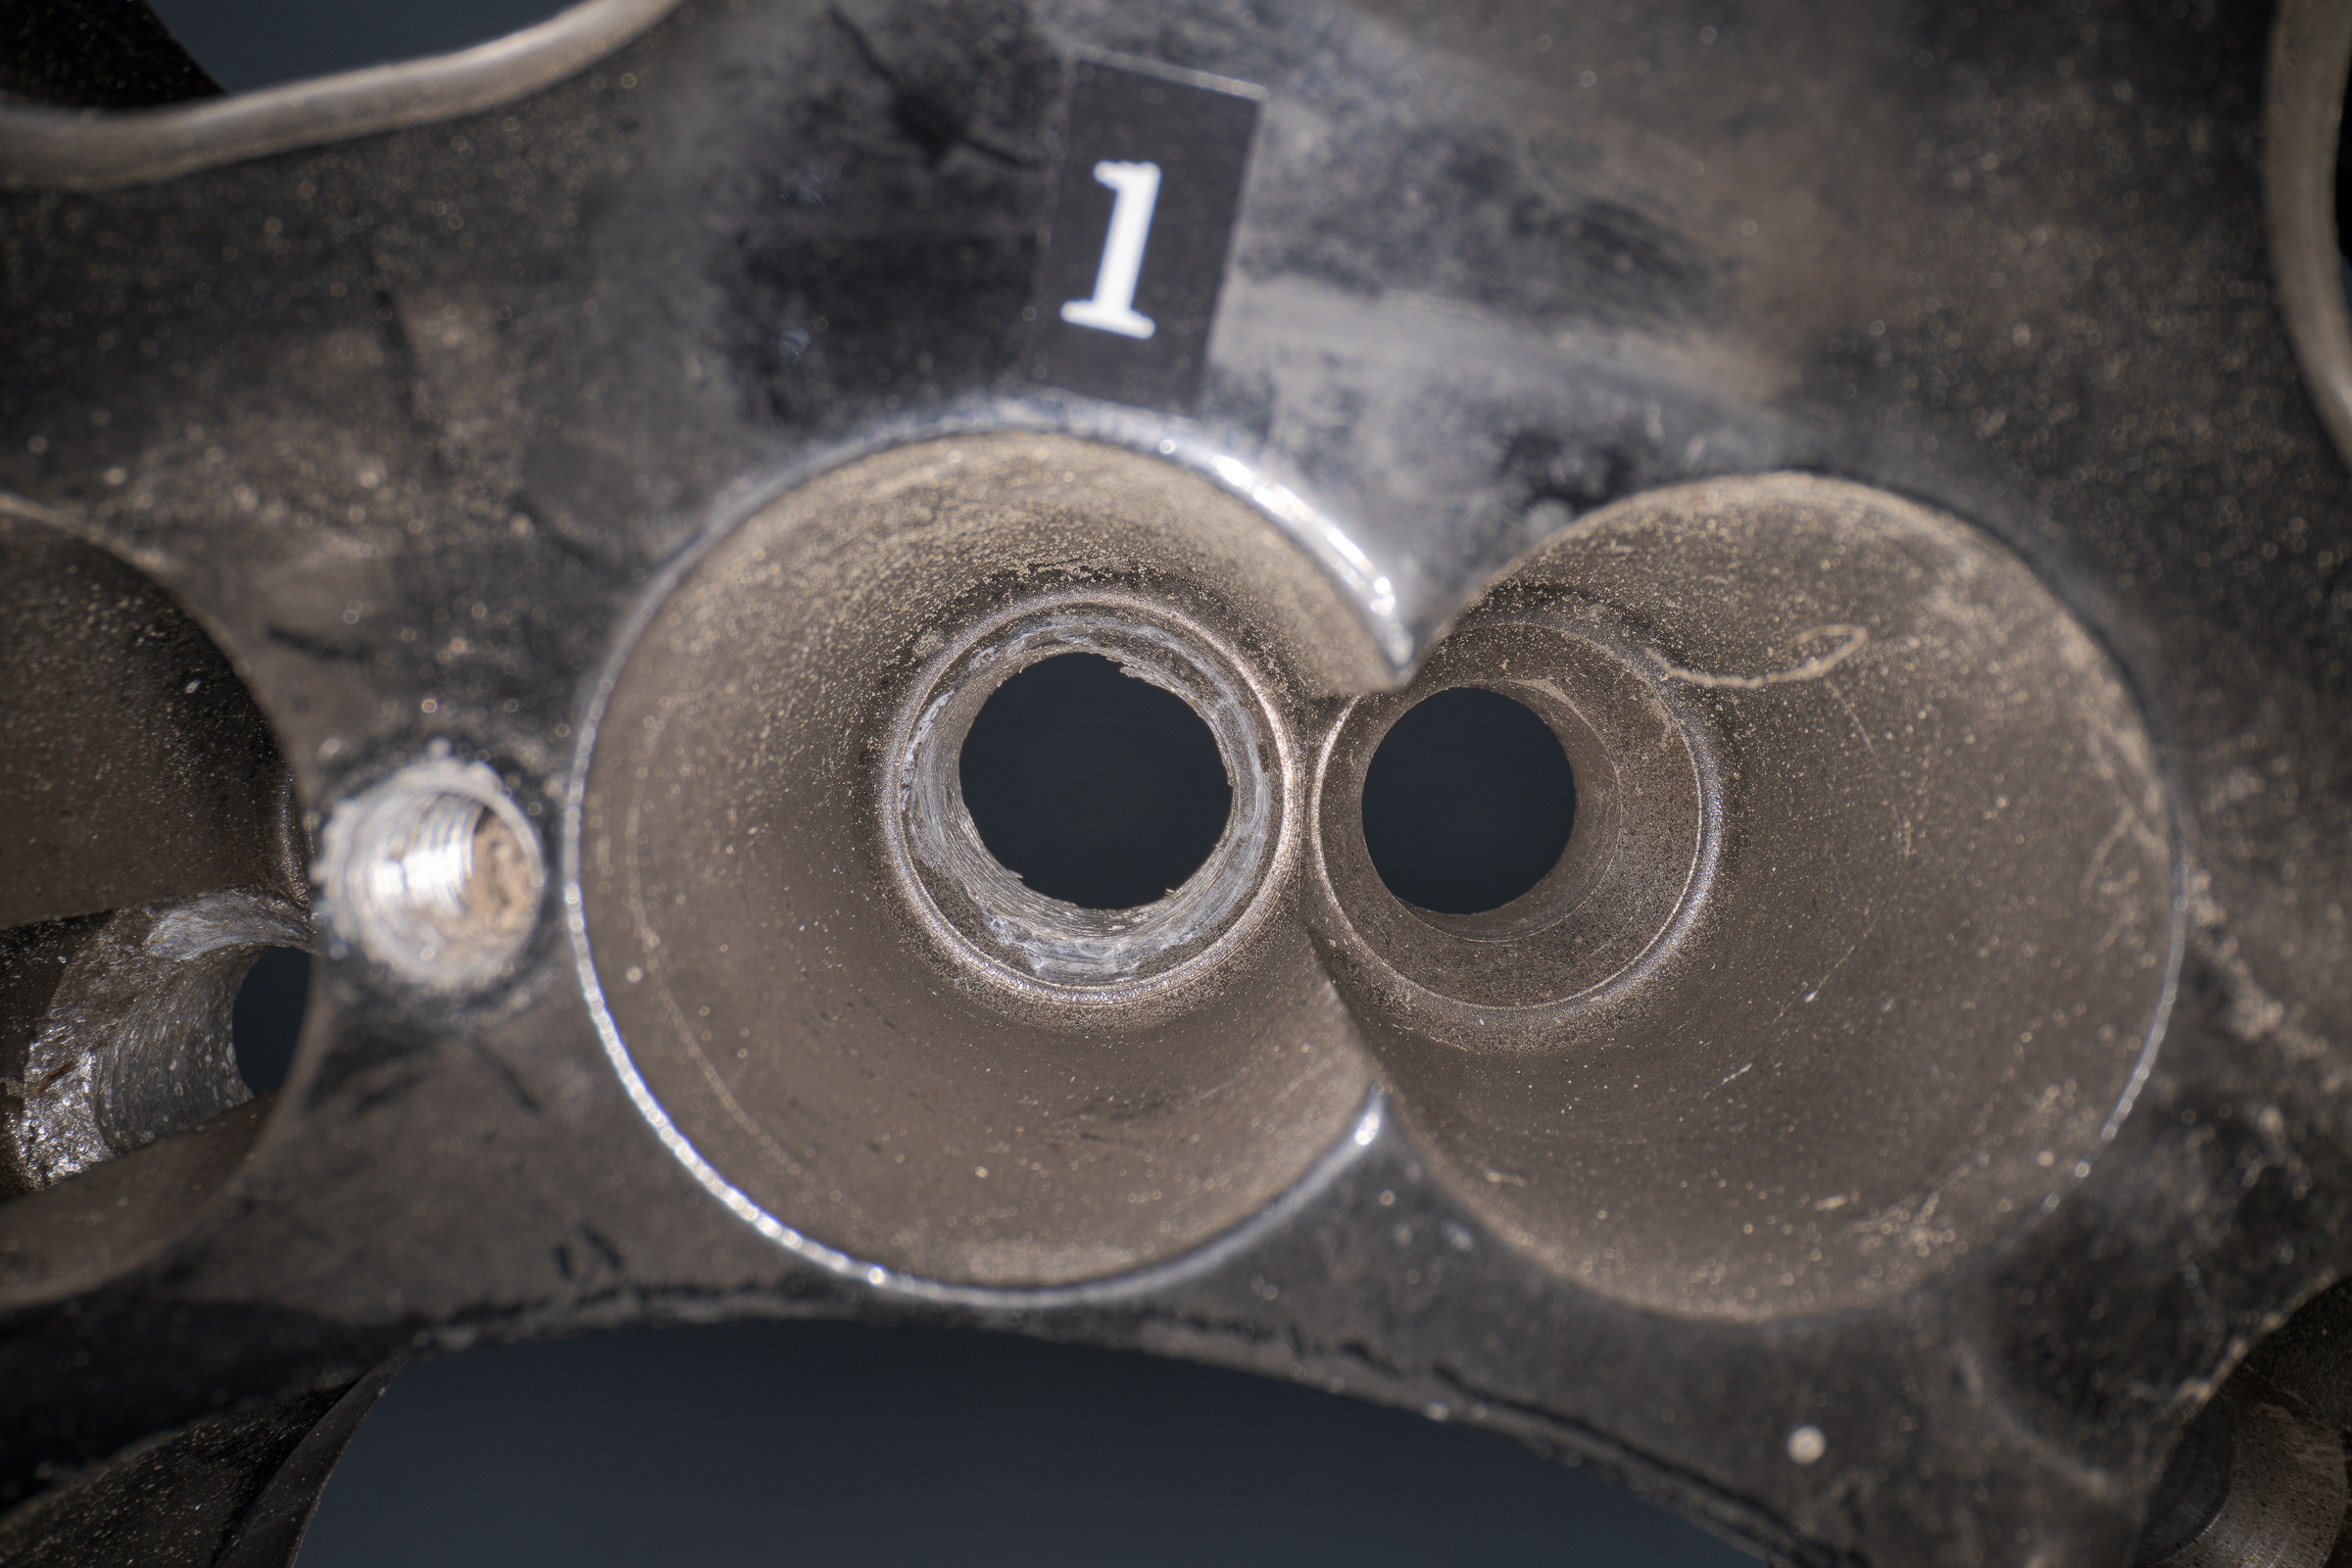
For this wheel, I numbered the holes in pairs. Note that the numbers are counterclockwise on the inside so they will correspond with the same numbers on the outside of the wheel, which were clockwise. (Click on image to enlarge, then click on the back arrow to return to this post.)
Nikon D850 with ZEISS Milvus 50 mm macro lens and Nikon R1C1 macro flashes. f/16, 1/200 sec, ISO 64.
Here is the outside of the wheel showing the clockwise bolt hole pair labels. (Click on image to enlarge, then click on the back arrow to return to this post.)
Nikon D850 with ZEISS Milvus 50 mm macro lens with two Profoto B1x in diffused silver umbrellas. f/16, 1/200 sec, ISO 64.
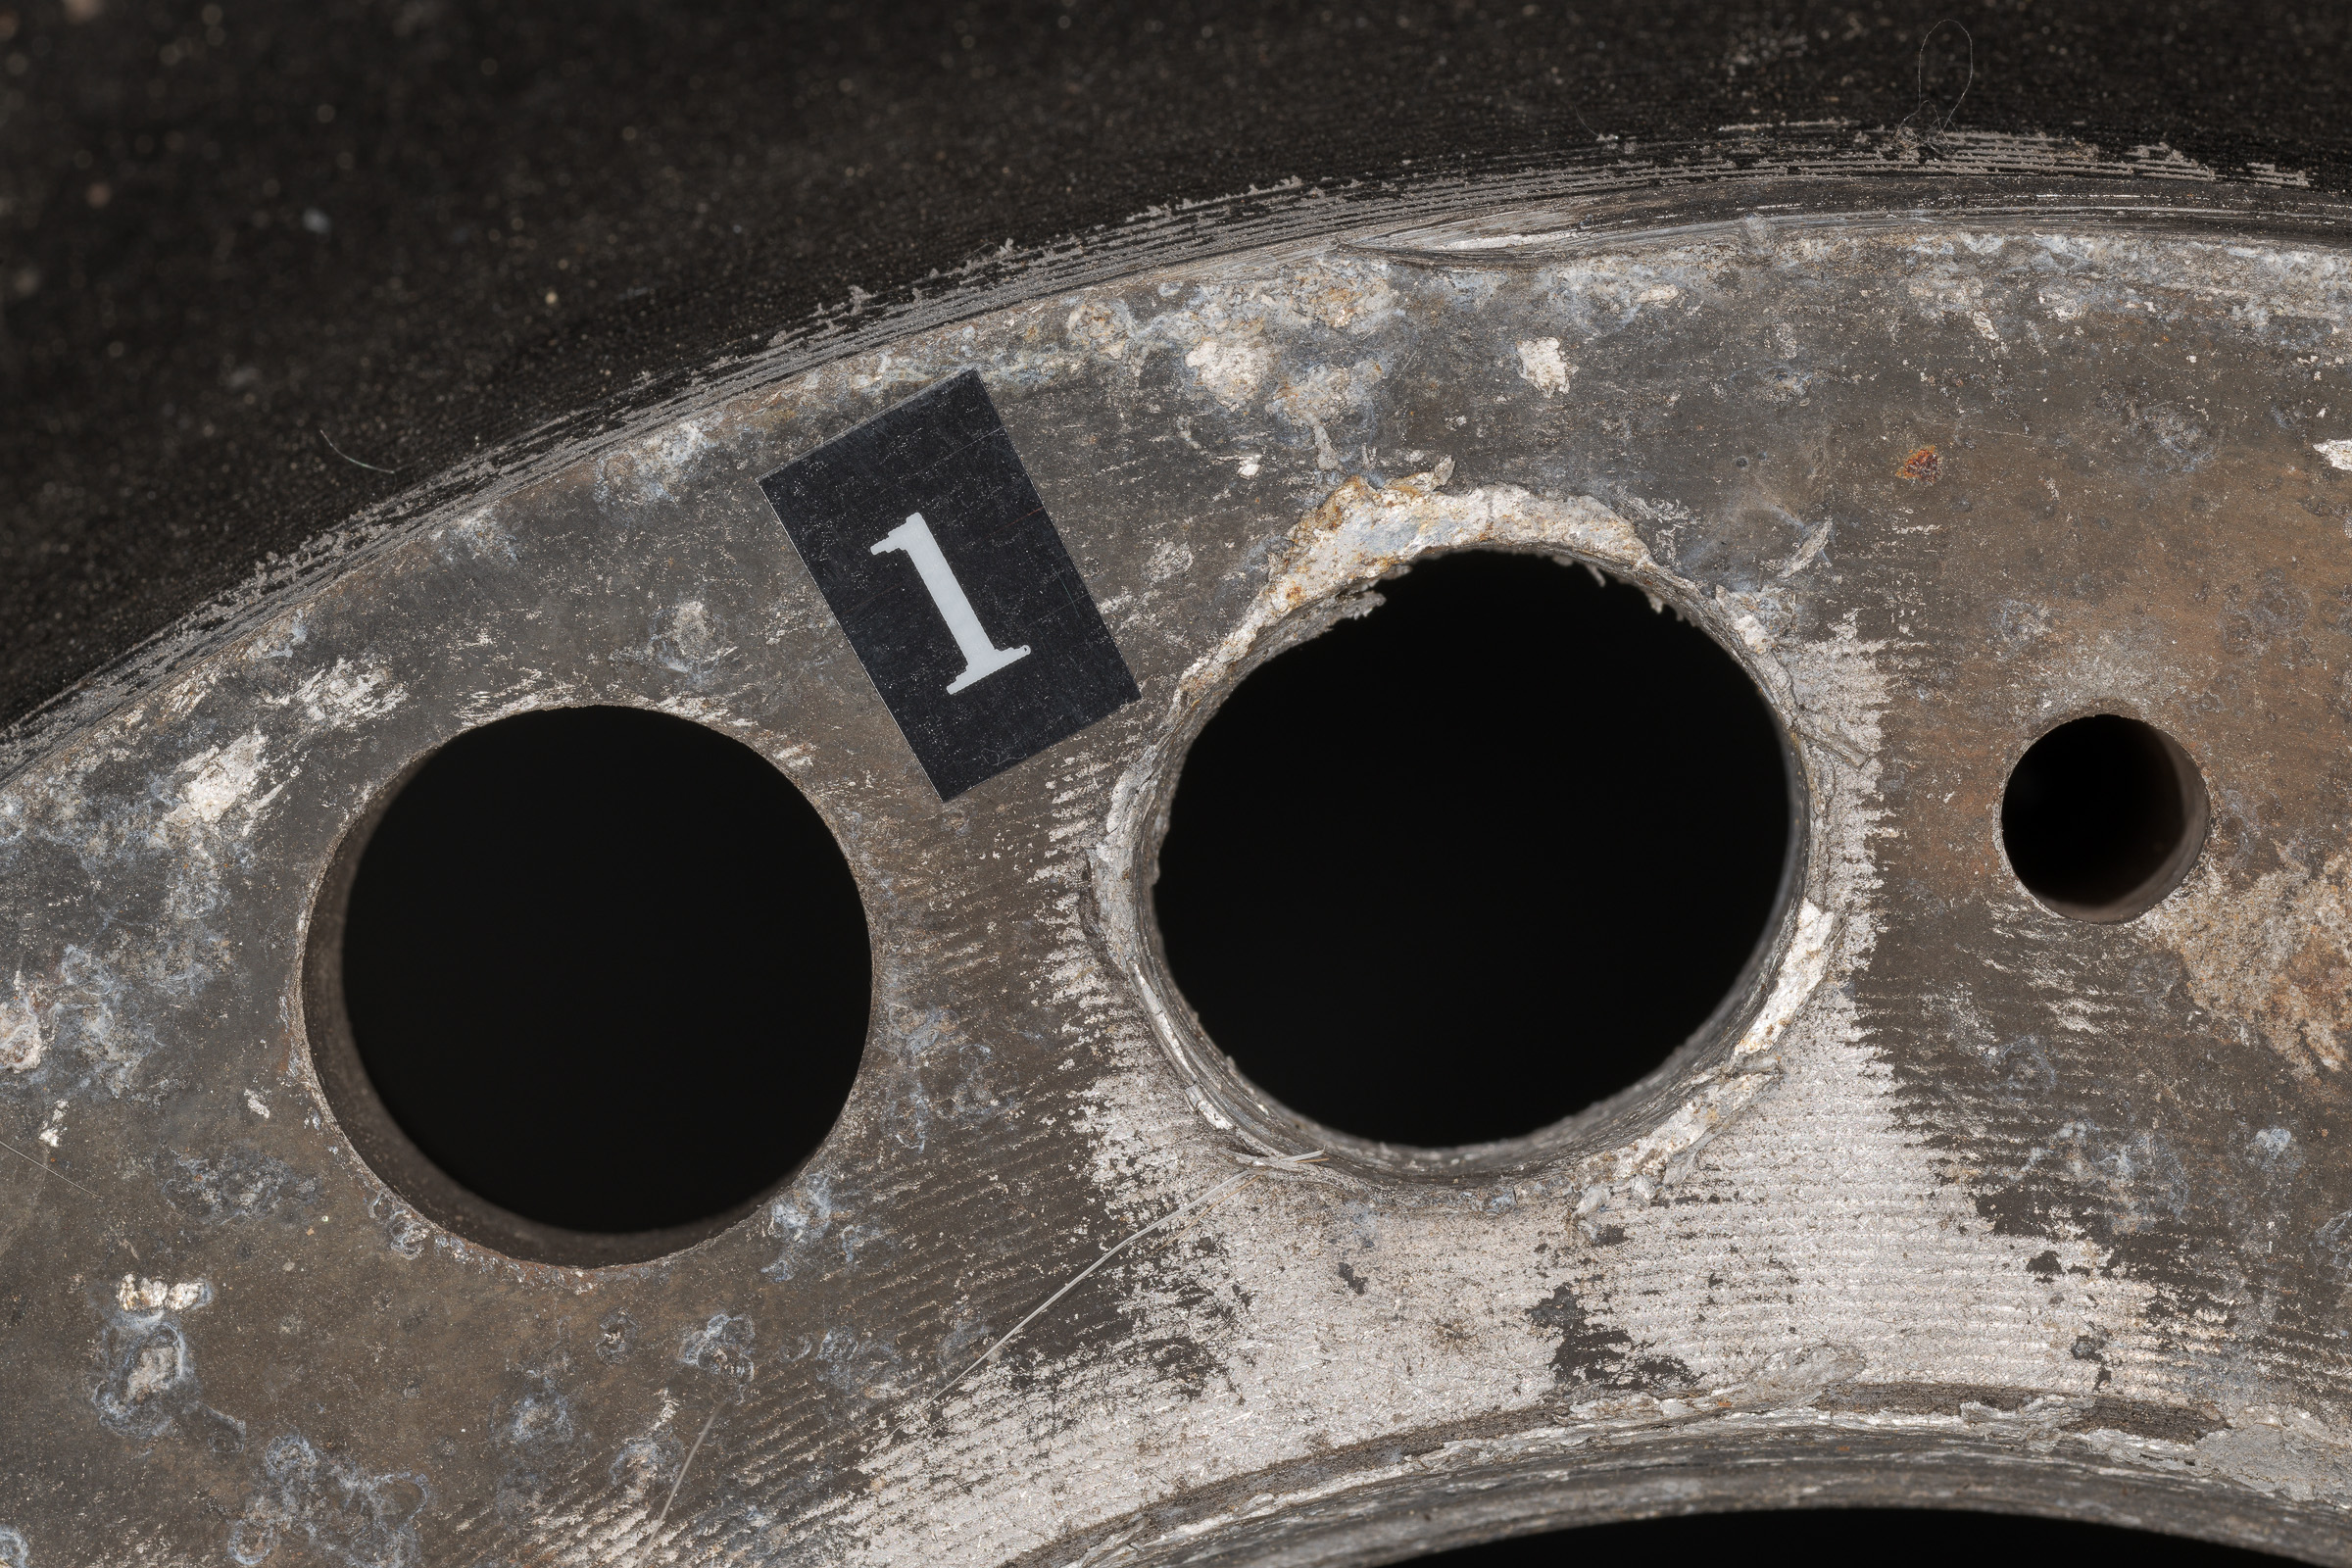
Now close-ups of every hole will be easily identified whether on the inside…
Nikon D850 with ZEISS Milvus 100 mm macro lens and Nikon R1C1 macro flashes. f/16, 1/200 sec, ISO 64.
…or the outside of the wheel. Note that the labels are a good size in the close-ups without overwhelming the subject. Also note that the label is still effective even if it is out of the depth of field of the subject and is slightly out of focus.
Nikon D850 with Laowa 24mm f/14 2X Macro Probe. f/unrecorded, 0.5 sec, ISO 64.
Takeaways:
-1- After photographing evidence as found or received, mark repetitive features on any sides that will be photographed.
-2- Do not make permanent marks on evidence.
-3- Mark evidence with small, legible, and removable labels instead of handwritten numbers on torn pieces of tape.
-4- While labels should be included in close-ups, they do not have to be within the depth of field of the subject as long as they are still discernible.
-5- After making each close-up image with its label, you may want to remove the label and take another photograph without it. Having your camera on a tripod will allow you to made identical shots both with and without the label.
Perspective is the relationship between the elements in your photograph. The only way to change perspective is to move the camera. In fact, any time you move the camera, your perspective automatically changes. Conversely, staying in one place and zooming in or out doesn’t change perspective; it only crops the image differently.
This series of photographs demonstrates perspective change by using a 24-70 mm zoom lens and changing the camera position while using four increasingly long focal lengths: 24, 35, 50, and 70 mm . All were made from my standing eye height. The goal was to keep the subject car the same size in each image by moving the camera further away at each longer focal length.
When the resulting images are viewed at the same distance, you’ll note two effects from increasing camera distances while using longer focal lengths: -1- the car appears to change shape and compress, and -2- the background and other vehicles seem to be getting closer to the subject car.
This spectacular 1937 Cord Model 812 Beverly Sedan was photographed at the Savoy Automobile Museum in Cartersville, GA. Like most car museums, neither tripods nor flash are allowed. This requires using high ISO and slow shutter speeds to obtain your images. Fortunately, almost all full frame and some cropped sensor mirrorless cameras have amazingly effective in-body stabilization, which allows handholding the camera at low (slow) shutter speeds that were almost impossible before.
While these examples were made at a car museum, the principles apply exactly the same for any vehicle—or any subject—anywhere.
For this first image—made with a 24 mm focal length—I was quite close to the car. Note how long the hood looks and how far away the DeLorean and the background appear. [Click on image to enlarge, then click back arrow to return to post.]
Made at Savoy Automobile Museum, Cartersville, GA, using handheld Nikon Z 7II with 24-70 mm f/2.8 lens at 24 mm. Exposure: f/9, 1/30 sec, ISO 1600.
Stepping backward with a 35 mm focal length, the Cord looks less distorted, and the background vehicles seem closer. Of course, no vehicles were moved between any of these images. [Click on image to enlarge, then click back arrow to return to post.]
Made at Savoy Automobile Museum, Cartersville, GA, using handheld Nikon Z 7II with 24-70 mm f/2.8 lens at 35 mm. Exposure: f/9, 1/30 sec, ISO 1600.
Moving further away using a 50 mm focal length appears to once again shorten the hood and wheelbase of the Cord, while bringing the background even closer. [Click on image to enlarge, then click back arrow to return to post.]
Made at Savoy Automobile Museum, Cartersville, GA, using handheld Nikon Z 7II with 24-70 mm f/2.8 lens at 50 mm. Exposure: f/9, 1/30 sec, ISO 1600.
Back even further with a 70 mm focal length apparently compresses the Cord even more and brings the DeLorean and background closest yet. [Click on image to enlarge, then click back arrow to return to post.]
Made at Savoy Automobile Museum, Cartersville, GA, using handheld Nikon Z 7II with 24-70 mm f/2.8 lens at 70 mm. Exposure: f/9, 1/30 sec, ISO 1600.
Takeaways:
-1- When you move your camera, the perspective of your resulting image changes.
-2- When viewing images from the same distance, moving your camera closer to your subject with a wider focal length makes your subject appear distorted and your background objects farther apart.
-3- Again, when viewing images from the same distance, moving your camera farther away from your subject with a longer focal length makes both your subject and background elements to appear more compressed.
Although the effect is usually unintentional, a single image may be deceptive!
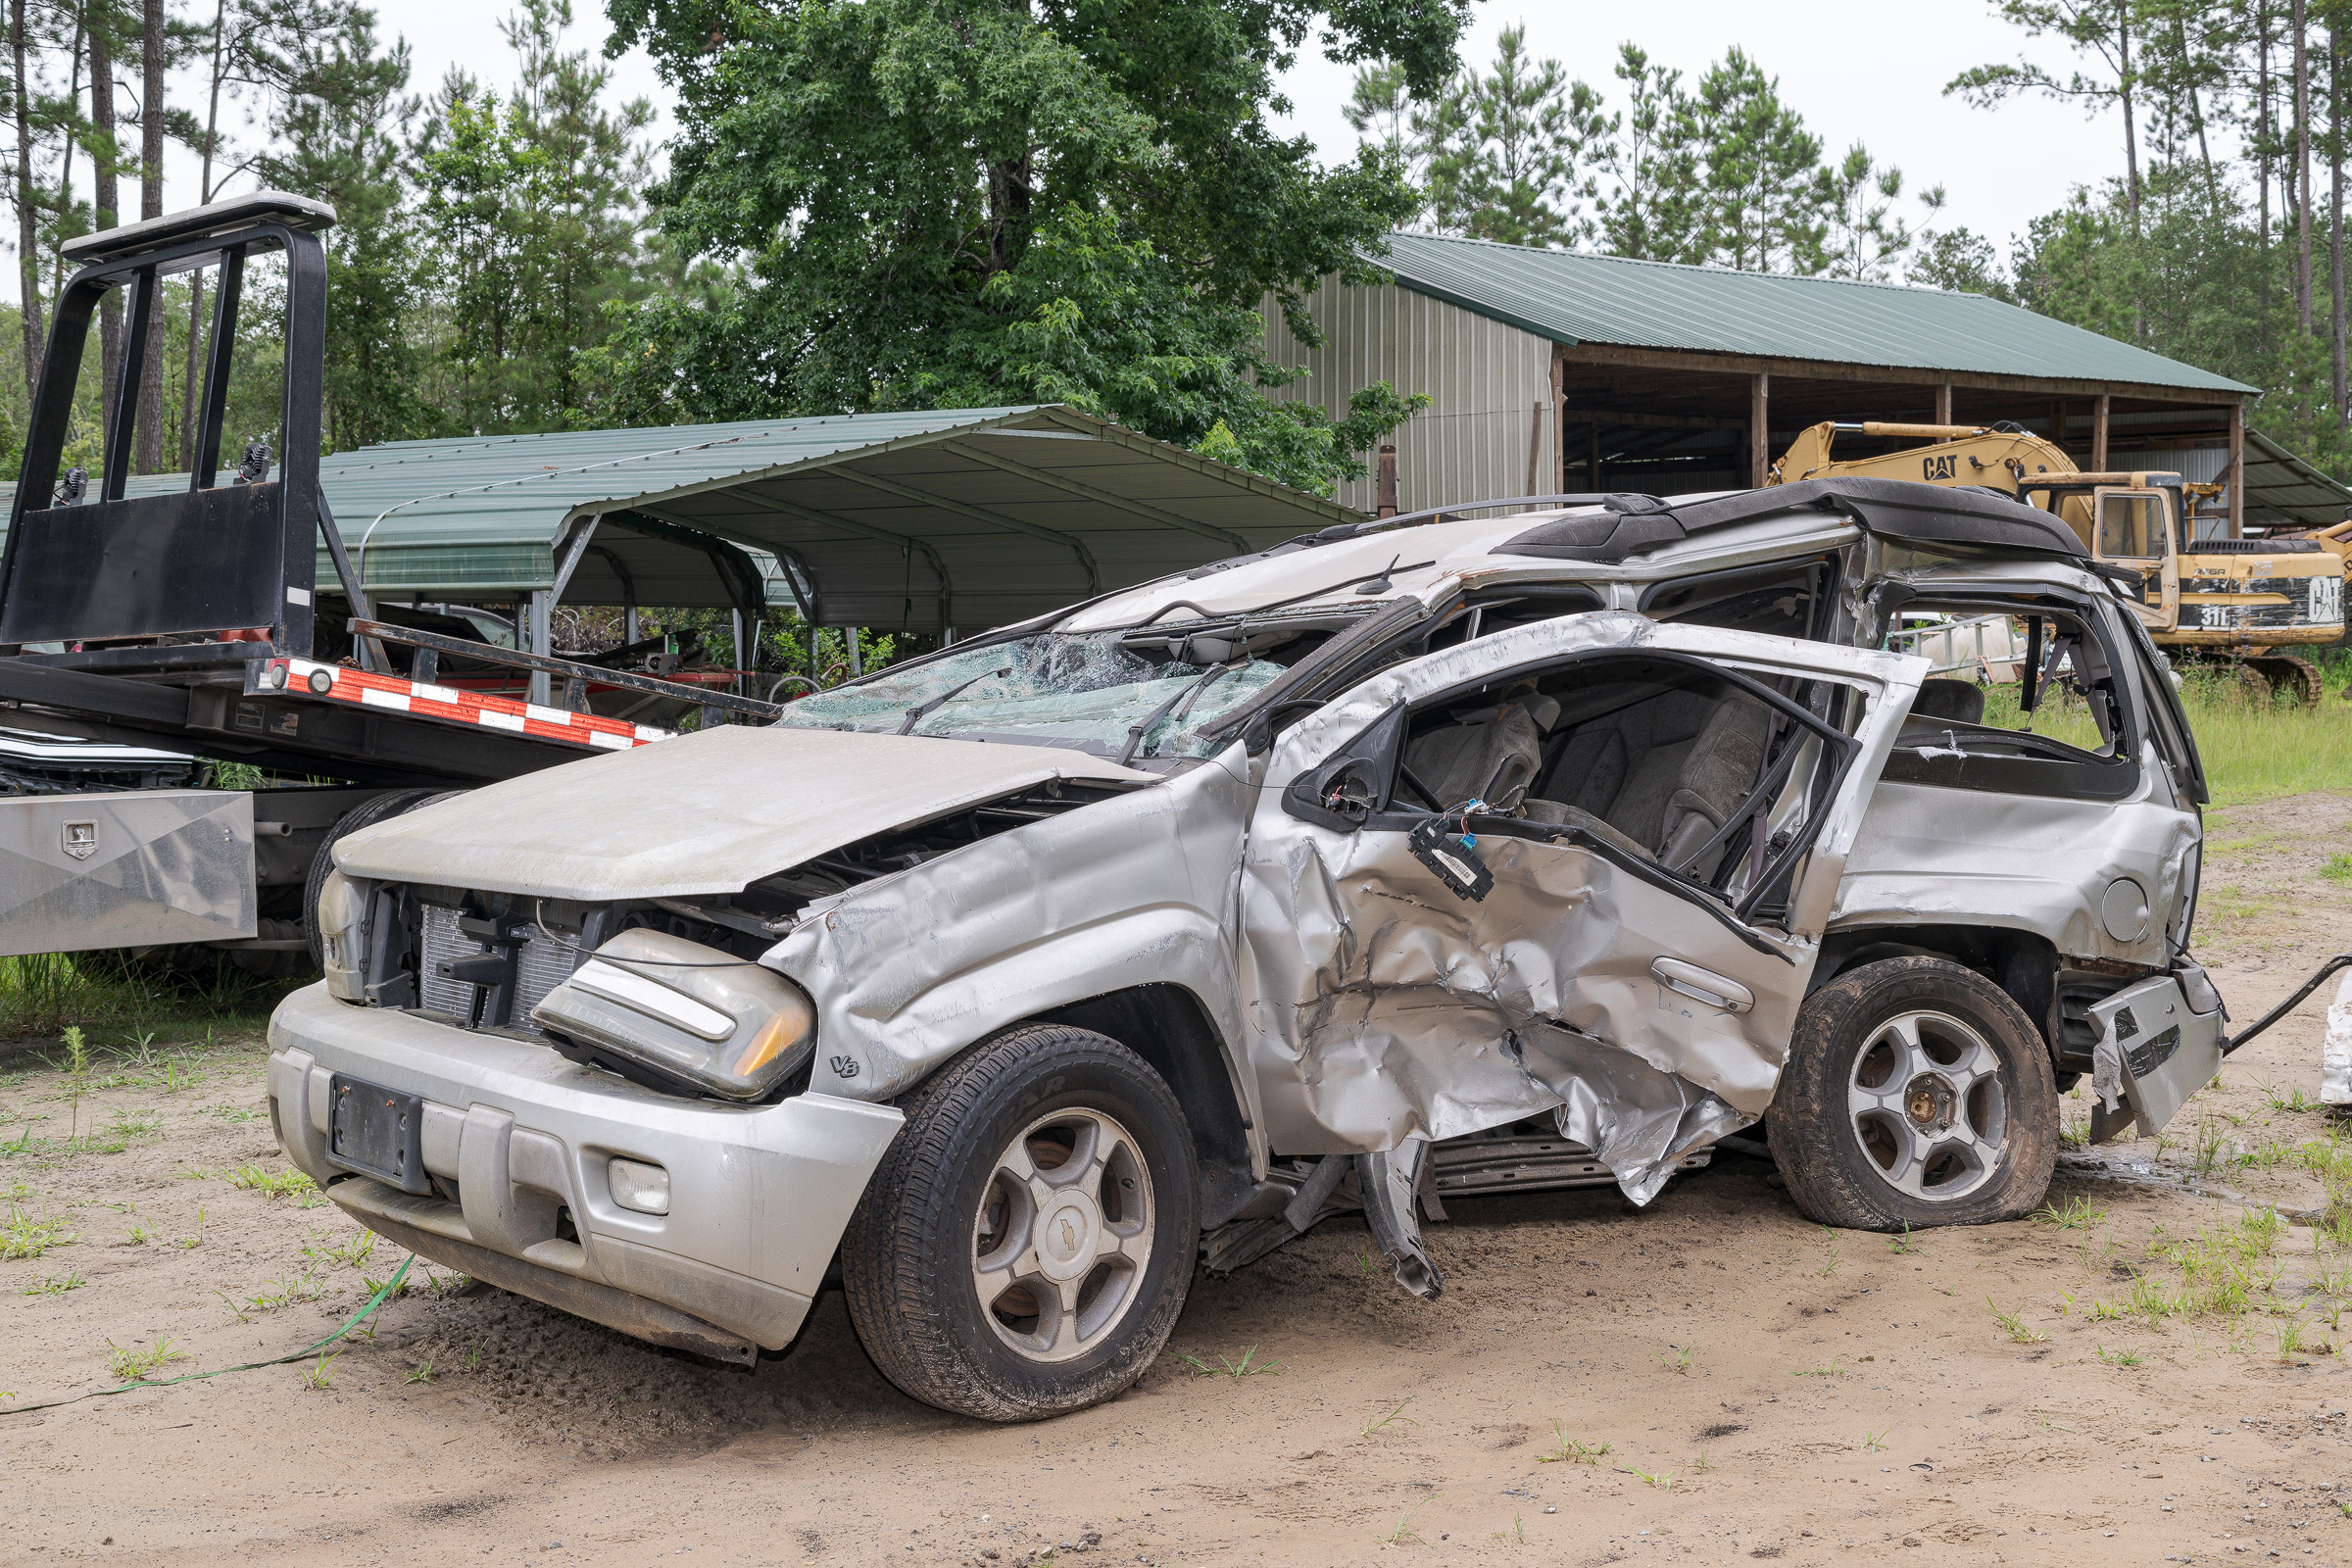
In the photograph below, both the height and the angle of the camera seem to indicate that the subject SUV was a two-door model. But actually, there was no such vehicle as a two-door 2004 Chevrolet Trailblazer. In fact, the subject shown here was even the extended EXT version of the standard four-door. (Note the top of the chopped off B-pillar visible above the window frame, which is the clear giveaway that it is actually a four-door SUV.) [Click on image to enlarge, then click back arrow to return to post.]
2004 Chevrolet Trailblazer EXT LT 4WD 3/4 side view. (Nikon D850 with ZEISS Milvus 50 mm f/2 macro lens with polarizer, fill flash, and tripod. f/13, 1/40 sec, ISO 125.)
It is standard practice to make multiple photographs around every subject vehicle. It’s also often necessary to make images at different heights and angles. No one who sees all of our photographs will be deceived. The problem is when you get only one or maybe a couple photos of a subject you either haven’t or can’t inspect yourself.
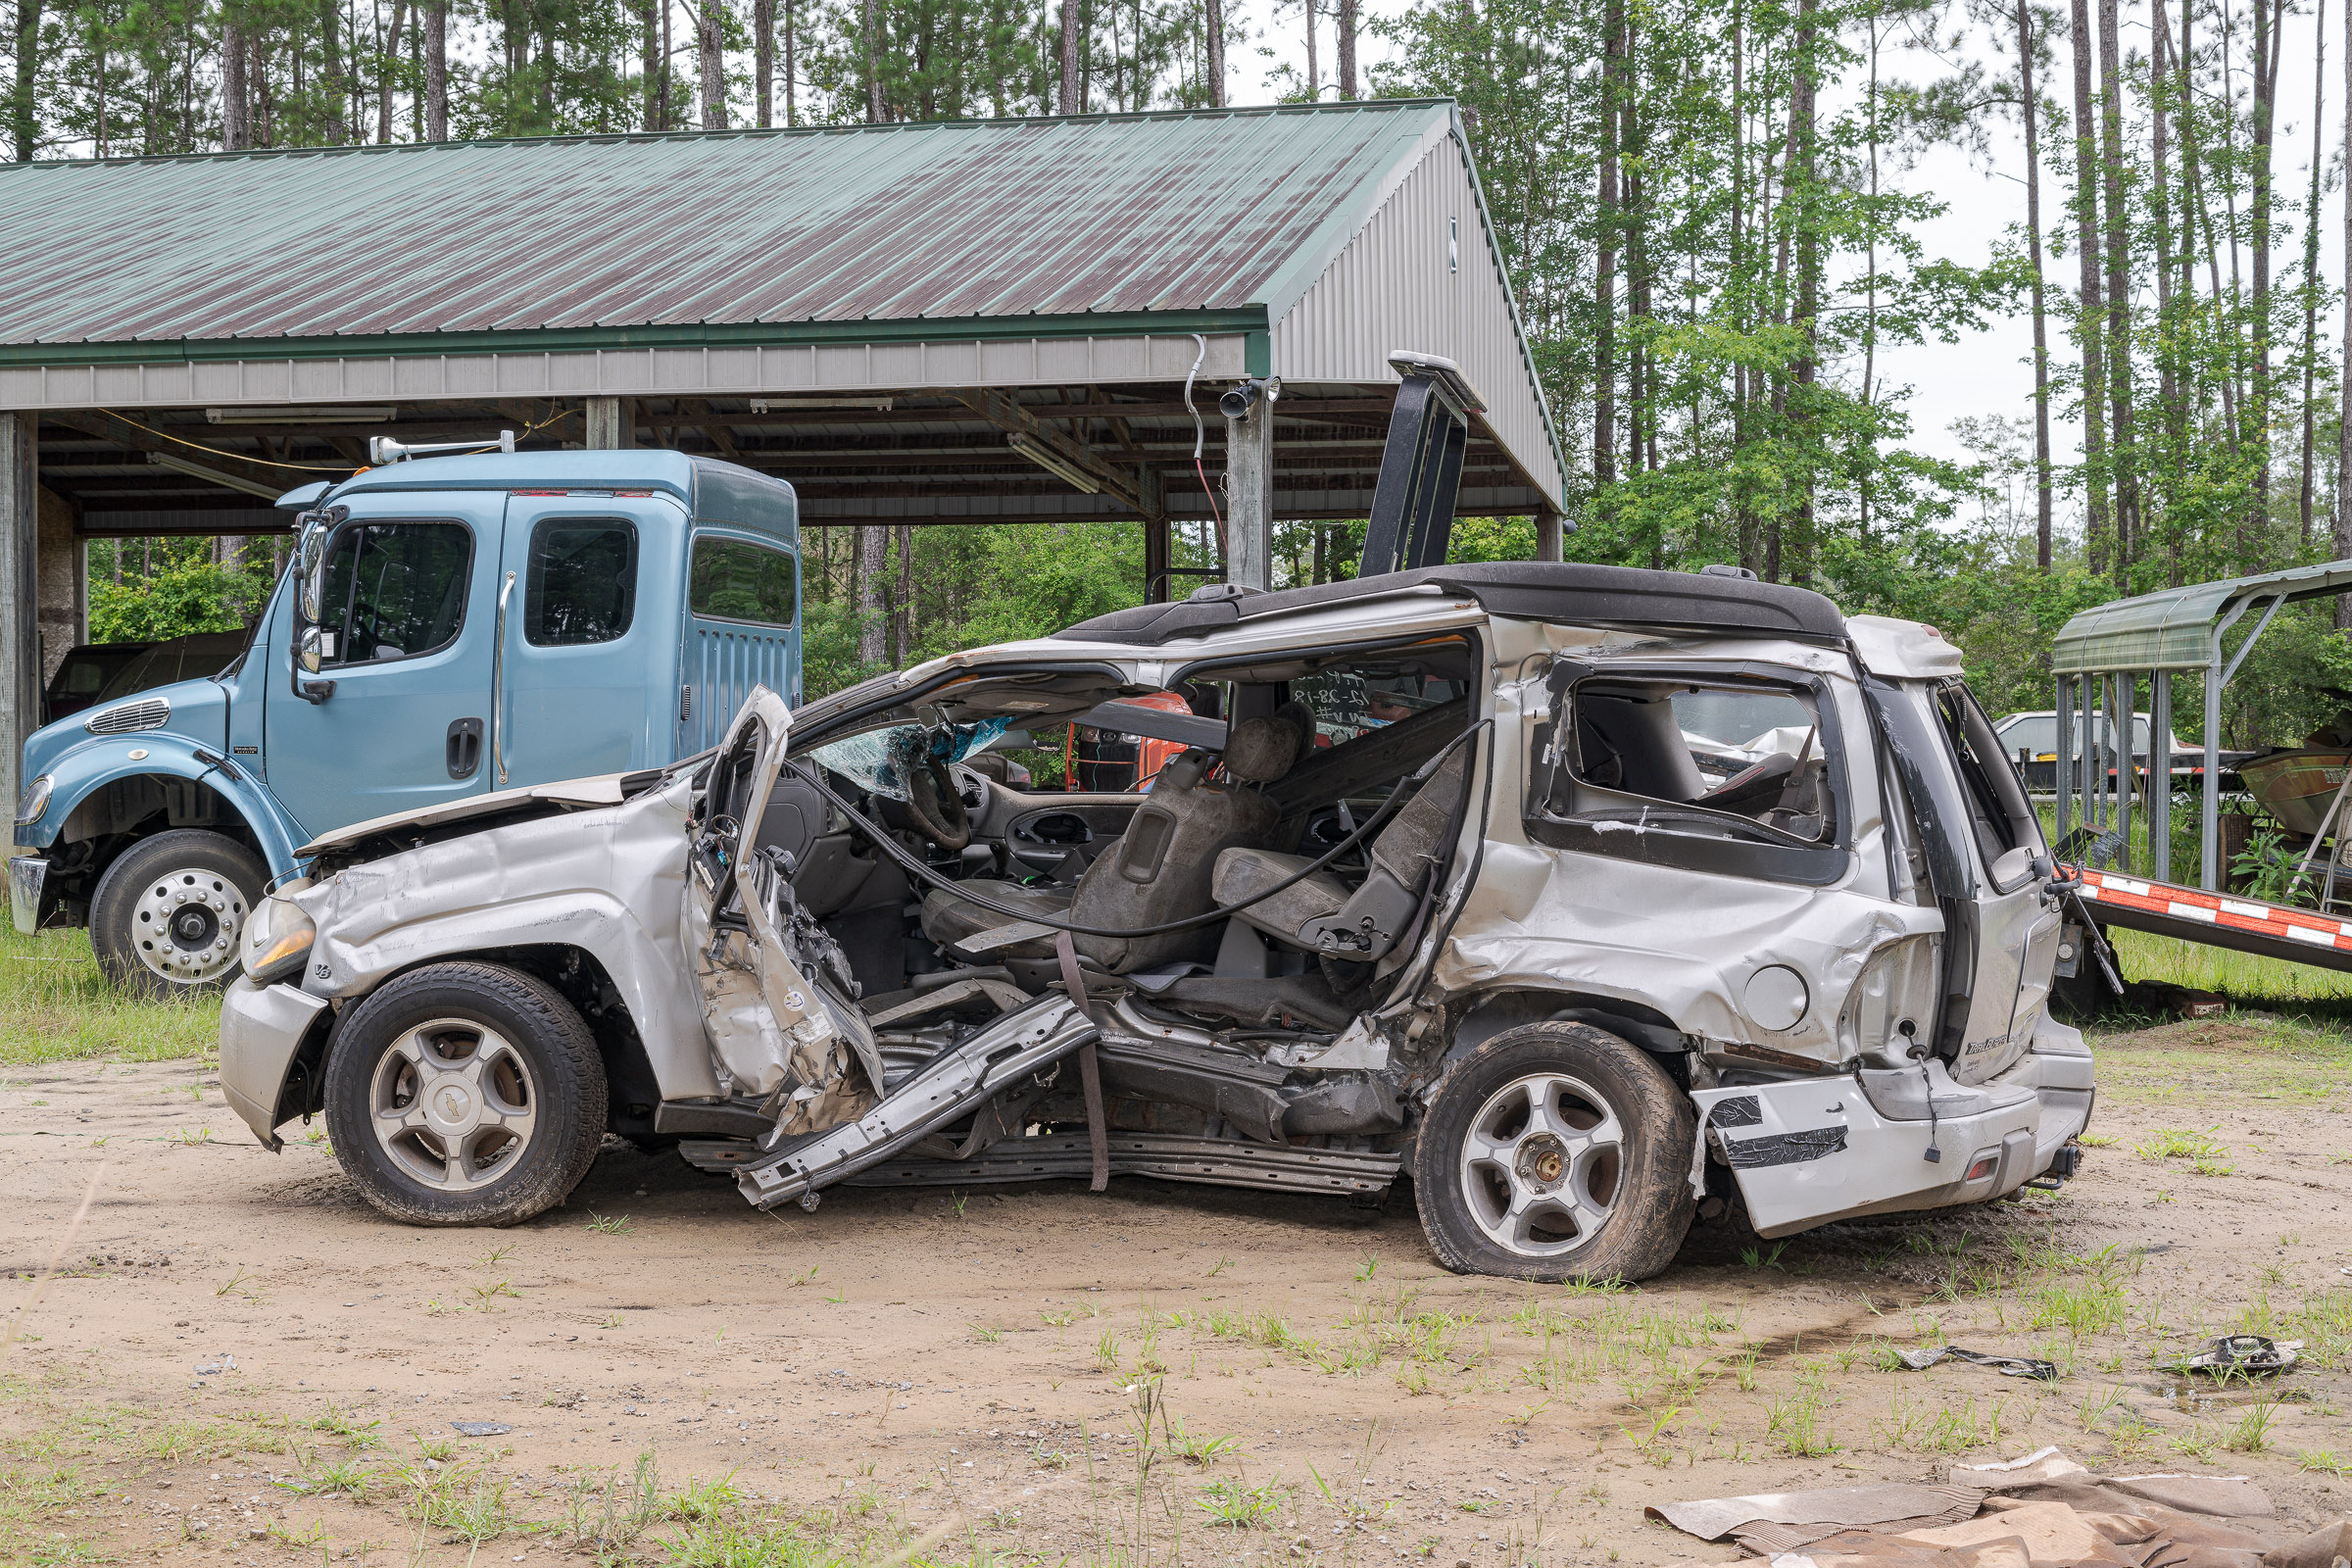
Using the same prime ZEISS 50 mm lens at the same tripod height, the photo below clearly shows the vehicle was a four-door. [Click on image to enlarge, then click back arrow to return to post.]
2004 Chevrolet Trailblazer EXT LT 4WD side view. (Nikon D850 with ZEISS Milvus 50 mm f/2 macro lens with polarizer, fill flash, and tripod. f/13, 1/30 sec, ISO 125.)
This unintended deception isn’t an issue when you’re making your own photographs, but it can be a problem if you’re trying draw conclusions based on a limited number of photographs provided to you. This frequently happens when the vehicle has been destroyed or is otherwise unavailable, and only one or a couple photographs—often made with a cell phone—are all the evidence that remains.
Takeaways:
-1- Be careful making conclusions based on a single photograph.
-2- Make a series of images around the entire circumference of any vehicle or subject you are documenting.
While this is hardly news, on sunny or lightly overcast days, the positions and sizes of the shadows of trees, buildings, signs, poles, fences, guardrails, etc., change throughout the day. At certain times, these shadows can make it difficult to clearly show tire marks, paint marks, or gouges in your photographs. The worst is when there is a pattern of light and shadow across your scene.
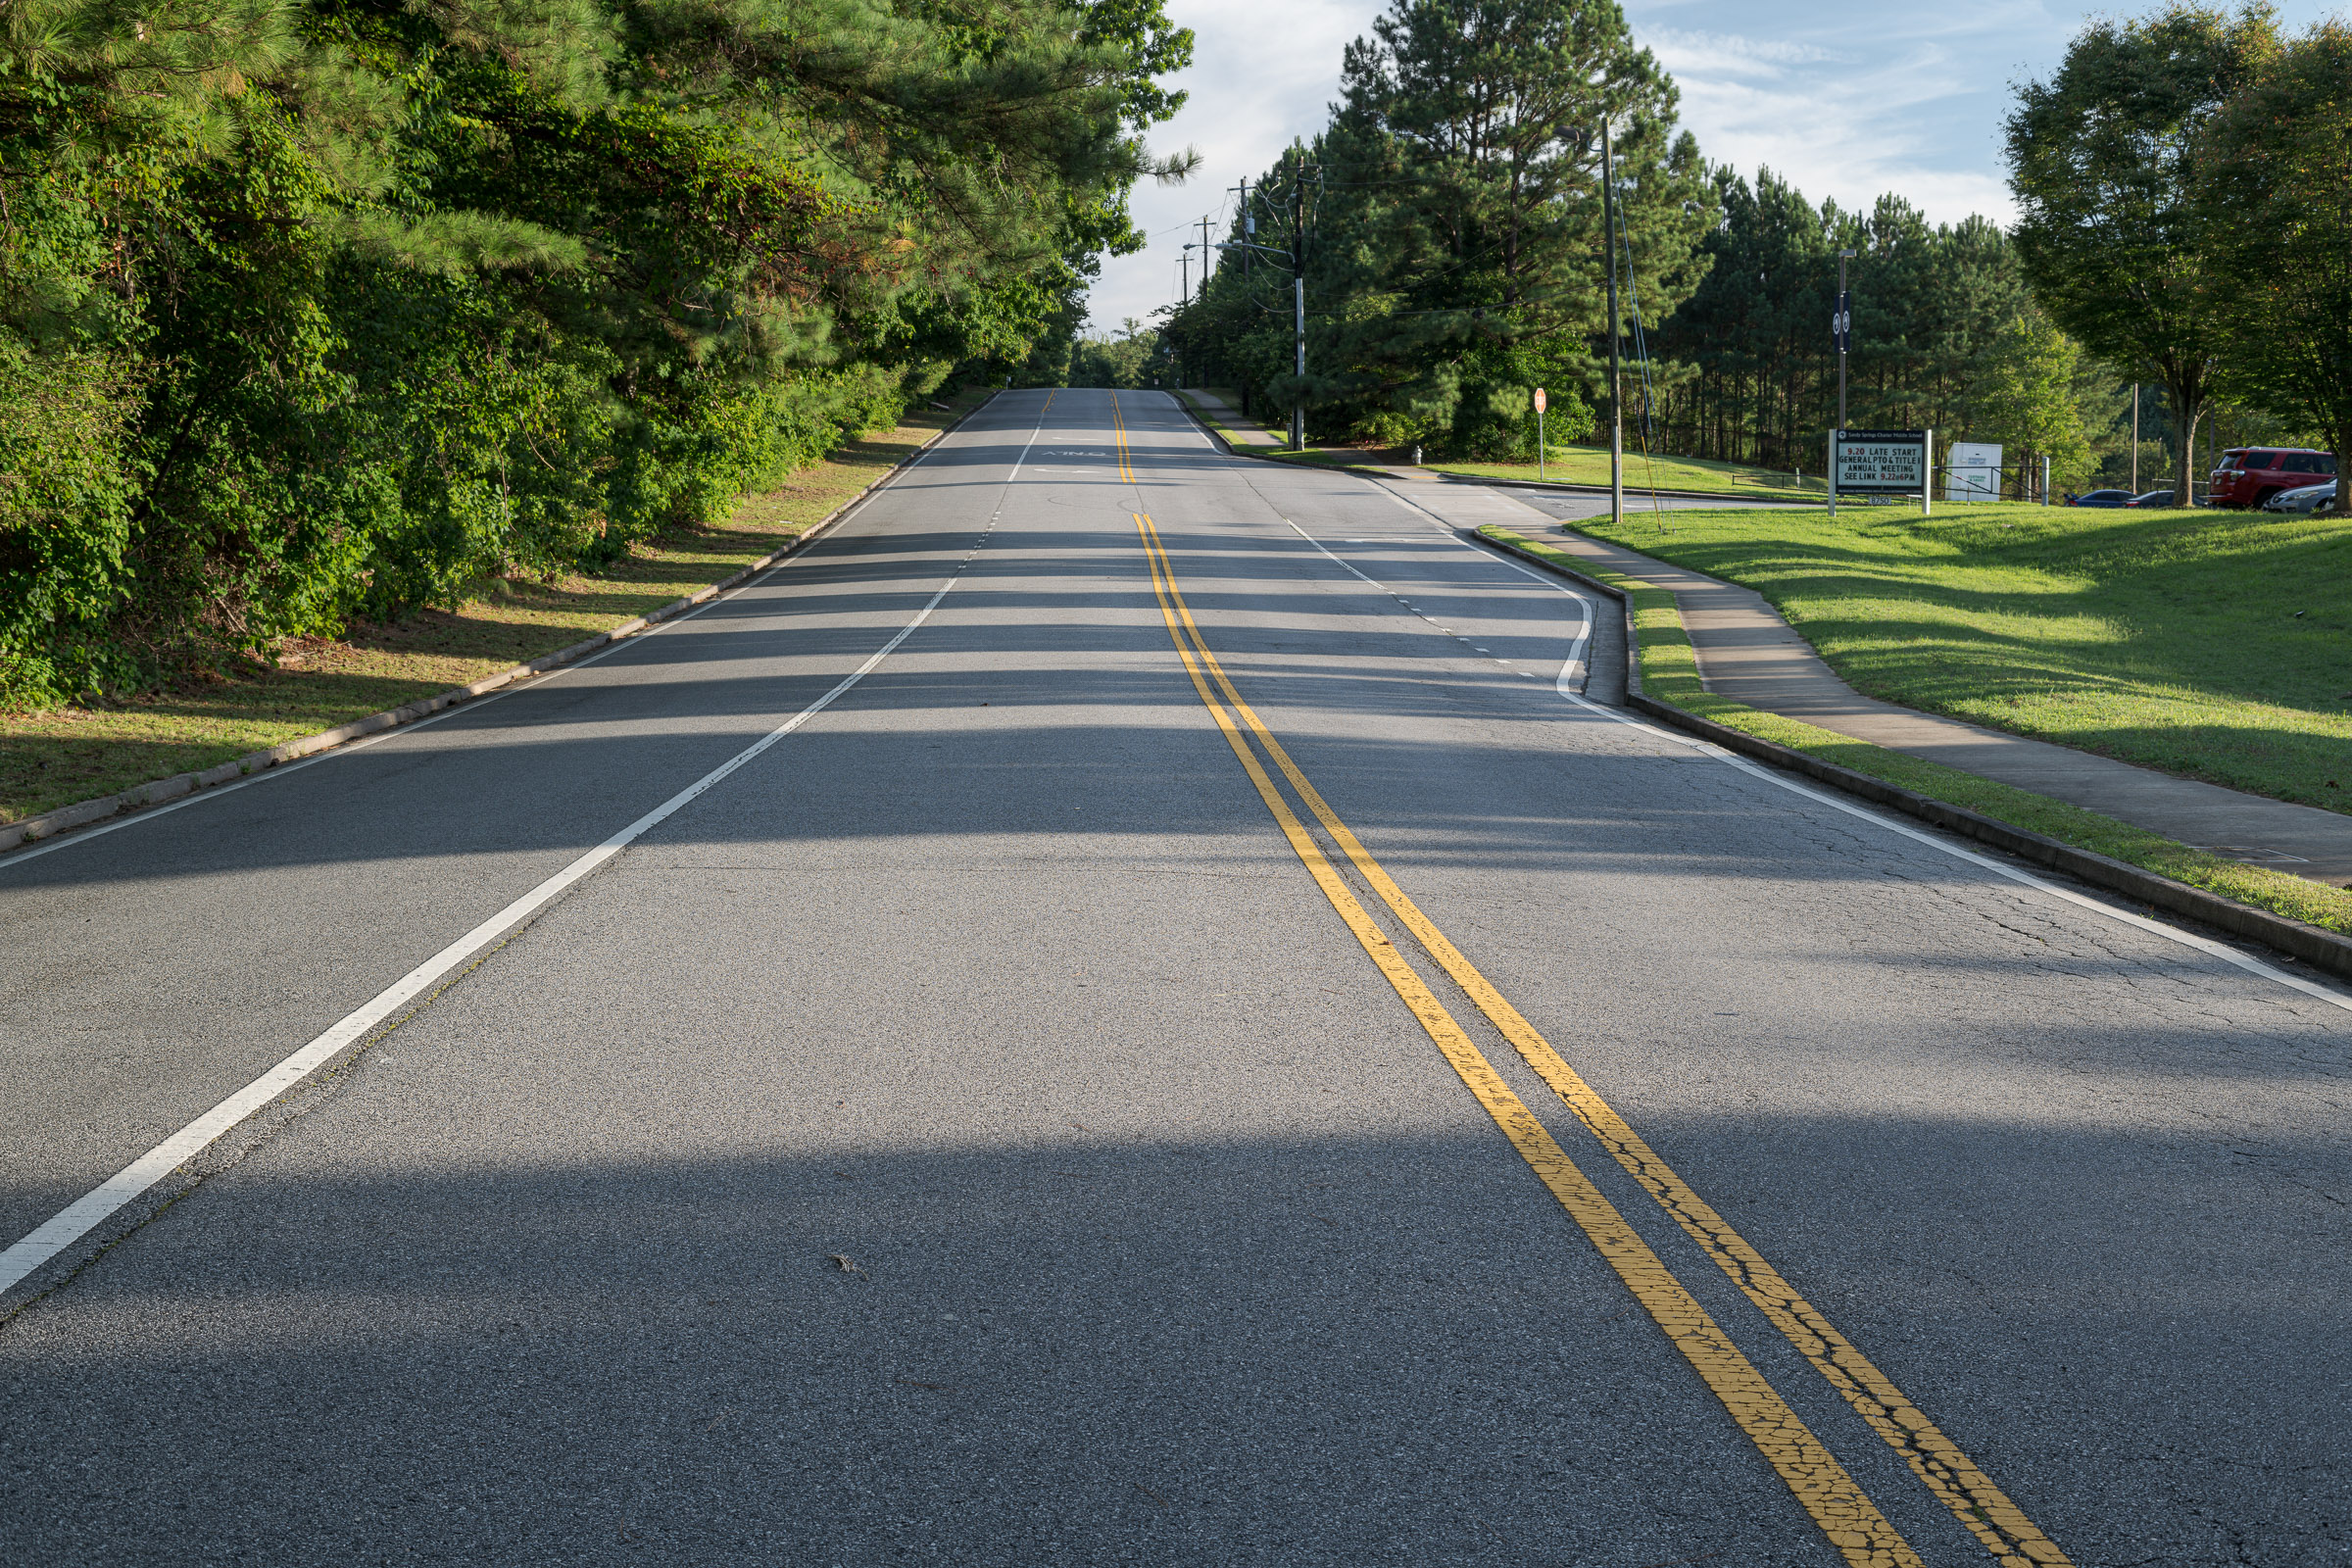
This first image was made at 10:21 am on a mostly sunny morning. (Click on image to enlarge. Then click back arrow to return to this post.)
Tree shadows at 10:21 am on 09/04/21. (Made with ZEISS 50 mm f/2 macro lens on Nikon D850 on RRS TFC-24L tripod with BH-40 ball head. f/11, 1/8 sec, ISO 64.)
This view was made looking south, so the morning sun would have been to left, or east. The dense line of trees on the eastern edge of the road cast a shadow across the entire road with bright spots through the openings in the branches. These bright spots can interfere with details or evidence you might want to show.
Returning to that same scene at 2:45 pm that afternoon, the overcast had burned off. Even though the sun was quite bright, it was at an angle that evenly illuminated a lot more of the road, with only some shadows at the left. (Click on image to enlarge. Then click back arrow to return to this post.)
Tree shadows at 2:44 pm on 09/04/21. (Made with ZEISS 50 mm f/2 macro lens on Nikon D850 on RRS TFC-24L tripod with BH-40 ball head. f/11, 1/60 sec, ISO 64.)
By late afternoon that day, it had become too overcast for deep shadows, so I went back a couple afternoons later to capture what that scene would look like later on a sunny day. The image below was made at 6:52 pm. (Click on image to enlarge. Then click back arrow to return to this post.)
Tree shadows at 6:52 pm on 09/09/21. (Made with ZEISS 50 mm f/2 macro lens on Nikon D850 on RRS TFC-24L tripod with BH-40 ball head. f/11, 1/15 sec, ISO 64.)
Those seemingly innocuous trees to the west (right of the photo) were now casting long, separated shadows across the road. These shadows would obviously make it more difficult to show gouges, tire marks, or even paint marks on the pavement.
Time permitting (i.e., it’s not a rapid response), it’s worth checking out where the sun and any shadows would be before you set out to inspect a scene.
For many years, I’ve been using The Photographer’s Ephemeris (TPE) https://photoephemeris.com/en to determine where the sun is going to be in relation to any accident site. (It’s now a subscription service, and well worth the small cost.) It’s extremely valuable if you need to show whether the sun could have been in the eyes of any drivers or witnesses.
And as in this case, it’s also useful for determining when you have the best chance of getting clean site images with minimal shadows. Below are the three TPE screen captures that show what information you get.
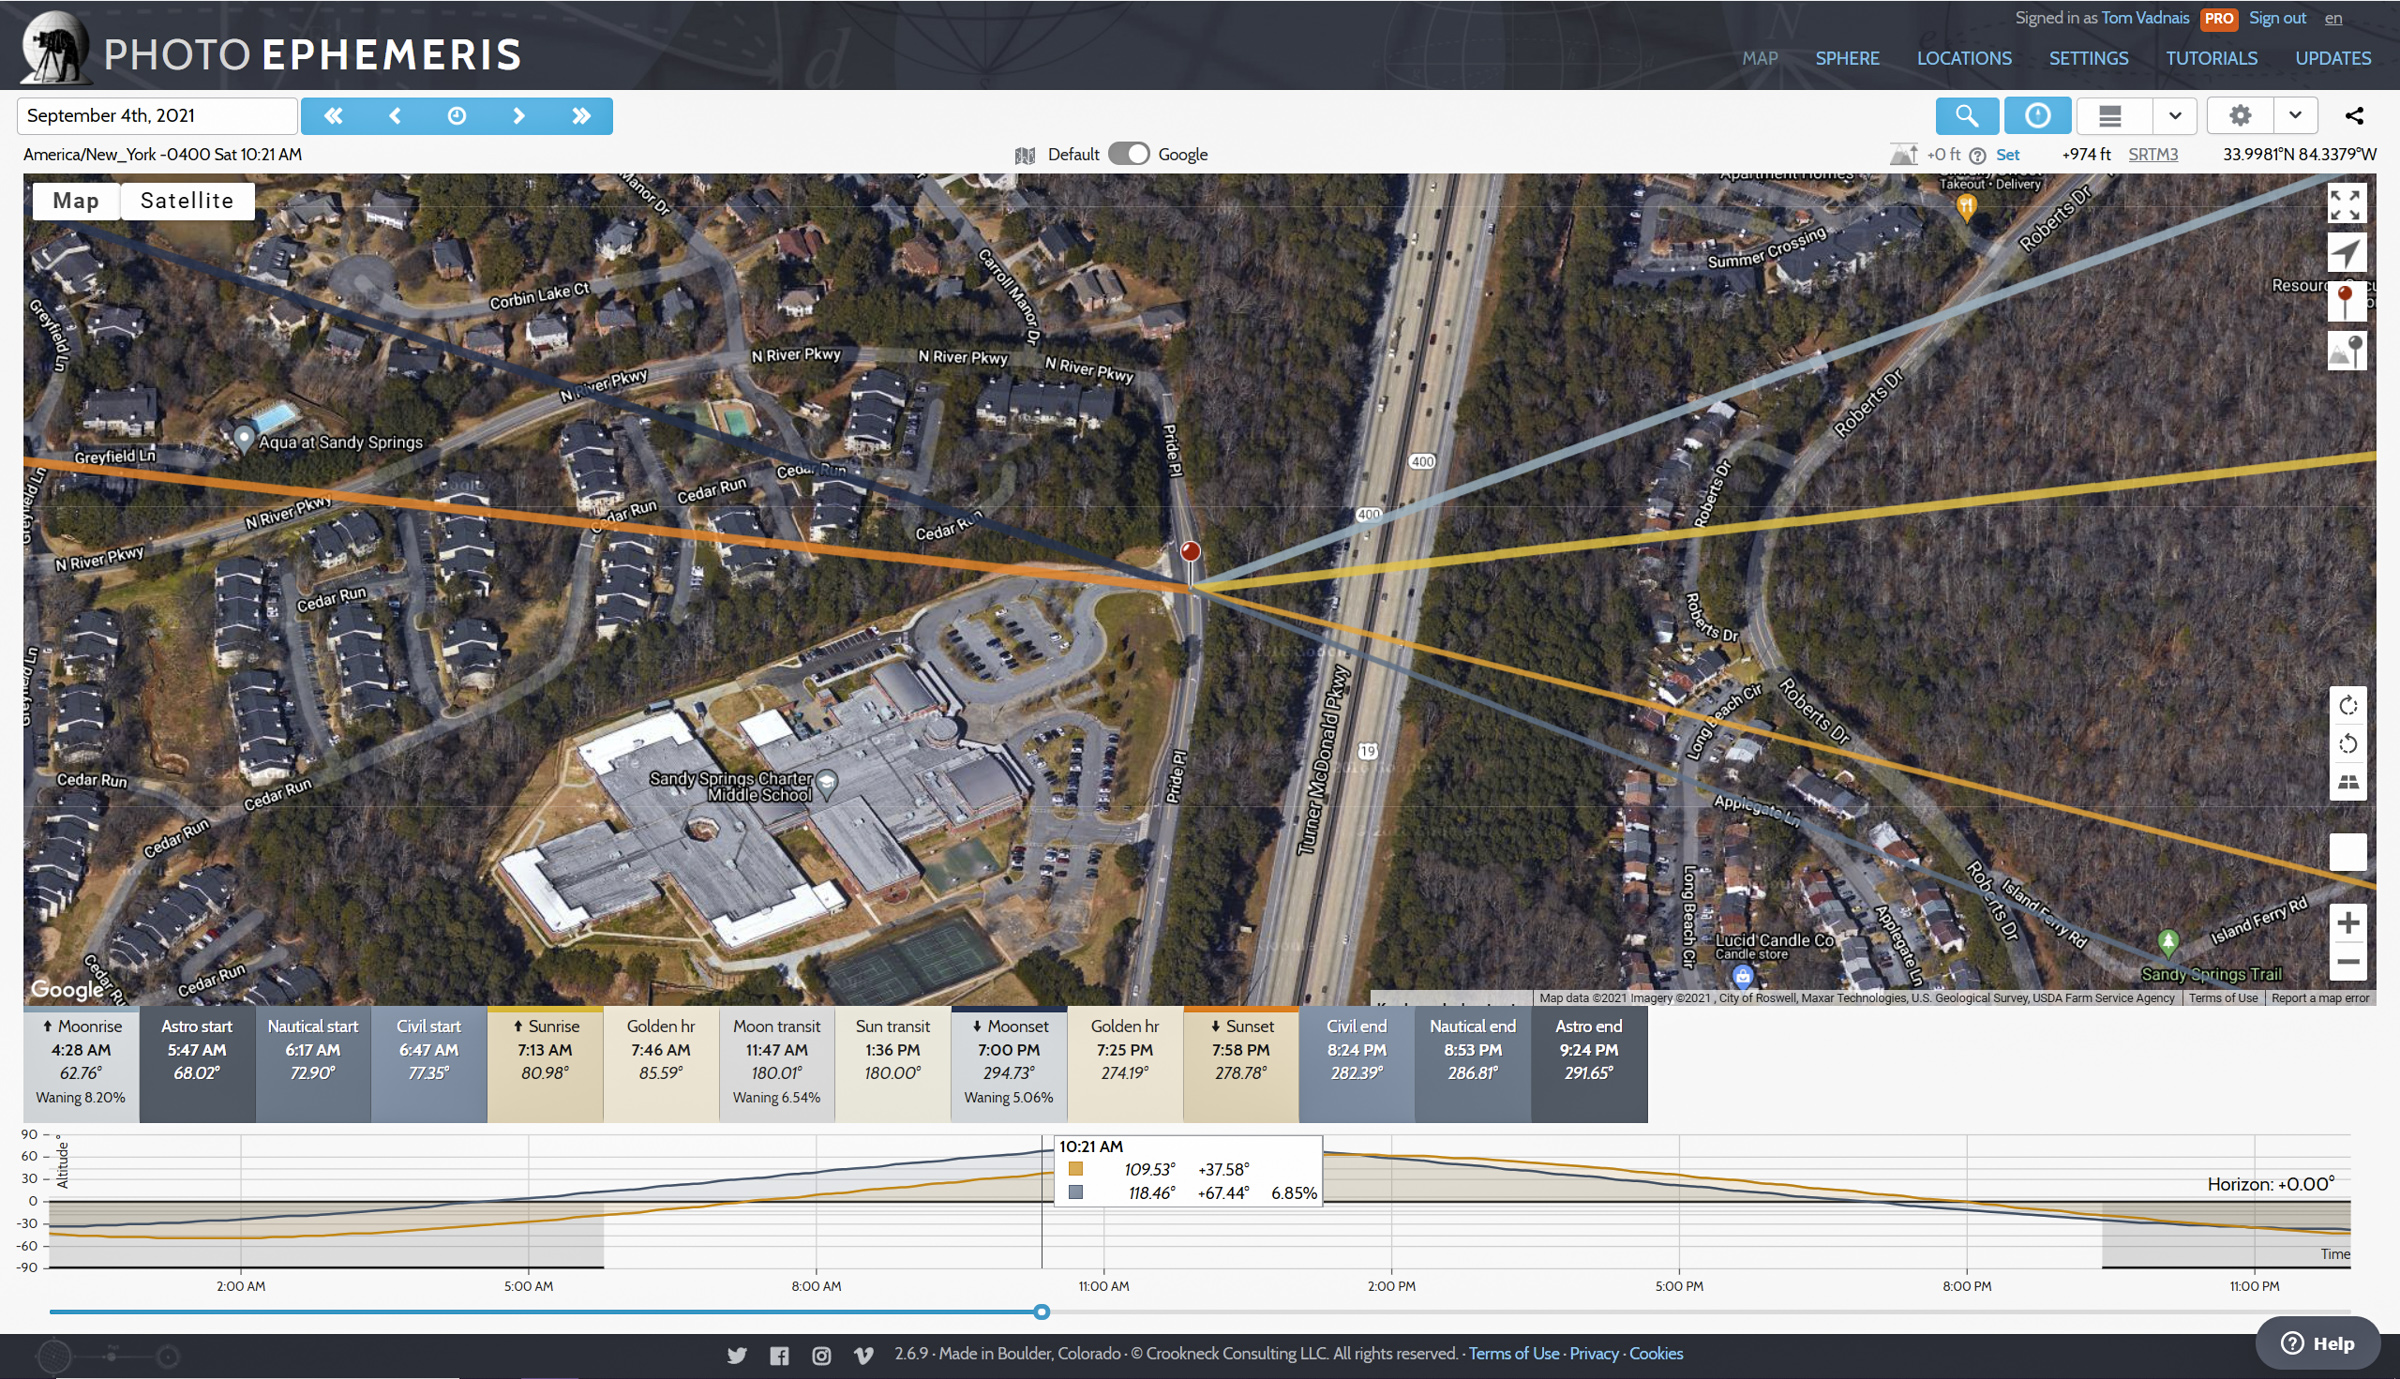
The first shows where the sun was when the 10:21 am photo (top one above) was made. (Click on image to enlarge. Then click back arrow to return to this post.)
TPE 10:21 am on 09/04/21.
The line of the sun is shown as the narrow gold line coming in from the lower right toward the pin marking where my tripod had been set up. Note that while the photographs were made looking south, the TPE diagrams have north at the top. So the morning sun in the east will be from the left side in the photos and from the right side in the TPE diagrams. (Just FYI, the wider yellow line at the upper right was the sunrise angle while the wider orange line at the left was the sunset angle.)
This diagram showed that at 10:21 am on 09/04/21, the sun would have been coming in from the eastern side of the road through a thick area of trees, which is exactly what was shown in the top photograph.
At 2:45 pm on the same day, the sun was beyond the thick trees to the east, yet below the tree line to the west. This should result in a photograph with minimal shadows on the road, as the second photo above shows. (Click on image to enlarge. Then click back arrow to return to this post.)
TPE 2:45 pm on 09/04/21.
When I went back a couple days later at 6:52 pm, the TPE diagram showed that the sun would now be far enough west that it would come through the line of single trees to the west once the sun got low enough in the sky. Once again, that is precisely what the third photo above illustrates. (Click on image to enlarge. Then click back arrow to return to this post.)
TPE 6:52 pm on 09/09/21.
TPE gives both the azimuth and altitude of the sun. In this post, I’m only using the azimuth for direction, and applying a general knowledge of how high the sun will be from experience. For a question about whether the sun was in a driver’s eye, you’ll have to use both azimuth and altitude. That’s a future post.
TPE has many more sophisticated applications, including using AI to show where the sun or moon will be in a scene. It’s well worth getting and exploring all of its features. (I have no ties to TPE nor receive any compensation from them. It’s just a great tool I highly recommend.)
Takeaways:
-1- Before you photograph your wreck site, it’s often worth determining when the sun will cause the fewest or shortest shadows on your road.
-2- The Photographer’s Ephemeris is well worth using when you need to know where the sun will be at specific times on specific dates.